We may receive a commission when you use our affiliate links. However, this does not impact our recommendations.
Teaching someone to cut dovetails is easy. Teaching them to joint an edge for glue-up with a handplane is something else.
If you don’t believe me, consult Joseph Moxon, who wrote the first English-language book on woodworking.
But yet it is counted a piece of good Wormanfhip in a Joyner, to have the Craft of bearing his Hand fo curioufly even, the whole length of a long Board; and yet it is but a fleight to thofe, Practice hath inur’d the Hand to.
Translation: Edge-jointing takes practice.
So when I teach people to do it, I struggle as much as they do. I show them how they are tilting the tool. I show them how to fix the problem. Then they make it worse. After jointing the same edge 20 times over, it becomes almost impossible to correct (without a jack plane).
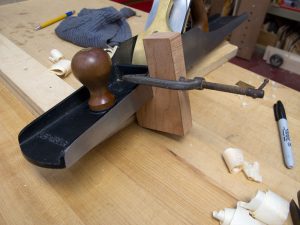
A couple months ago, one of the students in my campaign chest class at the Marc Adams School of Woodworking showed me a little L-shaped jig he used for edge jointing and it blew my mind.
Sure, I’ve seen all manner of commercial fences and long-grain shooting boards and whatever. I have seen it all (but I know you will still tell me I haven’t).
Anyway, this little block of wood clamped to his plane makes edge-jointing a breeze. You don’t even need to have a straight iron. If your iron is cambered you can adjust it laterally to make a square cut.
I told the student to submit the jig to Popular Woodworking Magazine as a “Trick of the Trade” and he did. It didn’t win as the best trick, but it is featured in the latest issues as one of the worthy trick.
Since that class, I have been using this jig to teach edge-jointing. Though a few people don’t like it, most people benefit greatly from it.
If you make one of these jigs, here are a couple tips for using it. First: clamp the jig so it is slightly ahead of the iron – but not too much. If the jig is too far in front of the iron you will have a difficult time with the dismount.
Second: Skew the plane slightly when you use this jig. Skewing will make only one corner of the jig register against your work and reduce the drag. Try it.
Anyway, pick up the latest issue of the magazine. Or subscribe….
And most of all, take the 2:34 required to build the jig and try it. I think you will be thrilled.
— Christopher Schwarz
Here are some supplies and tools we find essential in our everyday work around the shop. We may receive a commission from sales referred by our links; however, we have carefully selected these products for their usefulness and quality.


![How to Build a Modern Kitchen Island [Video]](https://dev.popularwoodworking.com/wp-content/uploads/bfi_thumb/dummy-transparent-olcy6s63it1p9yp7uhusjas7c8kahafrhg9su7q9i0.png)


Chris,
If a jointer plane is the best plane to use on a long edge,how does the shorter jack plane fix up a board that has been badley shaped by the jointer? I have no problem keeping the edge square but I do have problems getting the board straight,without any slight dips.I have a Lie Nielson No.7 jointer.Any tips would be greatly appreciated.
Kind regards,
Pomme.
Which current issue would that be? I can’t find it in any of the 2013 issues todate.
Chris,
I have the Aug issue and did not see this in the “Trick of the Trade” column. What am I missing?
And is this the same sort of thing that David Charlesworth shows in his video on handplanes?
Thank,
Tom
As long as the jig does not tilt forward or backward you can skew the plane. The scrap I used to make the jig is thinner than yours and it tends to tilt forward a bit when I hit a knot or the vise. That’s OK as long as I keep the plane totally unskewed.
Chris,
I ‘ve been using a fence clamped to a plane like this ever since I started woodworking decades ago. I never saw it described but it just seemed sorta common sense. However, I clamp the piece of wood lengthwise to take advantage of the full length of the right angle support. Then I apply pressure both on the clamped piece and the plane to maintain a perfect right angle. A few swipes and it’s 90 degrees.
I also do the same thing with a sanding block – clamp a right angle to it and you can sand at a perfect right angle.
–Bill
Simple solutions are usually the least obvious!
Awesome!
Albert
I perfected a jig similar to this last year but I think everyone is missing the reason this works. Anyone (nearly) can run a plane down the board and keep the edge of the blade off the work. The reason this works (almost) is the tall edge makes it easier to use as a plumb. Plumb and square are good friends. Mine jig is simply a thin piece of falloff that is lots taller held on with a magnet and is more useful as a plumb. For the first time I can plane square with the work.
Is this better than a full length fence???
Go Wormanfhip!!!!
A useful tool. Of course, by the time I saw this, I had already learned match planing the hard way. And also when it was time to invoke the jack plane….
Genius!
Sorry but I don’t see how this works, is it possible to create a short video?
A slight change to the design and you could slip it down from the front of the plane … without the C clamp.
Couldn’t you, uh you know, bevel the edge the rides against the work piece (think of the profile of a plane blade)?