We may receive a commission when you use our affiliate links. However, this does not impact our recommendations.
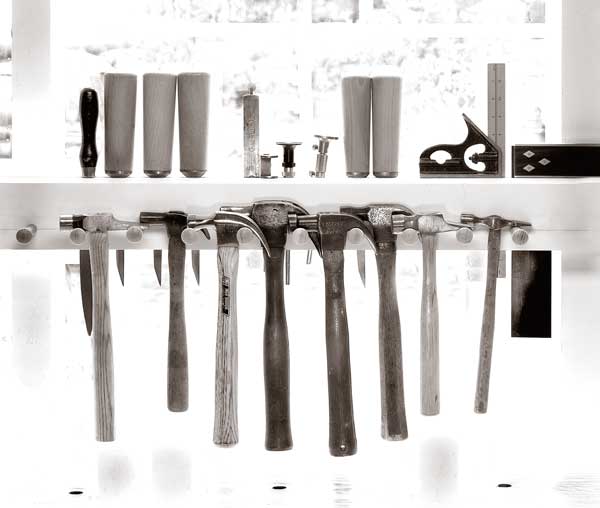
Hammers and cut nails are proper and useful when building fine furniture. The trick is to choose the right-sized hammer and the correct nail for the joint at hand.
Far from a crude implement, a good hammer is a wonder of subtlety and an asset for many kinds of joinery.
by Christopher Schwarz
(Excerpted from the Spring 2006 issue of Woodworking Magazine)
Most woodworkers, and woodworking publications, regard the hammer as a crude implement. Everyone has a hammer or two on the wall, but it’s almost always the shop’s redheaded stepchild. In some shops it has the same status as a crowbar – a tool for when a rare radical or violent act must be performed. In other shops the hammer is seen as a tool that must be endured only until one can afford a compressor and pneumatic nailer.
 Also maligned in all this is the hammer’s partner in joinery: the nail. Quality woodworking, the thinking goes, uses nails only when nothing else will do, which is usually when installing moulding, building quick jigs or temporarily securing parts to be worked with other tools. Nails are seen as weak joinery.
The truth about hammers and nails is actually quite different. If you have the right hammer, the right nail and the right technique, you actually can build furniture that assembles quickly and ends up plenty strong.
But to understand how a hammer can help your woodworking, it helps to first understand a bit about glue, and how it can sometimes fail you.
Relying a Lot on Glue
The first thing to remember in all this is that glue – any glue – can be weakened by stressing a joint (tipping back in a chair or wracking a case when moving it) or by changing its environment (such as with moisture or heat in an attic). And this stress can lead to joint failure. Treated carefully, glue can be tenacious. Conservators and restorers I’ve talked to say a rule of thumb is to expect a lifespan of about 70 years for a hide-glue joint in a household item that sees regular use. Well-cared for antiques can have hide-glue joints that have lasted much longer – indefinitely, really.
Likewise, modern yellow glue (polyvinyl acetate or PVA) was invented circa World War II, and there are sample joints that have survived since then with zero sign of degradation.
Of course, furniture suffers stresses in real life. Hide glues are sensitive to moisture and heat. PVAs are sensitive mostly to heat (things start to really weaken at 150° F, but a 110° attic isn’t good for the adhesive, either). And all glues and all joints will weaken if stressed regularly.
So if you build for real life and you build for tomorrow, then you need to design your furniture with this fact in the back of your mind. One way to reinforce a joint is to use interlocking components – dovetails, some locking miters, and pegged or wedged tenons are all ways of building for the longer-term. These are all valid and time-honored strategies, but they also require advanced hand skills or complicated power-tool jigs and cutters to execute well.
Not everyone can cut and fit sliding dovetails, and not every project should require it.
And it’s at this point where some woodworkers make a potentially disastrous mistake. They build their casework using joints that involve a lot of end grain or don’t fully interlock – rabbets and dados mostly – and they choose to rely heavily on the glue strength alone to keep their parts stuck together.
They don’t use nails or screws or another mechanical fastener because they are told that’s “cheap” joinery. But what’s going to hold things together if the glue joint goes south?
A 1,000-mile Lesson in Casework
This point was made clear to me when recently I drove to Maine to give a demonstration of casework construction. I brought along two examples of the cabinets shown on the cover of this issue. One was assembled entirely with yellow glue and cut nails. The other one I assembled mostly during the demonstration. I got the carcase together with glue and nails, but I didn’t have time to glue and nail on the face frame or to attach the shiplapped back. Some of the joints were glued with yellow glue, some with liquid hide glue. After letting the glue cure for a couple days, I wrapped up the partially assembled project in plastic, moving blankets and more plastic – much like any careful moving company would do. Both cabinets were tied down firmly in the back of my truck.
When I got home, I unwrapped everything and found that all of the dado joints in the partially assembled case had given up. At that point, the case was held together only by the nails.
My assumption is that the road and engine vibration damaged an assembly that was (at that point) weak. I was frankly surprised that the glue had given up, and I was glad that the nails were there to hold things together. As I pulled out the nails to re-glue the carcase I made another discovery: These old-style cut nails, unlike modern fasteners, did not let go easily. It was time to take a close look at cut nails.
Right Nail; Wrong Nail
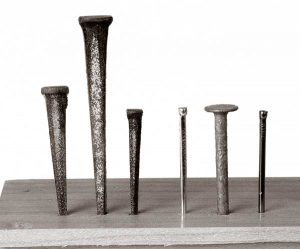
Cut nails (left) taper on two long edges and have rectangular cross-sections; wire nails (right) are straight and round.
What we call nails today were not the fasteners that built furniture and homes in the early days of the Colonies. Here’s a brief history: The nail is generally hailed as a Roman innovation, although small nails and tacks cast in copper and other precious metals have been found in ancient Egyptian work, according to Geoffrey Killen’s scholarly research into early woodworking. These Egyptian nails were used to hold furniture coverings – from upholstery to metal foil – in place.
The Roman iron nail was essentially the pattern for all nail-making from 3000 B.C. until the early 19th century. Indeed, photos of Roman nails recovered from a seven-ton cache dating to 87 A.D. look identical to nails recovered from Thomas Jefferson’s Monticello.
These Roman-style nails were made one at a time by hand, had square-shaped shanks and they tapered on all four sides to a point.

Here is an inside look at a nail hole made by a cut nail. Note the way that the end-grain fibers are bent downward by the tapers on the nail. This, and the rough finish of the cut nail, increases the holding power.
Beginning circa 1800, machine-made nails began to replace these handmade Roman-style fasteners. These machine-made fasteners were revolutionary because they could be made quickly and cheaply by cutting them from a flat iron plate. And that’s how they earned the name “cut nails.” These nails are square or rectangular in cross section. And – this is important – they taper on only two sides of the shank.
These were the fastener of choice in the 19th century, but they too were doomed for obsolescence, thanks to the next manufacturing innovation: wire nails. This is the round-shanked nail we’re all familiar with today and it can be made with astonishing speed by machines that clip round metal wire, file the point and pound a head on the top. Wire nails also have the advantage of being faster to install – they rarely require a pilot hole, unlike cut nails.
Although lightweight wire nails first appeared in France about the time of Napoleon I, production of wire nails cranked up considerably when Father Goebel, a Catholic priest, formed the American Wire and Screw Nail Co. in Covington, Ky., in 1876. As the cut-nail industry went into steep decline, there was a bit of a doomed public relations battle to prove the superiority of the old-school cut nail. College professors designed tests to evaluate the two fastening systems. Their tests showed that cut nails held far better than wire nails. How much better? Considerably – anywhere from 65 percent more to 135 percent more.
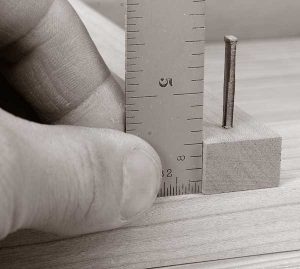
Here’s how to determine the right nail length. Measure the thickness of the board you are fastening and convert that to eighths (e.g. a 1⁄2″ board would be four-eighths). Select the nail based on that thickness (e.g. a 4d nail for four-eighths material).
Why? It’s mostly a matter of the wedging action of the taper. When a cut nail is driven in properly, the end grain of the board is driven against the nail’s taper, making the joint quite secure. Also, the rough surface finish of a cut nail is a feature, not a defect – it also adds holding power to the cut nail.
So where do you get cut nails? Luckily, they are still available. One popular source is Tremont Nail Co. of Wareham, Mass., which has been in the business of making cut nails since 1819 (call 800-842-0560 or tremontnail.com). Other sources include Lehman’s (877-438-5346 or lehmans.com) and VanDyke’s Restorers (800-558-1234 or vandykes.com).
There are a wide variety of styles of cut nails (Tremont offers 20 or so different types). For carcase construction, I like to use a cut fine finish nail. For moulding, I like a cut headless brad. Other styles are useful for cabinetwork, but these two nail styles are the most versatile.
How long should your nails be? Most places denote the length of a nail using the English pennyweight system. The origin of “pennyweight” is a mite murky, so let’s stick to the facts. Pennyweight is denoted by “d.” So a two-penny nail is 2d. And a 2d nail is 1″ long. For every penny you add, the nail gets 1⁄4″ longer. So a 3d nail is 1-1⁄4″ long. A 4d nail is 1-1⁄2″ long. A 5d nail is 1-3⁄4″ long. And so on.
 You select your nail’s length based on the thickness and density of board you are fastening in place. Here’s how the old rule works:
1. Determine the thickness of your board in eighths of an inch. For example, a 1″-thick board would be eight-eighths. A 3⁄4″-thick board would be six-eighths. And so on.
2. For a wood of medium density (walnut or cherry, for example), pick a nail where the pennyweight matches that thickness – a 8d nail for 1″ stock. A 6d nail for 3⁄4″.
3. For softwoods (white pine), select a nail that’s one penny larger. For harder woods (maple), use one penny smaller.
This seems complex at first, but it quickly becomes second nature. Use the chart “Nail Lengths” as a cheat sheet. Note that this is just a rule, not the gospel. The bottom line is that you should use the longest nail that can be driven easily – let your work and experience be your guide.
Pilot Holes Pave the Way
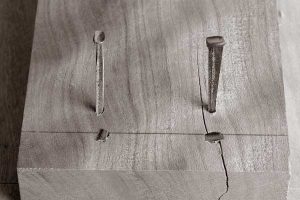
The taper of a cut nail can work for you or against you. If you align the taper so that the two tapered sides bite into end grain (left) then your nail will hold well. If you align the taper so that the two tapered sides bite into face grain, your wood is likely to split – even with a pilot hole.
Once you get the right nail, you also need to bore the correct pilot hole. The wedging action of a cut nail can split your wood, particularly when you are working near the end of a board.
For the cut fine finish nails, I use a 3⁄32″ pilot hole that goes almost the full depth of the nail. For the cut headless brads, a 1⁄16″ pilot works quite well for me without splitting the work.
The other consideration is where this pilot hole should go – this is important when working at the end of a board. If you are too close to the end of a board, it will split your wood, even if you’ve made an appropriate pilot hole. However if you position the nail too far away from the end, you could end up driving the nail through the inside face of your work, which is almost as bad as a split.
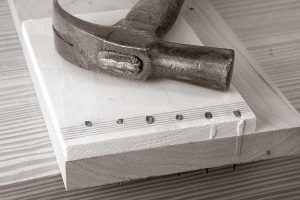
As you get closer to the end of a board, the risk
of splitting the work increases. A couple test joints will quickly reveal the optimal location for your fastener.
In general terms, when joining 3⁄4″-thick stock, perhaps the most common carcase operation, I like to position the nail 1⁄2″ in from the end of the board. This is a good place to start.
Whenever you encounter a new species of wood or a new kind of nail, you should make a few pilot holes in some scrap pieces and pound in some of the nails you have picked out for a project. This will let you see how big the hole should be and how close to the end of a board you can place it before disaster strikes. This is really not as tricky as it sounds, but being aware of these things will make sure your first encounter with cut nails is a good one.
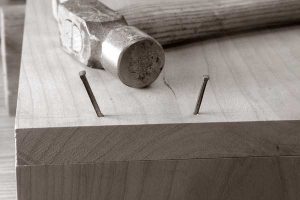
Angling your nails left and right increases the overall strength of the joint. Do this wherever you nail, including when you’re toenailing.
One last and important detail on pilot holes: When joining furniture components, I rarely drive nails straight into the work. Usually I angle them about 7°. Half are angled left; the rest are angled right. Angling the nails increases the wedging power of the nails in two ways. One, the nail is more likely to cross more grain lines when it’s driven at an angle. And two, it makes the board and its mate much harder to pry apart because the angled nails will work a bit like dovetails do to hold the pieces together.
Choosing a Hammer
Now you’re ready to drive a nail – once you have a good hammer. This detail would seem to be a simple matter, but there’s more to hammers than meets the eye. A good hammer acts like an extension of your arm. You can swing it with remarkable precision; and after a few hours of use, you’ll be able to drive nails perfectly flush with your work and without damaging the surrounding wood (those dents are called “French marks” by the way, though I don’t know why).
The first consideration is the weight of the head. A hammer that is the wrong size won’t drive the nail easily. A too-light hammer will require too many blows and will result in a lot of bent nails. A too-heavy hammer is hard to wield accurately and tires you. You’ll find hammers in sizes from 3 ounces up to 28 ounces. The sizes for woodworking are generally accepted to be between 10 and 20 ounces.
Most woodworking texts tell you to start with a 16-ounce hammer, and that’s good advice. My two favorite hammers (out of the too many that I own) are 16 ounces and 19 ounces. One quick tip on weights: Some of the best (and worst) hammers can be found used. How can you determine the weight of a hammer head based on a fuzzy photo on the Internet or while browsing an antique store? Have the seller put the tool on a postage scale. Take the total weight of the tool and subtract 6 or 7 ounces for a standard 13″-long hammer. That will be pretty close.
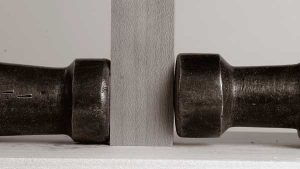
Here you can see the difference between a hammer with a flat face (left) and a bell-shaped face. The bell-face hammers allow you to drive a nail flush to the surface without marring it.
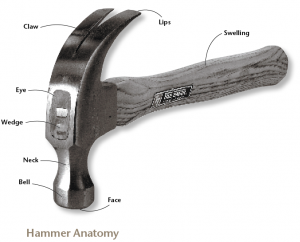
The face of the hammer is critical. It must be smooth and free of chips. You’ll also find faces that are flat and those that are slightly convex, which is called a “bell-shaped” face. I prefer the bell face. It allows you to drive the nail head closer to the work; I also think it reduces mis-strikes.
For claw hammers, you’re going to find two basic patterns to the claws. Generally I don’t use the claw to remove errant nails (I use pincers). But if you are going to remove nails with the claw then it should have a pretty fair curve to it and point almost straight down. The other common pattern is what’s called a “ripping” hammer. Ripping hammers have claws that don’t curve much at all – they mostly stick straight out. These claws are used for ripping woodworking apart – removing trim moulding or studs that were improperly nailed. I’ve found little use for them in the woodshop.
Beyond the head, there are other factors. The handle must be secured to the head without any wiggling. Sometimes you can drive in the metal wedges up at the tool’s eye to tighten things up, but just make sure there’s no wiggling in use.
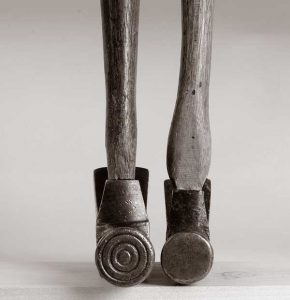
A poorly rehandled hammer (right) will be difficult to wield accurately. Look for a head that is secured tightly and squarely to the handle.
Look for a hammer that has the original handle or one with a handle that has been carefully replaced. It’s astonishing how poorly some people have rehandled their hammers. The head must be perfectly aligned in both directions on the handle or the tool will verge on useless. For this reason, I generally stick with hammers that had their handles installed at the factory.
Finally, I like a handle that has a slight swelling in the middle of its length. As you’ll soon see, there are (at least) two grips for a hammer, and the swelling assists one of those grips.
Most handles are elliptical in cross-section, though there are a fair number with octagonal handles. Either one is fine; pick one that feels good in your hands.
One final note on hammers: There are hammers designed for almost every craftsman out there, from cobblers, to farriers, to masons, to people who install slate roofs. They all have hammers designed for the profession. These hammers might drive a nail once you get accustomed to the their quirks, but I think you’re better off sticking with the common-as-dirt claw hammer. You’ll never have problems finding one of those.
Speaking English
In addition to the claw hammer, there’s another sort of cabinetmaking hammer you might encounter in catalogs and from antique dealers. It’s predominantly an English hammer and has a short wedge where you would expect to see a claw.
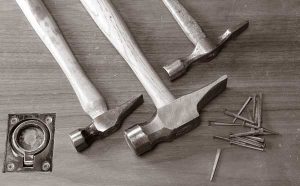
The cross pane on these English hammers allows you to start small brads and tacks without smashing your fingers.
This hammer is commonly called a “cross-pane” hammer – sometimes you see it referred to as a “cross-pein” or a “cross-peen.” That flat little wedge of metal is actually used to start short brads or tacks. The pane allows you to hold the brad between your fingers and start the fastener without hitting your fingers. Once you’ve started the brad, you turn the hammer’s head around and drive the brad the rest of the way with the face.
These cross-pane hammers have a lot of trade names, although the one that seems to come up the most is the so-called “Warrington” hammer. I like having a cross-pane hammer around in a smaller size. I have one that’s probably 31⁄2 ounces that starts brads and is great for adjusting plane irons and driving in small wooden wedges when chairmaking. A 6-ounce hammer is also nice for starting small brads.
Grip and Drive
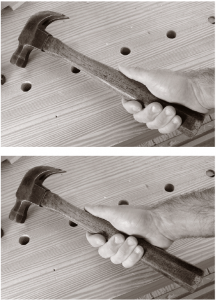
Gripping the hammer at the end of the handle (at top) increases the power in your stroke. Gripping it up at the swelling (below) reduces your power and can increase your accuracy. Note the extended thumb on both grips – this will also improve your accuracy.
There are two common grips for hammers for cabinetmaking. By grasping the hammer at the end of the handle you’ll increase your pounding power but slightly decrease your accuracy (although your accuracy will always improve greatly with practice).
The second grip is where you choke up on the handle and grasp it at the swelling at the handle’s midpoint. If your handle has a swelling you can move your hand there effortlessly. Choking up decreases the power of the blow, which is good for detail work. And it can increase your accuracy.
One other way to increase your accuracy with either of these grips is to extend your thumb out along the handle. Try it. It works.
Position the tip of the nail on the pilot hole and twist it so the tapered sides are in line with the grain of the wood. Start the nail with a light tap. Because cut nails are irregular, some will try to twist on you during the first blow, so hold the nail firmly.
With the nail started, remove your off-hand and drive the nail. When everything is in sync – right-size hammer, nail and pilot hole – you should be able to drive the nail flush to your work in four blows. Feel free to take it a bit easy at first as you get comfortable.
Setting the Nail
If the face of your hammer is bell-shaped, you’ll be able to reliably set the nail flush to the surface of the wood without marring the wood. While this sounds like a difficult goal, it’s a fairly simple skill with a little practice.
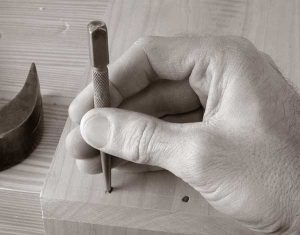
All that’s left to do now is set the nail. Nail sets come in a variety of sizes – the common ones have tips that are 1⁄32″, 1⁄16″ and 1⁄8″. Some have a flat tip; others have a dimple, which helps keep the nail set in place when you strike it. Choose a nail set that is as large as possible without enlarging the hole made by the fastener.
Hold the nail set between your thumb and forefingers on the knurled section of the tool’s barrel. Always strive to have the edge of your hand resting on the work, which helps steady the nail set as you strike it. Sink the nail head so it’s 1⁄16″ to 1⁄8″ below the surface of the wood. Sink it to the shallower depth when joining thin pieces or when the wood you are fastening is ready to finish. Sink it to the deeper depth when you are going to have to remove more material through sanding and planing.
Nailing Tricks
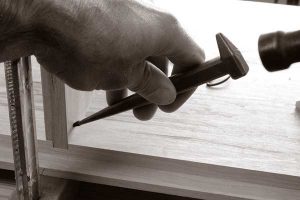
Toenailing allows you to nail joints from the
inside of a project and to conceal the nail head
in carcase construction.
There are a few common tricks to improving the strength or accuracy of your nail joinery. One trick is to always drive the nails in at a slight angle, as mentioned earlier. Another trick is toenailing. This also involves angling the nail, but is a bit different because it’s typically done from inside a carcase and is a way of concealing the nail. See the photo at right for how this works.
Nails can also be used in other surprising ways. Some cut nails are called “clinch” nails. These extra-long nails are generally more malleable than brad nails for a special reason. Clinch nails are designed to be driven all the way through the work and then the protruding tip is bent back into the wood. Done properly, this is a remarkable way to fasten things. In general, clinch nails are installed with two hammers: One to drive the nail, and the other held in place against the nail’s tip to turn it around.
Here’s a tip for trimwork: With the moulding unattached and on your bench, drill your pilot holes and drive your nails into the moulding so their tips just peek out from the other side. Now position the moulding on the case or on the wall. Tap the nail nearest the miter that is the most critical or visible a couple times to start the nail. If everything looks good, tap the other nails, remove your hands and check the work. If the moulding fits you can drive and set all the nails in coarse work. Or, for fine work, remove the moulding (it should come off easily), drill your pilots, add glue and reinstall the moulding.
Or, quite honestly, this might be the case for your 18-gauge brad nailer. Although I really like cut nails for carcases, backs and the like, nothing installs moulding like a brad nailer. WM
— Christopher Schwarz
“Woodworking Magazine” 2004-2009 CD (Includes all 16 issues of this short-lived, but excellent, magazine)
Editor’s note: I’m collecting a handful of Shaker projects from our archives for an upcoming eMag (6 Iconic Shaker Projects – due out in about two weeks). We’ve published a lot of Shaker projects over the years, and some of my favorite (and among the most iconic) are from Woodworking Magazine. But almost every one of that magazine’s 16 issues in built rather like a how-to book, with internal “refers” – that is, to build one of the projects (or to learn one or more of the techniques or tools used in a project), you have to see another article in that issue. And my eMags are “allowed” only so many pages. So, above is one of those “internal refers,” to which I’ll link from the eMag; free and good info on an important tool: Everyone wins! — Megan Fitzpatrick
Here are some supplies and tools we find essential in our everyday work around the shop. We may receive a commission from sales referred by our links; however, we have carefully selected these products for their usefulness and quality.




With the exception of the Vaughn 16 oz hammer with the wooden octagon handle I have found most hammers manufacturer today to be of poor quality. Plumb use to made a great hammer, but their once perfect wooden handle with a swelling in the middle and at the end has been replaced by a cheaper to make handle that is basically a straight shaf that lack the balance of their hammers from just a few years ago. Even though I have several good old hammers, I keep my eye open for quality hammers at antique shops whenever I’m traveling. Old Vaughn, Craftsman, Stanley, and Plumb hammers in good shape with the original handles can be found for 10 to 12 dollars. All of these old hammers are great users. Surprisingly, 5 years ago I was in a pinch on an out of town job when my favorite old Stanley hammer finally gave up the ghost and the handle split apart on me, I quickly needed to find a replacement handle and no one had anything in stock that was acceptable. All the replacement handles I can find are made like the new Plumb handle and are worthless as far as I’m concerned. Their balance is off and lack the swelling in the middle and at the bottom of the handle to keep your hand from sliding off while striking the nail. In frustration I went to the local Sears and found they carried an overseas 16 oz wooden handled hammer for $5.00 that was made with the same handle shape from 40 years ago. The head was properly forged of good steel and the handle had the correct shape for gripping in the middle or at the end plus the hammer had the same balance as those I grew up with. I was so happy with the hammer that I went back to that Sears and bought the only other two they had in stock to give to my two sons. Once I got home I went to my local Sears to by a few more of these hammers to give to friends only to find out it wasn’t a normally stocked item and they couldn’t order any for me. If you don’t own a good balanced hammer go get yourself a Vaughn with the octagon handle while they still make them.
In England we call the dents made in the wood when we miss the nail, French pennies. Pennies because they are round like a penny and we like to tease people we like, so pretend that the French are useless at everything.
We still use cut nails when nailing floor boards into place in a properly built house – rather than the Gerry built houses we often see today. Gerry is short for German and the term is used for the same reason.
The word pein is always used to describe cross pein hammers and ball pein hammers when the cross part is replaced by a half round ball. When copper nails are used to fix the planking to a wooden boat, they are held in place by the tip of the nail being deformed and shaped by “peining” it onto a copper washer. Hence the term used to describe the hammers used. – this sort of boat is called clinker built. The same method was later used when the first ship ever made here from iron sheets are held together by rivets the free end of which is peined over to hold it in place. In this case the rivet is white hot.
Thanks for posting this as it is an excellent piece that puts nails in their proper place.