We may receive a commission when you use our affiliate links. However, this does not impact our recommendations.
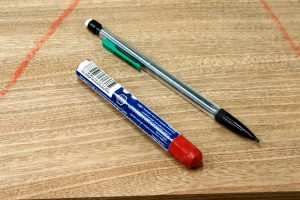
 Whenever I leave town to teach a woodworking class, I make two stops to pick up a supply of two essential things for project layout. The first stop is the office supply store for a box of Bic .5mm mechanical pencils. Next stop is the “big box home center” for a dozen lumber crayons. The pencils are all for me, I need to be prepared in case someone has a question, and like many woodworkers I can’t discuss details without a pencil in my hand. The lumber crayons are for passing out to students. In the first class I taught, I started scrawling on the wood with mine and the questions started flying: “What is that?” followed by “Where can I get one?”
I think that the way I mark and label parts is a good way to keep a project moving without making mistakes and is well worth teaching, but the real reason I pass out the crayons is that the way many woodworkers mark parts for a job in progress drives me crazy. In any furniture project there are a bunch of parts to keep track of. If you care about how the finished piece looks you want to take your time and decide which part of your available lumber fits best for the size of a part you need. When you make that investment in time, you don’t want to repeat the process, and you don’t want there to be any confusion about which part goes where. Most of all, you don’t want to take a piece that you carefully selected for a certain spot and glue it in backwards or upside down, and you don’t want to mistake a part destined for a prominent location for a random hunk of wood you can cut up for cleats.
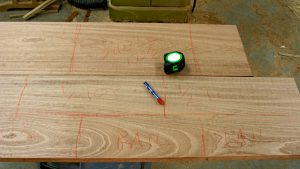
 The beauty of marking things up with a big red crayon is that you have bold bright marks that are easy to see at a glance. You don’t have to fuss when you make them, and it’s hard to miss them when you need them. The picture at left is typical of how I mark up a board before rough cutting my parts. The lines are approximate because I’m going to make everything too long and too wide to start with. The lettering is big and bold so I can’t miss it.
What drives me crazy is when I ask a student “which part is which?” and they start looking for the secret location on an edge or end where they wrote in teeny-tiny letters with their German drafting pencil equipped with the .3mm 4H lead. Once they find the marks, it’s time to find a light to shine on the letters, get the reading glasses or magnifying glass and then begin to decipher the convoluted message they left for themselves. These messages often include detailed written instructions about grain direction and which way to feed or plane and they’re almost always made on the first surface to be removed as work progresses.
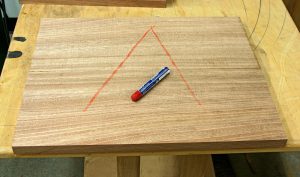
 There are simple ways to mark parts that cabinetmakers have been using for generations. One of these is the triangle, or in the case of my table-top-to-be, two legs of a triangle. In a couple of seconds, I’ve marked these parts in a way that leaves no doubt about which end is up, or how they go together. I marked this top as soon as I had the parts rough cut, and the marks will survive through the process of joining the edges and gluing the pieces together. When I join the edges, I’ll run one face against the jointer fence and one away from the fence to cancel out any error in the fence center. I don’t need a system of “O”s for out and “I”s for in and out, I already have that with the triangle. If I’m making a bunch of tops, I can add an additional angled leg for each new assembly and the triangle works no matter how many parts are coming together.
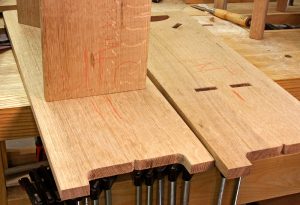
 As work progresses, I make any marks I need to keep things positioned. It isn’t much fun to fit four through tenons, take a piece apart then try to put it back together inside out, or with the left side where the right side ought to be.
The obvious question is “how do you remove the crayon marks?” Most of the time they wear off, or get cut off in the process. If any still remain at the end, a quick wipe with a rag dampened with mineral spirits gets rid of it. There is certainly a time and a place for precise marking with neat crisp lines in exactly the right places. There is also a time when we need big red letters that say “HEY DUMMY! DON’T MESS THIS UP!”
If you’re looking for a deal on solid woodworking information, get our 11-year collection of Popular Woodworking Magazine (2000-2010) – 76 issues on disc in PDF format of only $89.95
Here are some supplies and tools we find essential in our everyday work around the shop. We may receive a commission from sales referred by our links; however, we have carefully selected these products for their usefulness and quality.


![Tooley Park Scriber Review [Discount Week of Feb 3 2025]](https://dev.popularwoodworking.com/wp-content/uploads/bfi_thumb/dummy-transparent-olcy6s63it1p9yp7uhusjas7c8kahafrhg9su7q9i0.png)


Longtime user of chalk, but for the last few years I’ve been using the Crayola colored pencils. Especially since the lighter colors show up on the darker woods. Back to school sales is when I’ll pick up a few boxes for 99 cents each.
Years ago when I was in construction we called these keels. The were indispensable while framing houses. I’ll have to dig in the toolbox and see if I still have my wooden keel holder and get some new crayons for it.
http://www.baytools.com/products/dixon-wood-keel-crayon-holder
I prefer 0.7mm to 0.5. The 0.5s trend to break to easily.
I will get the red markers.
I always used sidewalk chalk as well. . but there are times it can get worn off if the wood is piled up. However it is easy kind of easy to “erase” if I make an incorrect mark or change my mind on something. Another con is that I often leave the shop covered in chalk dust! I’ll give the crayon a try next time.
I’ve been using a white charcoal pencil or drawing pencil with a very soft lead for the same thing; but I’m a huge fan of bold, broad marks however you get there.
As far as the .5mm mechanical pencils you also mention picking up, however, I’ve recently switched to 2mm drafting lead pencils, and find them so much nicer. I keep a couple with my tools, one with harder lead, one with softer. Even with the nicer leads, I could never make a mechanical pencil work for me with wood.
As one who has been guilty of tiny little “I’s” and “O’s”, and the frustration that goes with them, I thank you. Lumber crayons it is.
Hey Bob,
I like big visible marks as well, but I usually use a large piece of kid’s sidewalk chalk. It cleans up easily, and has the advantage of filling the marks made by my striking knife so that I can see them better.
Tom
Nice blog post I will use the lumber crayons on my next project.
Thanks
http://projectsforwood.com
Great idea Bob, thanks for sharing. I see lumber crayons in my future.
http://www.woodworkingwithajo.com