We may receive a commission when you use our affiliate links. However, this does not impact our recommendations.

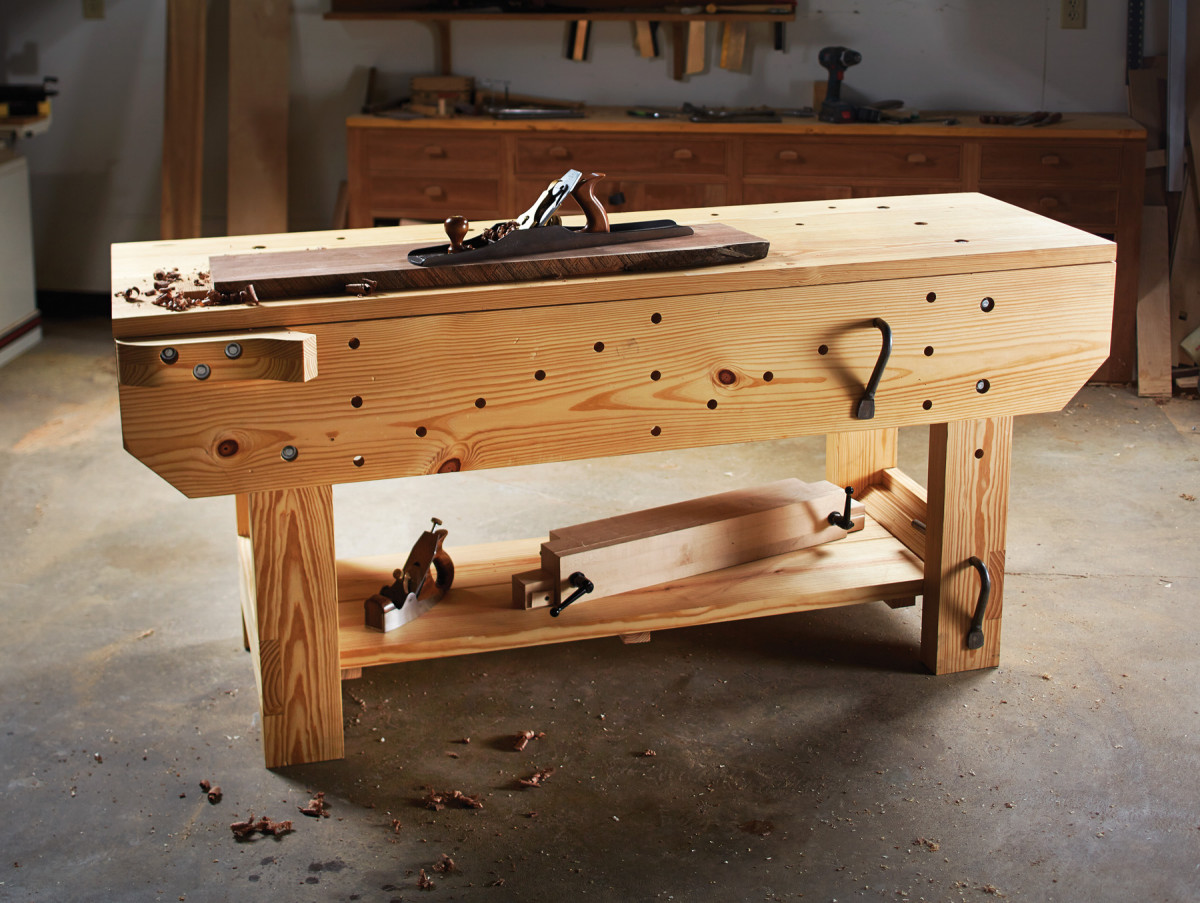
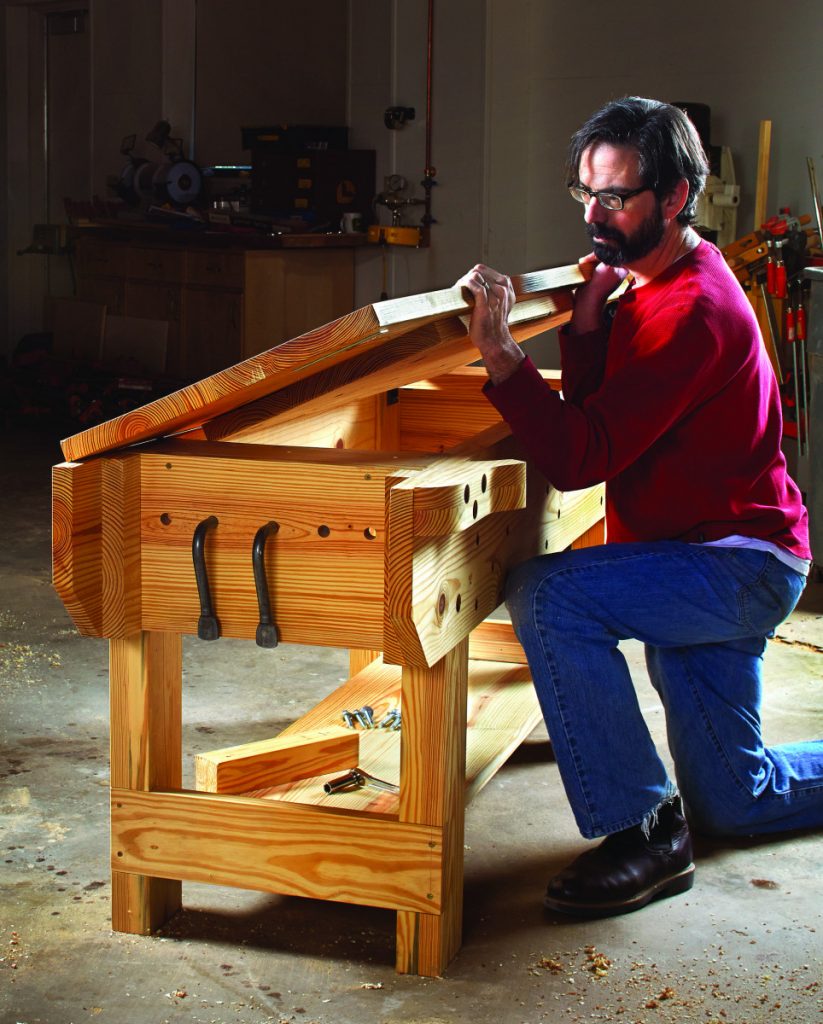
With $100 in lumber and two days, you can build this sturdy stowaway bench.
Many knockdown workbenches suffer from unfortunate compromises.
Inexpensive commercial benches that can be knocked down for shipping use skimpy hardware and thin components to reduce shipping weight. The result is that the bench never feels sturdy. Plus, assembly usually takes a good hour.
Custom knockdown benches, on the other hand, are generally sturdier, but they are usually too complex and take considerable time to set up.
In other words, most knockdown workbenches are designed to be taken apart only when you move your household. When I designed this bench, I took pains to ensure it was as sturdy as a permanent bench, it could be assembled in about 10 minutes and you would need only one tool to do it.
The design here is an English-style workbench that’s sized for an apartment or small shop at 6′ long. It’s made from construction lumber and uses a basic crochet and holdfasts for workholding. As a result, the lumber bill for this bench is about $100. You’ll need four 2″ x 12″ x 16′ boards and one 1″ x 10″ x 8′ board.
I used yellow pine for this bench, but any heavy framing lumber will do, including fir, hemlock or even spruce.
The hardware is another $75. The supplies list notes high-quality hardware from McMaster-Carr; you could easily save money by doing a little shopping or assembling the bench with hardware that is slower to bolt and un-bolt.
About the Raw Materials
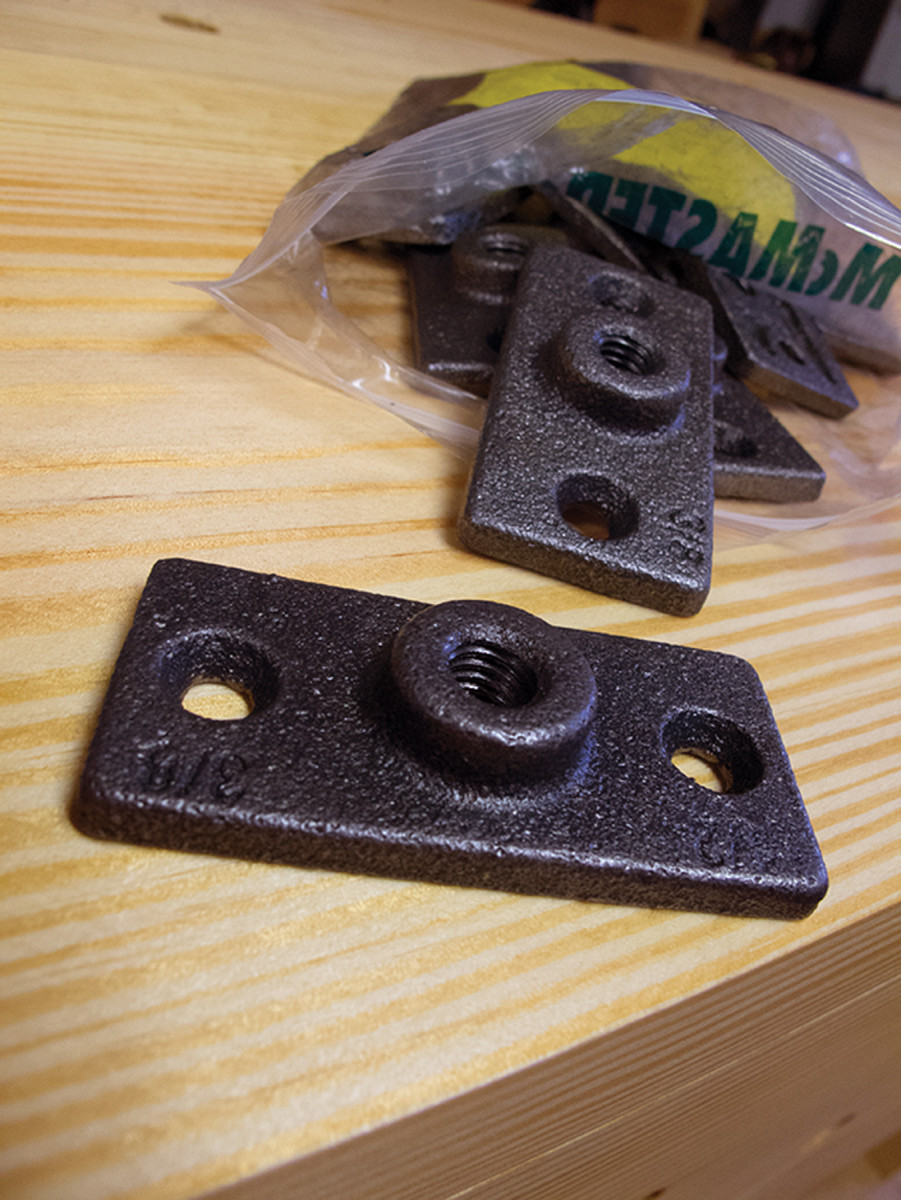
Mounted for work. The ductile mounting plates are easy to install and durable.
The core of this workbench is ductile iron mounting plates that are threaded to receive cap screws. This hardware is easy to install and robust. The rest of the hardware is standard off-the-rack stuff from any hardware store.
No matter where you buy your lumber, make sure it has acclimated to your shop before you begin construction. This workbench is made up of flat panels, so having stable wood will make construction easier and will reduce any warping that comes with home-center softwoods.
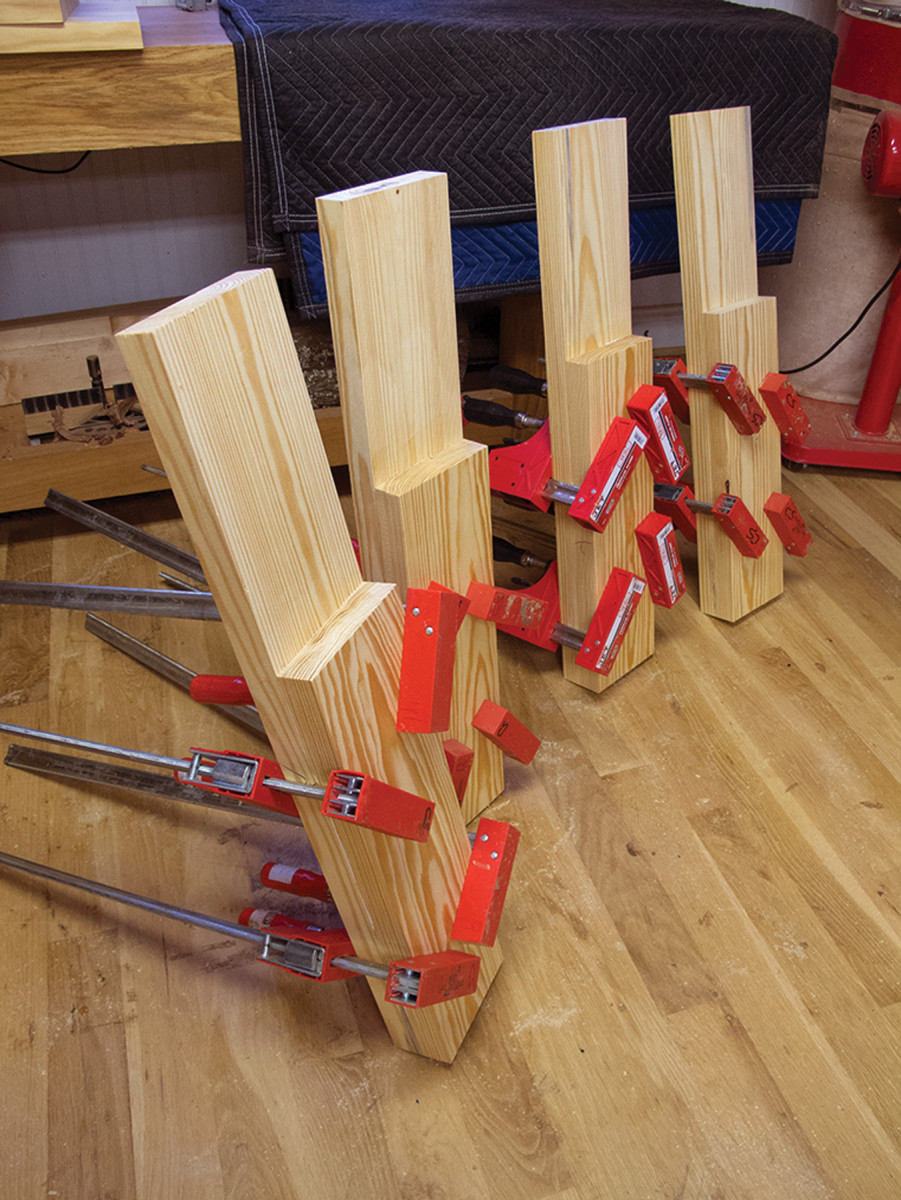
Four legs good. By gluing a short piece and a long piece together, you create a thick leg and the notch for the workbench’s apron.
When I bring a new load of lumber into my shop, I cut it to rough length and sticker it. I have a moisture meter that tells me when the wood is at equilibrium. If you don’t have a moisture meter, wait a couple of weeks before building the bench. Also, if the end grain of any board feels cooler to the touch than its neighbors, then that board is still wet-ish and giving off moisture. So you might want to give that stick some more time to adjust.
This workbench is made up of five major assemblies that bolt together: two end pieces, two aprons and a top. Each assembly needs some cutting and gluing. Let’s start by building the legs.
Glued-up Legs
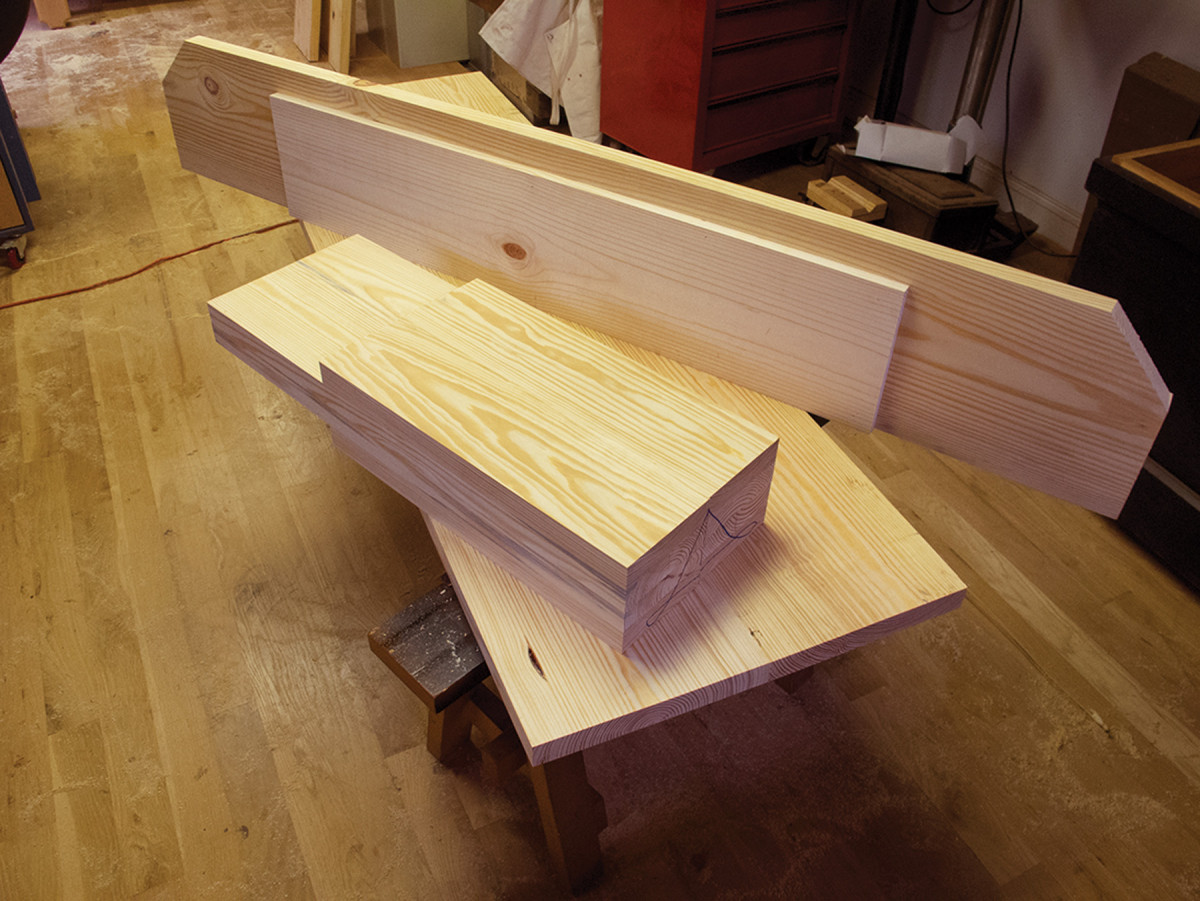
Aprons at work. Here you can see the 2×12 apron glued to the 1×10 interior piece. The legs will then butt against the 1×10.
The joinery for this workbench is mostly glue, screws and a few notches. All those joints are in the two end assemblies. Each end assembly consists of two legs made by face-gluing two boards together. The act of gluing these two boards together creates a notch for the bench’s aprons.
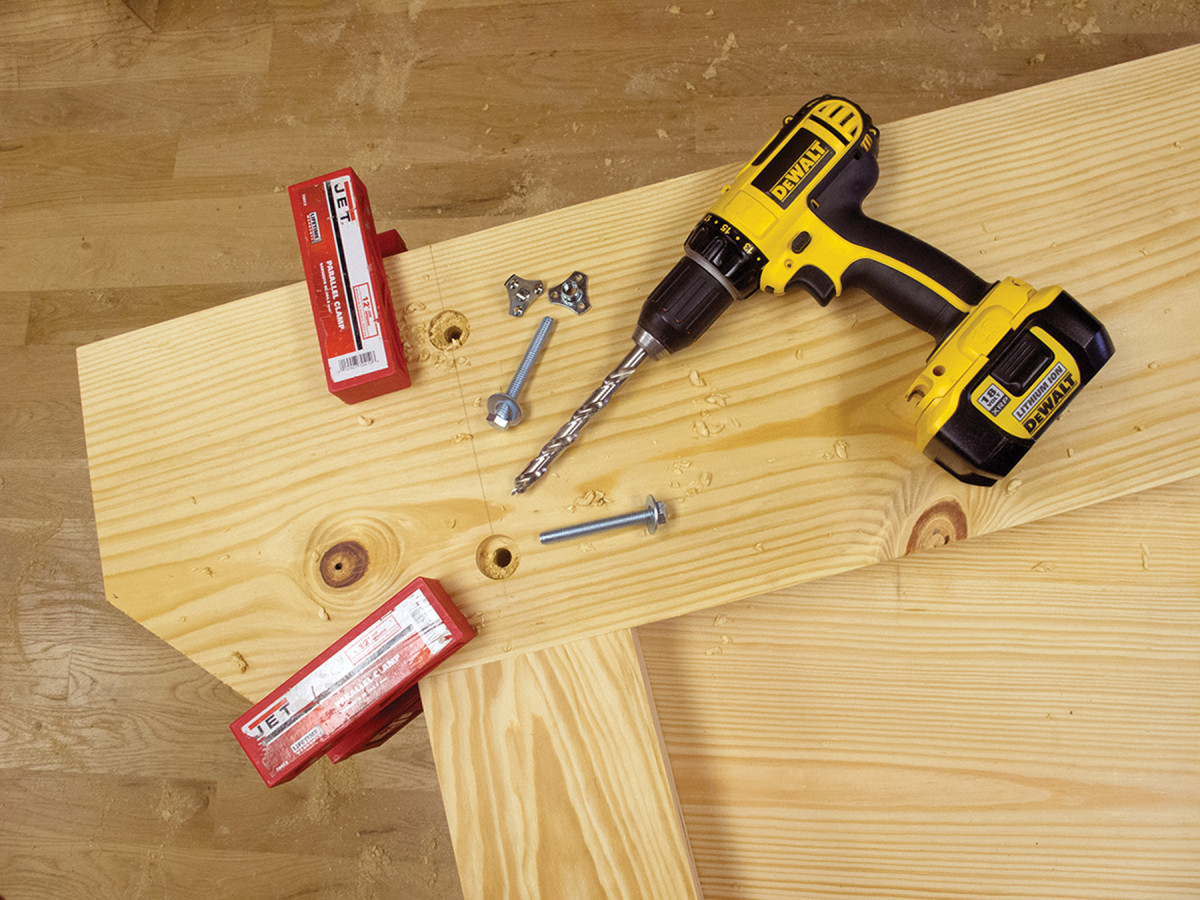
Can’t miss. By drilling these holes while the pieces are together, you ensure they will mate up again.
So begin making the end assemblies by gluing the 51⁄2“-wide leg parts together for each of the four legs. If you don’t own clamps, glue and screw these parts together, then remove the screws after the glue has dried. If you own clamps, I recommend sprinking a pinch of dry sand on the wet layer of glue between the laminations to prevent the pieces from shifting during the clamping process.
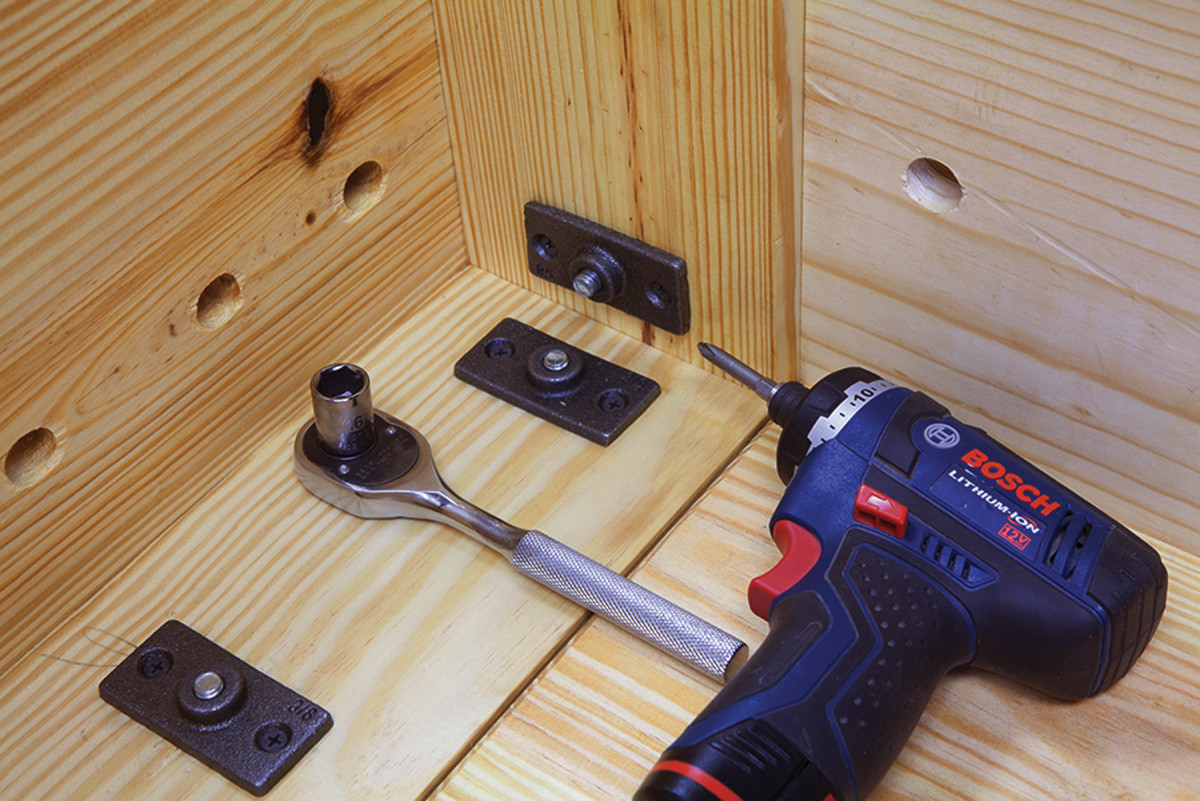
Mounting plates. Here is how the mounting plates look when they are installed. First you tighten the bolts, then you screw the mounting plate down. This way you can’t miss.
While the glue in the legs is drying, turn your attention to the aprons.
Laminated Aprons
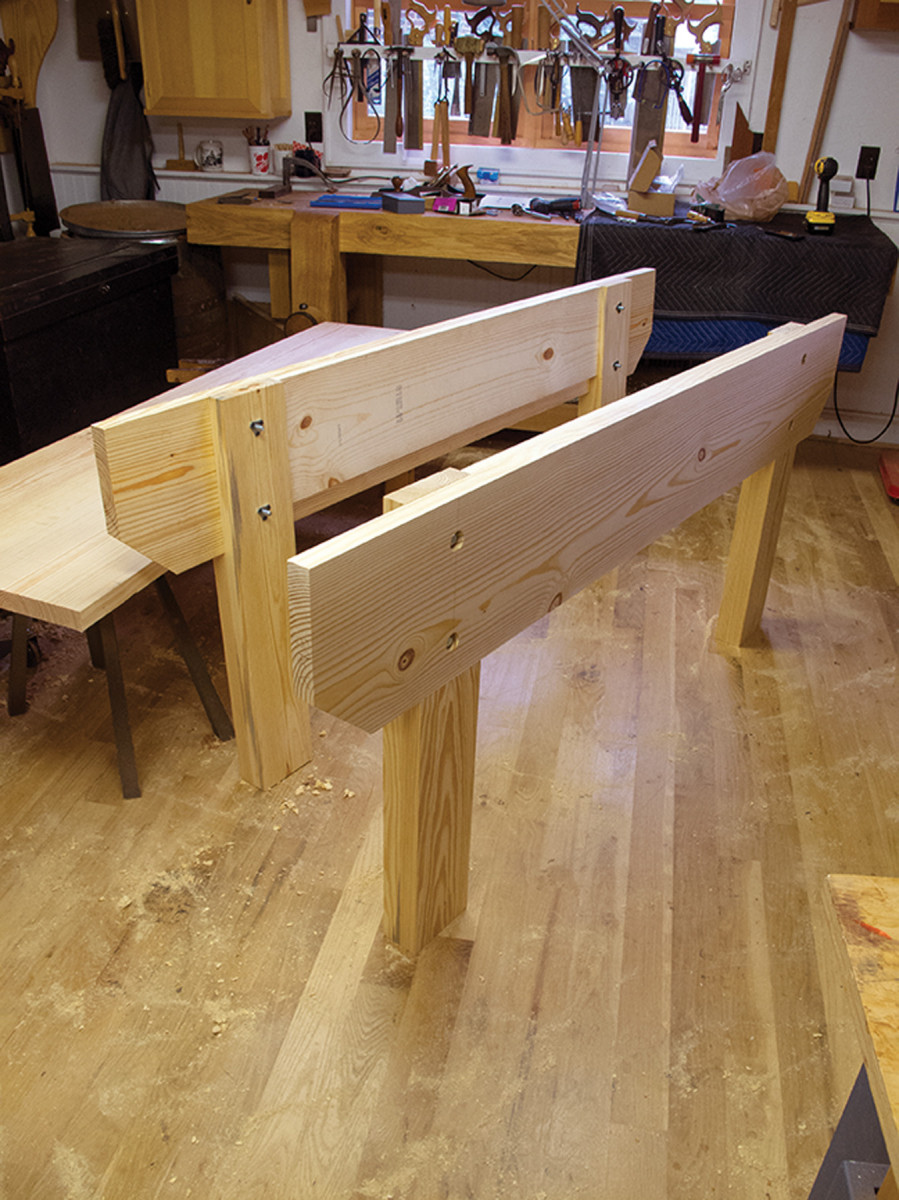
Legs & aprons. With the legs and aprons bolted together, you can glue up the parts for the benchtop.
Like the legs, the front and rear aprons of the workbench are made by face-gluing two parts together to thicken the piece and create notches for the other assemblies.
Each apron consists of a 2×12 glued to a smaller 1×10 piece. The 2×12 is the exterior of the workbench. The 1×10 makes notches for the legs.
The length of the 1×10 is the distance between the left legs of the bench and the right legs. In this 6′ workbench, the 1×10 is 45″ long. If your bench is longer, make these parts longer.
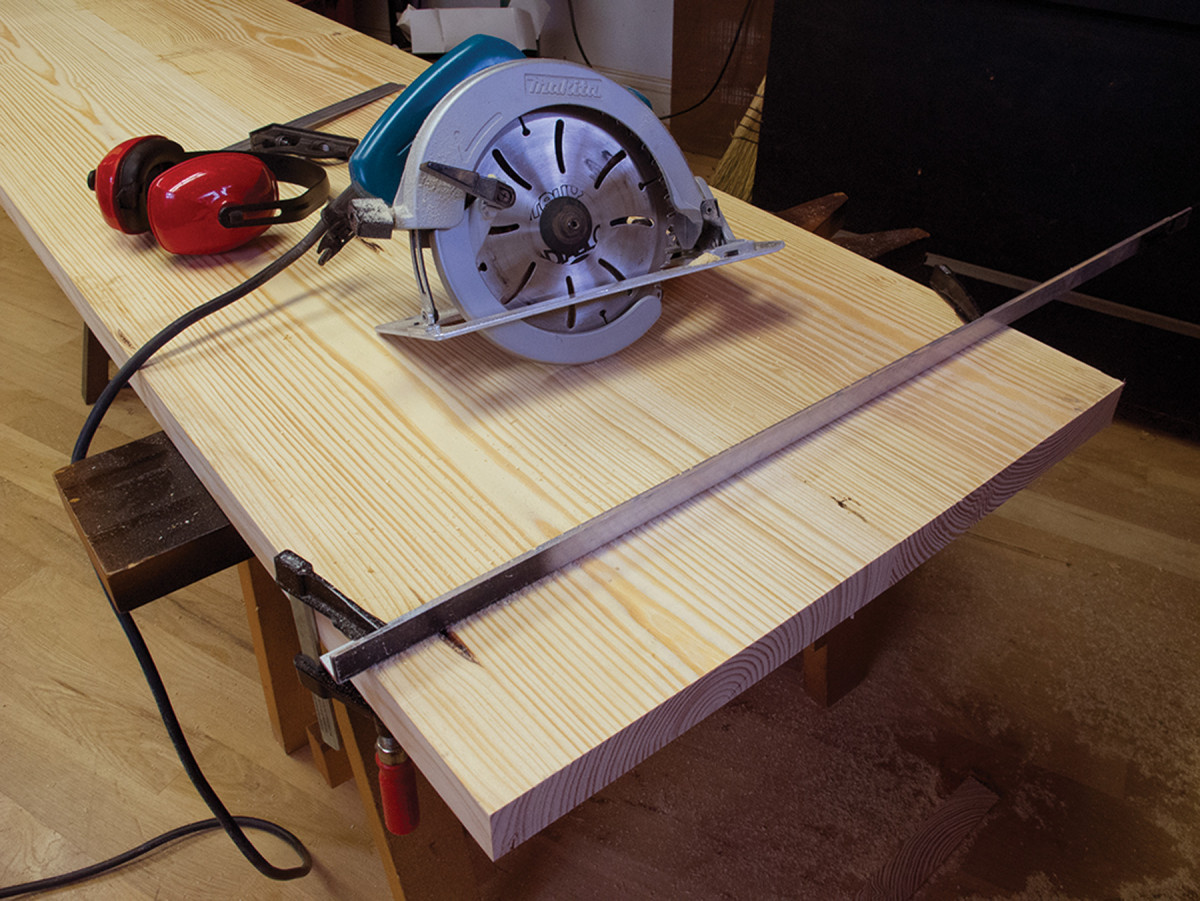
Easy & accurate. I use aluminum angle pieces for winding sticks. I also use them as edge guides for my circular saw. Clamp the aluminum angle to your benchtop and make your cut.
Glue and affix a 1×10 to its 2×12 – and make sure the smaller piece is centered on the length of the larger. I used glue and nails to put these parts together. Any combination of glue, screws and nails will do.
Once the aprons are assembled, you can then clip the corners of the aprons if you like. The 45° corners are cut 4″ from the ends of each apron with a handsaw. The next step is to use the heavy-duty ductile hardware to bolt the legs and aprons together.
Knockdown English Workbench Cut List

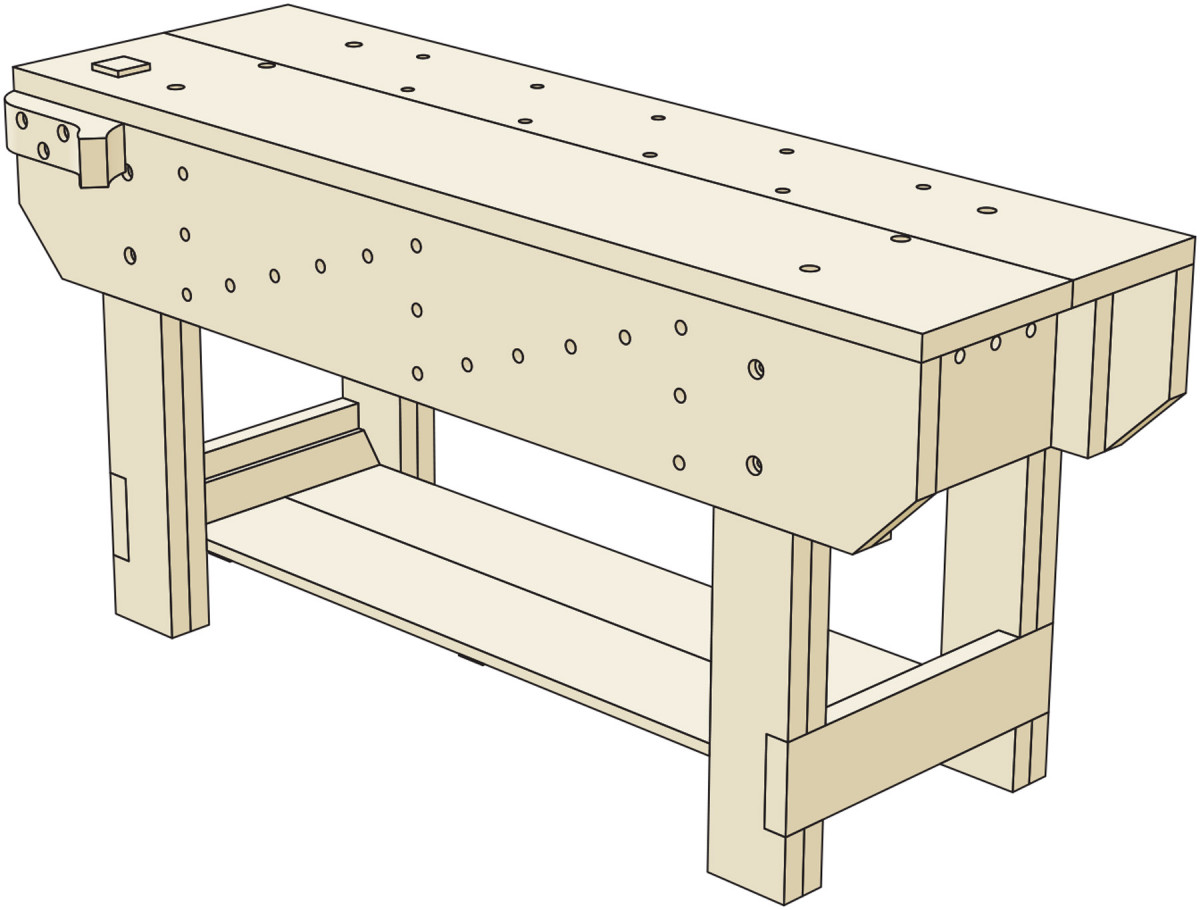
3D View
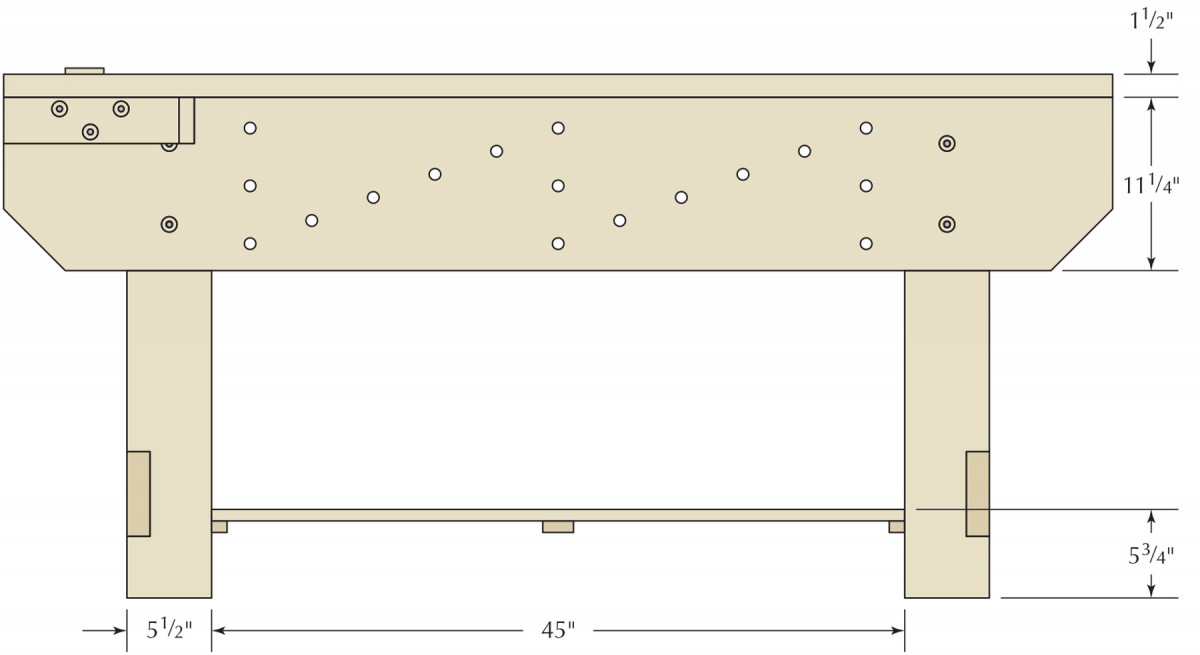
Elevation
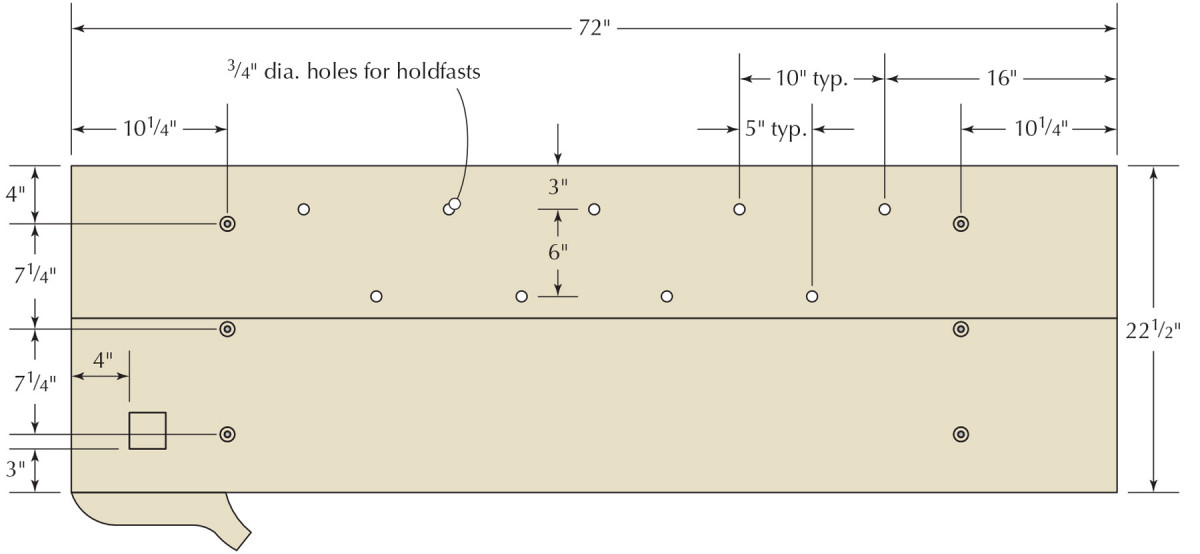
Plan
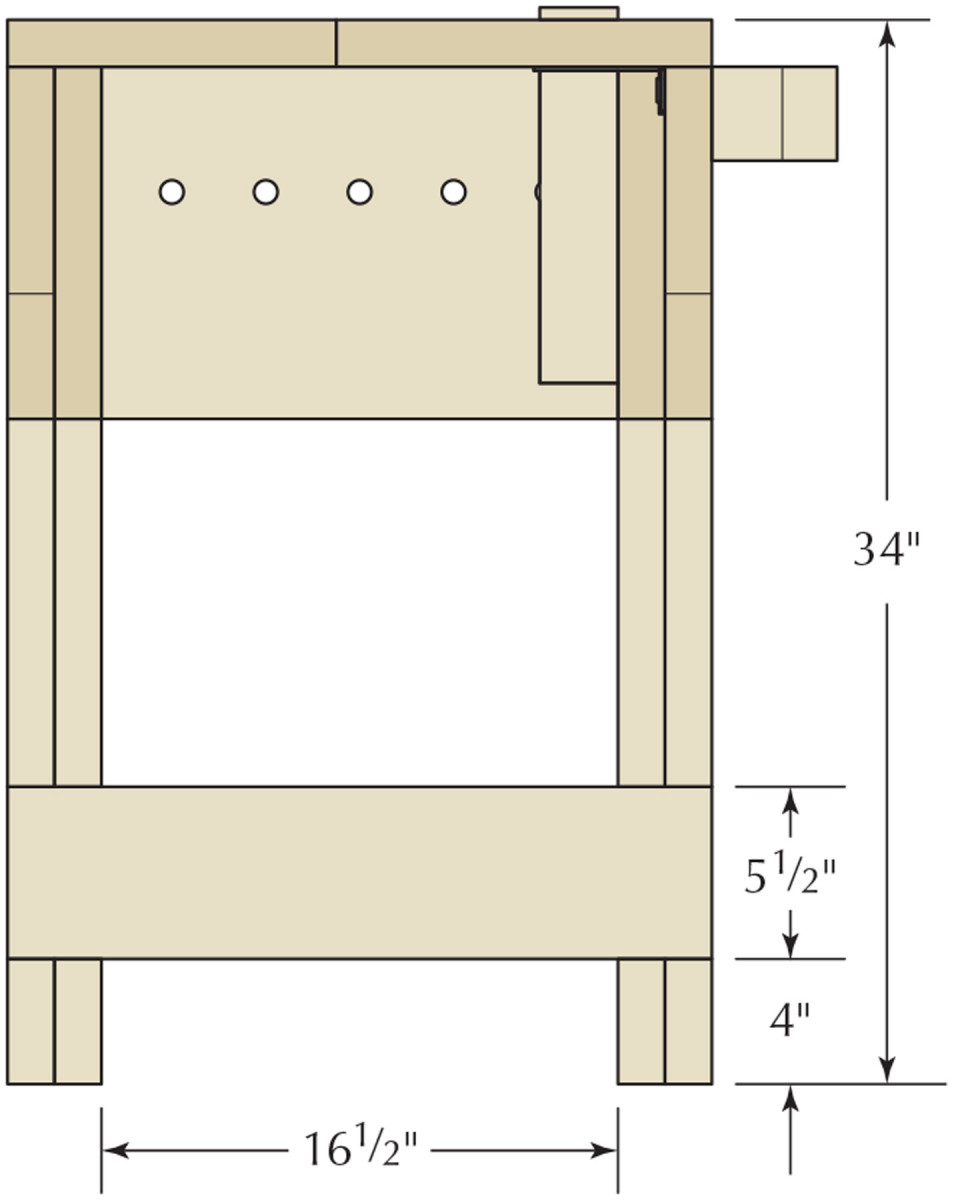
Profile
Hardware Install
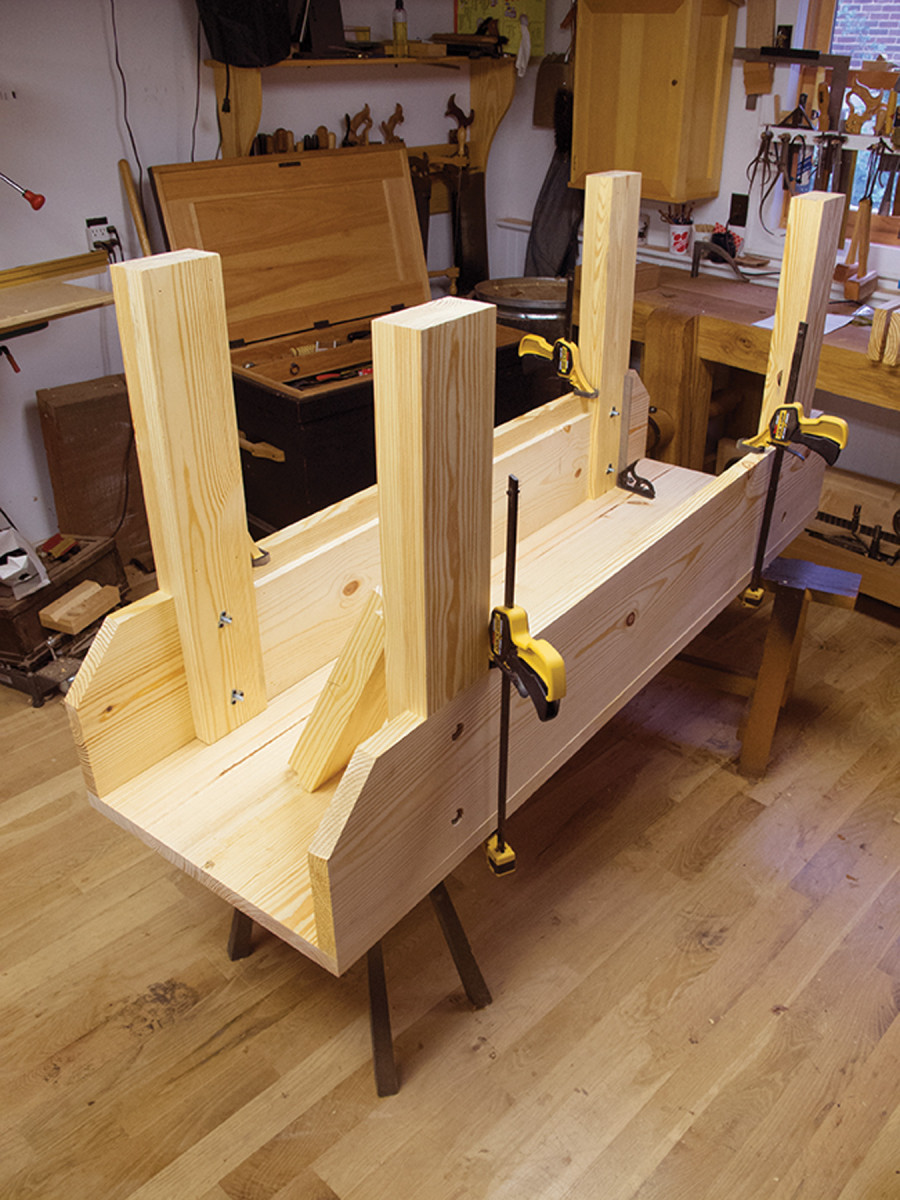
Leg up. With the bench temporarily assembled like this, you can fit the pieces between the legs so they match the space available.
Clamp a leg to one of the aprons, making sure the leg is snug against the notch created by the apron’s 1 x10. Now lay out and drill the counterbore for the washer and the clearance hole for the bolt’s shaft. The clearance hole should go all the way through the apron and leg. The counterbore should be deep enough to hold the head of the bolt, the washer and the lock washer.
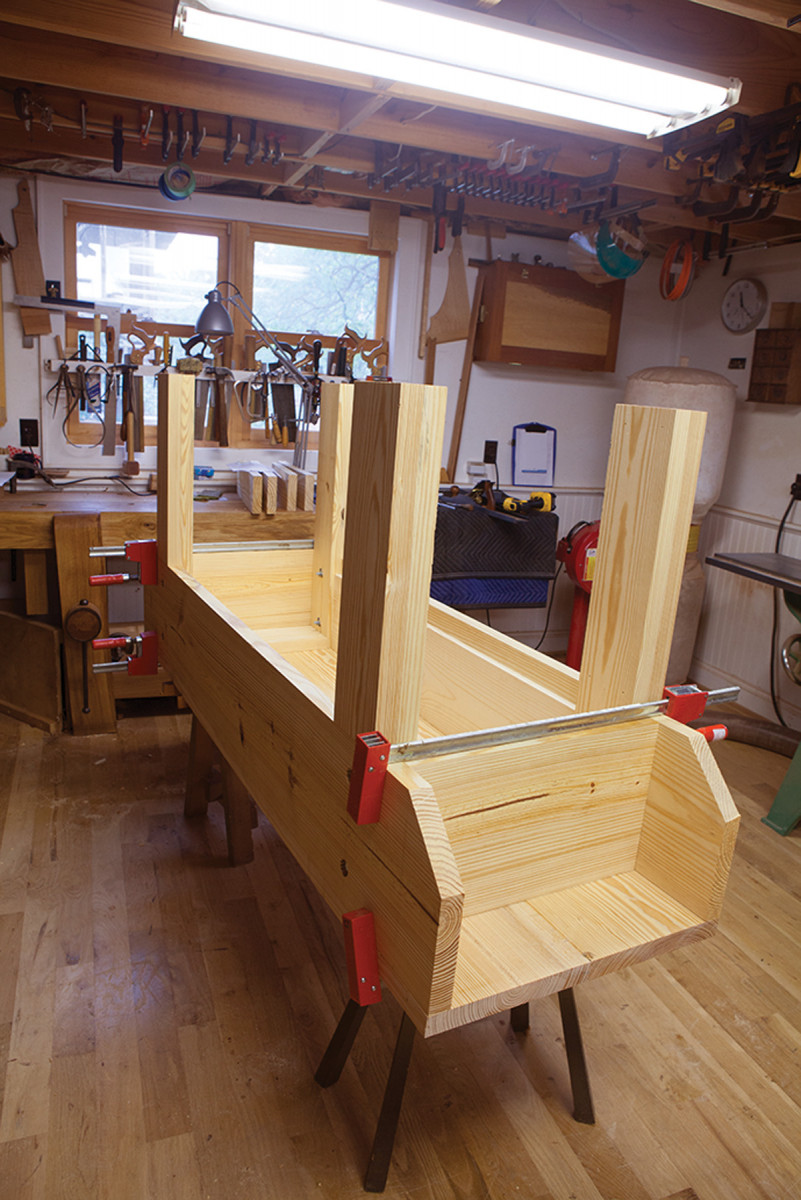
Can’t miss II. With the top plate between the legs, you can put each stretcher on with screws (skip the glue because this is a cross-grain construction).
Now lock the leg and apron together with the hardware. Thread the bolt through a lock washer and then a washer. Push the bolt through the clearance hole. Spin a ductile mounting plate onto the bolt on the other side.
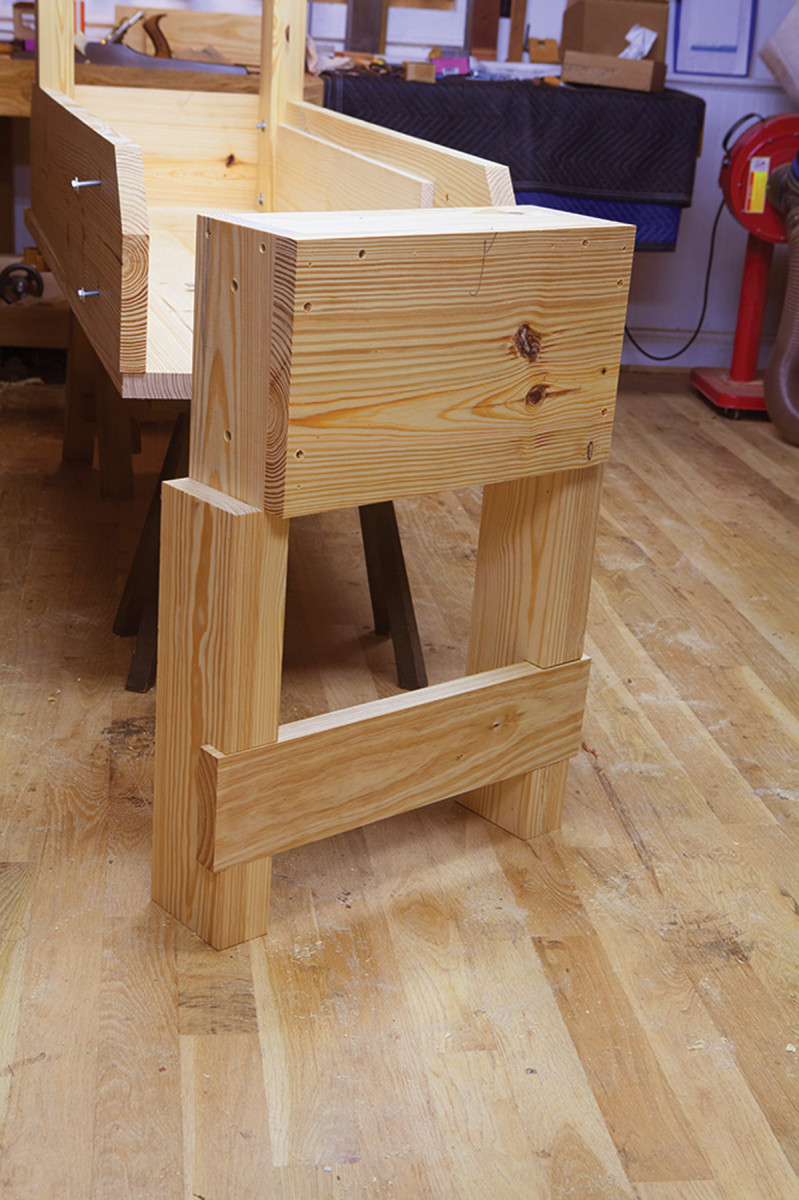
An end, assembled. I know this is an odd construction, but it works. And once you see it, you’ll get it. Here you can see the finished end assembly with the lower stretcher ready for trimming and screwing.
Snug up the mounting plate, then tighten the nut with a socket wrench. Once both bolts are snugged up on the leg, you can permanently install the mounting plates with screws.
Repeat this process with the other three legs. When you are done you will have two aprons with their legs attached.
Beefy Benchtop
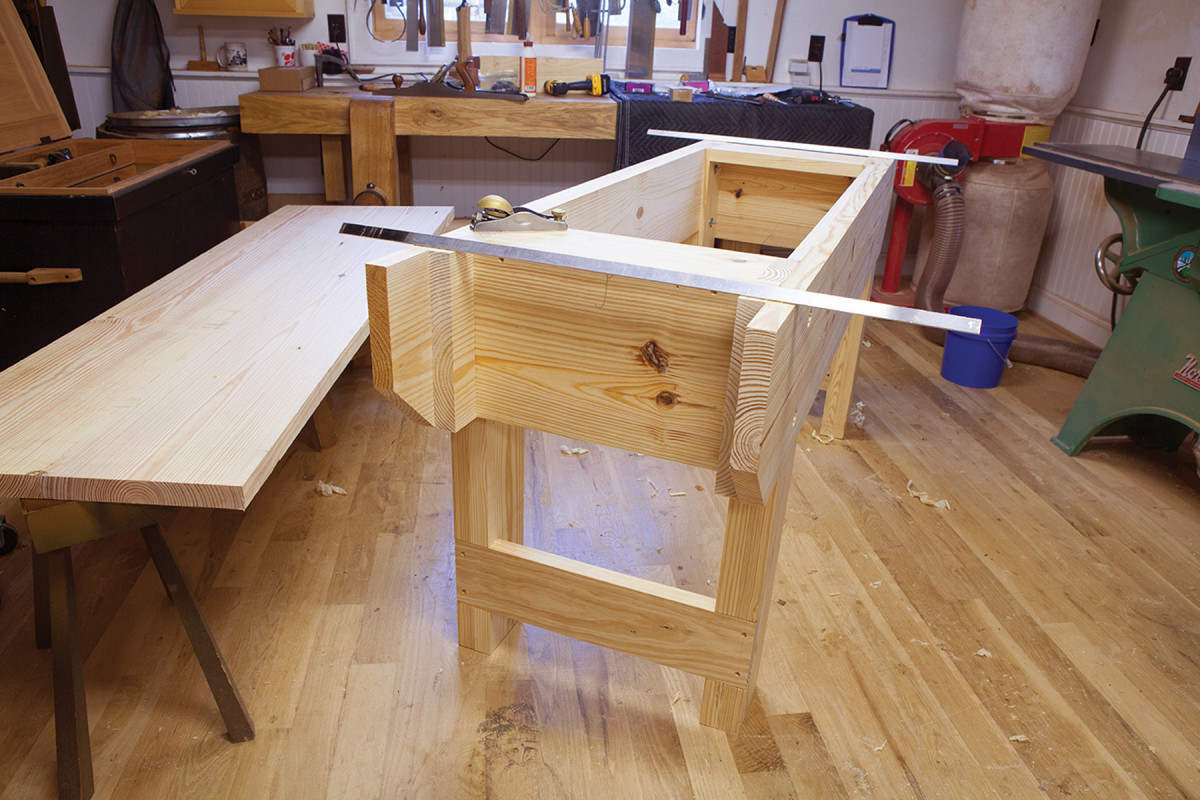
Flat makes flat. If your bench base is twisted, your benchtop will be twisted. It pays to get all the base bits in the same plane.
One of the downsides to many English workbenches is that the top is springy because it is thin or unsupported from below. The traditional solution was to add “bearers” under the benchtop.
These cross members ran between the front apron to the rear apron. And while they do make the benchtop stouter, I have never liked these tops as much as I like a simple thick benchtop.
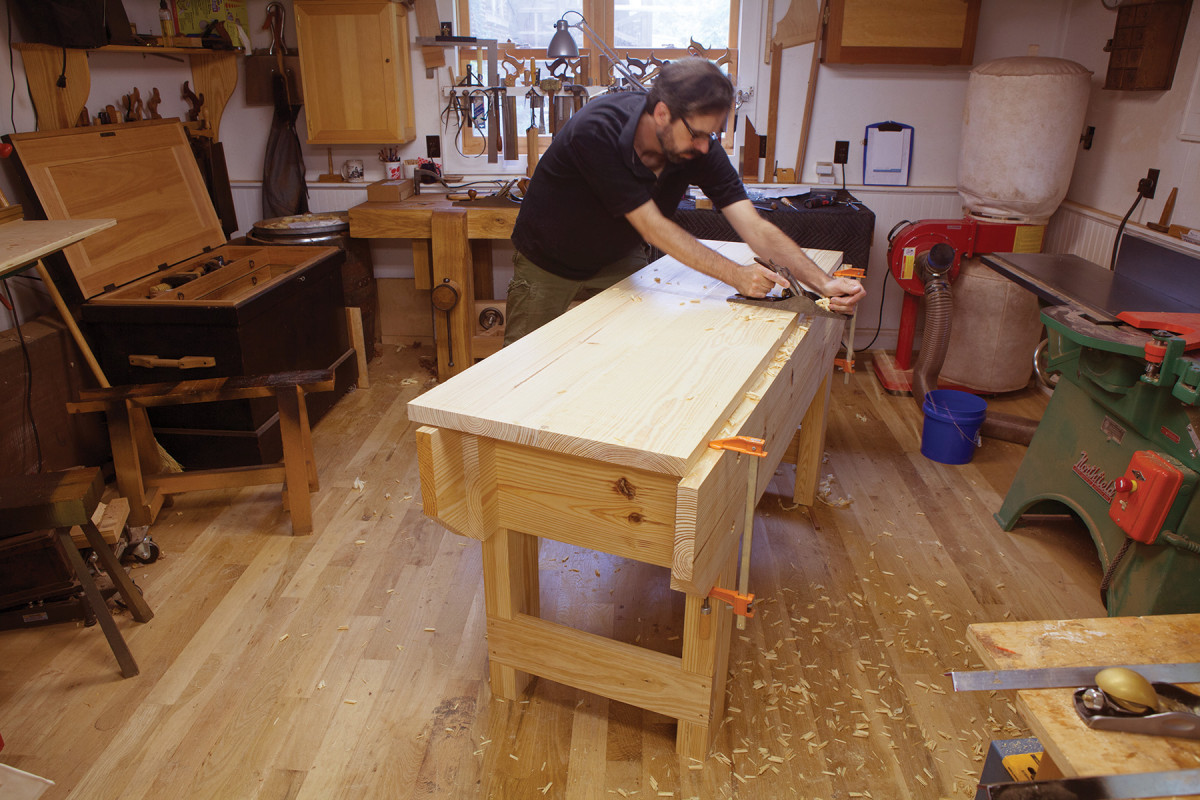
Bench, flatten thyself. Traverse the underside of the benchtop with a jack plane to get the surface fairly true.
The top surface of the benchtop is made from 2x12s that have been edge-glued to create a flat panel. This benchtop is 221⁄2” wide because it is made from two 2x12s. You can make it narrower if you like – an 18″- to 20″-wide bench is stable enough for handwork.
Glue up your two planks for your benchtop and cut the top to its finished width and length.
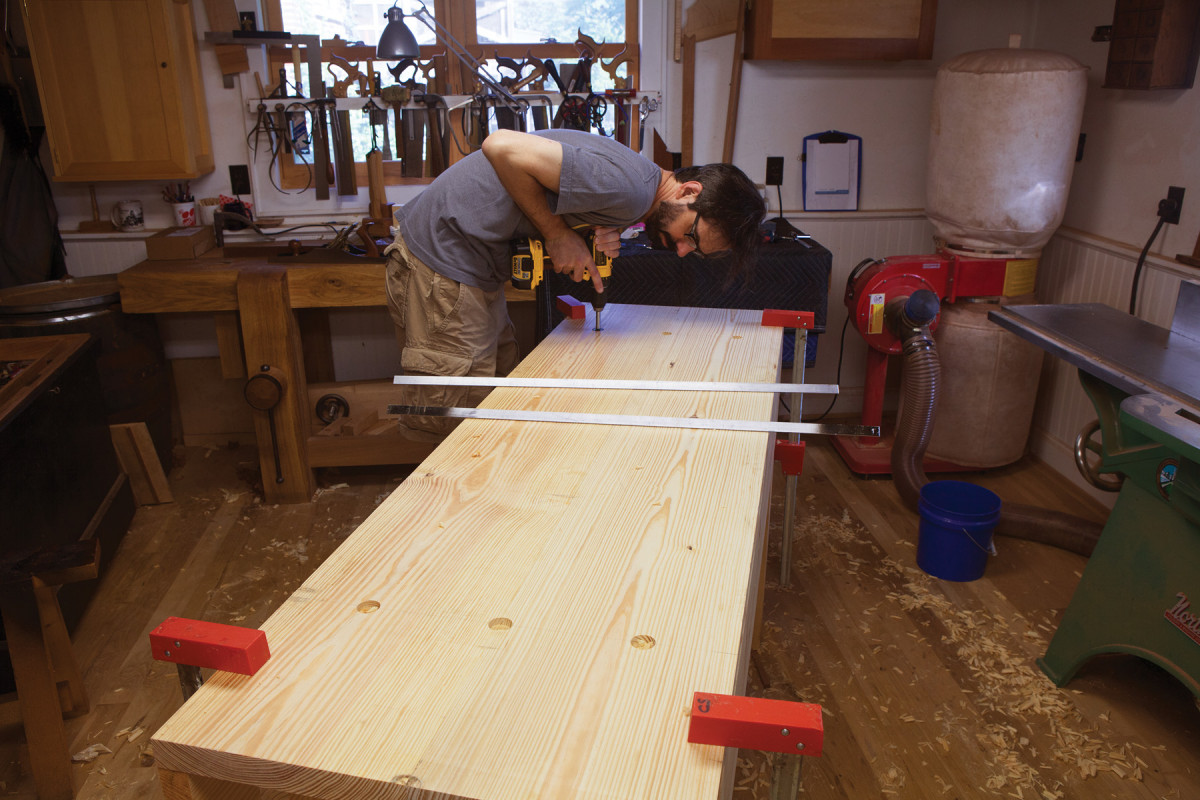
Boring for strength. I put three bolts through each assembly. This keeps things flat. Yellow pine doesn’t move much, so I allowed for only a little expansion and contraction by making my clearance holes 1⁄16″ larger than the diameter of my bolts.
It might be tempting to glue on the second layer of 2×12 to make the benchtop its final thickness. Resist. It is easier to first attach the aprons, legs and thin top. Then, once you finish building the end assemblies, you will know the exact size of this second top piece and exactly where it will go without measuring.
Viseless Workholding
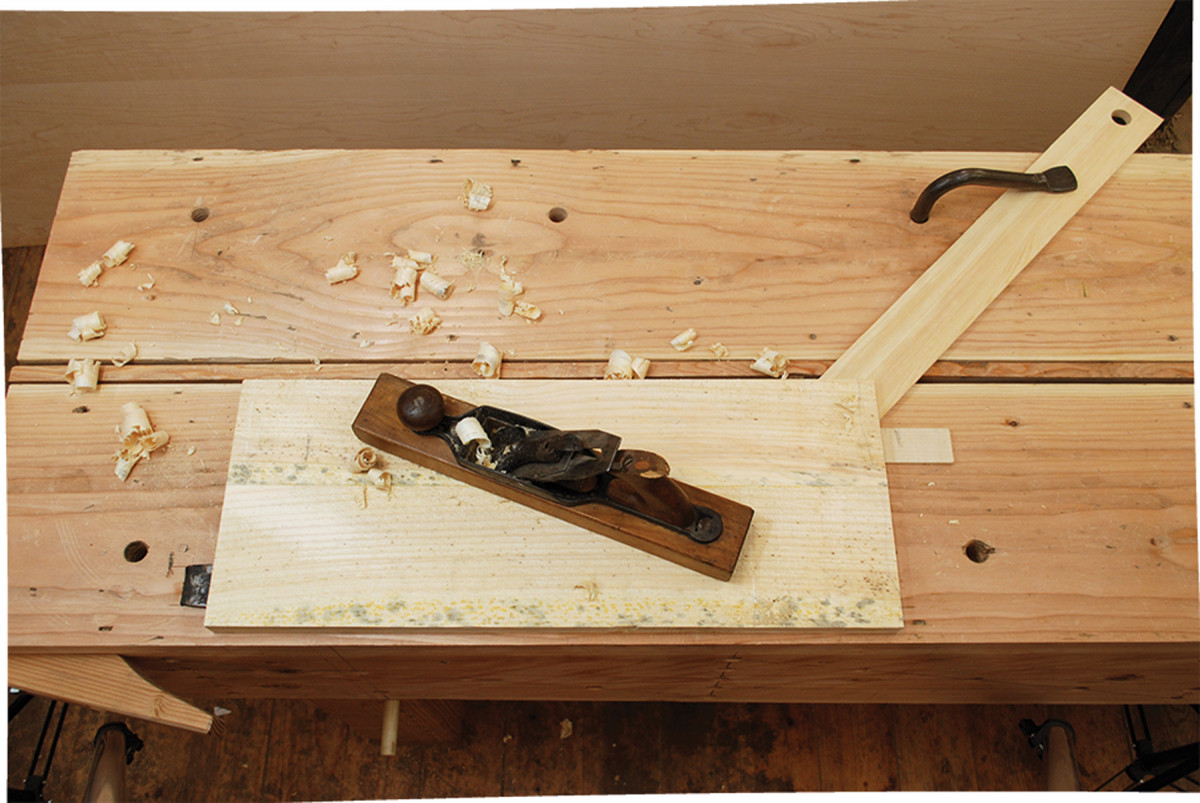
Face planing. Face planing is accomplished by using a planing stop in combination with either battens or a doe’s foot. A holdfast keeps the doe’s foot in place at the corner of the workpiece to push it against a toothed planing stop. The wedge under the workpiece corner keeps a high corner from rocking. Plane toward your stop and the battens, and don’t drag your plane on the return stroke, or the board will pull away from the stop. Flip the doe’s foot over if the angle is wrong for a holdfast hole.
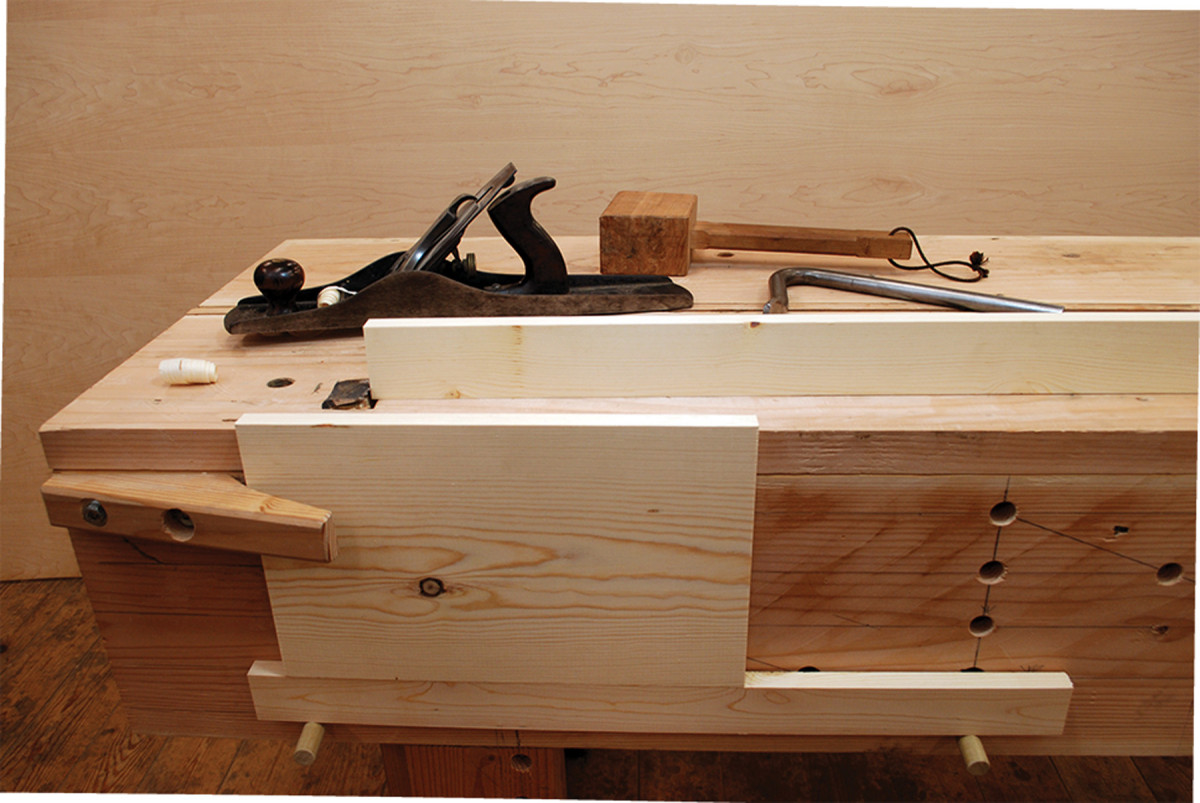
Edge planing. Here are two positions for edge planing: One board is in the crochet and supported by pegs (in holes in the apron) and a batten; the other is supported by the benchtop and held against the planing stop. If the pegs are too far apart, place a batten on the pegs and place the edge of your stock upon that. If the workpiece is narrow and flexes under the plane, or doesn’t reach above the benchtop with the pegs in their highest position, plane the board against the planing stop on the benchtop. If there are hollows under the board, place wedges in them to keep the board from flexing away from the plane. If the board tips over, you are not planing with even pressure. End grain can be planed in the same manner, but to avoid splintering, plane almost to the corner, then flip the workpiece and finish planing.
You have probably used benches with vises your entire woodworking career. A face vise and tail vise are pretty much the way to go, right?
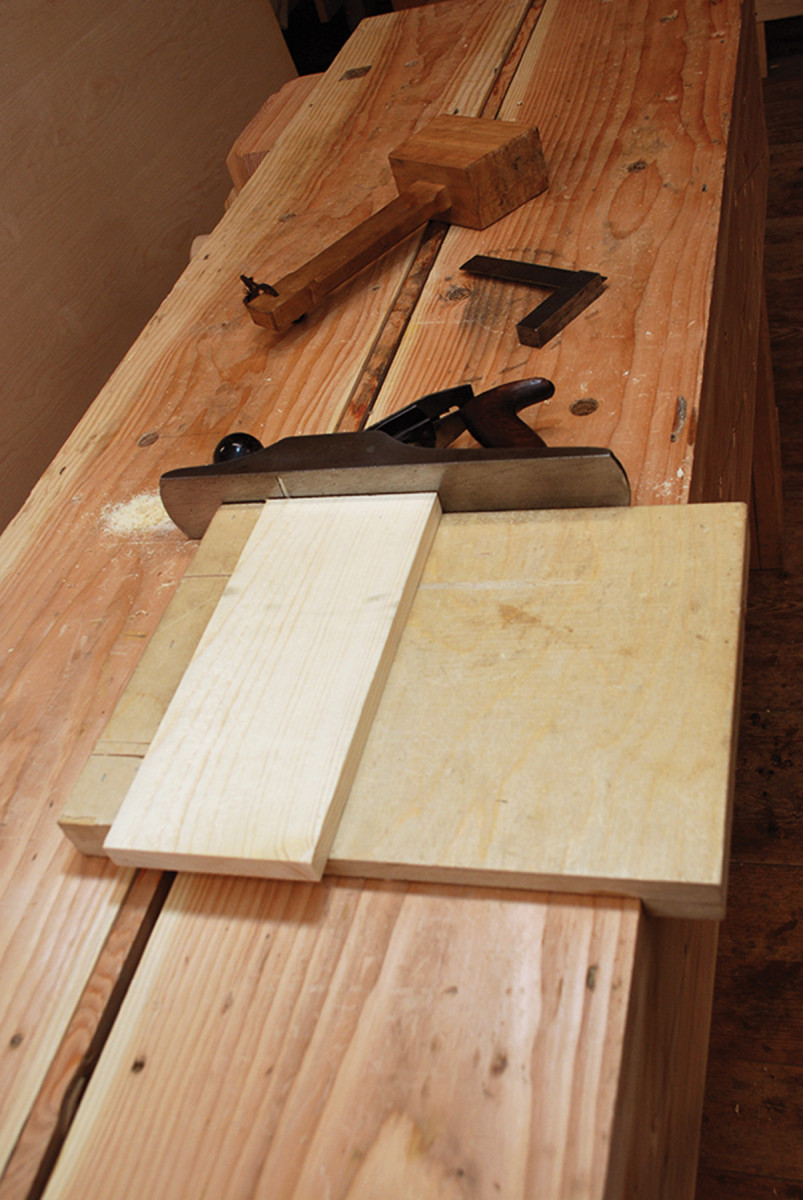
End grain. A bench hook can be used as a simple shooting board for longer or wider boards; the plane rides on the benchtop.
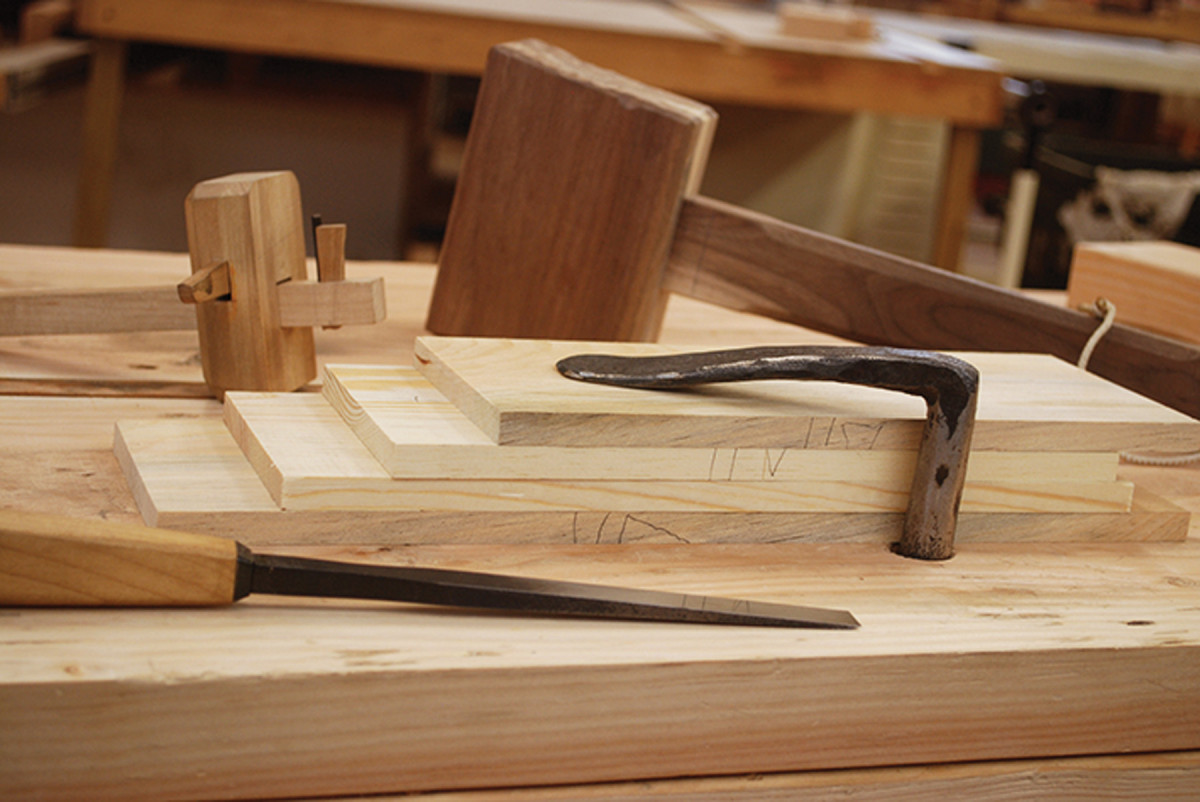
Dovetail chopping. Stacking the parts to be chopped saves the need to reset the holdfast individually for each workpiece.
Maybe. Maybe not.
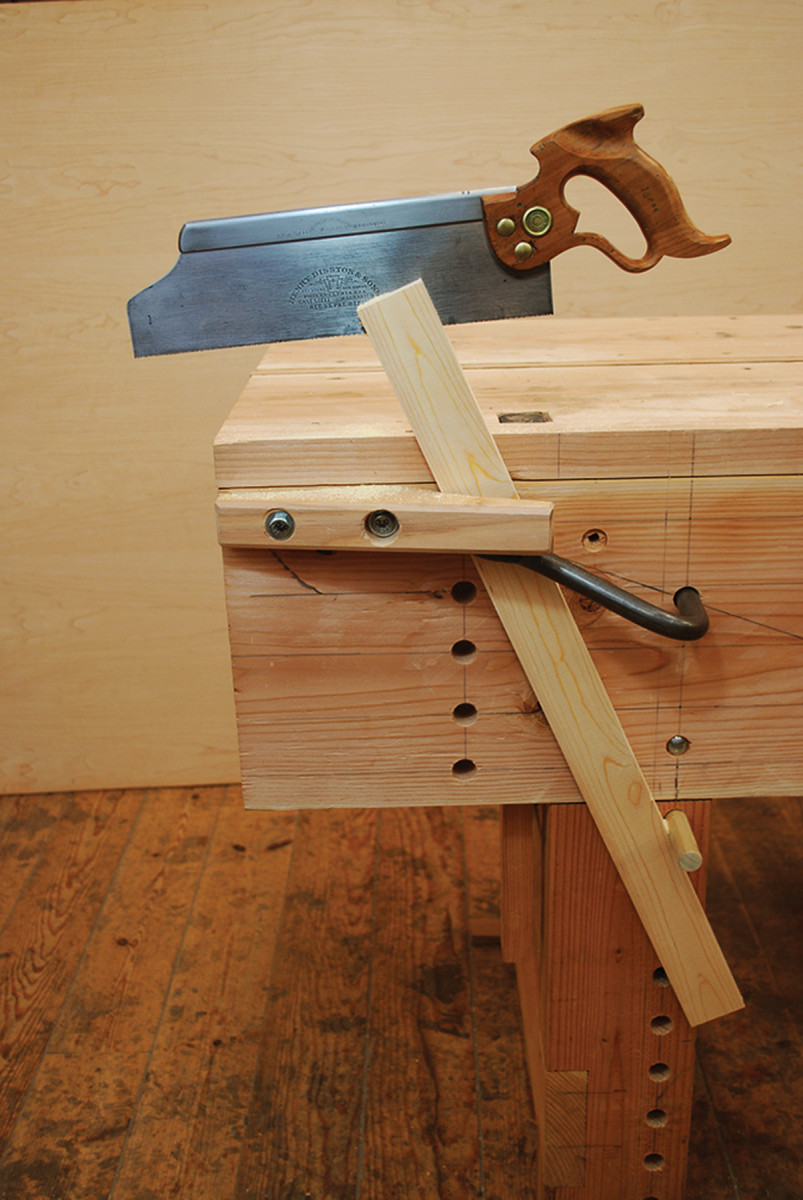
Tenons. Tenoning can be accomplished with the material in the crochet, angled against a peg and held with a holdfast. Angle the board away from you and saw the corners, reverse the board to saw the opposite corners, then square across the bottom. Cut the shoulders in the bench hook (or at the end of the bench using pegs and a holdfast).
Once you get the hang of it, viseless workholding becomes very fast and can be liberating and fun. Many of these techniques are quite useful, even if you have a vise on your bench. I find them useful for the entry-level person on a budget as well as for the seasoned woodworker seeking to expand his or her options.
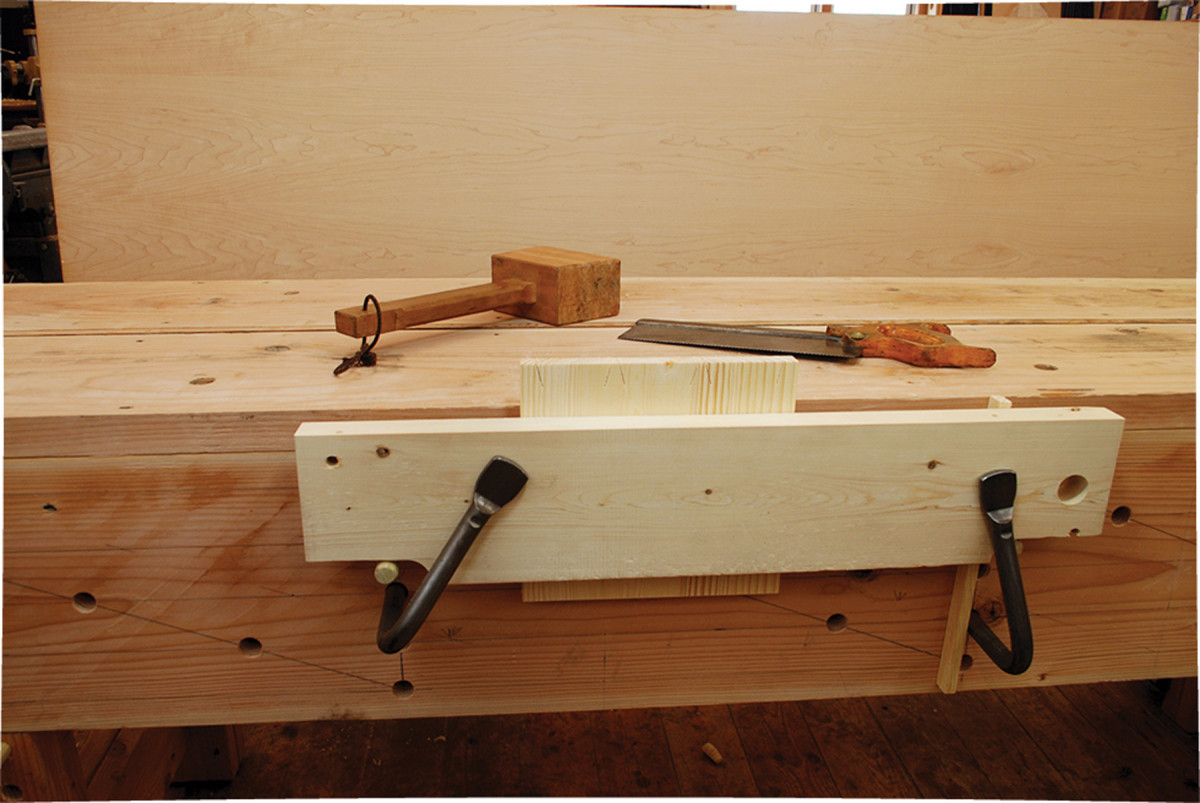
Dovetail saw cuts. Secure the workpiece against the apron with a thick batten held flush to the benchtop with two holdfasts, and supported by two pegs in the apron’s holdfast holes. I like to take a scrap of stock the same thickness as the material being dovetailed and put it to one edge of the chop. I place my holdfast just to the inside of the scrap and give it a good whack. This will keep that end of the chop fixed so that I need only to loosen the other holdfast when changing out parts to be worked.
Let’s look at how to accomplish some of the more common tasks at a bench: planing faces, edges and ends of boards; crosscutting and ripping; and sawing a couple of joints.
— Mike Siemsen
Feet in the Air
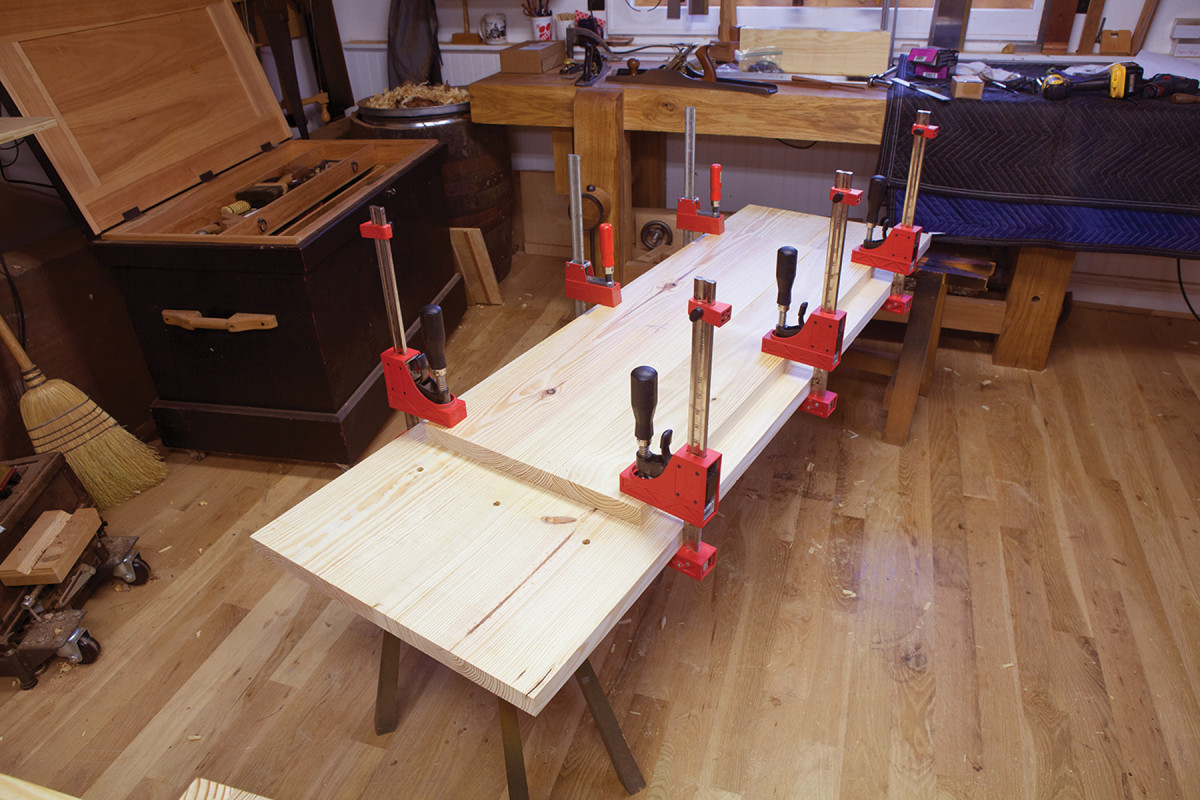
Overkill. After gluing and screwing the second benchtop piece in place I also clamped things together while the glue dried.
This next step ensures that the end assemblies will be the correct size for the width of your top. Assemble the bench upside down on sawbenches. Clamp the aprons to the top and push things around until the legs are square to the underside of the top and the aprons line up with the top all around.
Once you have everything clamped as you like it, you can fit the pieces for the end assemblies that go between the front legs and the back legs. There is a top plate that is the same width as the legs, plus a top stretcher made from a 2×12 that fits between the front apron and the rear apron.
Cut these pieces to fit. Then wedge the top plate pieces between the legs and screw the stretchers to the legs.
With the top stretchers screwed to the legs, you can take the bench apart, then glue and screw the top plates in place. Don’t forget to glue the edge of the top plate to the face of the top stretcher. There is a lot of strength to be found there.
The last bit of work is to attach the lower stretchers to the legs. These stretchers are in a notch in each leg. Cut the notch with a handsaw and clear the waste with a chisel. Then screw and glue the lower stretchers into their notches.
Reassemble the bench’s base so you can get the top complete.
The Top (& Details)
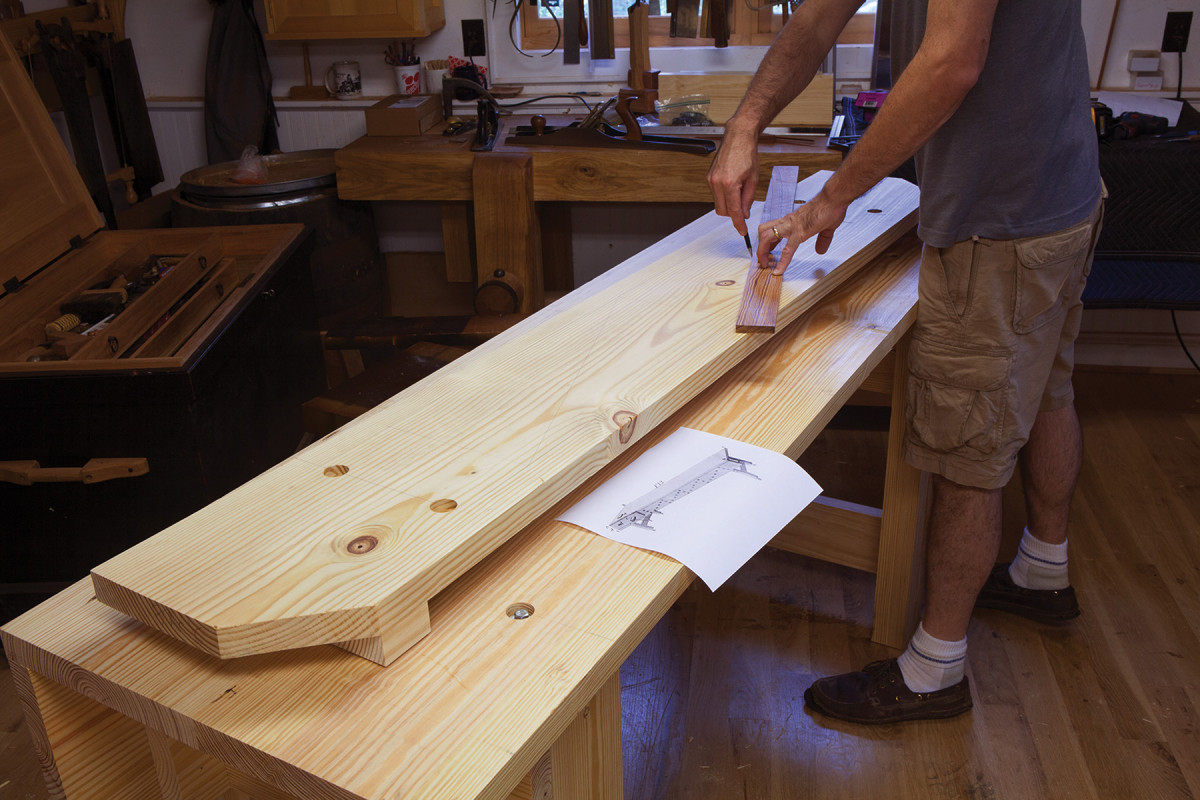
Apron holes. Here I’m drawing the diagonal lines for the holdfast holes in the aprons. Many people use wooden pegs in the aprons instead of holdfasts. Both solutions defy gravity just fine.
With the base assembled, level the top edges of the aprons and the end assemblies so they are coplanar – that’s the first step toward a flat benchtop.
I dressed these parts with a jointer plane and block plane and checked my work with winding sticks and a straightedge.
Before you put the top on the base, I recommend one little addition at this stage. I attached glue blocks – for the lack of a better word – to the aprons so the end assemblies would be captured. You can see in the photo above that I used an offcut from a 2×12 and oriented the grain sympathetically with the apron. This five-minute upgrade makes the bench easier to assemble and a bit stouter.
Now you can flatten the underside of the benchtop by using the bench’s base for support.
Put the benchtop on the base and plane the underside of the top flat with a jack plane – don’t worry about flattening the top of the benchtop. A couple of F-style clamps on the bench base will keep the top in place during this operation.
Test your benchtop by flipping it over and showing it to the workbench’s base. When the two parts meet without any rocking, you are done. Clamp the benchtop in place with the worksurface facing up. Now install the bolts, washers and mounting plates through the top and the top plate of the end assemblies. Do this in the same way you attached the legs to the aprons.
Now flip the assembled bench over. You now can see the precise hole where the second benchtop piece should go. Glue up a panel using 2×12 material and cut it to fit that hole exactly. Glue and screw it to the underside of the benchtop. Then lift the workbench base off the benchtop and clamp the top pieces together for extra bonding power.
When the glue is dry, use a block plane to bevel the mating surfaces so they will slide together easily during assembly.
Holes & Holding
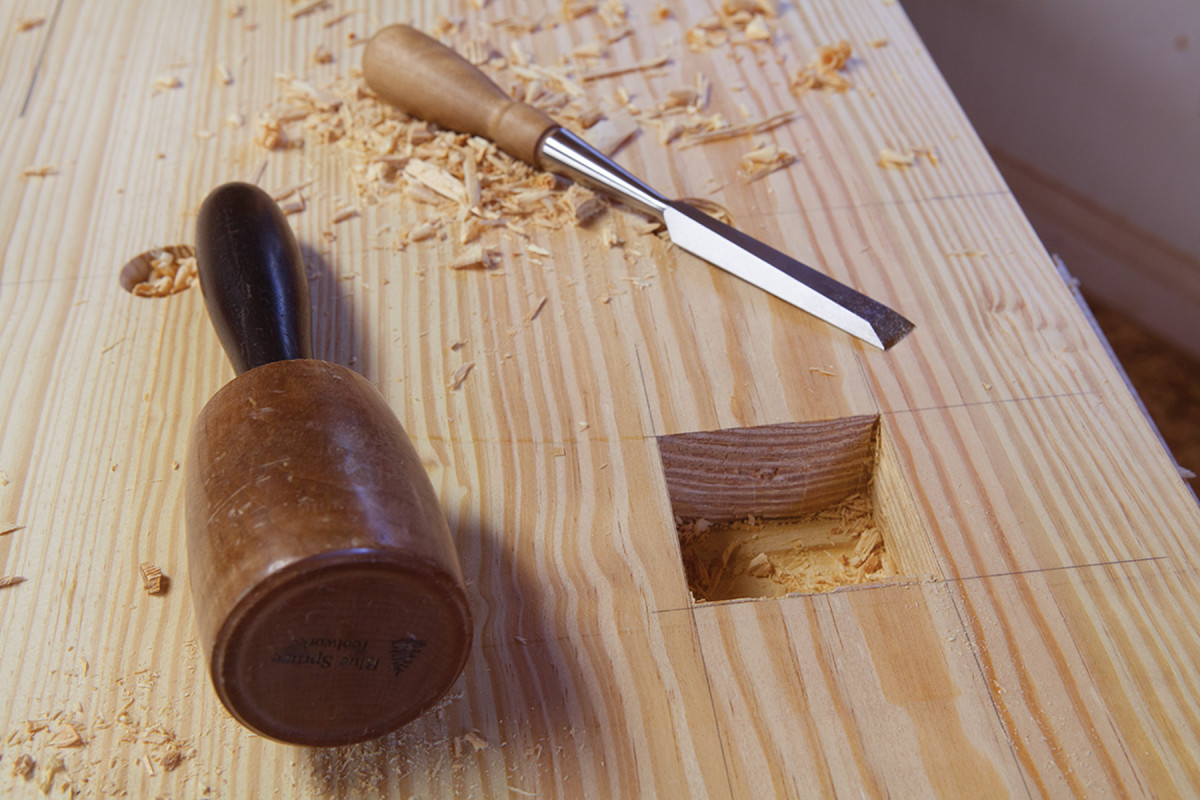
Square hole. This is a great first mortise for a beginning woodworker. Take your time in squaring up the walls.
You just made a table. Now you need to make it a workbench. To do that you need to add three things: a crochet, a planing stop and holdfast holes. The holdfast holes restrain your work on the benchtop and front apron. The crochet is for edge planing. The planing stop is for lots of things. Let’s make the holdfast holes first.
To lay out the holdfast holes on the aprons, draw two or three rectangles on the aprons between the positions of your bench legs. Two rectangles for a 6′ bench; three for an 8′ model.
Connect two corners of each rectangle with a diagonal line. Then use dividers to equally space six holes from corner to corner on the diagonal lines. Then divide the vertical ends of each rectangle into three using your dividers.
Drill 3⁄4“-diameter through-holes at each of these locations. These holes in the aprons are great for supporting work from below, especially when edge-planing or dovetailing.
Now lay out the holdfast holes on the benchtop. My preference is to have two rows of holdfast holes on the benchtop (you can always add more later). One row is about 3″ from the back edge of the benchtop. These should be spaced every 10″ to 16″ depending on the reach of your holdfast. Then make another row of holdfast holes about 6″ in front of your back row. These should be spaced similarly, but these holes should be offset from the first row, as shown in the drawings and photos.
Be sure to drill some holdfast holes in the legs – both to store holdfasts and to support large work, such as passageway doors. Hold off on drilling any additional holdfast holes until you really need them.
The Planing Stop
The traditional planing stop is a workhorse. I push workpieces against it to saw them, plane them, stick moulding on them, you name it. The stop is a piece of dense wood (yellow pine is dense enough) that is friction-fit into a mortise in the benchtop.
First make the mortise, then make the planing stop to fit.
The mortise for the planing stop is right in front of the end assembly and typically 3″ or so in from the front edge of the benchtop. This planing stop is 21⁄2” x 21⁄2” x 12″ – a fairly traditional size.
Lay out the mortise on both faces of the benchtop. Then bore out most of the waste with a large-diameter bit. Finish the walls with a chisel. It pays to check the walls so they are perfectly square to the benchtop.
Then plane the planing stop until it is a tight fit in the mortise and it requires mallet blows to move it up and down. Some planing stops also have a toothy metal bit in the middle that helps restrain your work. You can add that later if you like. It can be a blacksmith-made stop, a piece of scrap metal screwed to the top of the planing stop or even a few nails that are driven through the stop so their tips poke out.
Le Crochet
For this workbench I decided to make a crochet that looks exactly like the one in Roubo’s “l’Art du menuisier.” But to be honest, I don’t think the shape matters much. I’ve used a lot of different shapes and they all seem to work fine as long as they are vaguely “hook-shaped.”
I made this crochet from scraps. I glued them together, then shaped the hook on the band saw, finishing it up with rasps.
I attached the crochet with two lag screws and one cap screw, which was backed by a ductile mounting plate. This allows me to remove the crochet from the apron. As you might notice in the illustration, and in the photo above, the crochet slightly interferes with one of the cap screws through the apron. You can avoid this by altering the shape of your crochet or moving the hole for the cap screw.
A Shelf if You Like
I always like having a shelf below my bench to store bench planes and other assemblies. I haven’t included the shelf in the calculation for buying materials, so you’ll need some extra wood and screws to get the job done.
The shelf is simply a panel that rests on cleats that are glued and screwed to the lower stretchers of the end assemblies. You can also screw some battens to the underside (and/or top) of the shelf to help keep it flat.
The only thing holding the shelf in place is gravity.
And Finish
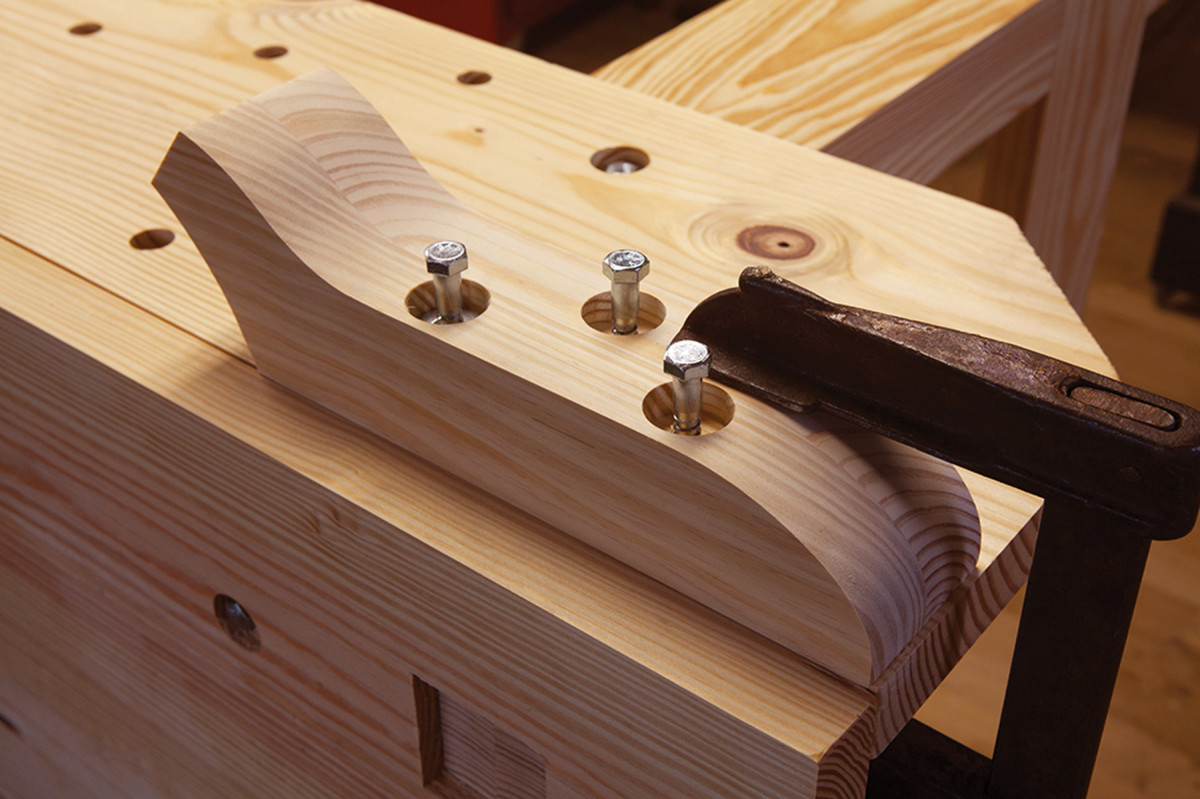
The hook. You can bolt your crochet on. Some early accounts indicate it was nailed on. You probably could get away with glue alone.
You don’t want to make your bench too slippery, so stay away from film finishes (or French polish). I recommend using little or no finish. For most workbenches, I usually just add a coat of boiled linseed oil. You can use an equal blend of oil, varnish and mineral spirits or just leave the wood bare.
In the end, this really is a remarkably sturdy bench. Most people who use it cannot even tell that it is designed to be knocked down. It is only after they notice the cap screws in the benchtop that they suspect anything.
Plan: Download a free SketchUp model of this project.
Here are some supplies and tools we find essential in our everyday work around the shop. We may receive a commission from sales referred by our links; however, we have carefully selected these products for their usefulness and quality.


