We may receive a commission when you use our affiliate links. However, this does not impact our recommendations.
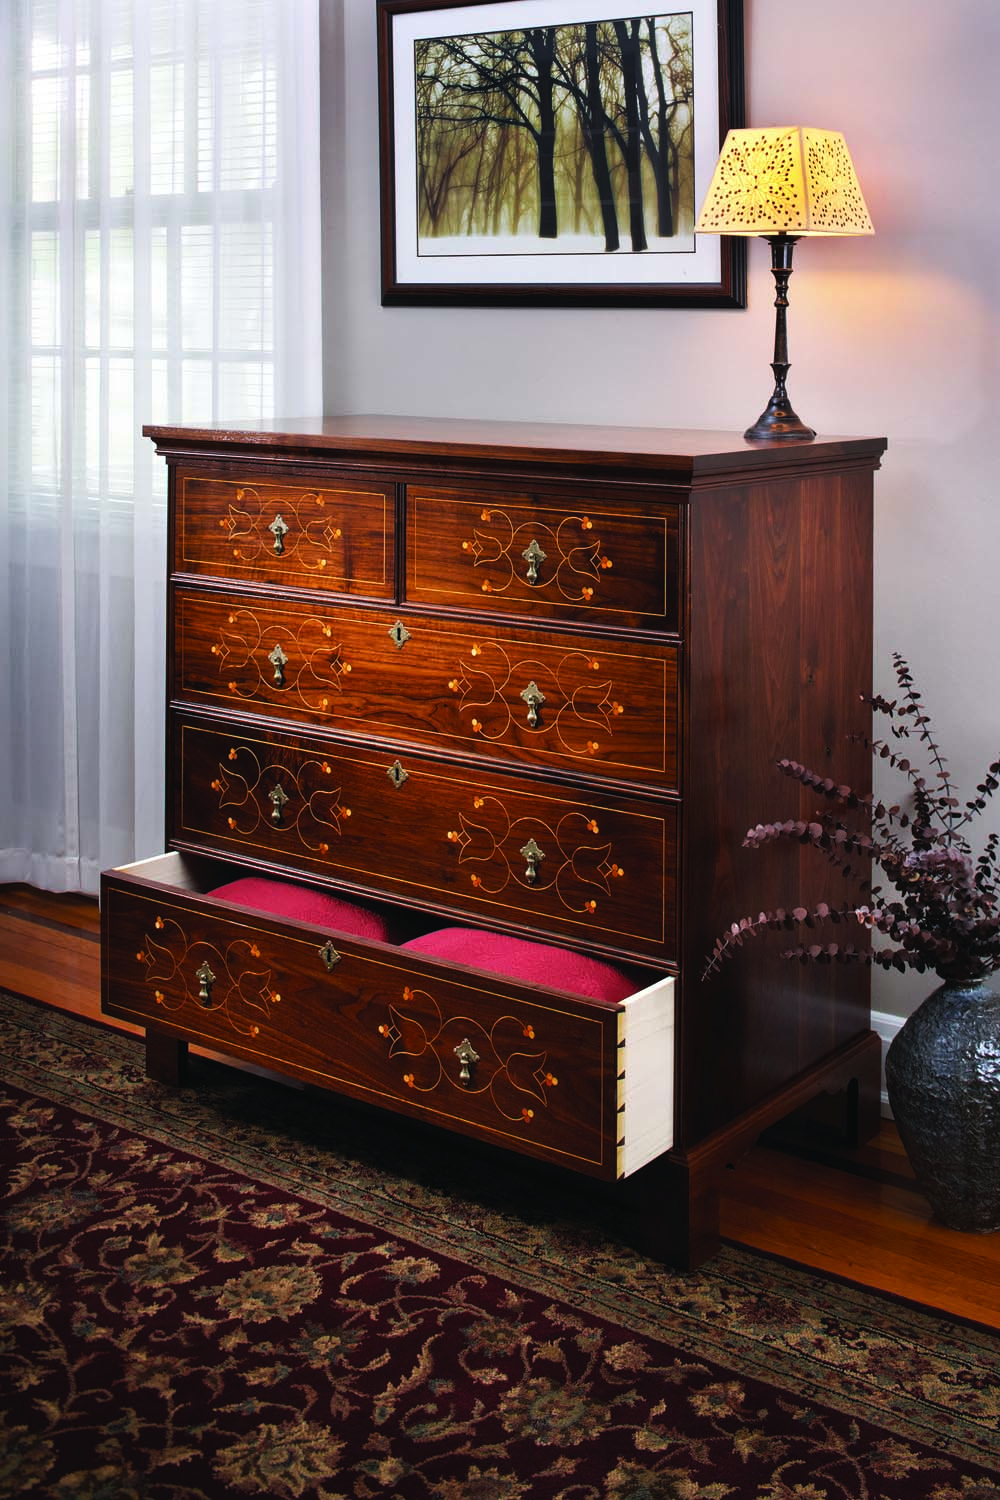
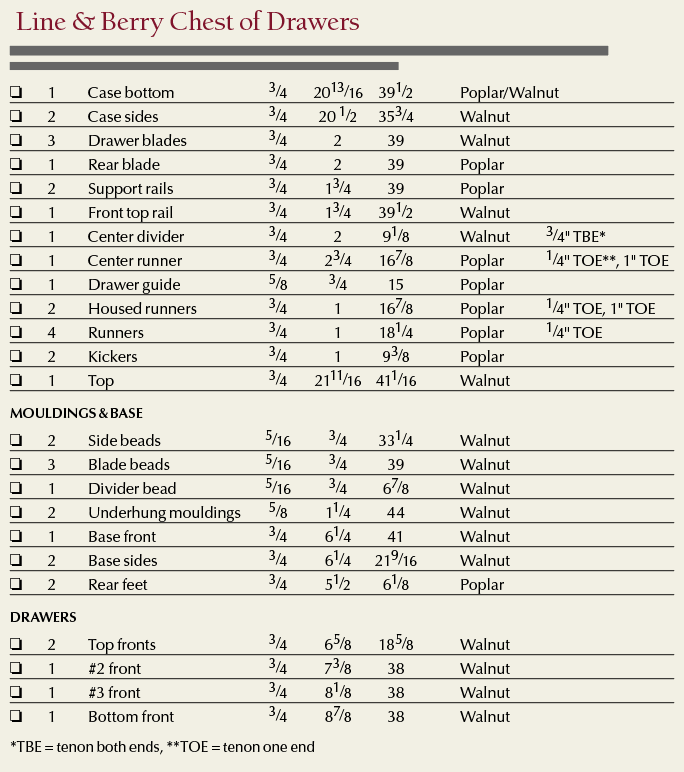
Though not traditional, router patterns make quick work of the inlay.
In southeastern Pennsylvania, just northwest of Philadelphia, is Chester County. It was one of the original three counties formed by William Penn in 1682, under a charter signed by King Charles II. In 1729, a large portion of the western county was split off to become Lancaster County, and in 1789, the southeastern townships closest to Philadelphia were organized as Delaware County. That left Chester County as we find it today.
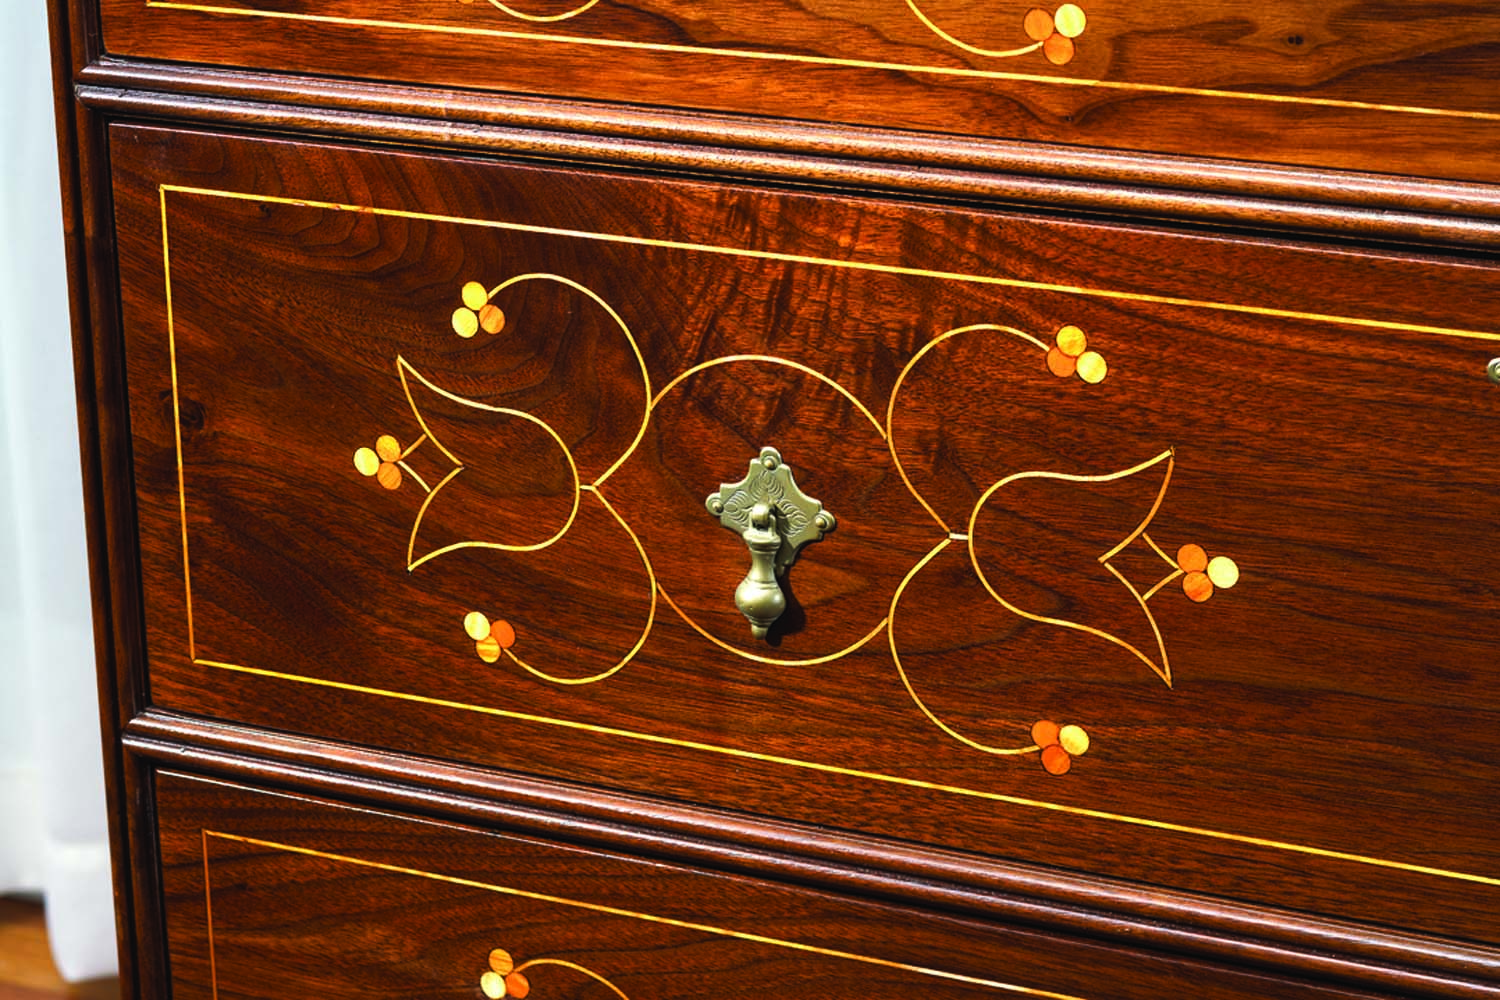
Inlay gets noticed. This arresting, seemingly complex inlay is accomplished using a router and series of patterns.
Throughout the 1700s, Chester County furniture makers produced pieces with unique surface decoration, such as the line and berry inlay shown on this chest. Furniture makers of the period scribed inter-connected half-circles into the surface. The design was scratched using a compass, which is why the process is often referred to as “compass inlay.” Sometimes, at the termination of those circles, small groupings of round berries completed the design. This decoration reached a popularity peak in the 1740s.
Where to Begin?
The striking feature on this chest is the inlay on the drawer fronts – but the chest, on its own, has attributes not often seen in furniture construction.
Begin by prepping the panels for the case sides and bottom. Notice that there is a difference in the widths of these components. The 5⁄16“ offset allows for the added double-bead moulding on the case sides and drawer blades, a common feature during the William & Mary period. That offset is at the front of the chest, so when transferring your dovetail layout, work with the rear edges of the panels aligned.
There is quite a bit of work needed on the case sides. Dovetails join the sides to the case bottom and single sockets hold the support rails, both front and back. From a pins-first point of view, set your marking gauge to 5⁄8“ and scribe the two case sides along the bottom edge. Why 5⁄8“ when the thickness of the bottom is 3⁄4“? It’s to hide the dovetail joints when the base pieces wrap the chest. Lay out and cut the pins in the case sides.
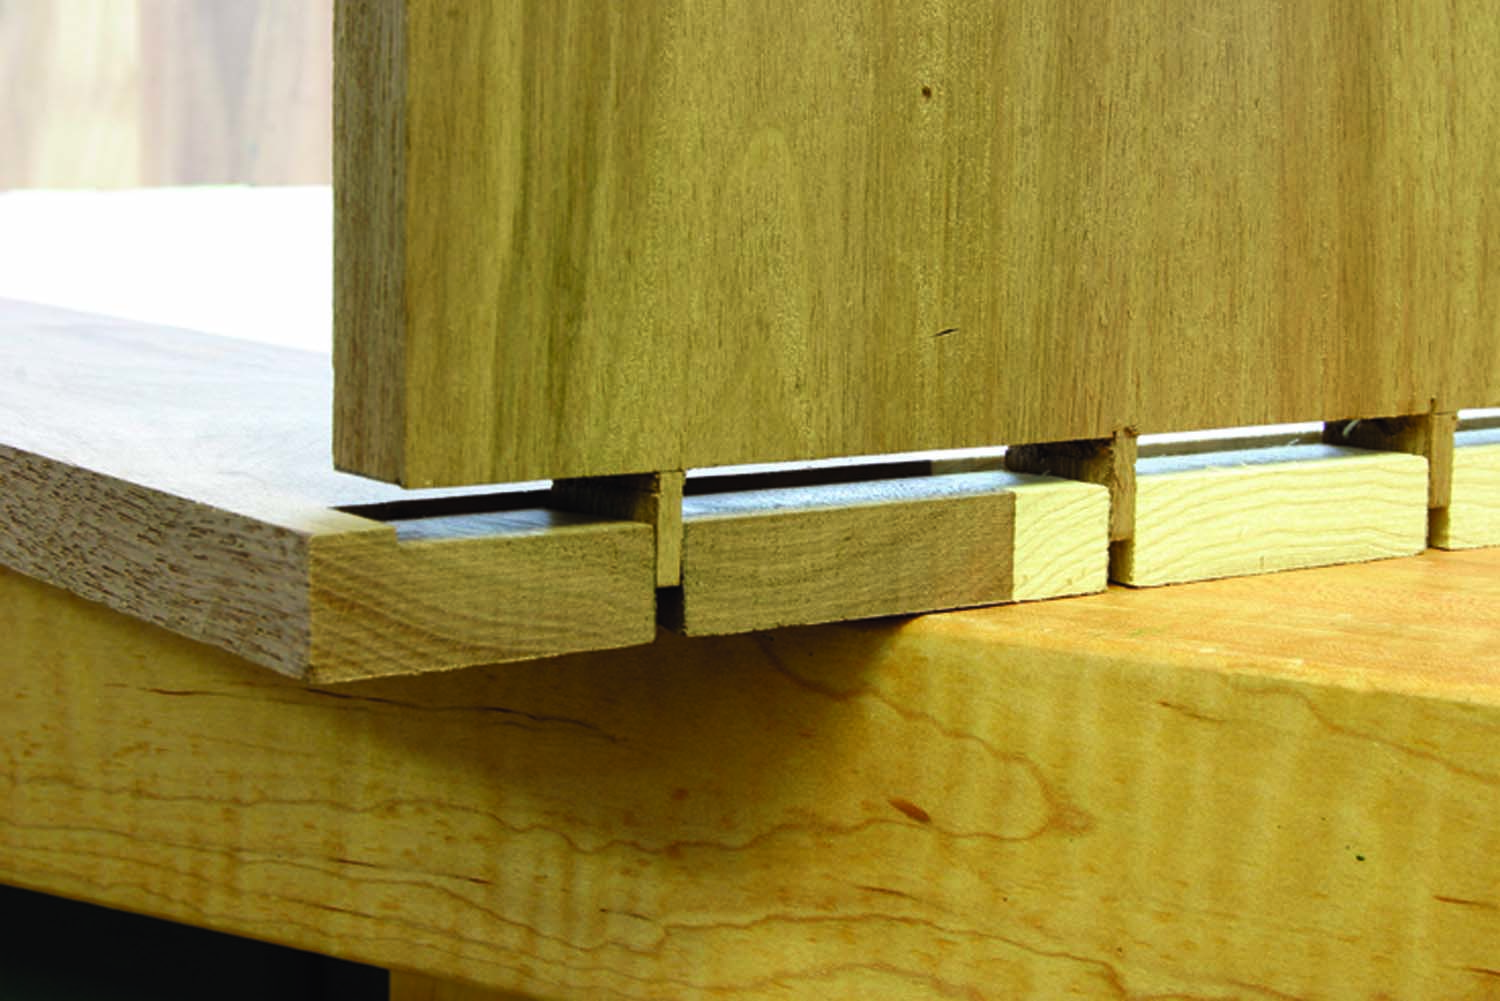
Disappearing joinery. Form the tails in the case bottom after you cut a rabbet 1⁄8″ below the inside surface. This allows the base moulding to cover the dovetail joint.
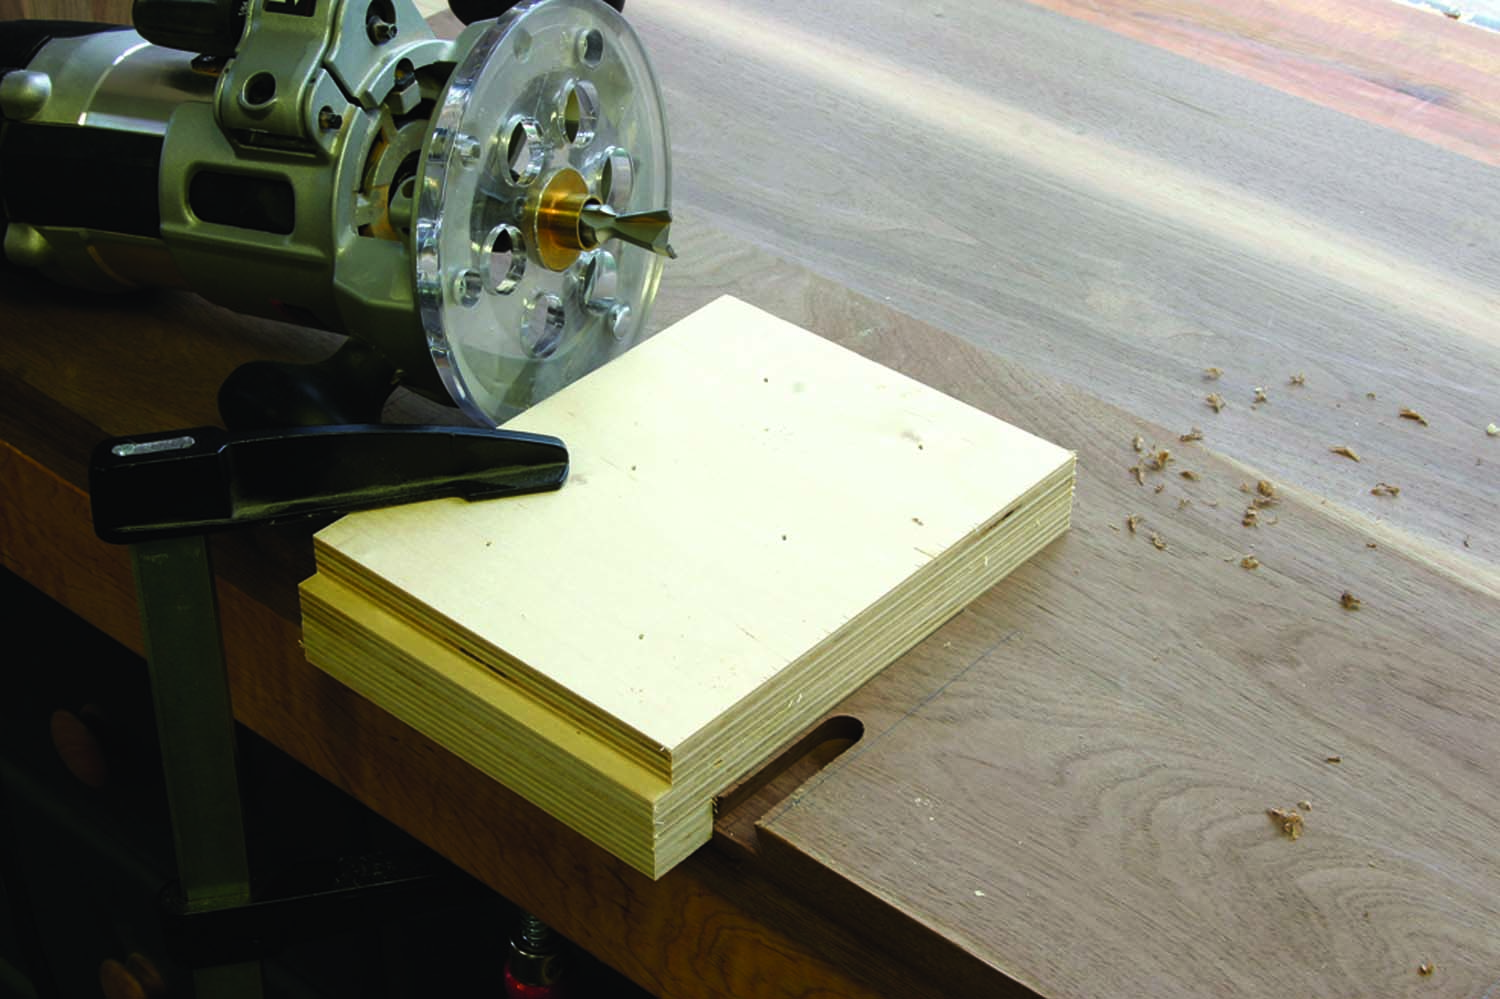
Best router setup. A platform jig, 3⁄4″-dovetail router bit and a 3⁄4″-outside-diameter guide bushing are used to create the sliding dovetails that attach the drawer blades to the case. It’s simple.
With the pins complete, mark the case bottom where the front edge of each side ends. Chuck a straight bit into your router, set the depth of cut for a shallow rabbet that leaves 5⁄8” of material and clamp a fence even with the inside layout line. Now make the cut from that mark to the back edge of the bottom on both sides. The rabbets help register the sides to the bottom and provide a more accurate transfer of the pin layout. Cut the tails at both ends of the bottom and fit the joints. Tweak the fit as necessary.
After the dovetail joints are fit, lay out and cut four sockets at the top of the sides, along the front and rear edges. The tails for the support rails slip into the sockets from the top down. The front support rail fits 7⁄16“ behind the front edge of the sides; the rear support rail is set flush to the backboard rabbet, or 3⁄4“ in from the rear.
Slide-in Blades
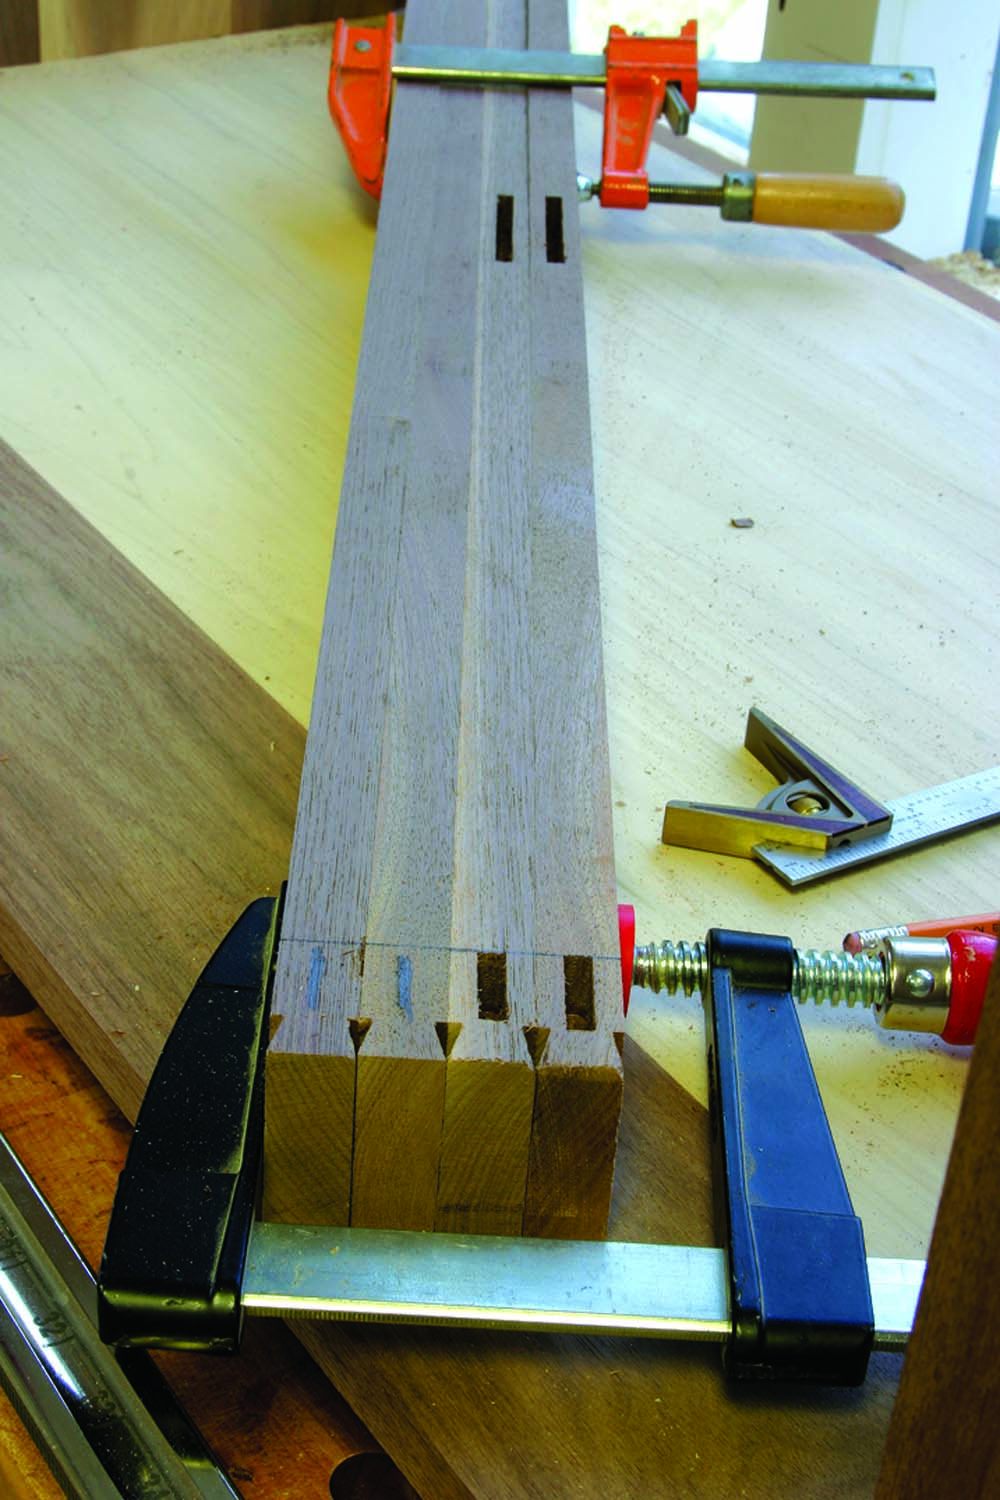
Strong connections. The top and rear blades are mortised for the housed and center runners. The lower drawer blades have a single mortise cut at each end to hold the runners in position.
The drawer blades attach to the case sides with sliding dovetails. Lay out the sockets along the front edge of each case side and on the back edge for the one rear blade, making sure that each location matches its counterpart in the opposite side – you want the blades to be level across the front of your chest. Slide a 3⁄4“ dovetail bit through a 3⁄4“-outside-diameter guide bushing, then chuck these in your router. Position the platform to the left of the socket area as shown in the top right photo, then cut the 1⁄2“-deep x 21⁄4“-long sockets. (Read more about this technique in the November 2008 issue of Popular Woodworking, #172.)
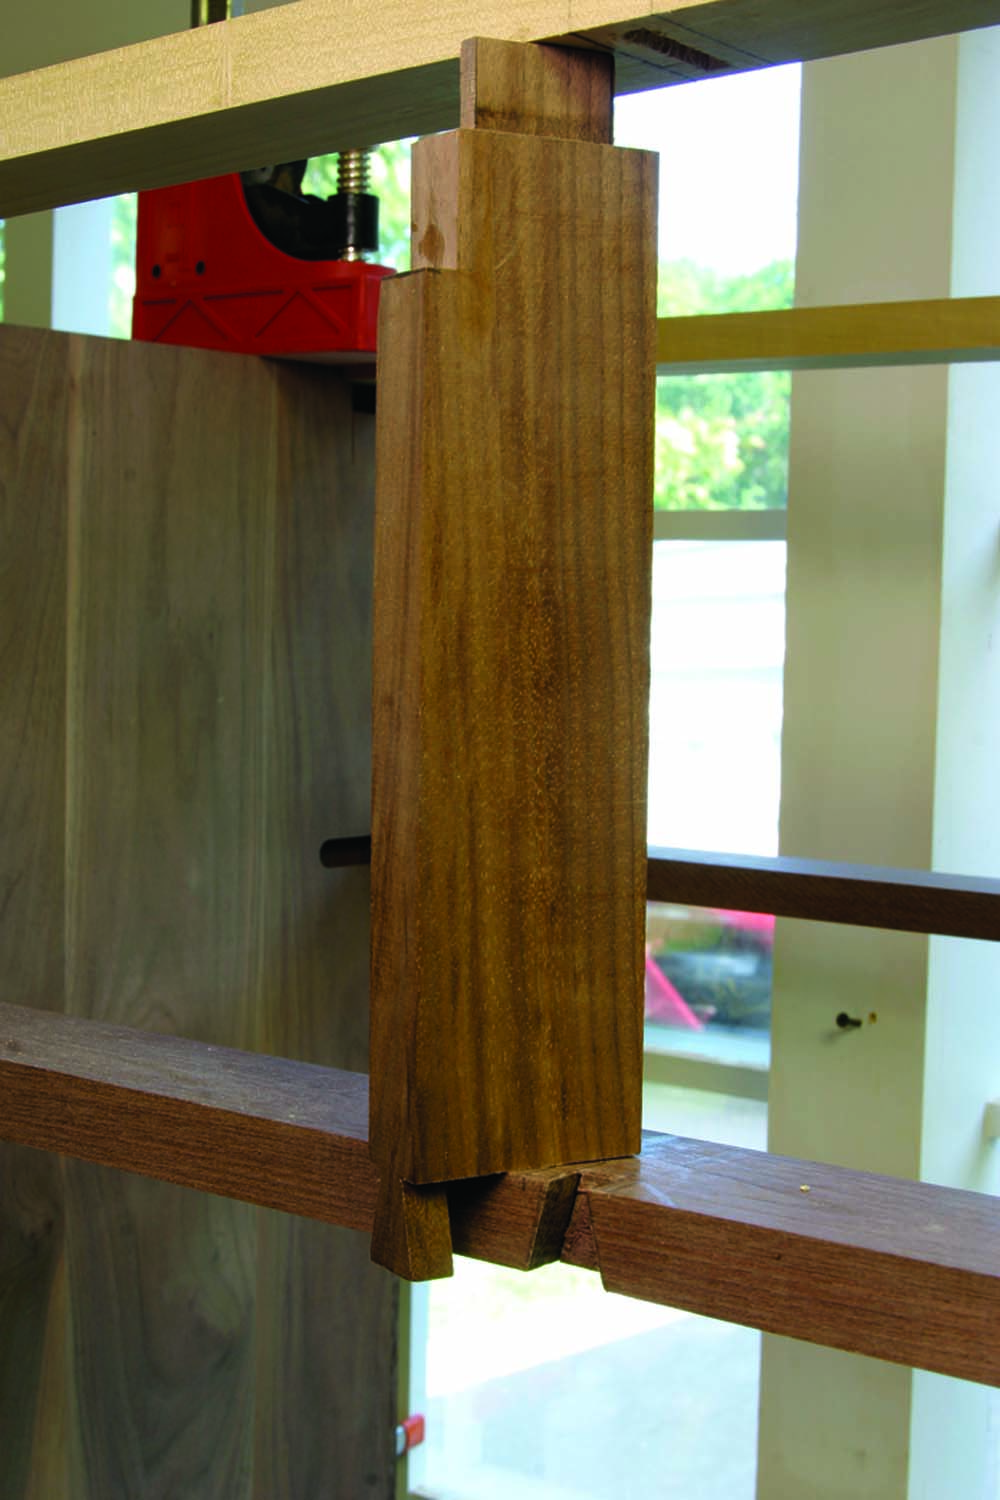
Want to make it easy? All the joinery work on the center divider is hidden – covered by the mouldings or the top. To make quick work of the divider, attach the piece to the blade and support rail with screws.
For the backboards, cut a 7⁄16“-deep by 3⁄4“-wide rabbet along the rear edge of the case sides. Now the work on the sides is complete.
Next, mill your drawer blades, front top rail, support rails, vertical divider and drawer runner stock to thickness and size. To get exact lengths, measure off of your assembled case. The blades’ lengths includes the two dovetails, as do the support rails. The top front rail runs from outside edge to outside edge.
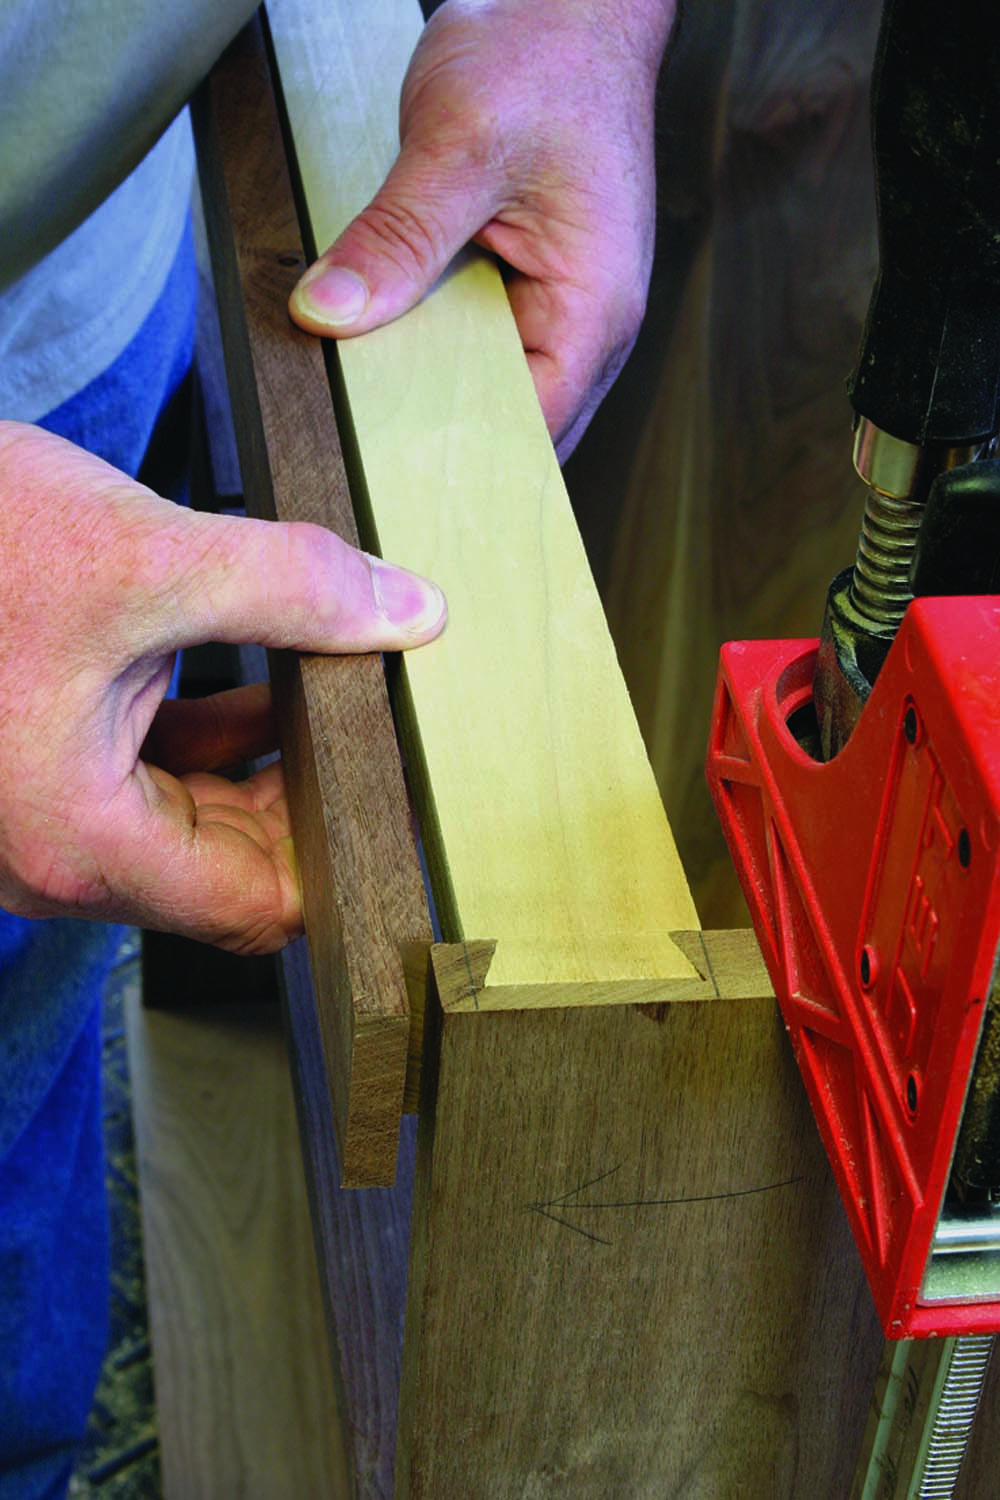
Built out to match. Here you can see exactly how the front top rail fits with the support rail to bring the front edge equal with the case bottom. The notches at the ends of the rail are nibbled away at the table saw.
Dry-fit the sides and bottom, position the support rails to the sockets cut in the sides, then transfer the layout onto the rails. Trim the ends then fit the rails to the case – be sure to mark front or rear. The drawer blades get the tail portion cut into both ends. Do this with the same dovetail router bit used to create the sockets. Install the bit in your router table and adjust the cut height first, then set the fence to cut the sliding tail to fill the socket. (It’s best to test the setup using a scrap of the proper thickness of stock.) To complete the work on the blades, lay out and cut mortises for the runners.
A Runner to Ride On
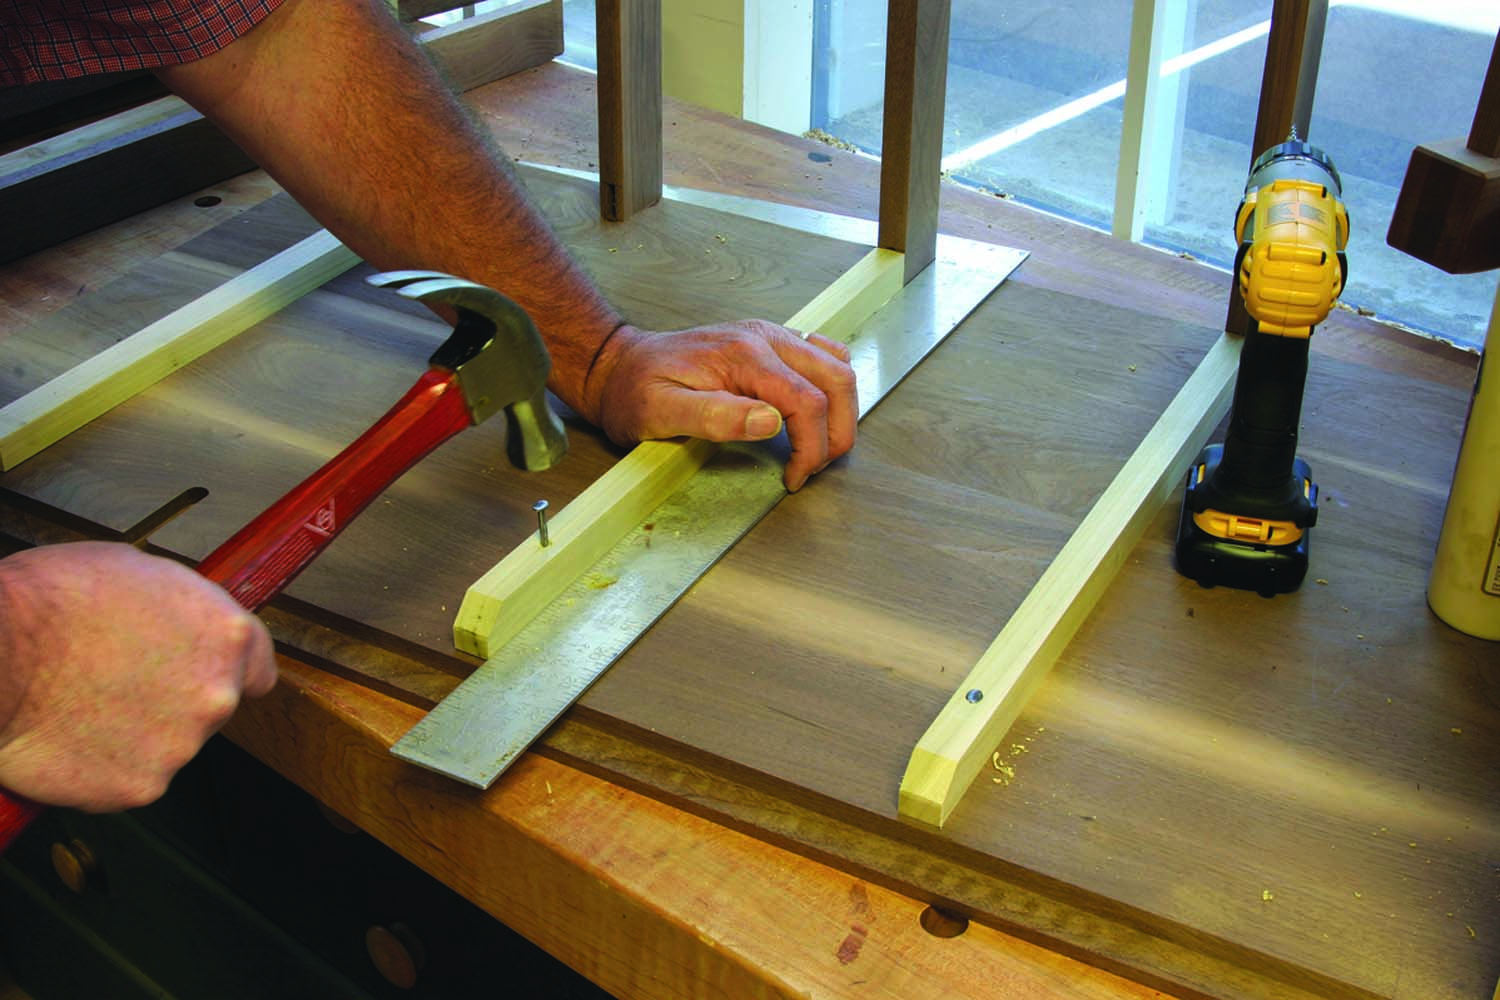
Set for change. The bottom drawer runs on the case bottom and the top bank of drawers rides on housed runners. The middle runners, to allow for seasonal changes, are attached to the case side with cut nails.
The next step is to assemble the case. Apply glue to the bottom, sides and dovetails, and slip the joints together. For the front blades (leave the rear blade floating), apply a dollop of glue at the front of each dovetail slot then add a thin coat on the tail before slipping the blade into position. A light touch with a mallet should set the blade flush with the front edge of the case sides – that’s a correct fit.
In the center of the front support rail, cut a through-mortise that’s 1⁄4“ wide and 11⁄4“ long (oriented front-to-back) for the center divider. Take a look at the photo above. The divider has a unique shape because the top notches around the front top rail as the tenon fits through the support rail. The divider is joined at the bottom with a 1⁄4“-thick dovetail that slips into the top blade. That’s a lot of work. If you want to simplify the process, a couple screws through the rail and blade make this quick.
With the center divider ready to install, add glue to the joinery, including the sockets in the case sides and the dovetails on the support rails, then slide it all together. The front top rail fits tight to and is glued to the support rail and wraps over the case sides, building out the 5⁄16“ to match the case bottom. The notches are cut at the table saw.
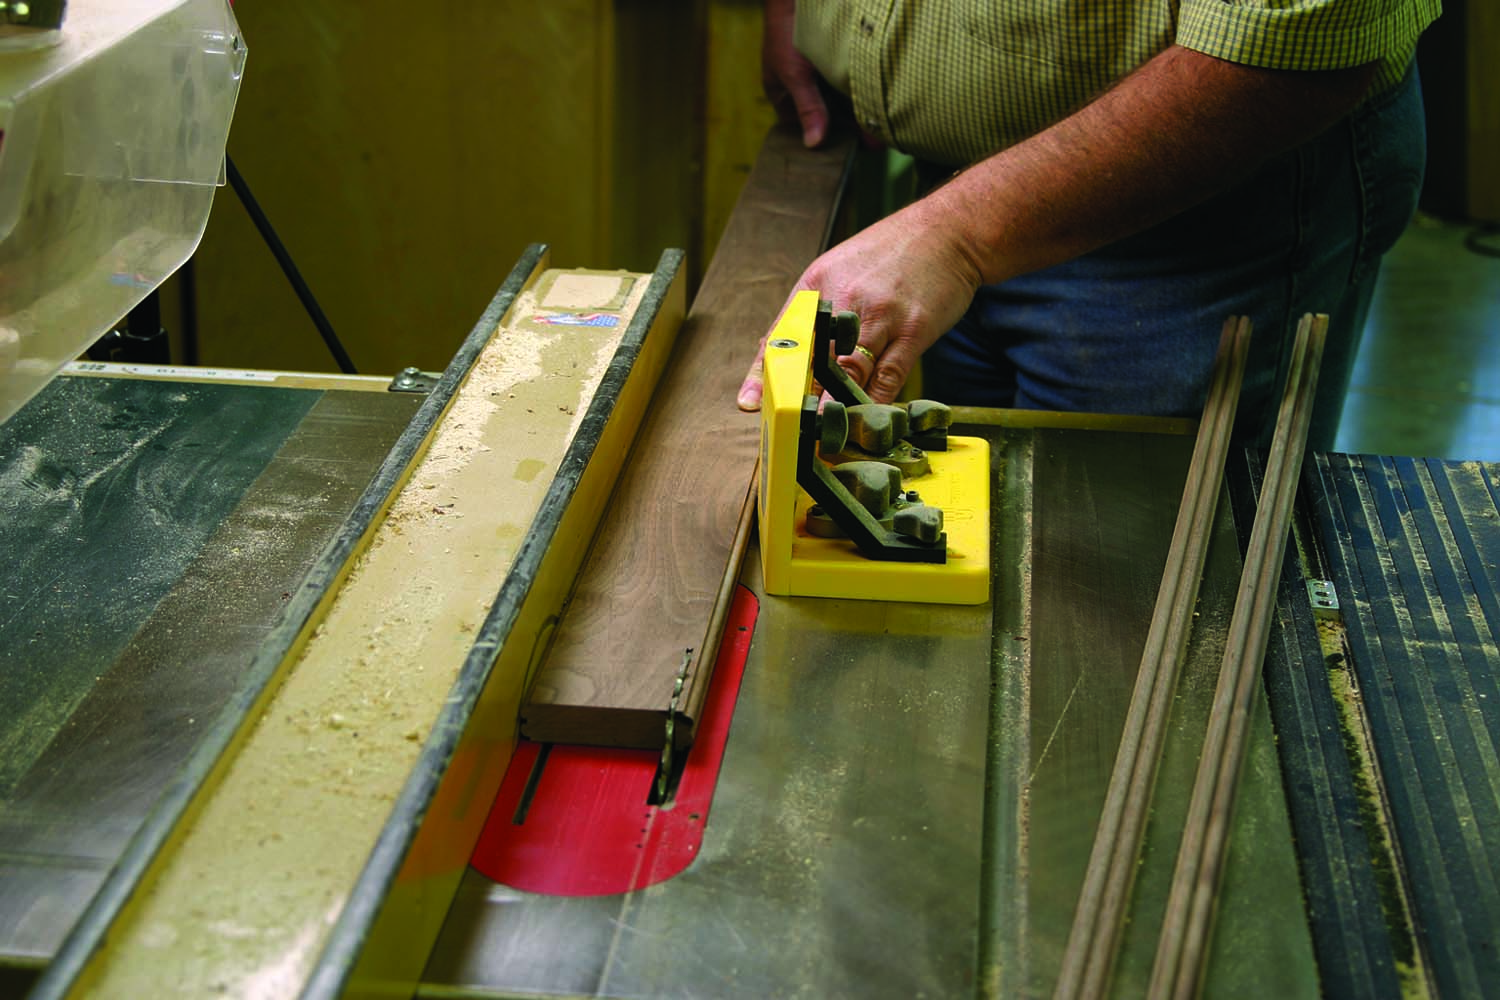
Cut tenons where needed on the ends of the runners. The housed and center tenons each get a 1⁄4“ tenon at the front and a 1“ tenon at the back. Glue the tenons in position (the rear tenon is not glued, which allows for seasonal movement) square the runners, then nail them to the case side.
Keep Your Bevels Sharp
Except for the bottom and front top rail, the front face of the chest is covered with a double-beaded moulding. Use a traditional beading bit to form the twin beads. The setup for the beaded moulding requires accurate adjustment to get the beads evenly spaced without the second pass cutting into the first bead. Once set up, create the profile on a wide board that’s milled to the proper thickness. Slice the moulding from the board then produce another set of mouldings until you have the pieces needed.
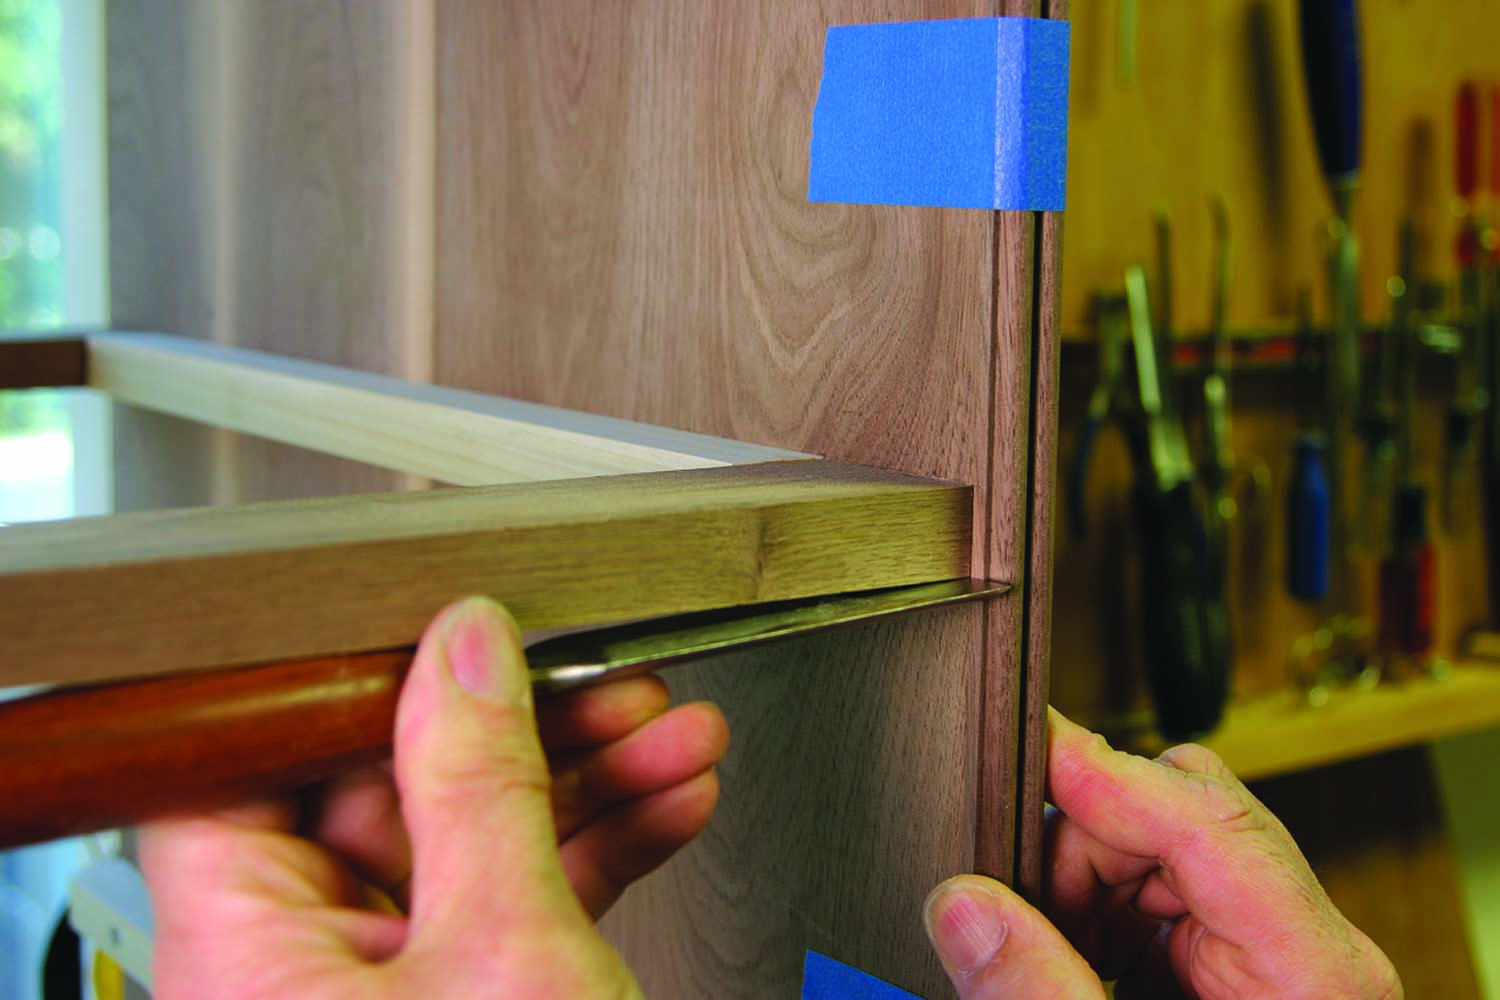
Accuracy is important. A sharp chisel marks the beaded moulding exactly at the place the V-shape is to be cut.
Use blue tape to hold the moulding pieces to the case sides then use a chisel to mark the exact location where the blades meet the sides. From those marks, draw lines along the back of the moulding at a 45° angle to show the waste area that’s removed to accept the end of the blade mouldings.
Saw as much of the waste out as you can without working past the lines then pare exactly to the lines. To keep the edges square and the angle correct so the perpendicular moulding fit is tight, use a simple V-shaped guide block. Pare the V-shape until the chisel rides the guide block.
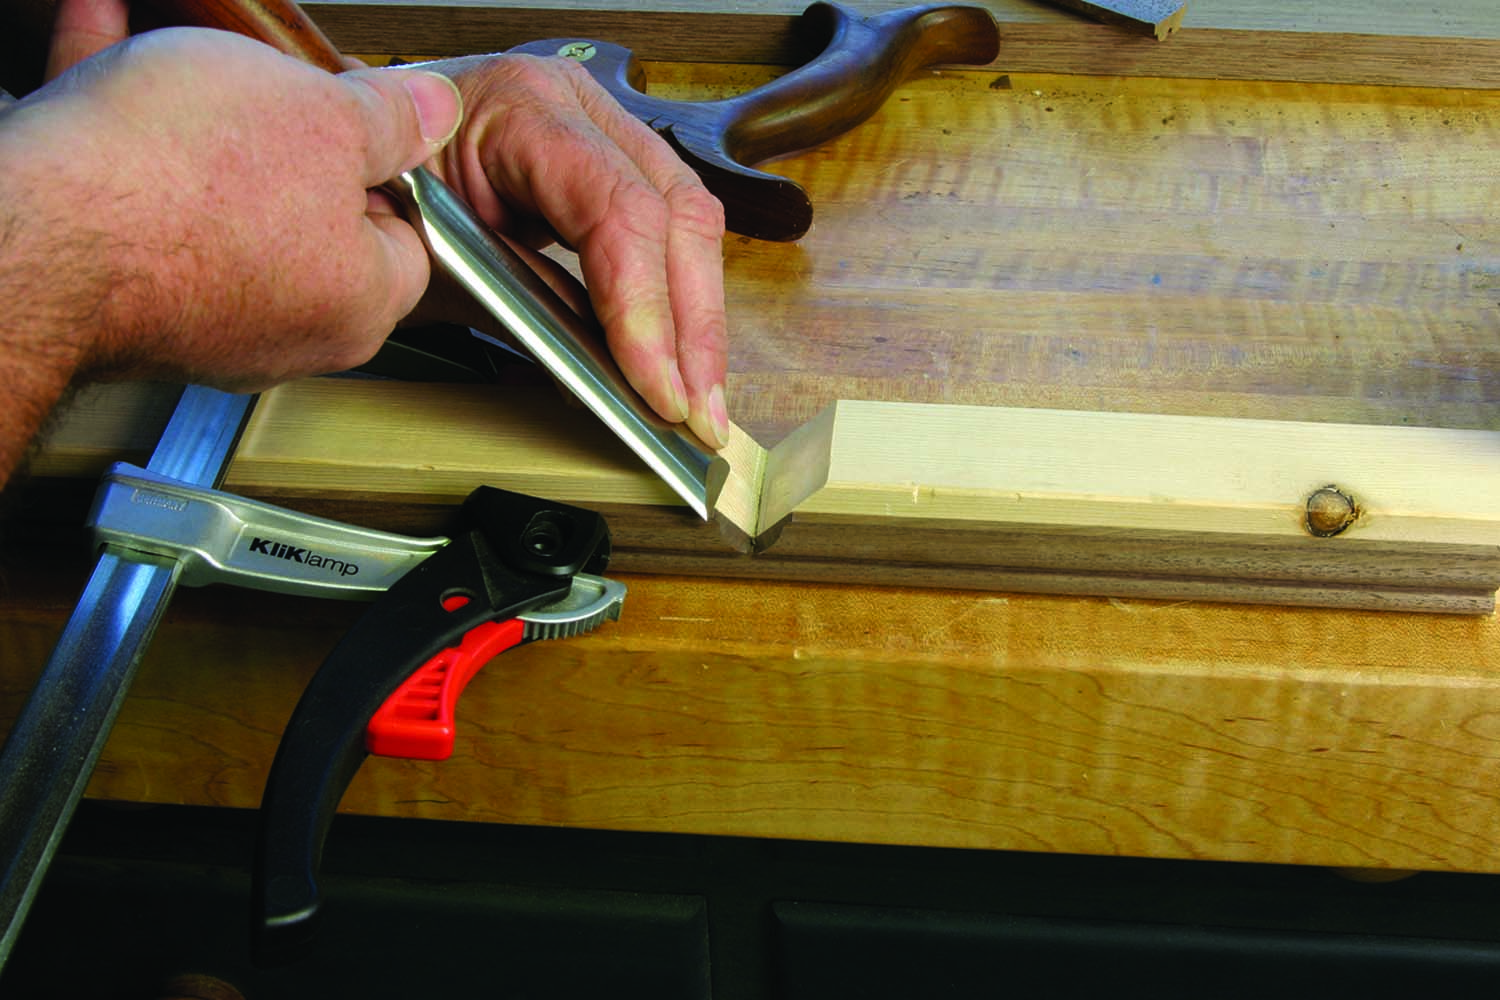
Back up that cut. The V-shaped notches that accepts the drawer blade bead moulding need to be perfectly cut, as do the mouldings. Use a backer with a 45° opening cut made at the table saw to pare them.
The bead mouldings that cover the blades have pointed ends to fit the V-shaped cutouts. Form the ends just as you did on the side mouldings. That’s easy. The trick is to get an accurate cut length. It’s best to cut it long then pare to a good fit. The center-divider moulding is cut square, to fit against the front top rail.
To attach all the mouldings, add a thin bead of glue to the back of each then secure the pieces to the case with blue tape. Add a few inconspicuous 23-gauge pins to help keep pieces from moving.
Simple & Solid Base
The base for this chest is as simple as it gets. Mill the pieces to thickness and size before adding your favorite profile along the top edge. Next, miter the pieces to length using the chest as your guide. The top edge of the base is flush with the top edge of the case bottom. After the pieces are fit, trace the cutout profile at each end of the three pieces and draw a line connecting the profiles.
The base pieces have a thin bead of glue along the top edge and are attached to the case using cut nails. To keep glue squeeze-out to a minimum, cut a shallow groove on the back face of the base approximately 1⁄4“ down from the top. Align the front piece to the chest then add a couple clamps to hold it in place and tight to the chest. Add glue along the front 6″ of the base side, position that piece to the front piece and tack it in place with a 23-gauge pin. Work the second side, too.
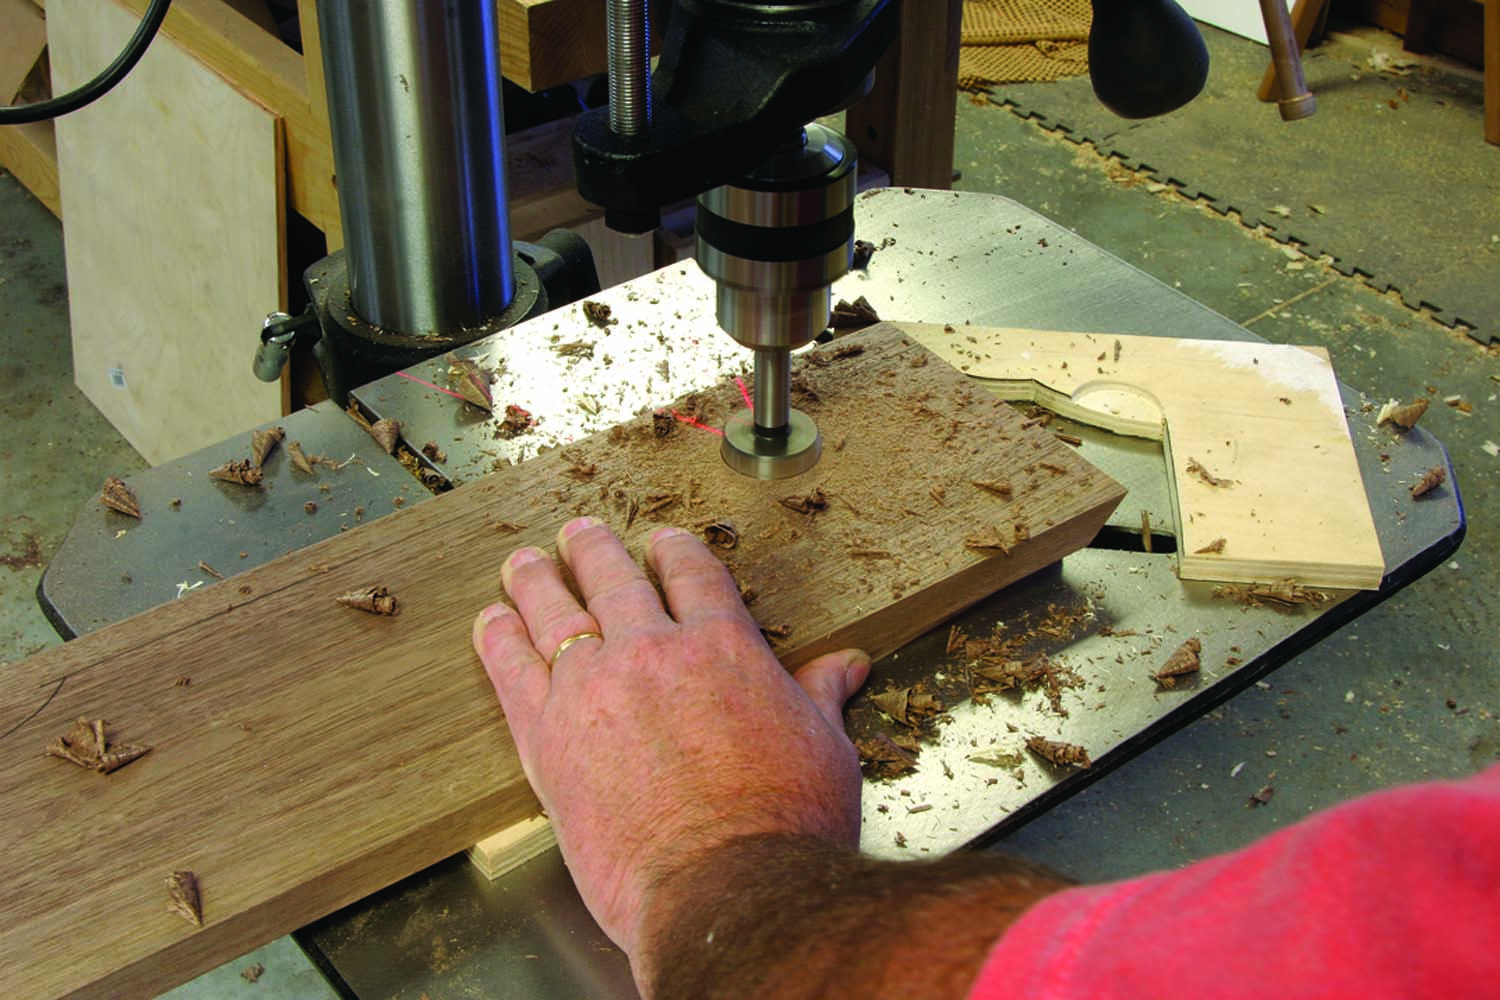
Form the foot. Use a 13⁄4″ Forstner bit to clean out the rounded portion of each design that forms the spur. Then at your band saw, cut away the remaining waste.
Next, remove the front piece, add glue along the top edge and on the miters, then clamp it back in place. Pin the mitered corners to keep them aligned until the glue sets. For an authentic look, drill pilot holes and install cut nails in the base, with the nails set just below the surface.
To complete the base, slip the rear feet in position and reinforce the corners with glue blocks. The chest actually stands on the blocks, which extend slightly beyond the base. Glue blocks should also be installed along the base/bottom intersections behind the feet.
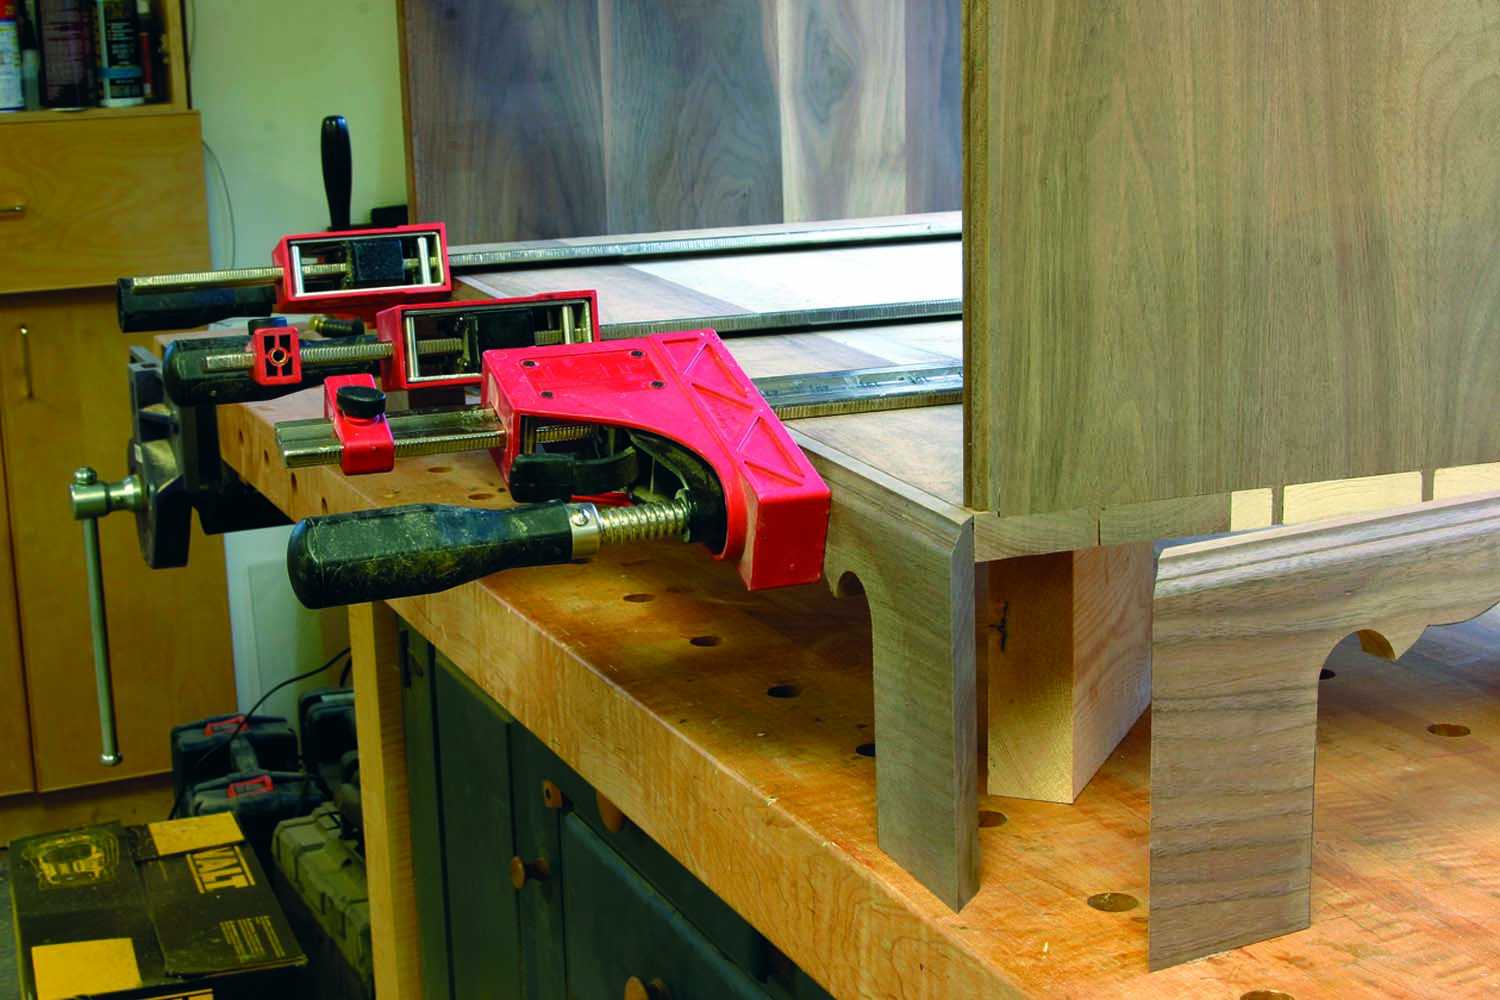
Work on your bench. Use scrap 8/4 to raise the chest off your bench and make fitting the base that much easier. One piece at each corner does the job.
The top is attached to the chest with #8 x 11⁄4“ wood screws through the support rails (screws in the rear rail should be in oversized holes) and two wooden clips per end that are evenly spaced between the rails. I cut the 1⁄4“ slots for the clips with a plate joiner; screws hold the clips in place.
The underhung moulding is made at a router table with the lower portion of a specialty moulding router bit (Rockler # 91881). With a wide board stood on its edge, create two profiles then rip the mouldings at your table saw. The moulding is attached to the chest just as the base is – glue and square-head nails.
Patterns Make Repeating Easy
With the chest assembled, mill and size the drawer fronts to fit the openings – these are flush-fit drawers so keep the reveals at a minimum (1⁄16“ or less). Depending on your preference, at this time either build the drawers or work on the inlay for the drawer fronts.
The drawers are built using 18th-century construction techniques – half-blind dovetails at the front and through-dovetails at the rear. The drawer backs are sized so the drawer bottoms slide under the backs. The bottoms are beveled to fit into 1⁄4“ grooves in the drawer sides and front – the tops of those grooves are cut 3⁄4“ above the edge. Cut a slot in the drawer bottoms even with the inside edge of the drawer back. Nails driven through the slot and into the drawer back secure the bottoms and allow for seasonal movement.
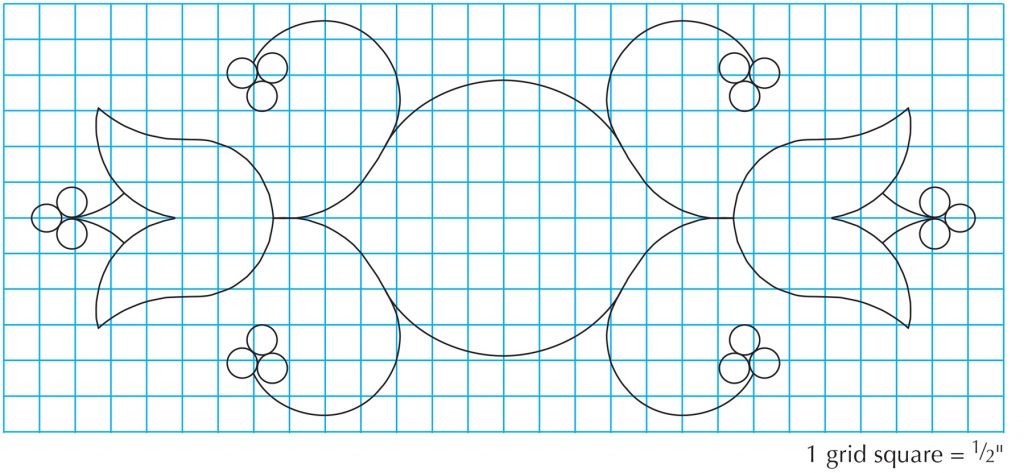
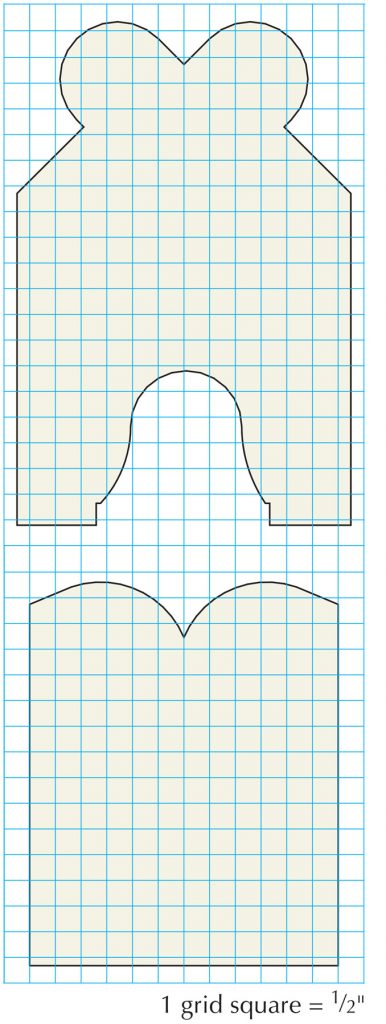
Patterns for the string grooves can be created from a design you already have in mind – or use the plans included here on page 39. To make your own patterns, create a design in a full-size drawing (Google SketchUp is great for this step). Next, select a guide bushing size (for this piece, I used a 3⁄8“-outside-diameter bushing) and offset the lines to compensate for the bushing. Transfer your new lines to 1⁄4“ plywood then cut out the patterns. Plywood thicker than 1⁄4“ causes problems with the bit length when cutting the grooves.
For this project, three patterns were developed. The included patterns are sized for the top drawers. Because the drawers are graduated, make a second set of patterns (20 percent larger) for the lower three drawers.
Each of the inlay designs is created around a center point. That point is established using one of the top drawers. Find the exact center of the drawer front then measure from the edge of the drawer front to that center point. Each drawer inlay design, whether on the right or left of the drawer, is set to that measurement – all the designs line up vertically on the chest.
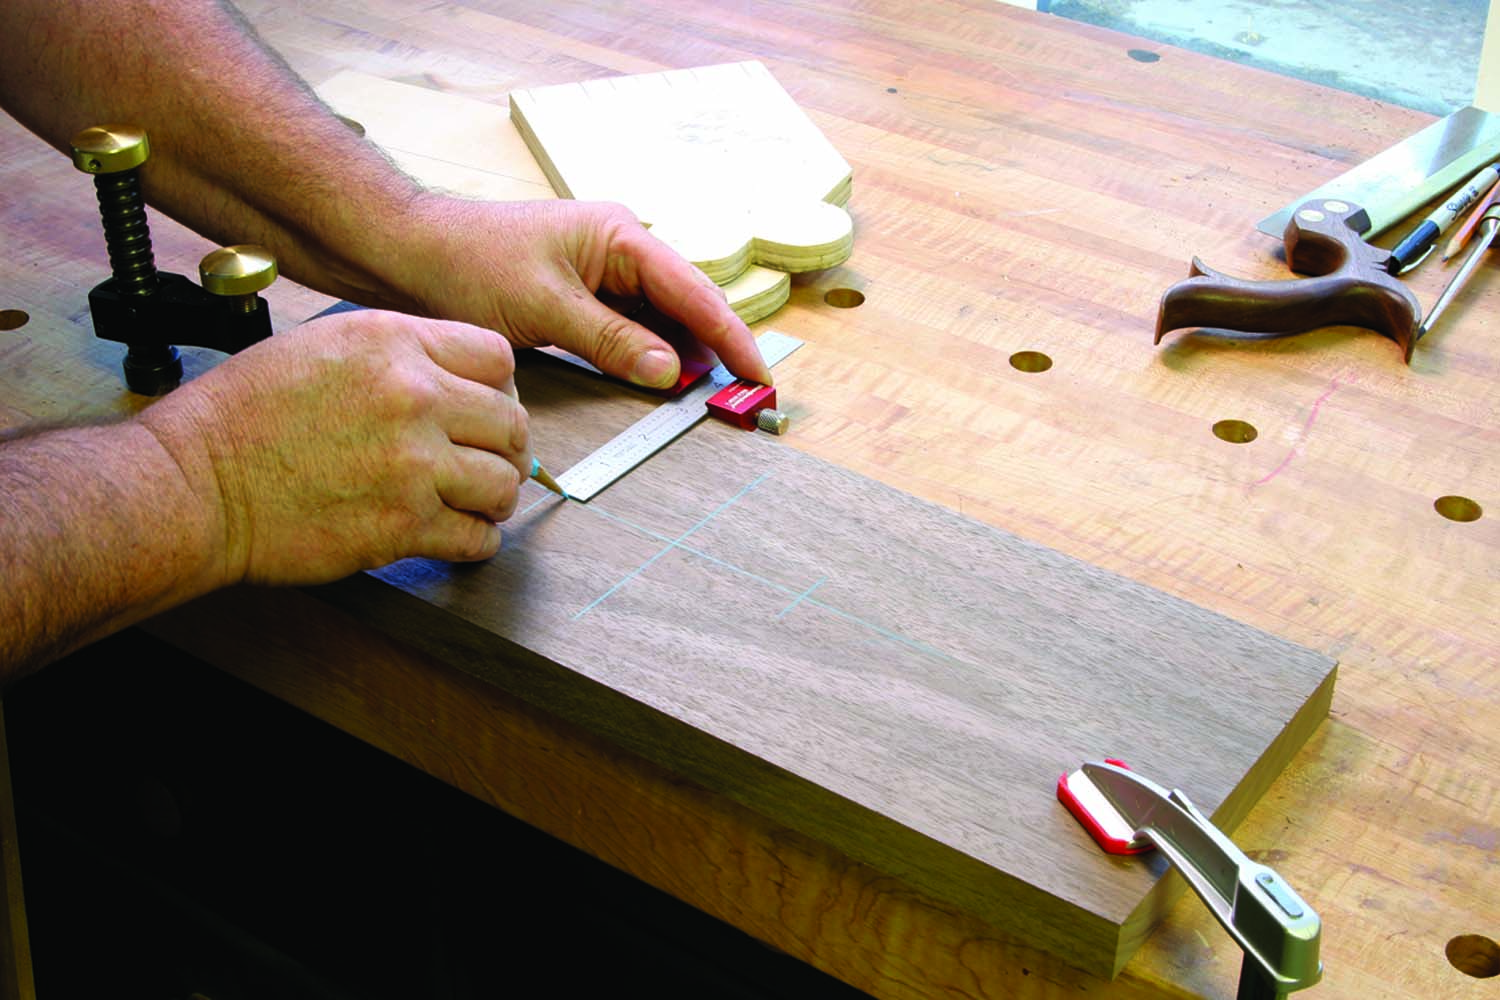
Proper layout. The design of the drawer fronts is dependent on getting your layout right. Space the lines off each drawer’s center to keep the designs aligned.
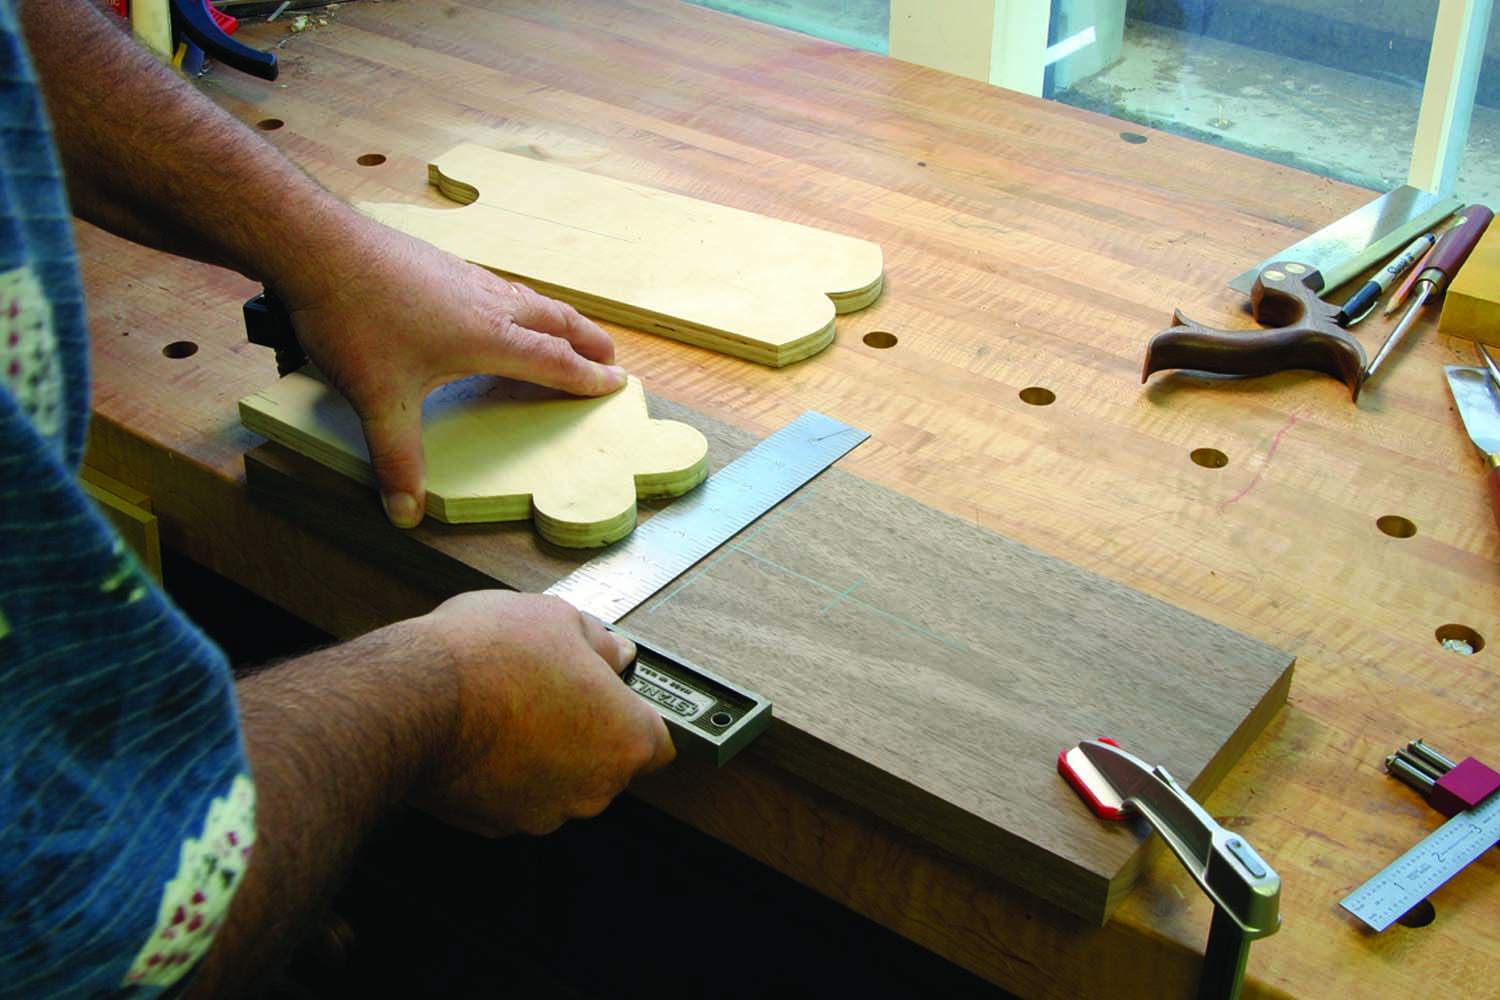
Keep it straight. The jigs used in this project are all held square to the drawer front. Proper placement is essential to the task.
For the top drawer, draw vertical lines that are equally spaced 25⁄16“ off the center point (the line spacing for the larger drawers is 211⁄16“). Also draw a line horizontally as shown in the photo below.
Begin with the twin-bump-shaped pattern. Set the pattern square to the drawer front with the valley of the bumps set at the intersection of the horizontal centerline and one of the 25⁄16“ lines. Point the bumps toward the drawer center.
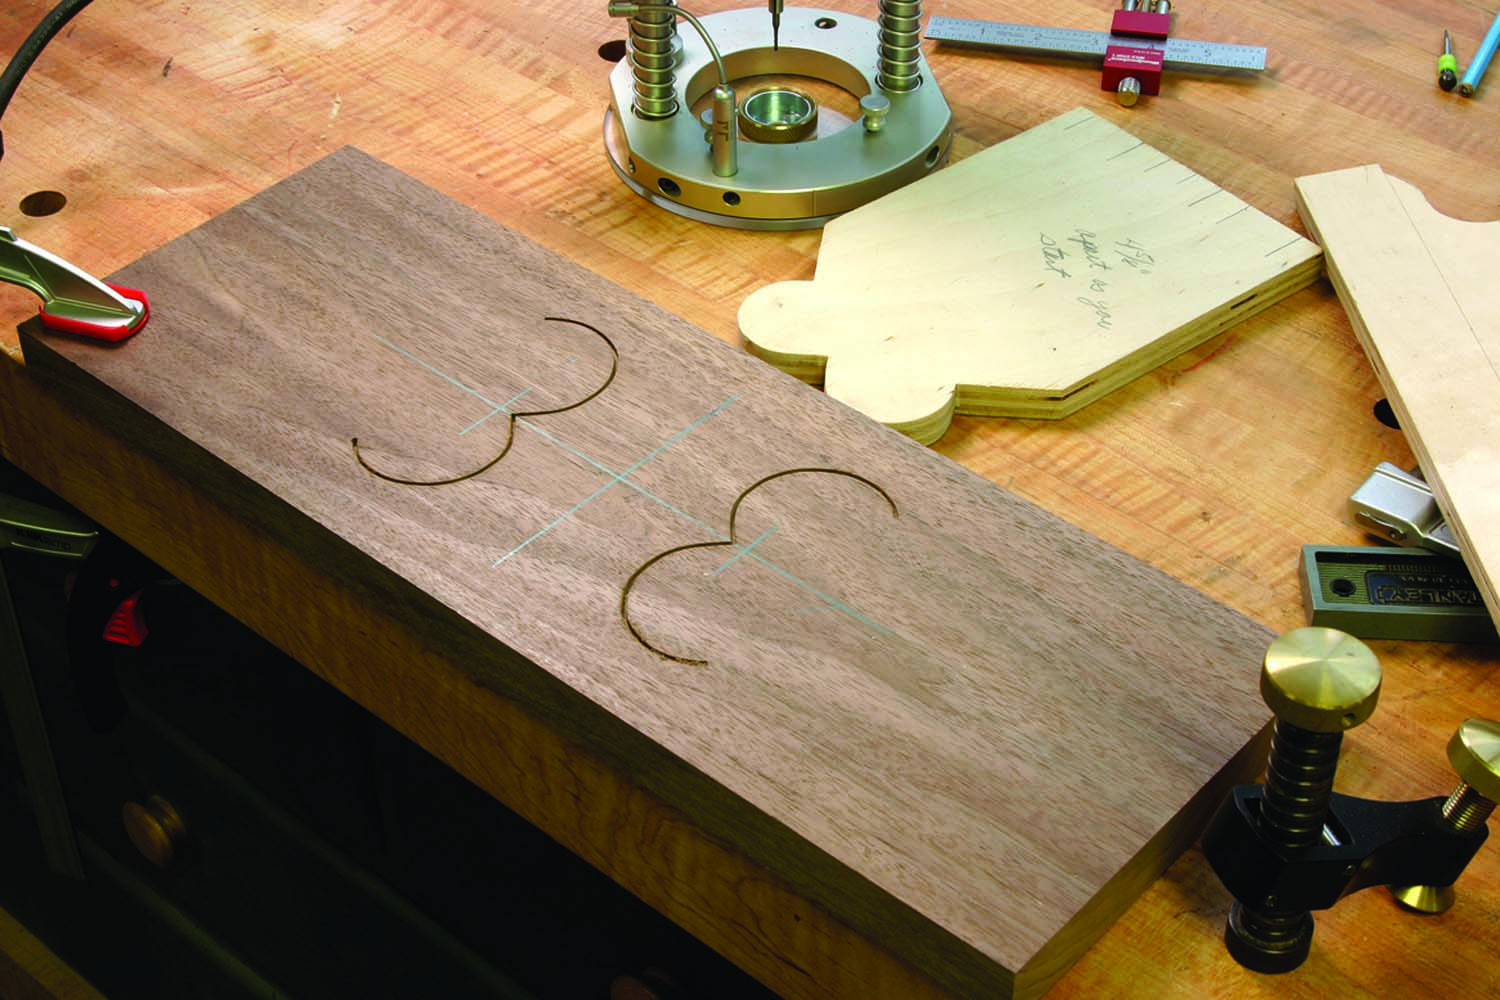
That’s step one. These are the first set of lines in the design. The depth should be a strong 1⁄16″ for a secure fit that’s easily trimmed after installation.
With the guide bushing and a 1⁄16” straight bit chucked in the router, and the bit set to cut a strong 1⁄16” into the fronts, locate the bushing at the top end of the pattern, plunge the bit into the drawer front then rout the design. Stop when the bushing hits against the pattern’s flat step, completing the pattern. Repeat the steps with the pattern set to the opposite lines, again facing the center.
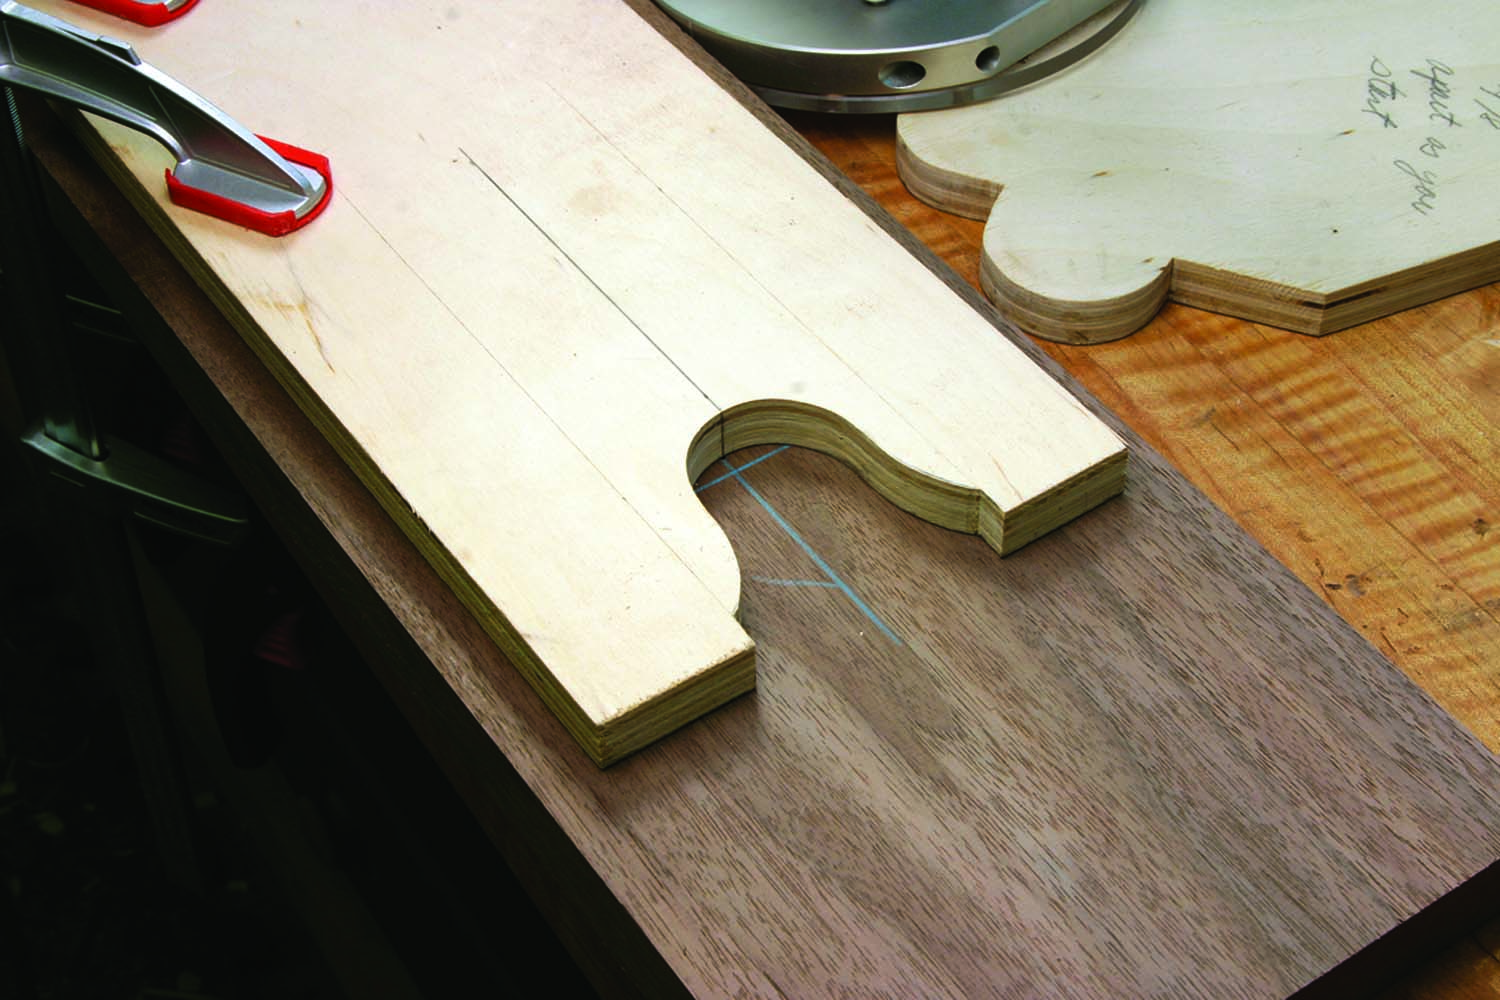
Accurate placement. After the jig is properly placed, the two flat steps at the top of the tulip are where the router guide bushing begins and ends. The bushing snaps into the corner.
The second pattern is the tulip design. Place this pattern squared to the drawer front with its top-to-bottom center aligned with the drawer front’s centerline. The pattern is also aligned with the outer edge of the twin-bump routed line as shown in the bottom right photo on the opposite page. Begin with the bushing located at one of the corners. Plunge into the wood then rout through the tulip shape until the bushing nestles into the opposing corner.
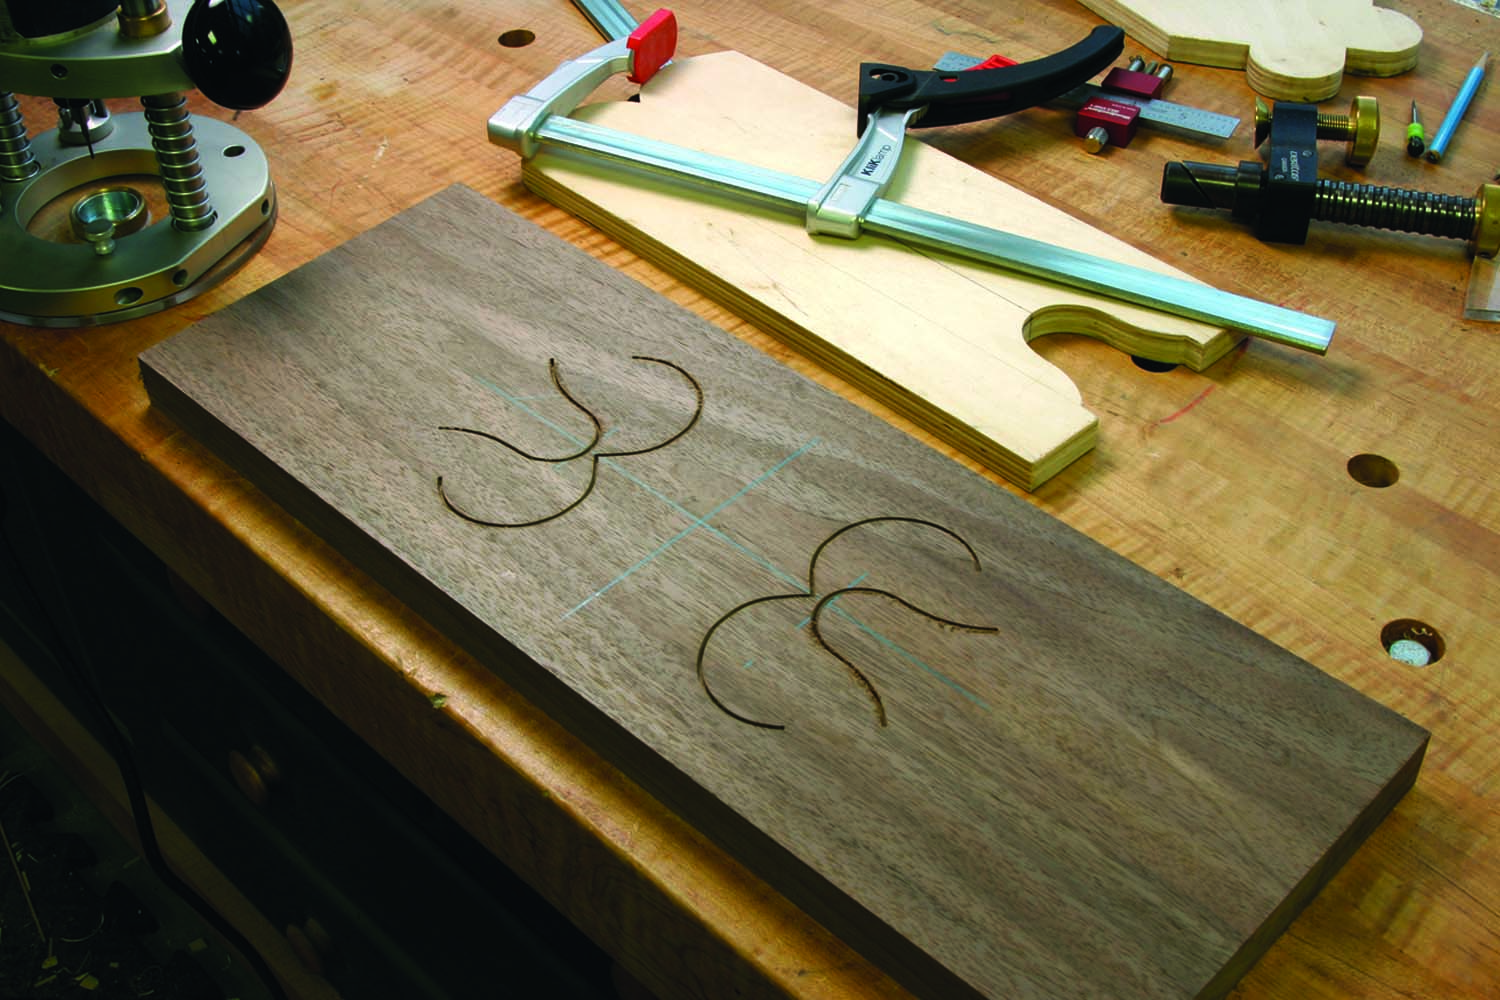
Step two. The completed tulip design faces away from the drawer center and is spaced just outside the bump design.
The next two steps of string routing are the most difficult. To locate the wave pattern, you need to lay out a couple lines as shown in the top right photo below. The first line is squared off the drawer front and aligned with the ends of the tulip design. The next line toward the center is half the width of the guide bushing being used. It’s used to set the wave pattern square to the drawer front and just at that inside line.
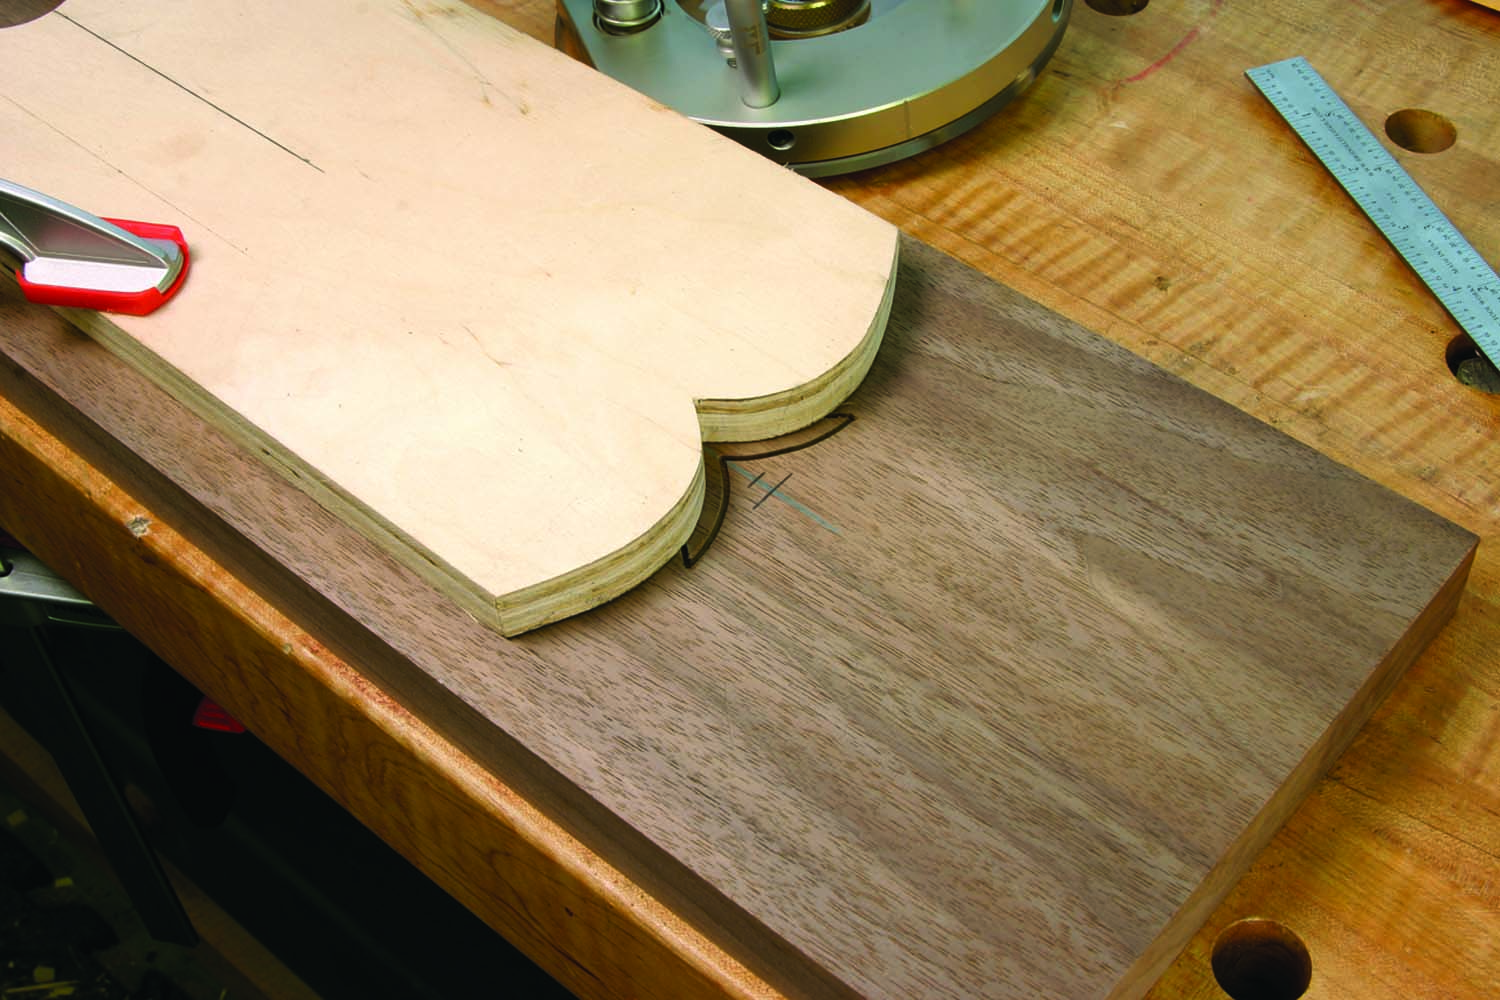
Plunge to begin. The tulip top string groove is the first of two grooves that require that you see the bit as you work – or develop a feel for when to stop at the line.
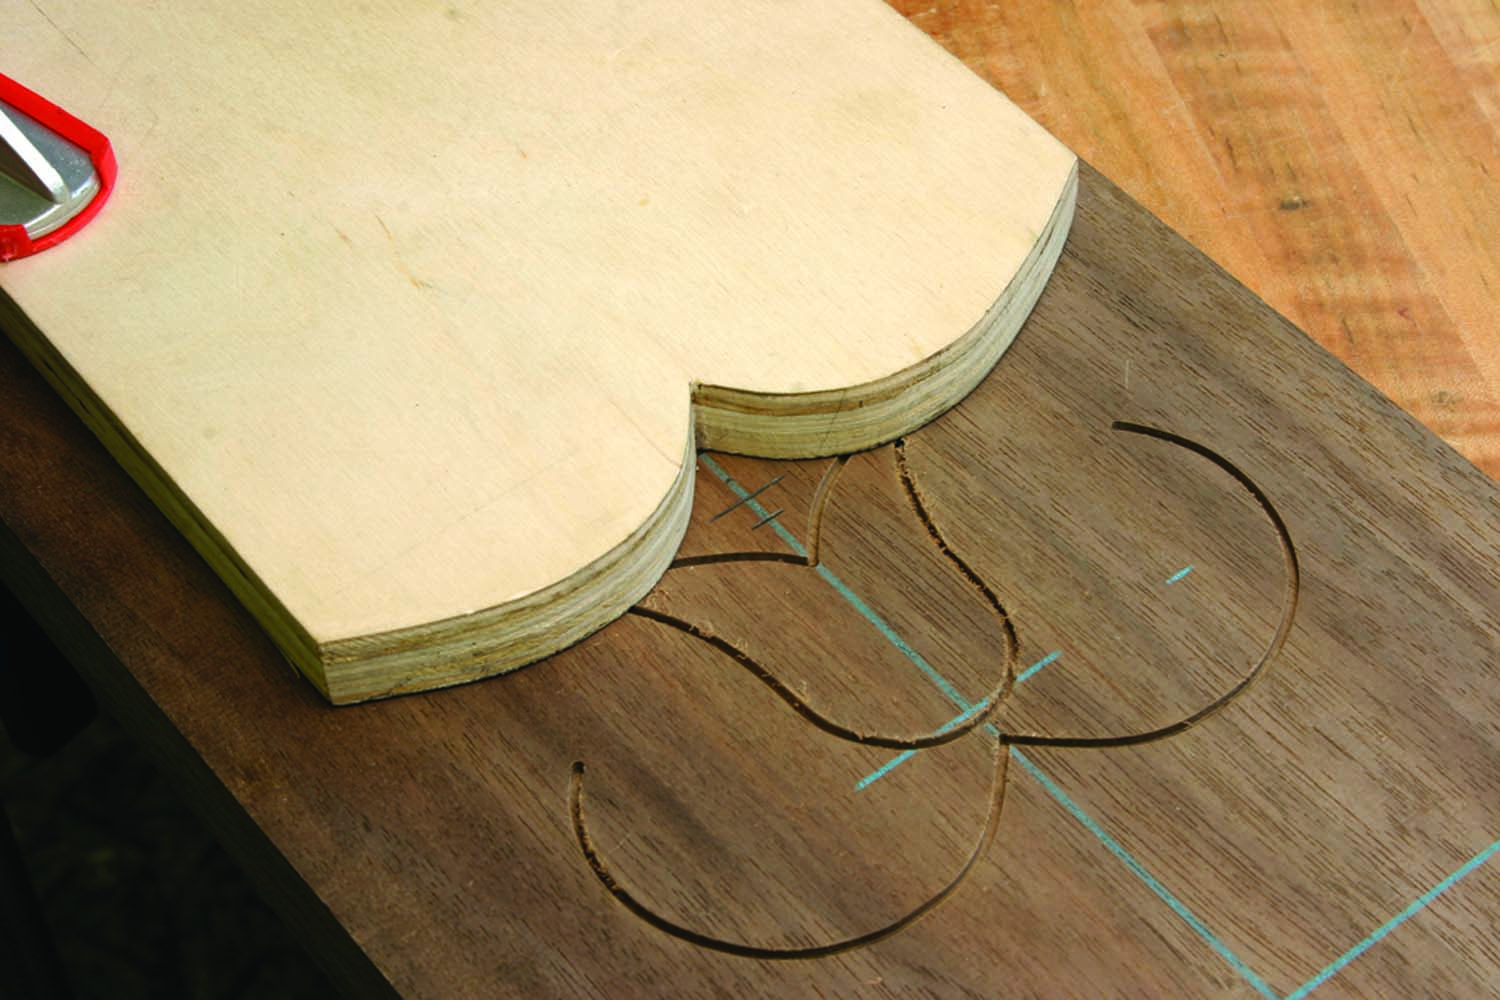
A simple reversal. Flip the wave pattern then set the distance between the pattern and the previous groove at 1″ for the two top drawers and 11⁄4″ for the lower drawers.
This time, fully plunge the router off the pattern then place the router bit to drop into the tulip line, right at the end. Hold the bit out of the wood and the bushing against your pattern as you start the router then allow the bit to settle into the tulip line. Rout to the center of the pattern then back out toward the second end of the tulip design. When you get to that second line, stop your movement and release the plunge on your router. As you repeat this process for each inlay design, you’ll develop a feel and ear for it – you’ll hear a different sound as you break into the second line. But on the first couple passes, watch the router bit as you move.
The last bit of pattern work is to reverse the wave pattern and cut in the pointed end. To locate the pattern, measure along the drawer centerline out from the valley of the wave line and place a mark at 1″ for the top drawers and 11⁄4“ for the other drawers. Again, the valley of the wave sits at the intersection. Routing the line is a repeat performance, but on a smaller scale.
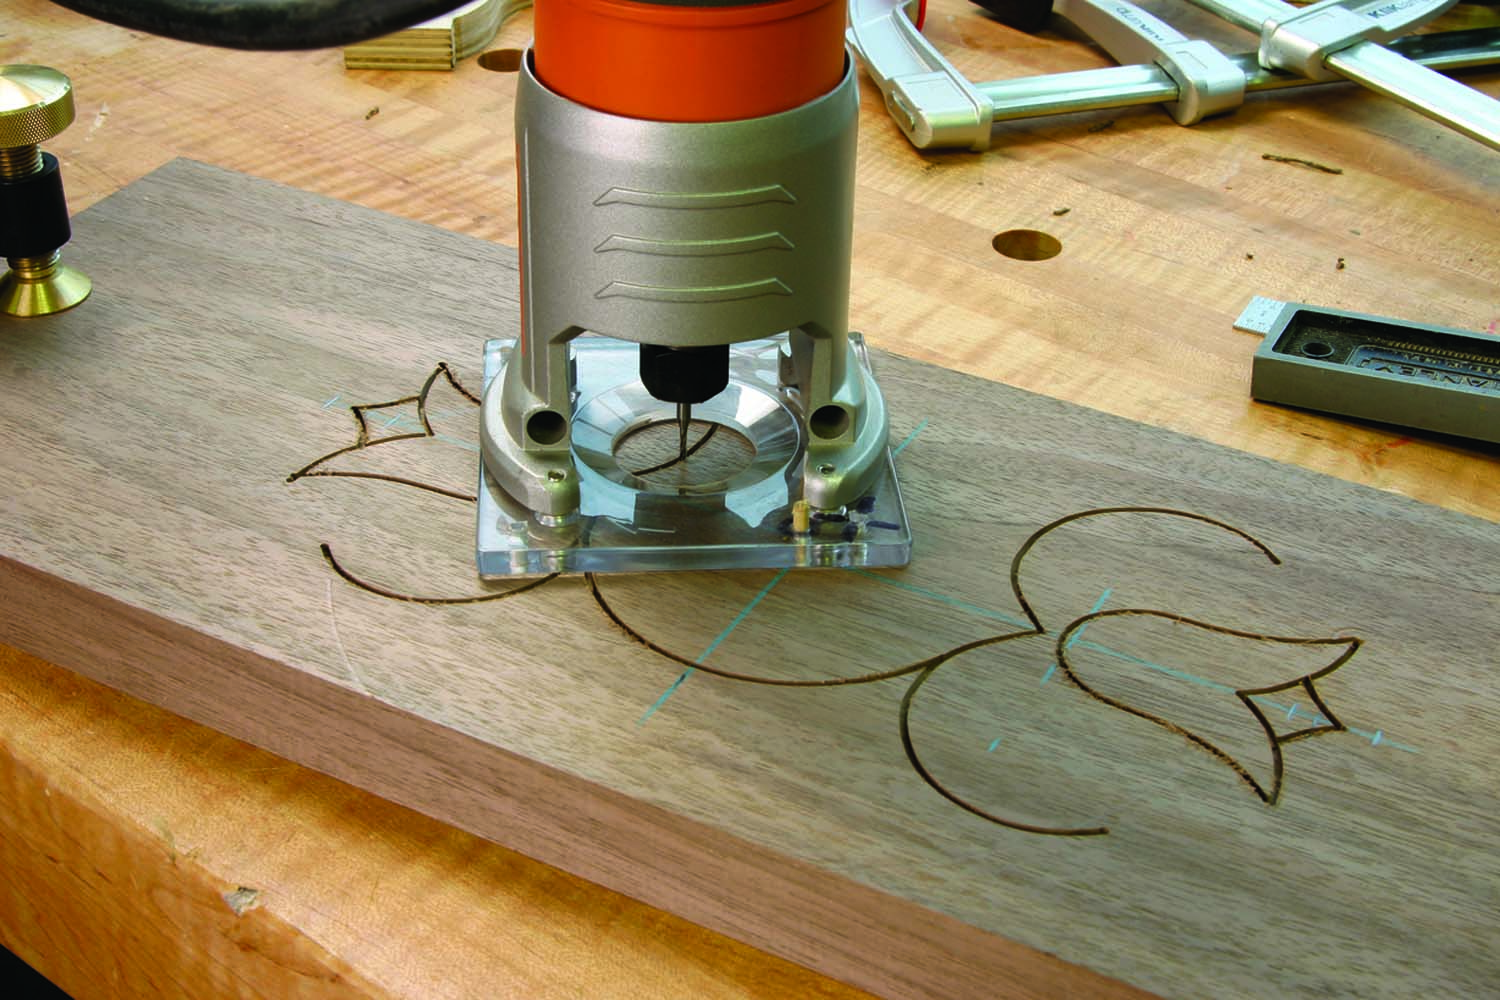
It’s all in the base plate. The arcs around the center of the design are cut using the router base plate as a circle-cutting jig. Place a dowel into the drawer front’s centered hole, slip the router plate over the pin then cut the groove from bump to bump.
The center grooves are cut with a circle-cutting setup. Drill an 1⁄8“ hole at the center of the inlay design. Due to the diameter of the circle being so tight, I simply drilled a 1⁄8“ hole in the router’s base plate, set to cut from pattern to pattern. For the top drawers, the radius is 111⁄16” and on the other drawers the radius is 115⁄16“. Rest the bit in one of the routed grooves, start the router and rotate it to cut the arced groove. Stop the cut as you reach the opposite string groove. Repeat the steps for the second arc.
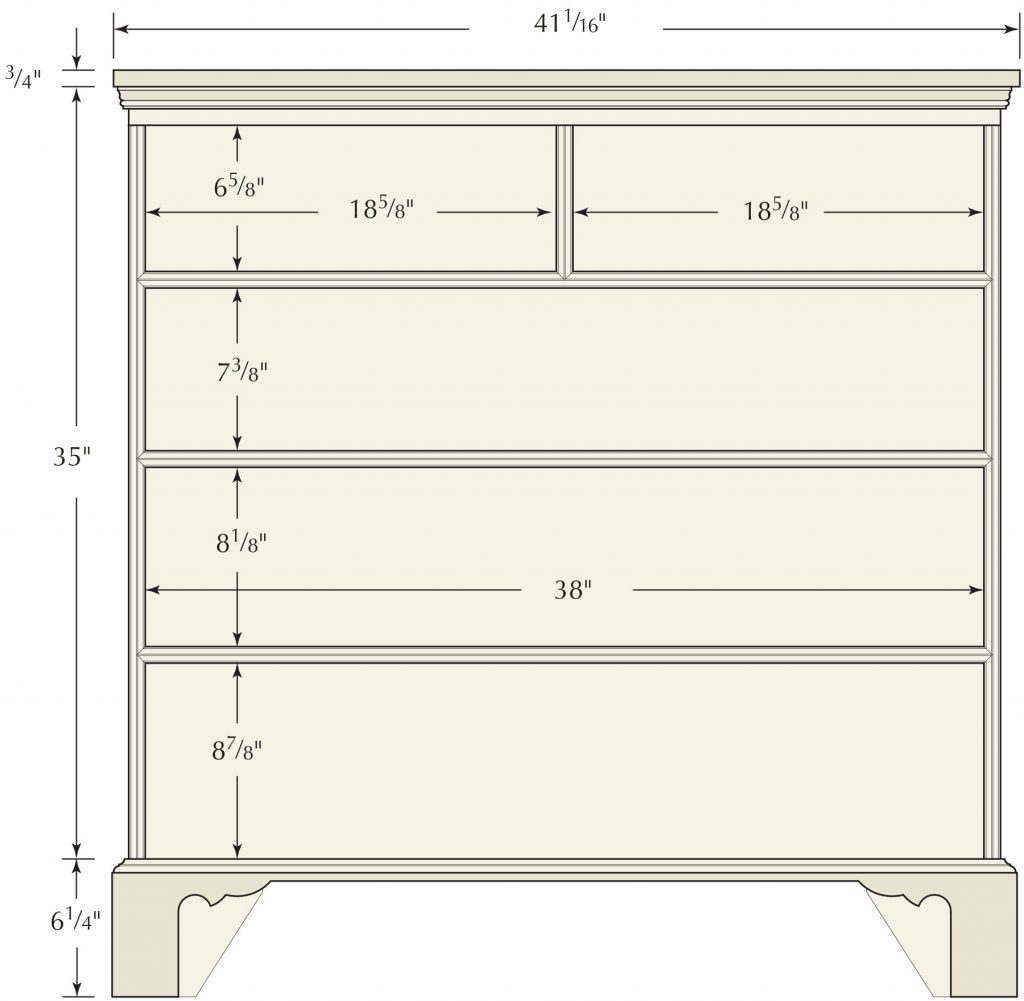
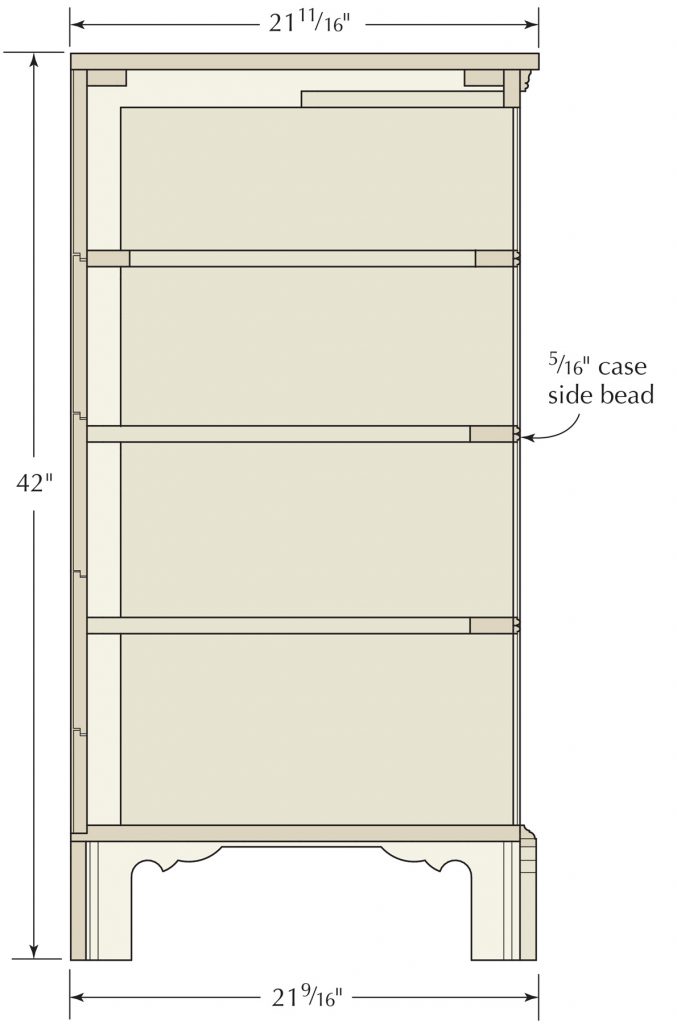
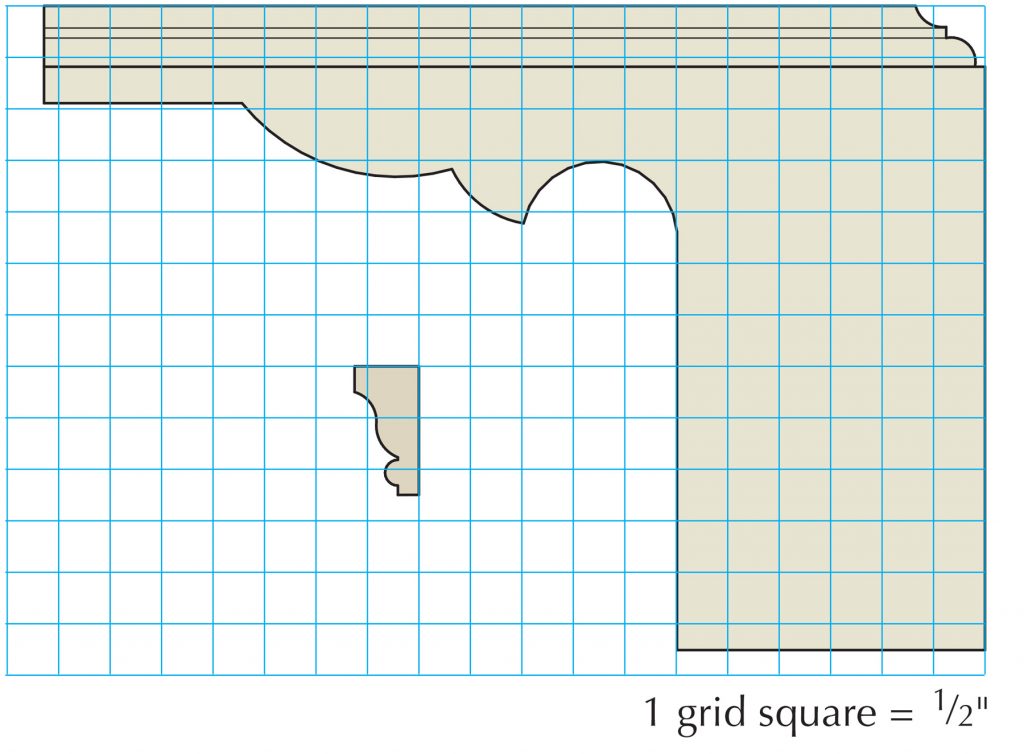
Finally, String & Berries
There are straight grooves for inlay, too. The small section between the bumps and the tulip can be routed or you can use a regular screwdriver to punch the surface just deep enough for stringing. The other straight grooves are around the entire perimeter of each drawer. This line is routed using a fence attached to your router. Space the grooves 7⁄8“ from the outside edge of the drawers.
Traditionally, string used in Chester County furniture was made of holly for its white appearance, but I have oodles of scrap maple lying around my shop. That’s what I chose for my string. (You can also purchase string material.)
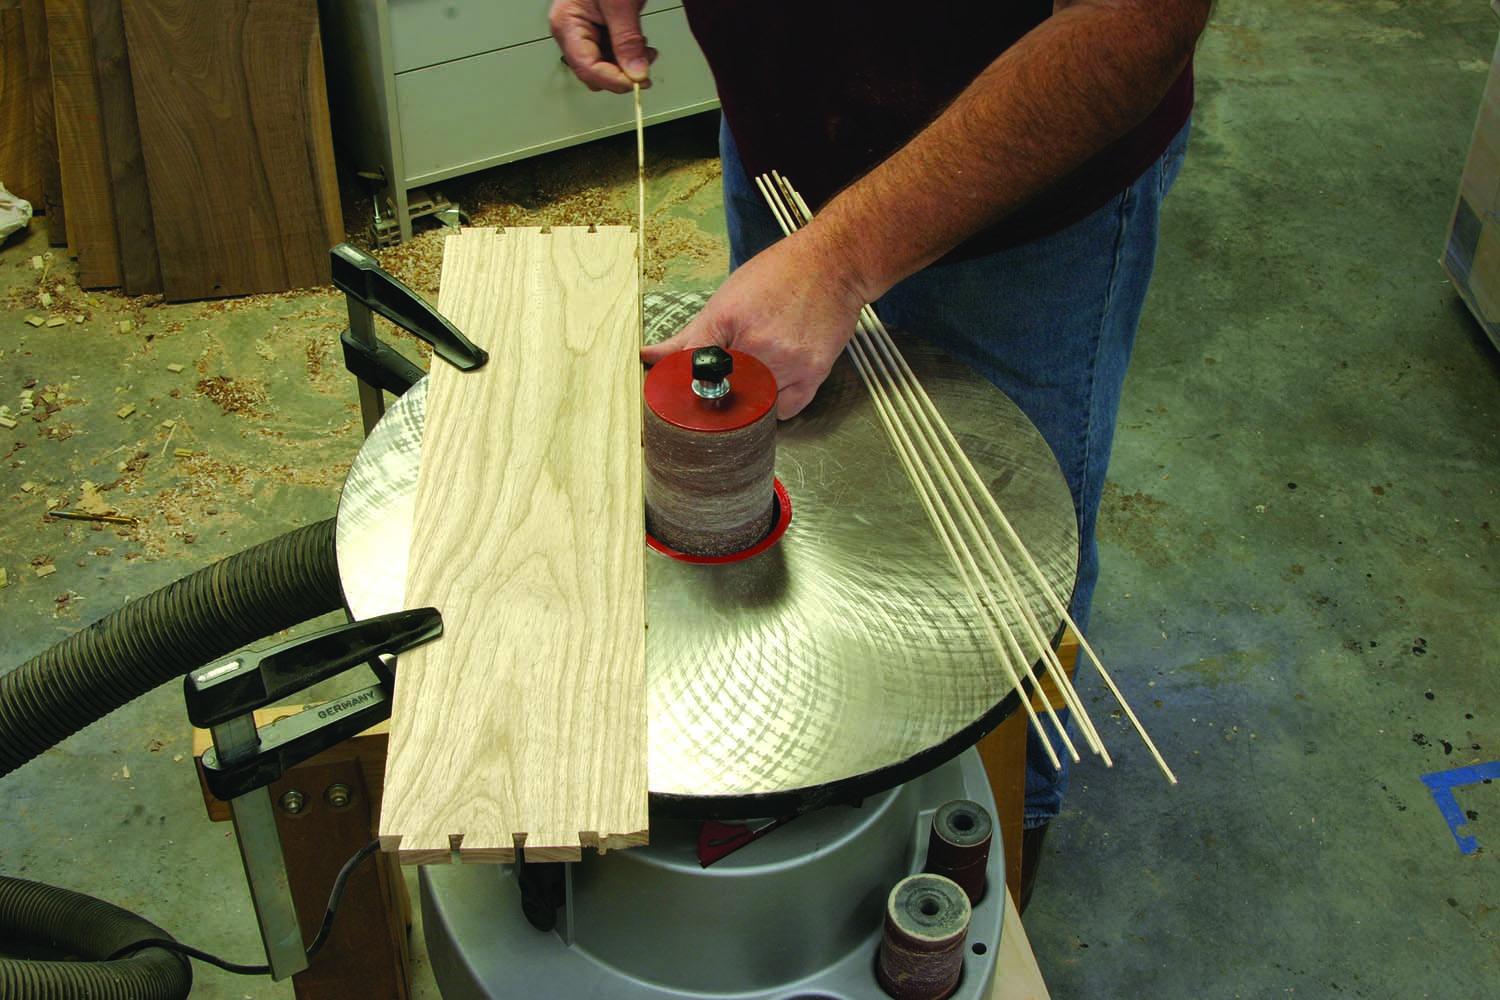
Sized right. Clamp a fence at your spindle sander to perfectly size the stringing thickness. Run a sample. If the fit is too tight, adjust the fence and try the setup again.
String inlay needs to be sized to fit your grooves. Mill a piece of scrap that’s about 3“ wide into pieces that are a strong 1⁄16“ thick then rip thin strips from the wider stock – a cutting gauge is ideal for this work.
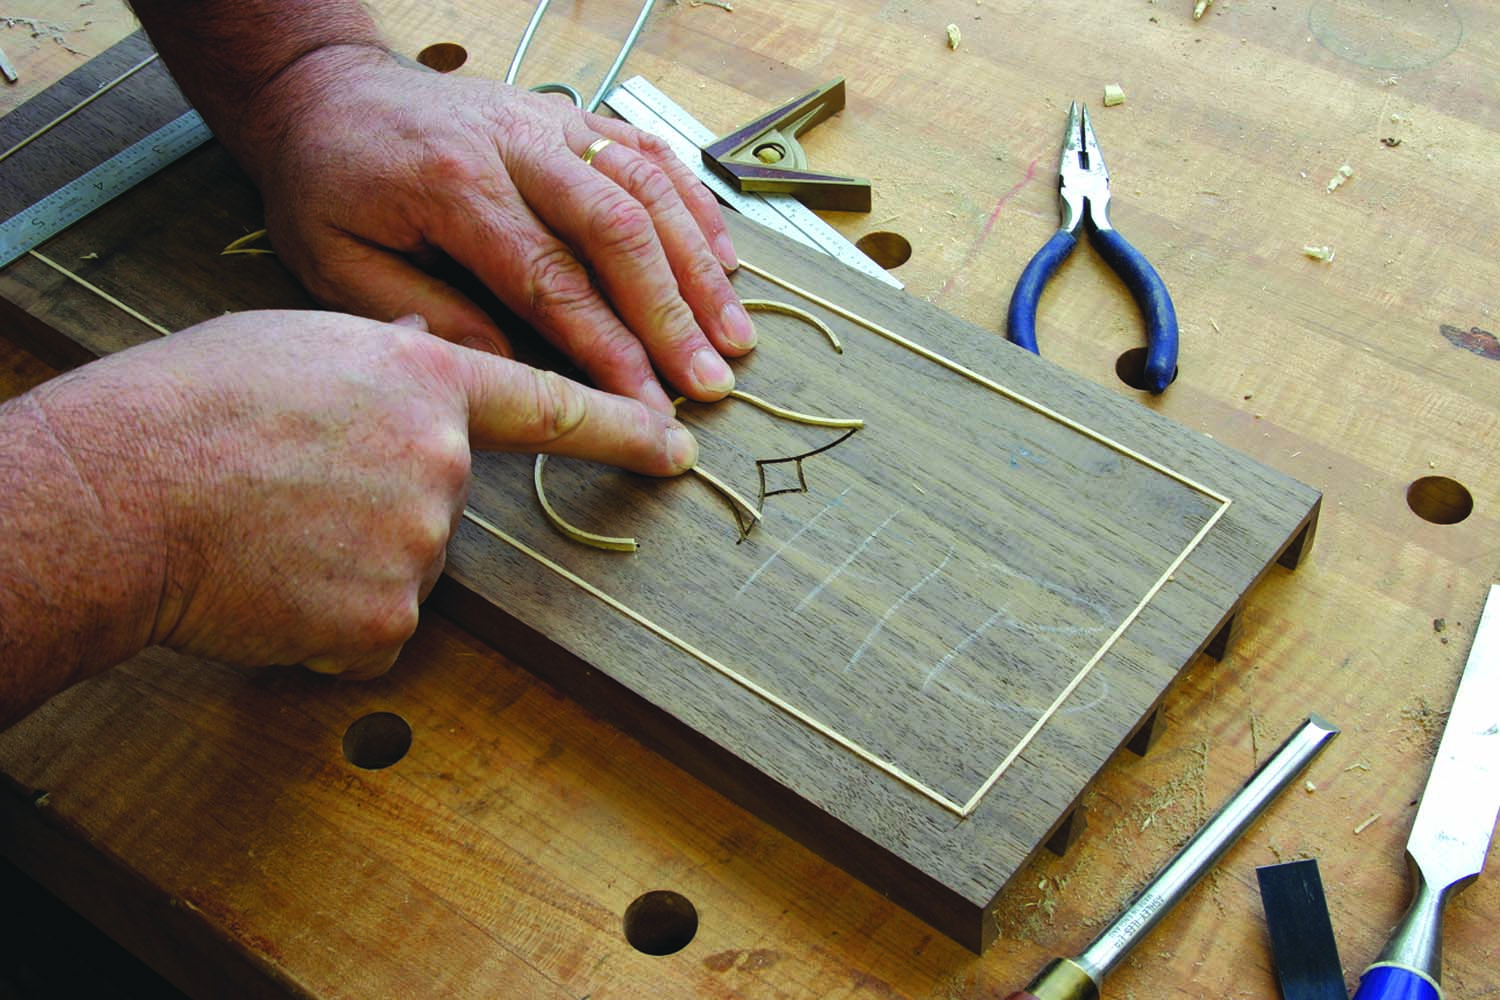
Take your time. With the stringing bent to closely match the grooves, begin at one end of the run then work to the opposite end. String left in the groove tends to hold its shape better. As you glue the pieces in place, work again from end to end of the groove.
After the string is made, it’s necessary to size each piece. The best method for sizing the string to an exact fit is at your spindle sander. Fit the string between the fence and the drum while pushing into the rotation of the drum. Test the fit. If it’s good, you’re good. If not, adjust the fence and try it again.
Straight pieces are ready to fit. Miter the corners and, unless your stock is plenty long, use scarf joints to hide additions. The curved pieces are another story. I’ve tried a variety of methods to bend stringing, but the best I’ve found is to heat-bend the pieces on a pipe that’s heated with a torch. For the larger-diameter curves created with the bump pattern, a 2″-diameter piece of galvanized pipe works perfectly; 11⁄4“ pipe is ideal for the tulip area.
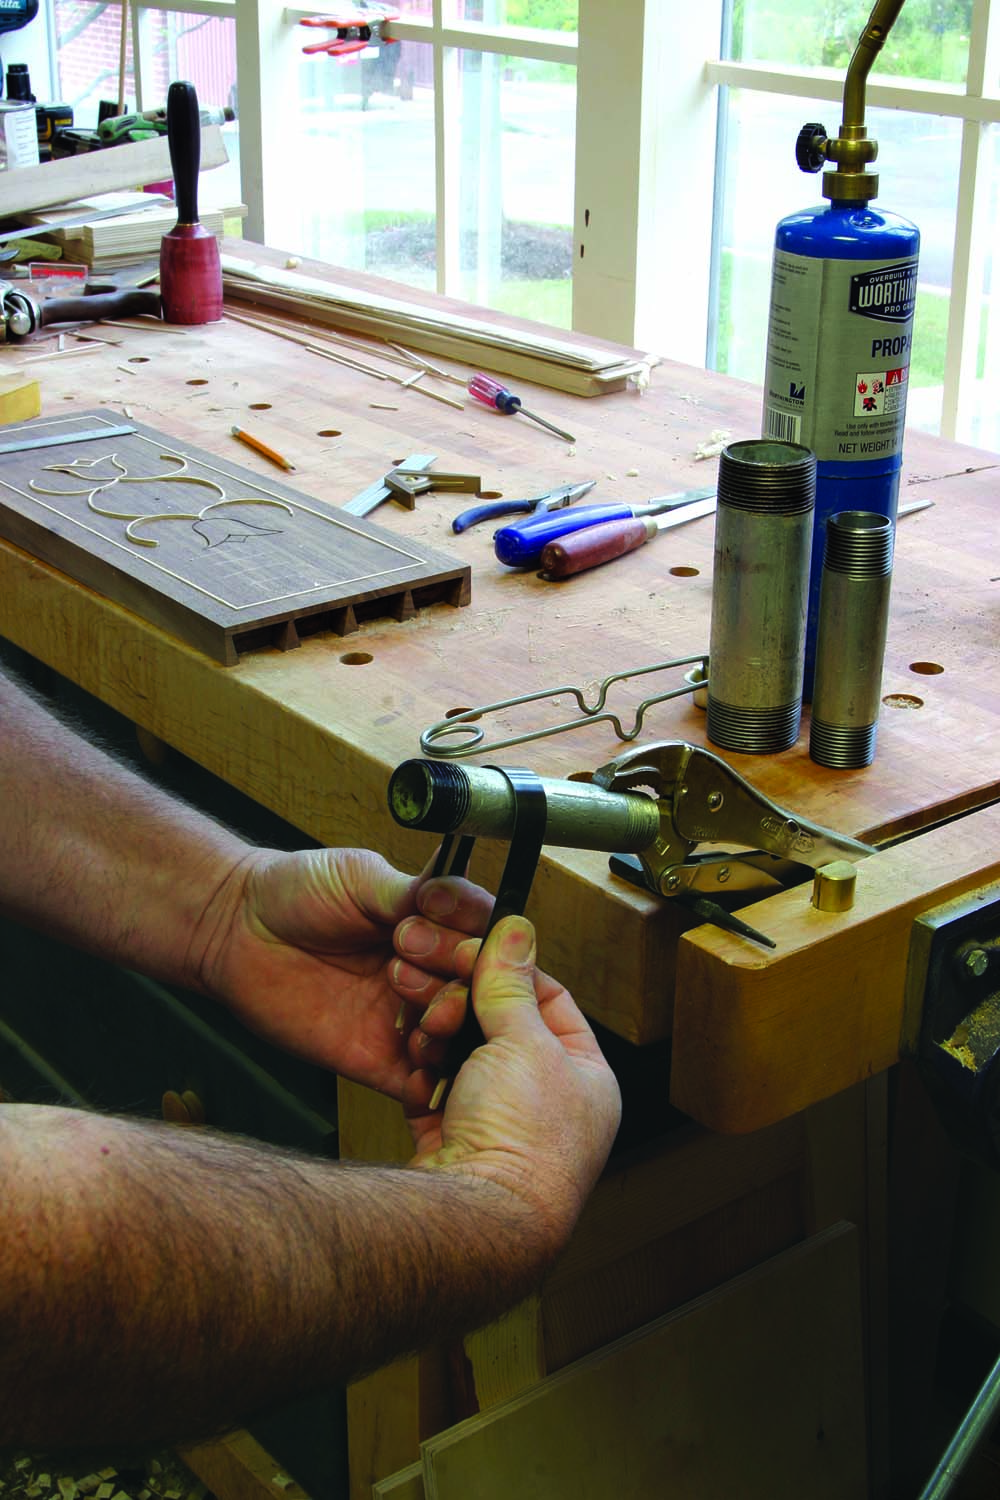
Hot pipes. The heat from the torched galvanized pipe steams the water and dries the string at the shape needed to fit into the grooves. It’s always good to have pipes of various sizes on hand.
Heat the pipe until it’s hot but not scorching hot – a couple test pieces should clue you to what temperature is best. Lightly wet the string then, using a backer strip such as a piece of pallet banding, bend the string around the heated pipe.
Fit the string to the grooves and don’t sweat the areas where the string ends. Those spots get berries to cover the raw ends. The place to work meticulously is where two pieces of string meet. The tighter the fit, the nicer the look. However, as with dovetails, a few imperfections says “handmade.”
A few small dabs of glue along the groove keep the string in place. As you tap in the string, the glue chases around the groove. Wipe off any excess when all the string is placed.
The berries are where you become the artist. On the original, each berry cluster – most likely made from red and white cedar – was set with the two berries that touched the vine perfectly aligned with the length of the drawers. A third berry was placed directly at the center while just touching the other two berries. The symmetrical look was very regimented.
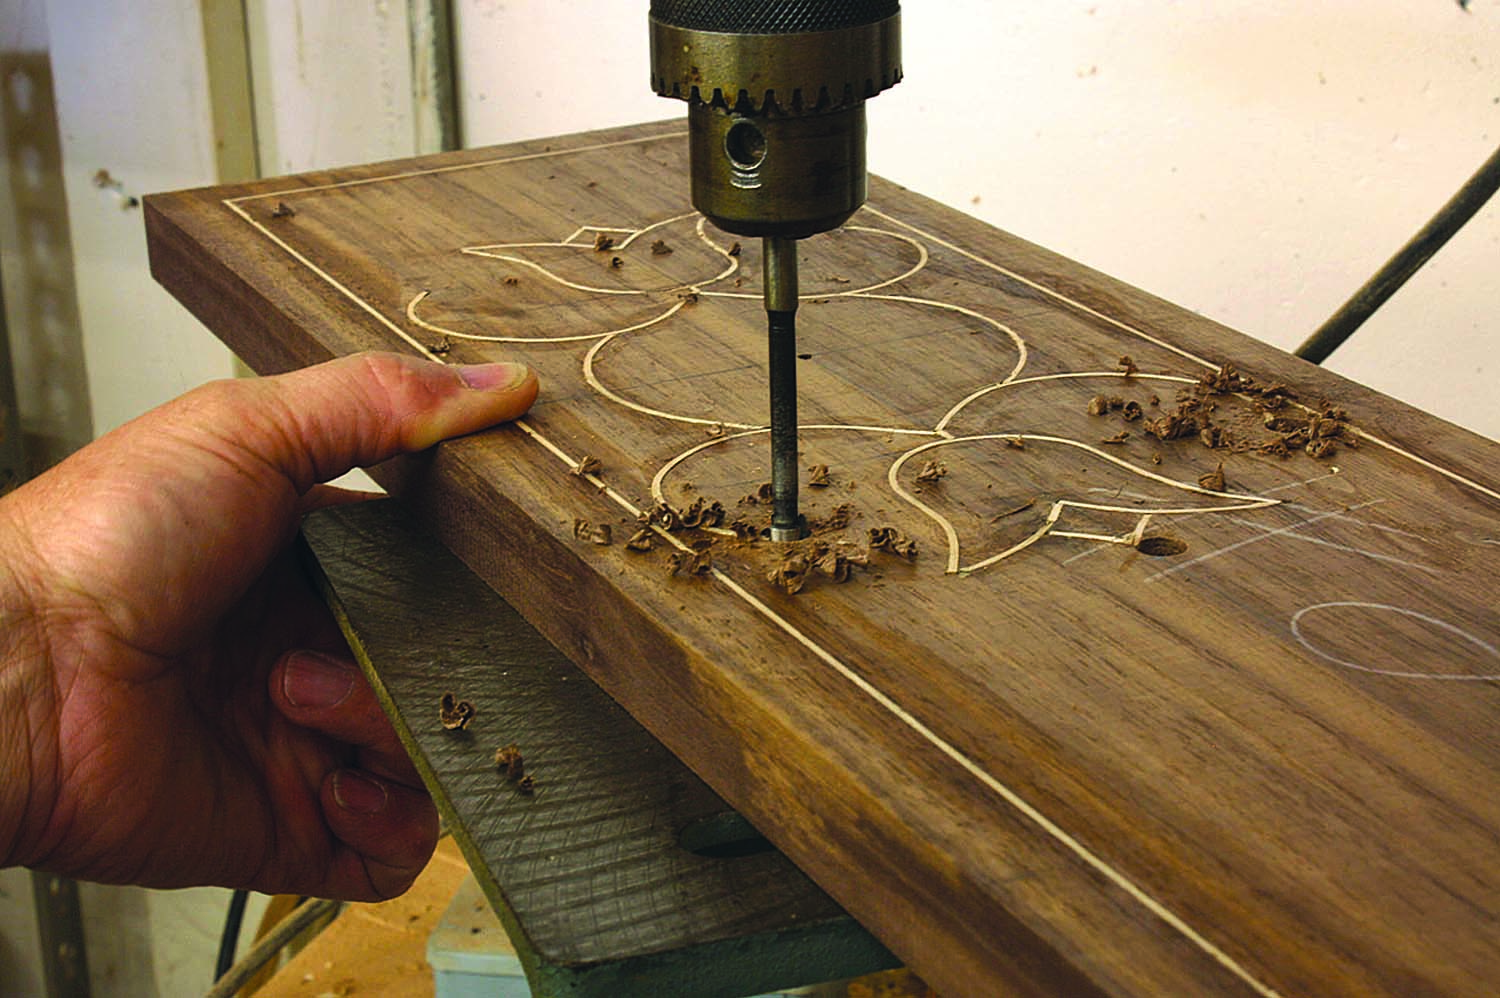
Berry nice. The placement of the berries is left to your discretion. I think it’s best to have the berries overlap and appear like clusters of grapes on the vine.
My take is to lighten up. I randomly located the berries that touched the vine, and made sure the two lapped, as did the third when it was installed. To do this, you have to install a single berry at a time. Drill an 1⁄8“-deep x 3⁄8“-diameter hole at each berry location.
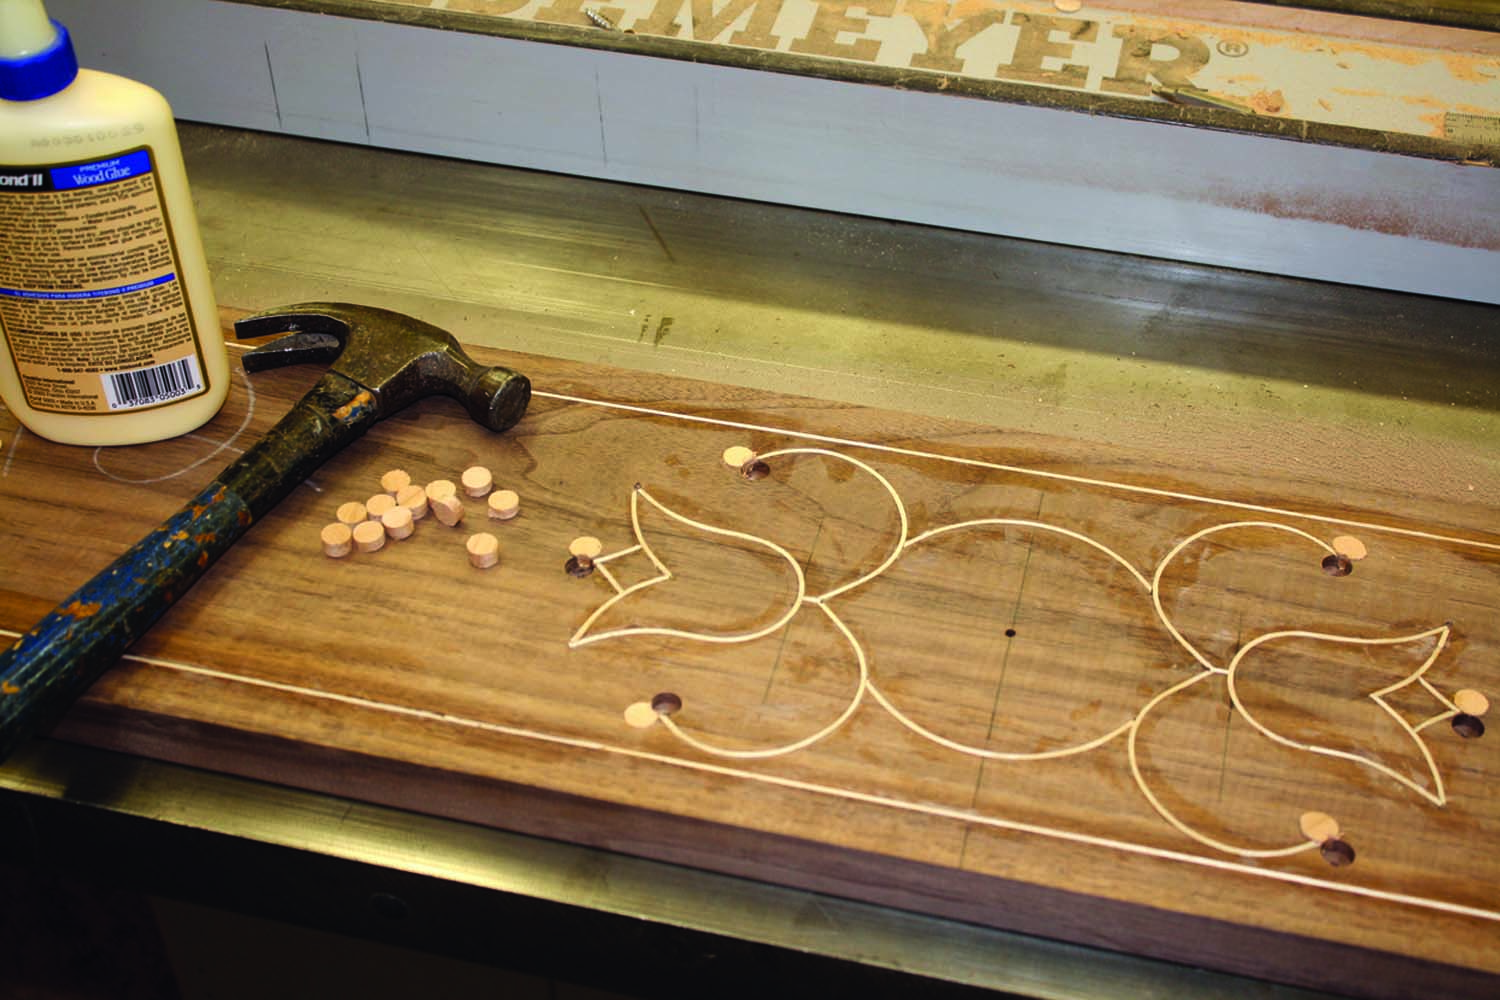
It’s a perfect match. The face-grain plugs that become berries are fit into holes drilled with a 3⁄8″ drill bit. Because of the flat-grain to flat-grain gluing surfaces, the berries will stay put.
The berries themselves are face-grain plugs, either shop-made or store-bought. Dab glue in the hole then tap in the berry. Use a chisel to flush the berry to the drawer front prior to drilling and installing the second and third berries. I used two cherry berries and a single maple berry for each of my clusters. The choice is yours.
At the Finish Line
With the drawers and drawer front inlay complete, the only woodworking left is the chest back. The backboards run from side to side and fit one another with a tongue-and-groove joint. Each board is nailed with a single nail at each end; the top board has two nails per end.
As for the finish on the chest, stain or dye would reduce the contrast of the string against the walnut background. So, to achieve a deeper color in the walnut while highlighting the string, apply a coat of boiled linseed oil. Follow that with a layer of clear shellac once the oil is dry. From there, I sanded the clear shellac then added multiple layers of amber shellac – the amber color warms the walnut, but also colors the other woods – sanding between coats to smooth the walnut grain. Once I achieved the color I wanted, I returned to clear shellac in order to build a smoothed surface. I thoroughly sanded the shellac before spraying a layer of dull-rubbed-effect pre-catalyzed lacquer to dull and further protect the surface.
After the hardware is added to the drawers (I ordered post-and-nut equipped pulls instead of snipe pins), the chest is ready for use. Mine is going into my bedroom, but you might just want this piece in a high-visibility area. It commands attention.
Working With Inlay Bits
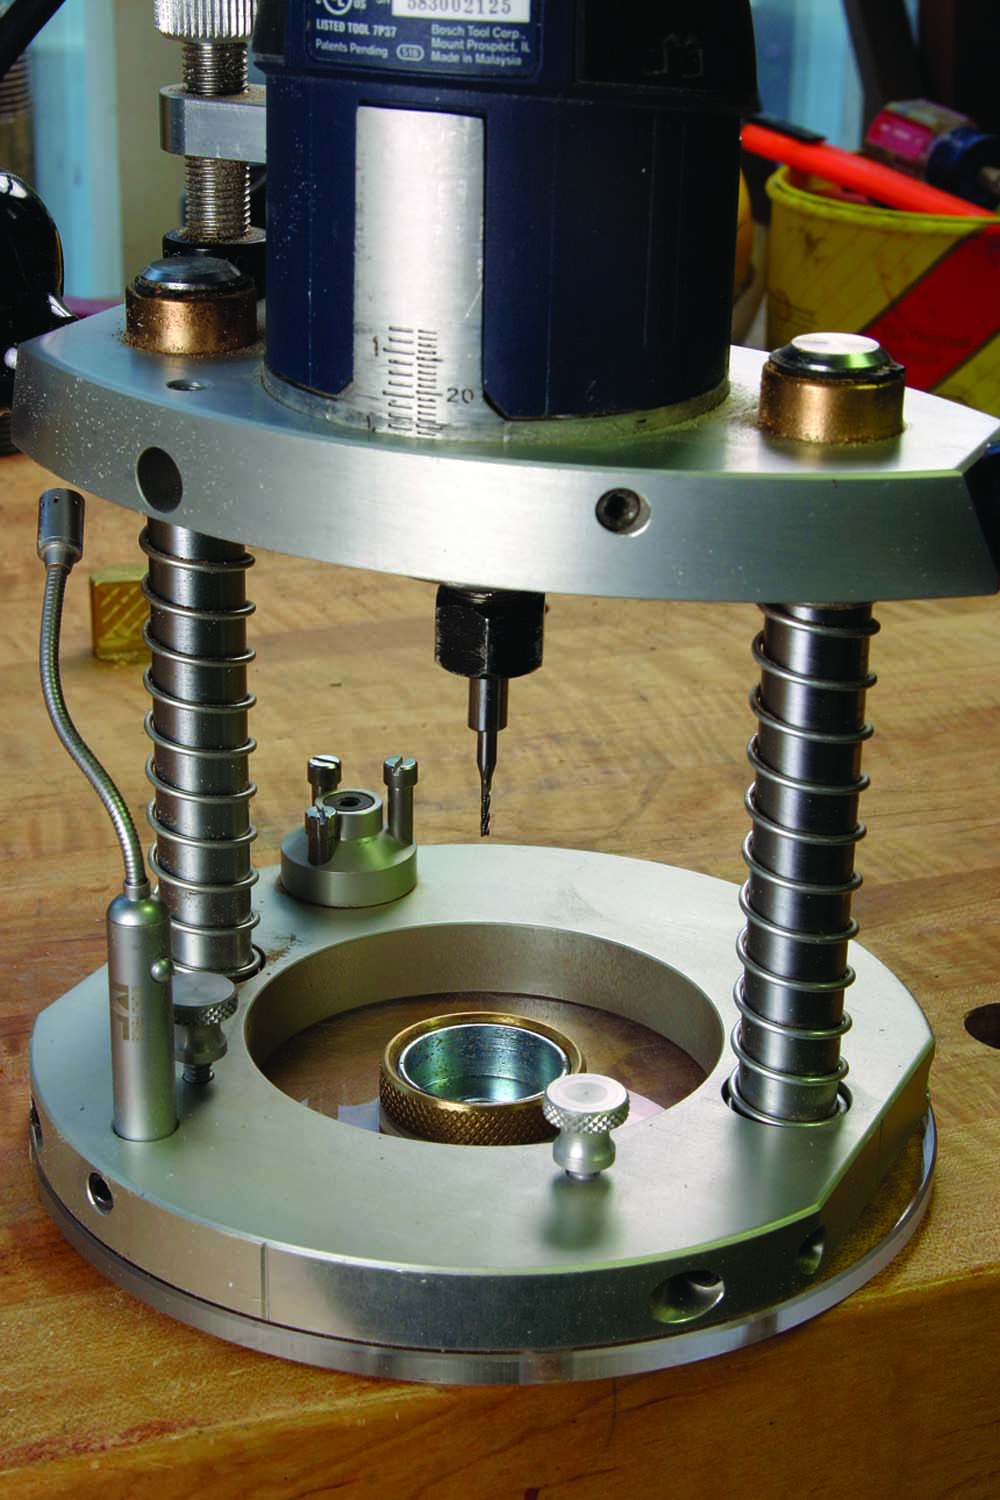
Stretching the point. Collet reducers, chucked into regular collets, can help to lengthen a router bit’s reach.
A 1⁄16” router bit is used to create the grooves in the line and berry design found on Chester County furniture and elsewhere. Bits available through most suppliers have 1⁄4” shanks and the cutting length is a short 1⁄4” at most.
Two potential problems arise when using these bits in string inlay work. First, the cutting length is too short so as not to allow ample depth of cut for your stringing if you push through a guide bushing and beyond a plywood pattern, as we’re doing with this project.
Second, the 1⁄4” shank, when extended enough to reach through the above-described scenario, requires that you use a larger guide bushing than the 3⁄8” bushing used for the chest – the inside diameter of the bushing is only slightly larger than the shank diameter, so without spot-on setup, the bit has the potential to rub the bushing. What to do?
The first and most simple fix is to use a larger-diameter guide bushing. Working with a larger-diameter bushing reduces the crispness of the design, but allows the bit’s shank to easily pass through the guide bushing as the router bit tip reaches your drawer front.
You can also use thin pattern material. With less thickness to pass by, your bit doesn’t have to extend as far to cut the grooves. (Remember, it’s OK to shorten the length of the guide bushing to make everything work.)
Another option is to use a 1⁄8“-diameter router bit in conjunction with a collet reducer. This setup (as shown in the photo) allows you to extend the collet reducer beyond the router’s collet and if you pull the 1⁄8” router bit out of the reducer to its fullest extent, the bit’s reach is enough to create the grooves without adjustments to either the bushing or your pattern.
One source for the 1⁄16” straight bit is inlaybandings.com; collet reducers can be found at IMService (cadcamcadcam.com).
Here are some supplies and tools we find essential in our everyday work around the shop. We may receive a commission from sales referred by our links; however, we have carefully selected these products for their usefulness and quality.


