We may receive a commission when you use our affiliate links. However, this does not impact our recommendations.
Editor’s note: With the holidays upon us, we’re looking through the magazines and books we own for fun handmade gifts – things that you can build in not too much shop time, but that will help to create a lifetime of memories for the recipients. This is Holiday Project Post number five – for the “Pint-sized Pickup,” click here; for a Craftsman-style Wall Shelf, click here; for “Heirloom Photo Album” click here; for two turned “Spindle & Globe Wooden Ornaments,” click here.
 by John A. Nelson
form the January 1989 issue of American Woodworker
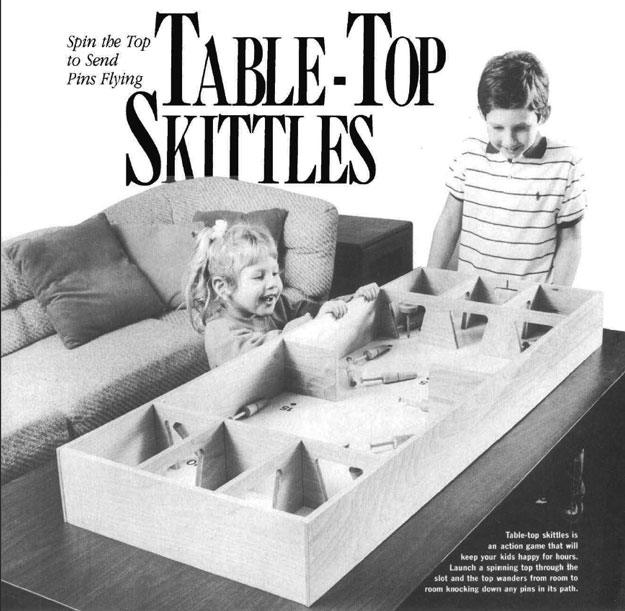
Here’s an action game that you and your kids will enjoy for many years to come. It’s simple to play. Just launch a wooden top through a slot at one end of the playing field. The gyrating top roams from room to room, knocking over wooden pins known as “skittles.” The object of the game is to knock down as many skittles as possible to get the most points.
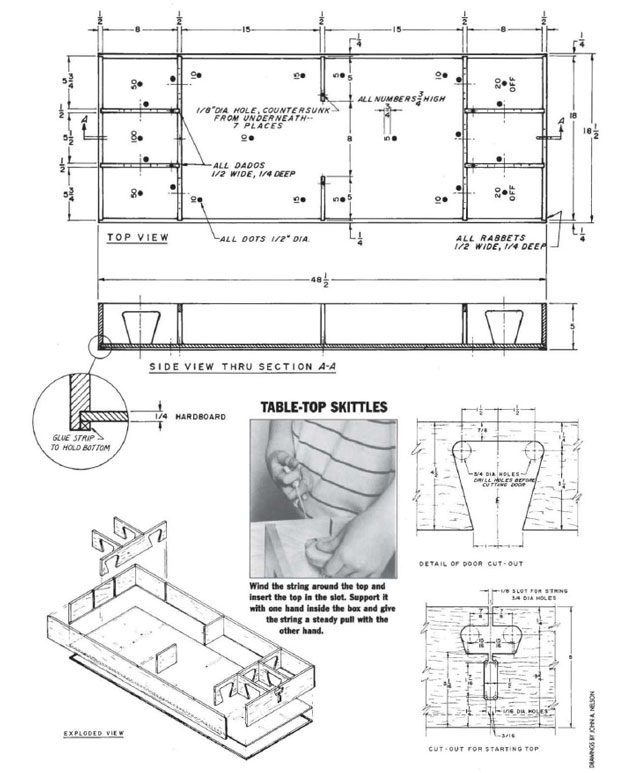
The playing field is a box made from 1/2″ birch plywood with a 1/4″ hardboard bottom. There’s nothing fancy about the joinery – rabbets and dados fastened with nails and glue. The most time-consuming part of the entire project is turning the game’s pieces. You’ll need to turn the top, 15 skittles and a handle for the top’s string.
Before you start cutting, read the instructions once or twice and study the drawings so you’ll know how things go together.

Cut all the plywood parts to the dimensions shown in the drawing. Cut the dados with a dado head table saw or with a 1/2″ straight bit in a router. Cut the rabbet that runs around the bottom on either the table saw or with a router.
The next step is to saw out the door openings and the top cutout in one end of the box. Mark centerpoints as shown in the drawing and drill on these centers to form the radiused comers of the openings. You may want to stack the four small dividers and drill and cut them all at one time. After drilling the holes, cut out the openings with a coping saw, handsaw or saber saw. Sand all the plywood parts before assembly.
Assemble the box, except for the bottom and the strips that secure the bottom in place, with glue and small finishing nails. Be sure to keep everything square.
Fit the bottom board into the rabbet in the bottom of the box. With the bottom in place, mark the location of all the walls. Remove the bottom and drill and countersink pilot holes for flathead wood screws to fasten the bottom to the walls.
Stain or paint the walls of the game board and paint the bottom board white. Apply two coats of white paint, sanding lightly between coats. Rub the final coat lightly with #0000 steel wool and paint the pin markers and score numbers on the bottom. I used a drawing pen with india ink but black enamel would work fine. Note that the numbers are all positioned so they can be read from the playing end of the board.
After painting the circles and numbers, put a coat of varnish over the entire bottom board and rub it lightly with #0000 steel wool when dry. Apply a coat of paste wax and screw the bottom to the box. Glue in the strips that secure the bottom in its rabbet.
Turn the top, the 15 pins, and the top-string handle between centers on the lathe from an easy-to-turn hardwood such as poplar, cherry or maple. You may want to paint the pins and top – it’s up to you. Tie a 15″ long-string to the handle, and you’re ready to play.
Playing the Game
Place the game on a flat surface and set the skittles on their spots. Wind the string around the top and insert the top in the slot at the end of the board. Support the top with one hand inside the box and give the string a steady pull with the other hand. The top will spin around, knocking over any skittles in its path. For a faster game, raise the end of the game board 1/2″ or so to incline the playing field slightly.
You can play the game one of two ways: until one player reaches a predetermined number of points, such as 100, or until each player takes a predetermined number of turns with the top. In the latter, the player with the highest number of points at the last turn is the winner.
If the top tends to stay in one spot instead of moving around the board, try flattening the point of the top a bit more with a file or a piece of sandpaper. This makes the top less stable and more inclined to wander.
Get all 30 years of American Woodworker on one CD – available at ShopWoodworking.com.
Here are some supplies and tools we find essential in our everyday work around the shop. We may receive a commission from sales referred by our links; however, we have carefully selected these products for their usefulness and quality.


Hey Guys,
Thanks for sharing this blast from the past. If I can persuade y’all to share just one more project, AW produced a fun TABLE HOCKEY story. We had a lot of fun “testing” this project in the office.