We may receive a commission when you use our affiliate links. However, this does not impact our recommendations.
To join veneer edges together, they need to be straight and true – just like when gluing up solid lumber. Gaps are not allowed. Granted, veneer edges are not glued in the same way as solid lumber, but are taped together to form a wider piece, called a veneer face.
There are a number of ways to achieve those required straight edges in the small shop. Your approach may vary depending on the equipment you have (or may wish to acquire). Here’s a look a three approaches that can yield good results on any budget. I show how to do each of these in a new video we’ve produced at Popular Woodworking Magazine called “Getting Started with Veneer.”
 Traditional Veneer Saw
You can pick up a traditional English-style saw for less than $15 but it will need to be sharpened. The one shown here is a French-style saw offered by Gramercy Tools that costs about $80. It’s an improved version of the traditional French model, with the addition of a stiff blade-backing plate. The blade is sharp and ready to go out of the box.
Each of these veneer saws is used in combination with a straightedge to produce a dead-straight jointed edge. Of course, your straightedge must be true to be effective. Place the veneer on a cutting surface that’s flat and not too soft. Hardwood plywood or MDF are both good choices. The cutting surface will protect both the saw’s teeth and your benchtop. Softwoods will not provide the crisp edge cut needed when making the final pass.With your straightedge pressed down on the veneer, draw the saw toward you making several passes. You can use the technique for sawing with the grain or across the grain.
 Router and Pattern Bit
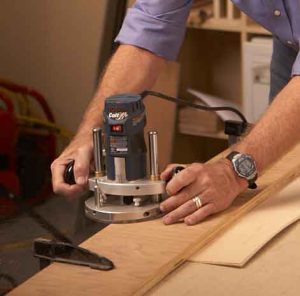
With a similar straightedge as described above, you can also get good results with a router and pattern-cutting straight bit (the bearing is on top). Using this method, you can also joint the edges of multiple leaves of veneer at the same time. Place your veneer at the edge of a bench or table with the line of your cut overhanging it slightly. Clamp your straightedge to the bench at both ends and allow enough space for your router to start and exit the cut without bumping into the clamps. Adjust the router bit so the bearing rides against the straightedge.
For best results, don’t cut more waste at the veneer edge being trimmed than the diameter of the bit you are using. Run the router along the straightedge at a deliberate speed that’s not too fast. If you are cutting end grain, “climb cut” the last inch or so of the cut so as not to tear out the grain. And again, make sure your line of cut is slightly off the edge of the bench or table. Don’t ask me how I know.
Festool Track Saw
Excellent results can be had with Festool’s Track Saw. While it’s an expensive piece of equipment, it’s fast and easy to use. Use the Festool blade that’s designed for cutting non-ferrous metal. It has a -5° rake on the teeth. The method works well on both with-the-grain and across-the-grain cuts. As with the router method, multiple veneer leaves can be cut at the same time. Unlike the router method, the amount of waste cut doesn’t matter at all. Set the depth to just 1/4″ more than the veneer. Work directly on top of your bench or table but use an inexpensive sheet of foam board insulation under the veneer. You’ll be cutting the foam – not your benchtop! Mark your veneer where the cut is to be made, set the edge of the track to the pencil line, place the saw on the aluminum track then make the cut. You’re done. Assuming the material is relatively flat, the track does not need to be clamped.
There are even more options for the small shop. Short lengths of veneer can jointed using a handplane and shooting-board arrangement. At the other extreme, you can sandwich a stack of veneer between two reasonably straight boards, clamp them all together and run them over a jointer. Sounds a bit crazy but it works – I’ve done it.
• If you’d like to learn more about veneer techniques check out our ShopWoodworking.com online store.
• Order our new two-hour long video “Getting Started with Veneer.”
Here are some supplies and tools we find essential in our everyday work around the shop. We may receive a commission from sales referred by our links; however, we have carefully selected these products for their usefulness and quality.


Or you could take a class from Michael Fortune and make his super slick veneer cutter from 1 piece of oak, 1 small piece of aliminum, 2 screws, and a double edged razor blade.
My favorite method is using a scalpel along a straight edge. I use a green self healing plastic sheet under it. You can usually can find them at art supply stores. I mostly do smaller projects and find this method ideal.