We may receive a commission when you use our affiliate links. However, this does not impact our recommendations.
The more I study workbenches, the more I’m convinced there is no end to the clever vises out there. This week I have two vises that are worth a close look.
One is a ratcheting leg vise made by Will Myers, a woodworker who teaches at The Woodwright’s School and is one of the assistants at the French Oak Roubo Project. Will writes a lot for WKFineTools.com – check out his articles here. His article on how to make the ratcheting leg vise can be read in full here.
In the meantime, check out this short video of it on YouTube. The way it works is self-explanatory. While I’ve seen ratcheting leg vises before, I’ve not seen one with the lever that releases the ratchet mechanism. Many of the historical ones I’ve seen require you to put your foot in there and lift a bar with your toe to get it to release. Such as this one.
Like all of Will’s vise hardware, this one is made from off-the-rack components. I got a chance to use this one while down at The Woodwright’s School last year (I think it was last year). And it was smooth and sweet.
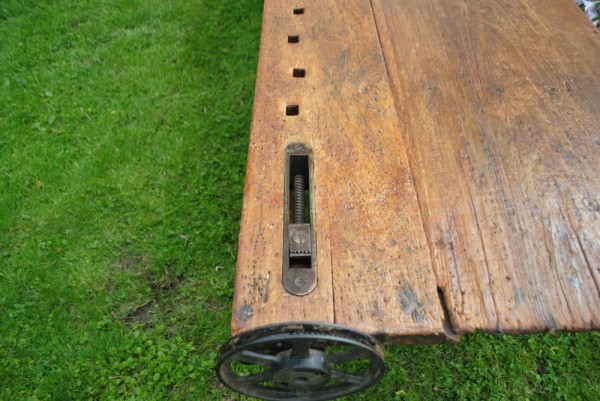
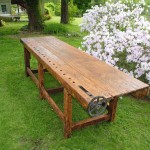
The other vise is a wagon vise that was spotted by woodworker Glenn Livingston at the website TheRetroFactory.com. It might be a Halyburton vise, as shown in this patent drawing. However, there were a lot of vises patented during the 1880s.
Why the wagon wheel is so high above the bench I’ll never know. A jointer plane would knock right into that. On some of these vintage vises the wheel was removable. So you would tighten the vise, remove the wheel and go to work.
Also curious: Why the dog holes were laid out by a drunk.
— Christopher Schwarz
Here are some supplies and tools we find essential in our everyday work around the shop. We may receive a commission from sales referred by our links; however, we have carefully selected these products for their usefulness and quality.


The large wheel and staggered holes make perfect sense together. The larger wheel can apply greater forces. My best guess would be that the builder was contemplating working with larger timbers or something that involved a lot of heavy pounding in parallel with the clamping forces. I’ll bet there was an earlier bench that was destroyed by his work. In any event, the larger forces would risk splitting the bench between the dog holes if they were perfectly lined up, so that is why the maker staggered them.
I too have this exact same vise on a nicholson bench i bought a few years ago. No handwheel, just a wood handled crank. It is a great vise and works great! It and the bench it is attached too is what finally allowed me to start using all the handtools i had been collecting all these years.
Nate
The Halyburton vise is not a wagon vise. The patent description calls it “… a self-adjjustable vise … which may be used as a tail-screw attached to a carperter’s bench.” The dog is removable and set in a socket in the jaw element . The novel bit is that if the vise is located near the corner of the bench it can be rotated and used hold work across the width of the bench like a normal face vise.
Actually the loop chain only hangs to about shoulder height to allow ducking!:-*
I see teeth on BACK end of the dog in the wagon vise. I have to think that it spun around, perhaps when the screw visible was loosened, to permit you to present different faces to the work.
I want one.
Chris,
That handwheel is definitely not original to the vise. If you look closely it has 2 rims like a V-belt pulley but with oddly shaped serrations between them. What it actually is made for is remotely operating difficult to reach valves . If you’re power plant (refinery, etc.) has a frequently operated valve which is too high to reach easily, you replace the valve handwheel with one of these gizmos then thread and endless loop of chain around it which reahes down to floor level. The chain grabs the serrations and opens or closes the valve when you pull on the loop while safely standing on the floor.
gerry
I think you may want another look at the Halyburton patent you linked.
As I read the figures – and without reading the whole thing so far – it appears to me to be a face vise mounted on a pivot so it can rotate around a bench corner so to function on the face or the end of the bench. The support is fixed by the cylindrical member shown in Fig. 5, which is bolted to the bottom of the bench, as shown in Fig. 4. The alternate positions are shown in Fig. 1 in the solid line drawings for the first position and the phantom (dashed) lines for the second position.
Interesting, but I can’t see a wagon vise here. Did you have a different Halyburton patent in mind?
I agree with Gavin, the design for the offset dog holes adds increased strength and support under load. This method is also used in timber framing as in adding enough “relish” behind an opposing member under load to resist failure. Since this bench is a survivor, incorporating a nice vise, it must of served it’s purpose for the craftsman who made it utilizing material to his advantage.
Chris, if you are interested in seeing new vise technology, you should click over to a post on the lumberjocks site here: http://lumberjocks.com/projects/98982
This particular vise took me a few minutes to figure out how it works, but after the “AHA” moment I appreciated how clever it was. It will be the next vise I try building. The author is an incredibly creative individual and you may want to check out some of his other creations (and no, it is not me). You may wind up being a fan of timing belts too 🙂
I have this wagon vise presently mounted in my bench . Originally it came with a cast iron handle which looked like a copy from a pipe clamp set. The handle was broken, probably from being dropped by the antique dealer who was selling it. I replaced mine with a small hand wheel, and it does interfere with hand planing. However, it can, and most likely, will be replaced with another soon. I love the vise! The toothed head can be lifted out and reversed by running the screw out and pulling up the head. As in the picture, it has teeth on each side; coarse and fine. It also works like a charm! Mine has no makers marks, so I’m at a loss as to who made mine. The vise is old and the castings look and feel like sand castings. But, all in all, it does the job.
The bench is quite thin, so if all the dog holes lined up, you would end up with a relatively short piece of grain holding the dog under load. You could easily pop out the piece between the holes.
By offsetting the dog holes you get a big increase in the support for the dog.
Looks like it was made by someone who knew something about benches.
I believe a closer look at the dog holes may reveal that every other hole lines up and are offset by maybe1/2″ to 3/4” or so. The bench looks like it may have been power washed or some such thing
as the holes are eroded in a depressed fashion- just a guess. but it does make the holes look wonky. The wheel could be a replacement as it looks like a sheave. The housing for the lead screw dog looks
like it may be a bronze casting.
Chris –
I think those holes were made using the old “cat’s meow” method. On your new workbench top, you put a cat on one end, and a can of tuna fish on the other. Where ever the cat steps, you put in a hole. It was mostly employed by Irish magazine editors, but much like ROUSes, I don’t think they exist.