We may receive a commission when you use our affiliate links. However, this does not impact our recommendations.
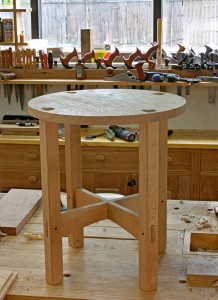
 At this year’s Woodworking in America conferences, I’ll be talking about and demonstrating how to make Arts & Crafts period furniture. It’s a popular style among woodworkers, but the history of the period and what details are significant are not well understood. We’re not even sure what to call it, and it goes by several names: Mission, Craftsman or that bulky stuff with exposed joints. As I work on examples for my classes, such as this small tabouret, I’ve been thinking about what to say, and what not to say. A lot of magazines and books in the last 20 years have worked around the theme of “let’s make this easy!” Instead of trying to dumb things down, I’m going to take the opposite course. If we smarten up, get some practice and look for efficient ways to work, we’ll find we can build almost anything. And when we master a few simple skills, things are already as easy as they need to be.
One of my proudest moments as a woodworker came at the first Woodworking in America conference in Berea, Kentucky. Frank Klausz was teaching a class on making mortise and tenon joints, and I had milled a few hundred pieces of stock for students in the class to use. As Frank was telling the attendees to come up and get their material, he made the comment that it was “beautifully prepared.” What he meant was it was all square, straight and the size it was intended to be. The stacks sat neatly on a bench, no wobbling or wavy surfaces. Good stock preparation makes every step that follows predictable and straightforward. Breeze past that step and everything that follows will be guesswork, wishful thinking and backing up to do it again.
 I was trained by cabinetmakers like Frank, guys who had served apprenticeships in Europe under demanding masters. At the time I hated them because they weren’t exactly tolerant of less-than-perfect work, and wasting any amount of time or material was considered a criminal and shameful act. I don’t agree with screaming and humiliation as teaching methods, but striving for efficiency makes perfect sense, even if your woodworking is strictly a hobby. Today most of my woodworking is for the enjoyment of it, and steps D, E, and F are a lot more fun if steps A, B, and C are done right.
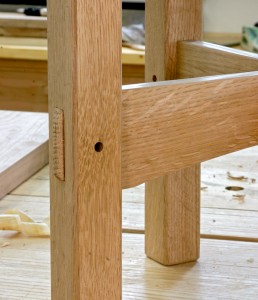
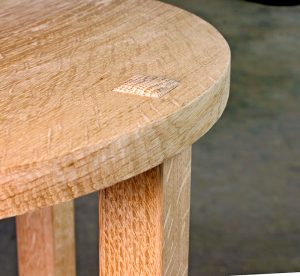
Exposed joinery is one of the key elements in Craftsman furniture, through mortise and tenon joints in particular. It’s a detail that even people who know nothing about woodworking notice and appreciate. If you pick up a tool catalog you’ll find all sorts of devices that promise to make this type of work possible, and you’ll find numerous articles online, in books and in magazines that suggest complex solutions and specialized tools as being absolutely necessary to make these joints. It’s easy to get sidetracked by all of that and put this work in the “someday I might be able to do that” category. That’s a shame, because what you see in a good exposed joint is the most basic skill in woodworking, executed consistently. And that skill isn’t dependent on any particular tool, or collection of tools, orientation towards product or process, or adoption of anyone’s school of thought.
If you think about it, almost everything in building furniture comes down to consistently cutting to a line. The rest of it is what to do if you miss the line and figuring out where to put the line. There are any number of ways to accomplish that, but the most important thing is to recognize that it is within the reach of anyone. If you learn to consistently cut to a line with one tool, performing the same task with the next tool isn’t that hard, if you keep the goal in mind and believe that you can do it.
So if you show up in my sessions at Woodworking in America (or sign up for my upcoming class at Marc Adams School of Woodworking in September) I’ll show you several different ways to consistently and efficiently cut to a line (and what to do if you manage to miss). We’ll talk about when certain tools or techniques make more sense than others, and alternatives if you don’t have all the tools. I hope you’ll walk away with the idea that making stuff is the best part of woodworking, and you don’t need to wait until you have the perfect shop or complete collection of tools. You can get started with very little, the most important thing to have is the knowledge that the ability to perform a few simple tasks will enable you to make anything you want, with some practice.
For more on building Arts & Crafts furniture, check out “Video Companion to Exercises in Wood-Working Part 2” and “Popular Woodworking’s Arts & Crafts Furniture” in our store.
Here are some supplies and tools we find essential in our everyday work around the shop. We may receive a commission from sales referred by our links; however, we have carefully selected these products for their usefulness and quality.


I built the Stickley Tabouret featured in an article by Chris in a back issue of Woodworking. That design featured a lapped cross-member under the table top joined to the legs by a singled dovetail. Am I correct in assuming using the legs as through-tenons on the top eliminates the need for the cross member?
Bob,
Would love your opinion on a design modification to this table. I’ve recently purchased your latest book with this table plan. I’m considering making mine out of sapele, but the question is around adding a smaller secondary shelf underneath.
Have you ever done this with the tabouret? Hoping to have one in progress at my booth during WIA.
That is a great essay.