We may receive a commission when you use our affiliate links. However, this does not impact our recommendations.
Ever since the minute I built my first leg vise, it has been my vise of choice. It is simple, offers lots of room for clamping and it doesn’t have horizontal guide bars that get in the way.
Its downside? Most people would say it’s the parallel guide that is below the vise screw – specifically the pin that needs to be adjusted when you switch to a piece of work that is significantly thicker or thinner.
I have yet to complain about stooping down to move the pin, but my back is still in good shape. People with bad backs have let me know that moving that pin is a real pain in the… back.
There are solutions out there for people who never want to stoop. Let’s take a look at three of them that I like.

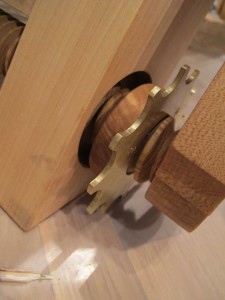
1. A spinning footplate. This solution appears in some historical benches, though you don’t see it much on surviving benches. I’ve seen this more on benches in books and old magazines than in real life. I wrote a little about this vise feature when I showed off Eric Mortensen’s workbench from Woodworking in America (check it out here.)
The threaded post passes through the leg of the workbench. It does not engage the leg at all. The spinning plate is threaded on the post and can be moved quickly in and out to provide different leverage positions for the vise’s chop.
What I like about this solution is that it is infinitely adjustable. And, of course, you don’t have to stoop to adjust it. The downside is that it’s more complex than a simple pin and parallel guide. I’m sure I’ll put this on a bench some day. Not sure I’ll make my spinning plate out of brass, however, probably just hardwood.

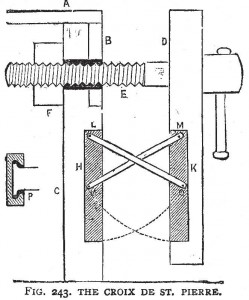
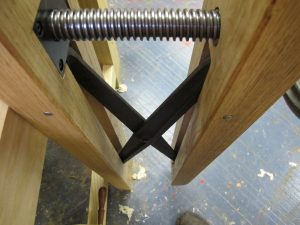
2. The cross. This appears in the literature as a St. Pierre’s Cross. Some Christians have given me grief about using this historical name and have even suggested that they are talking about the wrong saint. Anyway… I’m going to call it by its new commercial name: The Crisscross.
The Benchcrafted folks are just about to start shipping these out. Raney Nelson of Daed Toolworks had one at Woodworking in America in Covington, Ky. I’ve worked with a prototype and an historical example. It is a novel and excellent solution – surprisingly smooth and strong. See a historical one in action that I wrote about here.
You don’t see this solution much on surviving bench examples, though it is more common than the spinning plate solution discussed above.
I’m going to install a Crisscross on my 2005 French workbench with a vintage iron screw. It should look awesome and (I hope) work well. You know that I will let you know how it goes.
3. A rod in a hole. This solution is novel but it requires a deal of precision in its installation. In essence, you turn the lower part of your leg vise into a holdfast. How?
OK, the back of the vise’s jaw has a long wood or metal dowel sticking out toward the read of the bench. This passes through a closely fit hole in the leg.
When you move the jaw in and out, the dowel also moves in and out of the hole. But when the jaw encounters a piece of work, it racks the jaw ever so slightly. This racking causes the dowel to jam in the leg like a holdfast. When it’s jammed, it immobilizes the bottom part of the jaw and provides clamping force to the top of the jaw.
Professional bench-builder Richard Maguire has developed this technology to a high art and sells it both on his workbenches and separately. Check out his video of the “pinless” vise here. He’s also discussed it on his blog where he notes that the jaw remains quite parallel when in operation and clamping. Very cool.
I’ve only seen this type of solution on one historical workbench and it was in wood – a wooden dowel and a hole in a wooden leg. Maguire uses metal, which obviously will not deform over time like wood would.

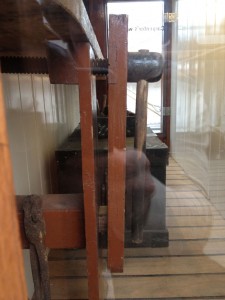
A variant on this idea is to use a parallel guide that is traditionally shaped and then sheathe it in a close-fitting box behind the leg. This is (I believe) what is going on in this photo from the leg vise on the Cutty Sark (hat tip to St. John Starkie who took the photo).
In addition to this example on the Cutty Sark, I’ve seen it in the wild a couple times.
As cool as all these solutions are, all of them (combined) show up less frequently than the good old pin-and-parallel-guide guide mechanism. That doesn’t mean the pin is the best solution. It just is the most popular one and it was used by a population that was probably younger.
— Christopher Schwarz
Here are some supplies and tools we find essential in our everyday work around the shop. We may receive a commission from sales referred by our links; however, we have carefully selected these products for their usefulness and quality.


Hey Chris, or anyone else who can help me…
i’m currently building a new workbench and i’m wanting to put an angled leg vise on it. Now i’ve been wondering would any or all of these systems work in an angled leg vise? currently i’ve emailed bench crafted to ask them directly about their criss cross being used in this manner and they gave me a very quick and polite reply stating they wouldn’t recommend it, in that it would not work on it’s own without some modifications to the vise. i have some ideas on how to make the criss cross work in an angled leg vise; but mainly i’m wondering about the maguire method? what are your guys thoughts or experiences?
I have MS and sometimes reading does not provide the detail to comprehend. Could you just send me a leg-vise so I can install and understand.
I found another solution, based on the scrap I had lying around and the tools I had easy access to.
There’s a scrap of aluminum stock (1/8″, give or take) on the back of the right front leg of the vise, beaten with a hammer until the top edge is a little thinner than the bottom. In my case, the bench leg is open on both sides — there’s a shelf a bit off the floor, but the leg is unenclosed at the bottom — and there’s a scrap of 1×2 loosely fastened to each side of the leg vise. Every 3/4″ I cut a 1/8″ notch in the 1×2 braces, and I fastened the end under the bench together with another scrap of 1×2. Total construction time, including figuring out how to get it around the leg of the vise, about 10 minutes.
I can easily adjust it by sticking a toe under the supports. I’ve tested it with stock down to about 1/8″ and up to about 8″. There’s no reason it shouldn’t work on thinner or thicker stock, though.. the vice can close down flush with the front of the leg, and open out to about 18″ without trouble.
There’s a photo here, if my description didn’t make sense:
http://www.flickr.com/photos/amckenzie4/6795877461/
When I saw the “bicycle chain” solution a while back, it got me thinking about doing something similar, but with a thin steel cable instead of a bike chain. It seems to me to be even simpler and potentially smoother-operating. Plus you can get all the necessary hardware from your local hardware store or big-box home center for a few bucks.
I recently made one such vise with the cross, you can view the construction process here: http://www.instructables.com/id/Parallel-Leg-Vise-with-St-Andrews-Cross/
Chris,
I know that this list contains “three that you like” so I’m wondering why you don’t like Lie-Nielsen’s chain-drive leg vise.
I have one on my Roubo (it’s actually the first one they sold) and it works great – you don’t even know that it’s there because it’s completely enclosed in the chop.
No maintenance either although taking off the plate and hitting it with a few drops of Tri-flow every year probably isn’t a bad idea.
Joe
It is correctly called St. Peter’s Cross.
Tradition tells us that Peter didn’t feel worthy of being crucified as Jesus was. Instead they honored his request to be crucified upside down on the Roman X-style cross.
Because of this, it became known as St. Peter’s cross.
It’s too bad some are so uptight about such things.
Just was made aware of this discussion. Any time your ready Chris I’ll send you a kit. Here is a link my website that has the chain leg vise info.
http://ancorayachtservice.com/?page_id=221
And here is another review. http://festoolownersgroup.com/other-tool-reviews/roubo-bench-modification/
Thanks all, love these discussions. I know a couple other solutions but they limit the capacity of the vise.
Jim
Love these ways to save my back. Glad you keeping a “leg up” on things there Chris.
I have installed a small compression spring on a 5/8″ dowel as a second parallel guide above the standard guide. I used a #54 spring and cut the length until I was happy. This method has it limits because the spring keeps the vise from closing completely flush on very thin stock or when empty. But it work well 3/8 to 1 1/2. Thinner stock can be clamped by placing a small spacer block between the work and vise. I use my standard parallel guide when clamping stock thicker than the spring length.
There’s a very simple solution. Replace the pegboard with a solid board with the top or bottom angled slightly. Then, insert a wedge through the leg that extends all the way from one side to the other, perpendicular to the board. Kick it with the right foot to trap the board then kick with the left to release. No bending over, no complex machinery, just a simple wedge. I have one variation built in Sketchup if anyone needs a visual.
I don’t use a pin. My vise extends almost to the floor. There is a piece of ¾ scrap sitting on the floor between the vise leg and the bench that works fine for stock ¼ – 1”.
If the chain makes four, then there are at lease six.
5: Hovarter makes a version of his unique clamping solution for leg vises: http://www.hovartercustomvise.com/index.php?route=product/product&product_id=52
6: Or maybe 1a. Make the bottom spinning disk a sprocket, add a sprocket to the vise screw and connect them with a chain like the Lie-Nielsen and Veritas vises.
I’m still trying to figure out what method I’m going to use on my new bench.
Mike
It’s really weird that you posted this today because for whatever reason I stumbled upon this today:
http://www.inthewoodshop.com/ToolReviews/AYSLegViseChainAdjuster.html
Most interesting.