We may receive a commission when you use our affiliate links. However, this does not impact our recommendations.

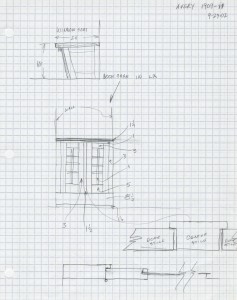
Don’t be ashamed of using graph paper to keep the lines of your sketches straight. The goal is to compile and transfer information, not win an award for a pretty picture.
In addition to using sketching to solve problems on the fly in the shop, I also use quick sketches while making formal drawings to visualize the appearance of the finished drawing. When I’m at a museum or an auction, I take along pencil and paper and make quick sketches for use at a later time. When I’m trying to design a new piece, several quick sketches will get me headed in the right direction or let me know if I’m heading in the wrong direction.
Sketching for design development is a valuable way to distill ideas into a tangible form. Don’t be concerned about the appearance of initial sketches. The idea is to identify ideas worth pursuing and reject ideas you don’t like — not to win an award for making a pretty drawing. The more sketching you do the better you will become, so don’t let the appearance of your initial efforts keep you from continuing.
Most people have the expectation that they should be able to sit down, pick up a pencil and draw what they want to build on their first attempt. Very few people can actually do this or even come close. A better approach is to sketch as many ideas as you can imagine, even if you know you won’t want to build some of them.
Steps for Design Development
Make a quick sketch of something that would fit in the Jetsons’ home, followed by a rock and a log that the Flintstones would use. Draw several more in between. Do a few in a style you like and a few in a style that you hate. Make as many as you can in a short period of time. Try different shapes and different combinations of shapes.

Quickly sketching what you don’t want to build will free your brain of clutter and clarify what you do want to build. Make a group of quick sketches to arrive at an overall concept.
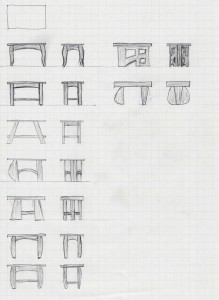
Keep the size small, making several quick sketches on a single sheet of paper. This is a warm up exercise for the brain, the hand and the eye. Even if you have a good idea before you start, exploring other ideas and variations will make it better in the end.
If you don’t have a clear idea in mind, sketching things you don’t want to build will often lead in the right direction. The idea is to eliminate bad ideas from your brain so that the good ones can bubble up to the surface.
This exercise will clarify in a short period of time what works for you and what doesn’t. You may be surprised that a detail or proportion from something that initially has no appeal will translate into something interesting when applied to something else.
As your design ideas become more refined, make a series of sketches with different variations. Rough out four or six boxes on a sheet of paper representing the overall size of what you intend to make, then sketch different versions. Don’t lock yourself into one idea at the start, but try different ideas until the best idea clearly stands out.
As your design develops you will want to move from free-form sketching to more mechanical means. You want to be sure you’re working on an idea that will be buildable, but don’t lock yourself in too quickly. Make some preliminary drawings to work out details or to establish overall shapes and sizes.

Two hours of expert instruction from Bill Rainford on hand drafting. Learn more about what’s covered and watch an excerpted video here.
When I have a size and shape established, I’ll make photocopies of a rough drawing of those shapes and sizes. I then sketch freehand on those copies to try out different ideas. This is like a bridge between designing and planning. Starting planning too early in the process can lead to a good idea being missed.
Design development is a process of choosing elements that appeal to our tastes, style and methods of work and eliminating ideas that don’t fit these criteria. In some situations the options are few and the choices are easy. At other times, sifting through all the possibilities can be overwhelming. A good designer knows how to sift efficiently.
–Bob Lang
The above post is an excerpt from Bob’s ebook, “Drafting & Design for Woodworkers,” available in our online store.
Here are some supplies and tools we find essential in our everyday work around the shop. We may receive a commission from sales referred by our links; however, we have carefully selected these products for their usefulness and quality.


thanks for the exercise…