We may receive a commission when you use our affiliate links. However, this does not impact our recommendations.

Right at home. This miter saw workstation is compact and inexpensive to build. As a bonus, our crosscuts are more accurate, and our shop is cleaner.
Is it the saw or where the saw lives that increases your accuracy?
There are two types of miter saws. The first can be a mainstay in the woodshop, dependably making accurate crosscuts day in and day out. Or it can be a cantankerous helper, needing constant attention and delivering inconsistent results. The difference usually isn’t in the saw; it is where the saw lives in the shop – how it is set up, the table it sits on and the fence and stop.
Miter saws were designed to be portable, taken to a job site and moved often. In many shops, the miter saw is still treated as a visitor, not a permanent resident. This makes sense if you’re just setting up shop, or often move your tools to share space. If, however, you have the room, a fixed location is preferred.
In our shop, our miter saw has floated around for several years on a mobile cart with folding tables. We still have a limited amount of space, but we assessed our needs, the way we work and the way we share our shop, and a permanent miter saw workstation was at the top of our list of shop upgrades.
Meeting of the Minds
I met with the other editors and we talked about how we use the saw and what our expectations were. And we listed the things we didn’t like about the old setup. We planned a new stand and decided to concentrate on the important things, leave the bells and the whistles for someone else to add, and keep to a tight budget.

All messed up and nowhere to go. Our old stand had lots of bells and whistles, but it lacked a way to deal with scraps and debris.
The two main tasks our saw faces are breaking down rough lumber at the beginning of a project and then making precise, repeated cuts after the lumber has been milled. Most saws on the market today are capable of being very precise with one big “if.” Tossing rough lumber around can knock a wimpy saw stand out of whack with the first piece of 8 /4 hardwood that comes its way, so the first requirement is strength and stability.
But this strength needs to be focused and refined. The alignment of tables and fences needs to be right on – and stay that way – or the saw is useless for precise work.
At least nine out of 10 cuts we make are with the bulk of the material to the left of the saw blade. We decided to trade some flexibility for precision and build a solid stand to the left of the saw. To the right of the blade is a rolling stand that’s the same height as the saw to hold material and to give some support when we need it.
Cutlist and Diagrams


 Pulling Out the Stops
The final point we agreed on was a stop system. We use stops on a regular basis to cut multiple parts to an exact length. We needed a simple and easy way to add a stop when we needed one. We also decided that it’s hard to beat a block of wood and a clamp (especially on the price).
We’ve seen more than our fair share of systems with T-track and fancy stops that flip up and down and decided that for us the time, expense and chance of a stop moving or slipping weren’t worth it.
One of my pet peeves is the buildup of offcuts and sawdust around the saw, so we left the saw table open on top, with a trash can directly below the saw.
We also borrowed a trick from the zero-clearance insert on our table saw. The kerf in the insert shows the exact location of the blade, and is an excellent aid to cutting right to a layout line. It sure beats trying to line up a cut to a tooth on the saw blade, especially if you’re trying to cut to one side of your line, or trying to split the line.
We added a sacrificial insert that sits outside of the saw’s metal fence. It won’t last forever, and it will get trashed as soon as we bevel the saw, but nearly all of the cuts we make are at 90°. The additional accuracy we get from having the insert makes moving or changing it on occasion no big deal.
Design Around the Saw
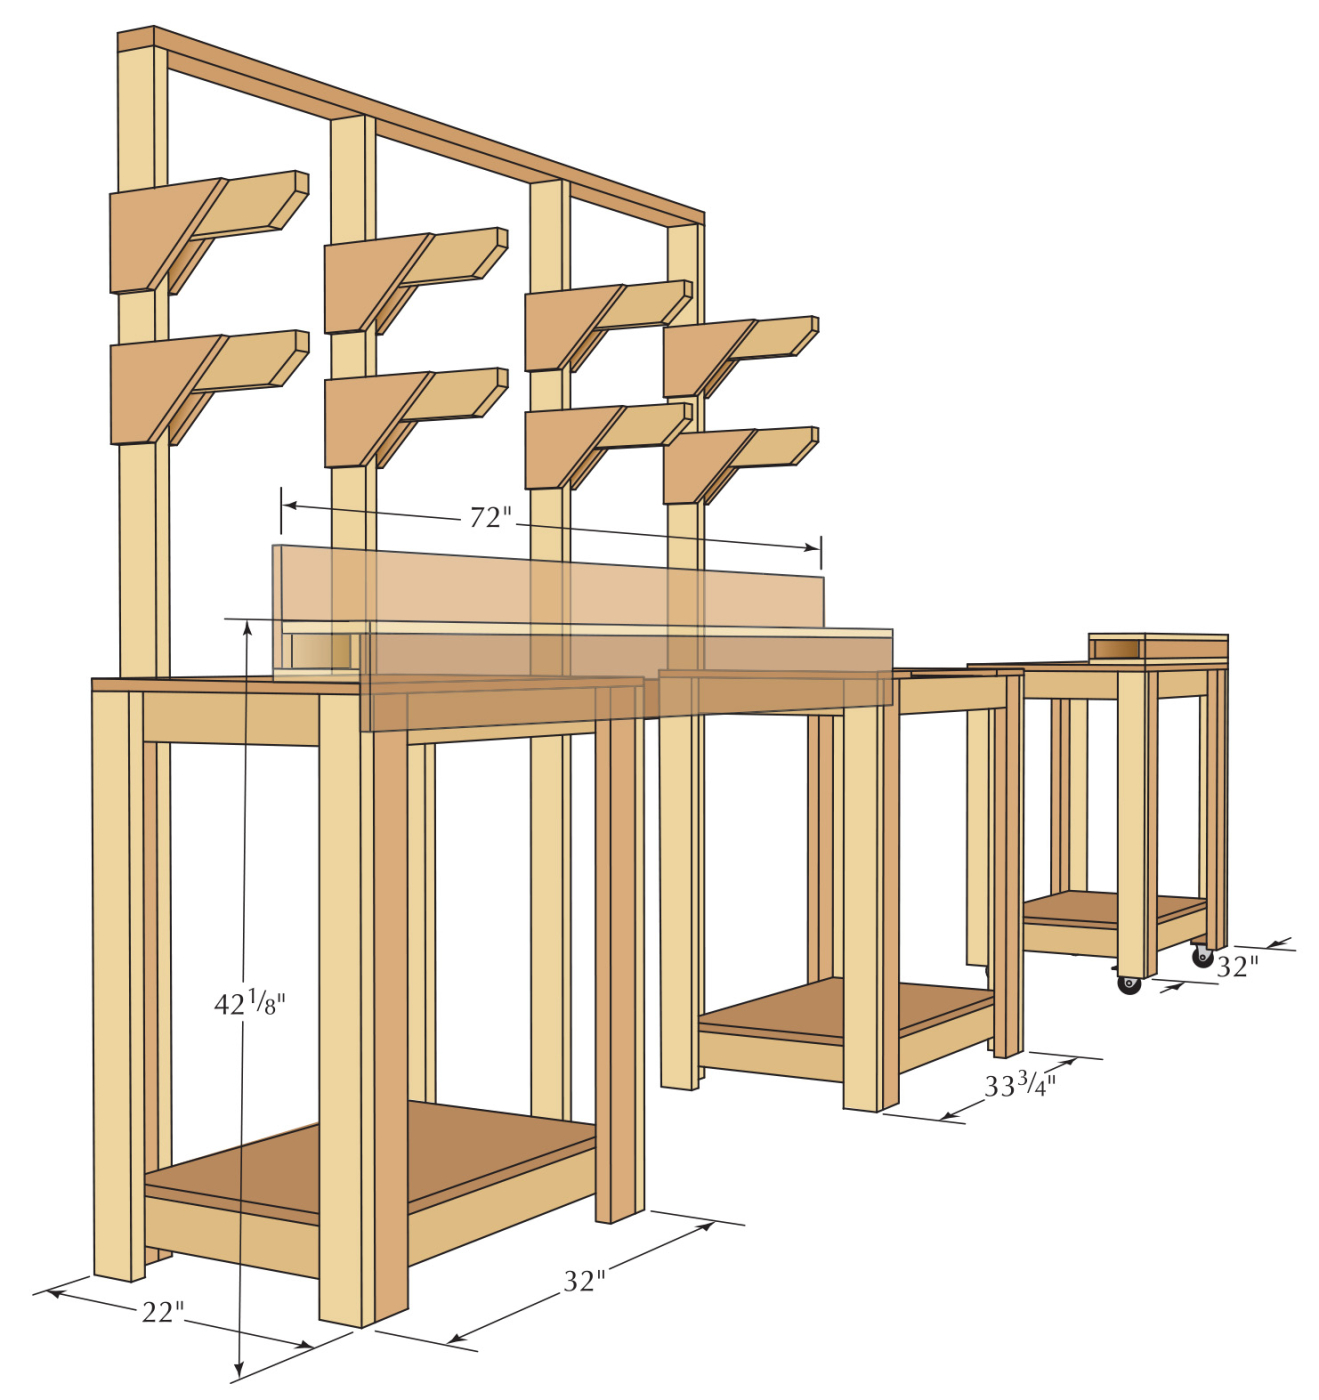
What we came up with works well for us, is adaptable to nearly any saw and shop, and you won’t spend a lot of time or money making your own. The first part of designing your stand is establishing the footprint of your miter saw. I set ours on a piece of plywood to mark the layout. Put the front edge of the saw on the edge of the plywood, and push the head of the saw as far back as it will go (if it has a sliding carriage).
Hold one leg of a framing square against the back of the guide tubes and mark the plywood. Swing the table to its right and left extents and make marks both at the back of the guide bars and at the control handle at the front of the saw. Extend the fences out from the saw and mark the distance at full extension. These marks will determine the size of the stand that the saw sits on. When the saw stand is complete, you want it to be tight against the wall, and the saw should be able to move to any position without interference.
Our stand fits in a limited space between an existing lumber rack and a corner of the room. The integral lumber rack we added holds the back of the saw stand away from the wall by 3-1⁄4” . Taking this into account with the footprint of the saw, this stand would be 31⁄4” deeper if we omitted the lumber rack.
We also made this stand a little narrower than the actual width of the saw with the fences extended. This puts the end of the left-hand fence over the end of the fence assembly. This means cutting a notch in the right end of the fence, but makes it easier to line up the end of the fence assembly with the saw’s fence.
The final parameter is the height above the floor. We chose 42-1⁄8” – which might seem tall, but it makes it much easier to see our work and line things up without an awkward bend.

Sow’s ear. Construction lumber is so wet that it will twist and warp as it reaches equilibrium with the shop environment. If used in this state, your work won’t come out straight.
Cheap is Good, With Patience

Dynamic tension. The jointed edge of one part helps keep the face of an adjacent part straight. Held together with glue and long screws, these legs are strong and straight.
The construction of the tables makes use of a common, cheap material and an assembly method that gives a solid and sturdy surface with basic joinery. All of the solid-wood parts began as spruce, pine or fir 2x4s from the home center. In our neighborhood, the least-
expensive hardwood available is poplar, and in 6/4 material, it costs about $2 a board foot.
I paid $2.38 each for “pre-cut” studs, slightly less than 8′ long; this works out to about 70 cents a board foot. The drawback is that this stuff can be soaking wet when you buy it. This can be overcome, but it requires time and effort.
Construction lumber is kiln-dried, but it comes out of the kiln at 18-20 percent moisture content. Similar material that has been in our shop for a year is between 8-10 percent moisture content. As the 2x4s reach equilibrium with the shop’s environment there will be some shrinkage, warping and twisting.
I’ve found some ways to work around this. The most important thing to do is wait. The drying process can be assisted, but it still takes time. When the wood gets to equilibrium, I mill it on the jointer and planer and obtain straight and flat material. Even though I am a procrastinator, I wanted to speed the process so I cut the studs to rough lengths.
Most of the moisture exits the board through the end grain, so this opens up the middle of the board and lessens the distance the water in the wood needs to move. Then I cut a bunch of scraps into 1⁄4“-square strips and stacked the rough-length 2x4s with spaces between the edges of the boards and my 1⁄4” stickers between each layer of the stack. I scanned a few boards with a pinless moisture meter every few days, and in about a month the wood was dry enough to use.
Without a moisture meter, it’s still possible to tell when the material is dry enough to use. If you have a piece of similar material that has been in your shop for several months, you can use that as a comparison to the new material. Wet wood will be heavier, and noticeably damp and cool to the touch.
The length of time it takes for the wood to acclimate will vary depending on where you live, and the environment of your shop. A month in our air-conditioned shop is the best-case scenario, but it could take two or three months in a damp basement shop. If you live in the desert, it could dry on the way home from the lumberyard.

Silk purse. After drying, jointing and planing, this common material is now fit to use.
Pretend it’s Rough Lumber
When the wood was dry, I milled it down to 1-1⁄4” x 3-1⁄4” on the jointer and planer. This may seem like a lot of waste, but in my experience, this is what it takes to get straight material from 2x4s. With a pile of now-straight and square stock, I cut the parts to final length and assembled the benches.
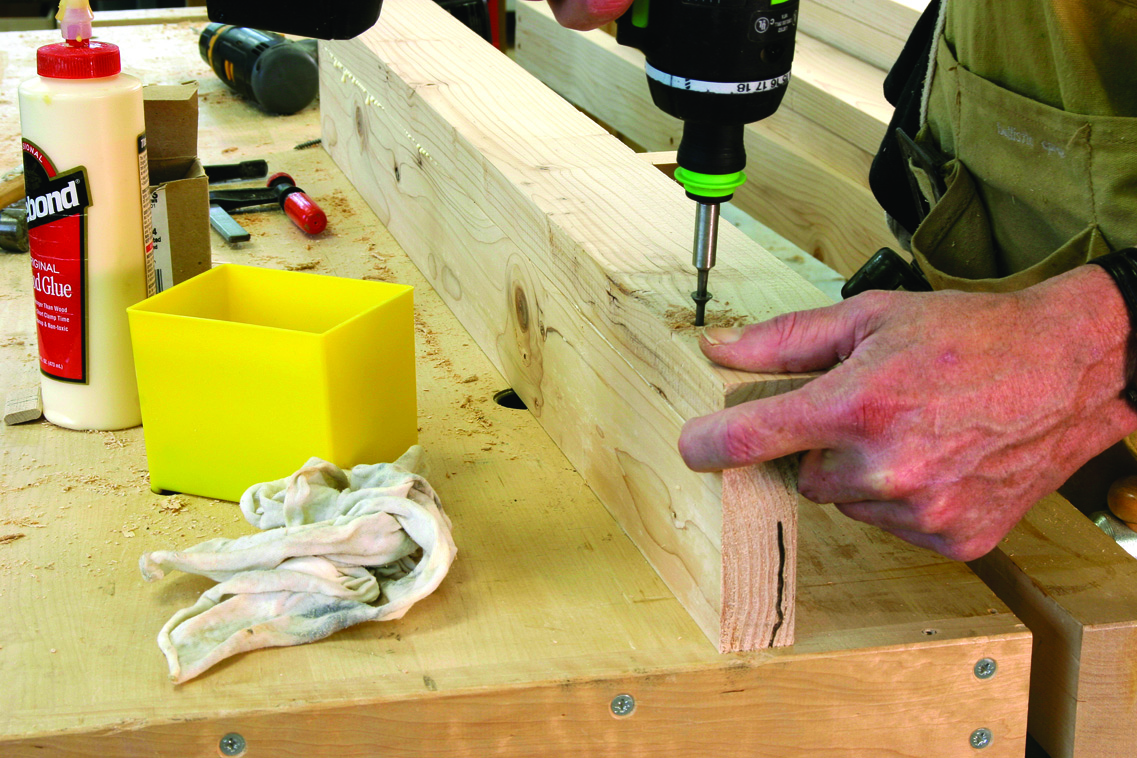
There are two subassemblies to the benches: “L”-shaped legs, and butt-joined frames. Glued and screwed together, the jointed edges of the leg components hold each other straight, resisting warping and twisting. The legs are far stronger than just a 2×4, and the shape allows solid attachment of the frame. This method can be used to make sturdy benches of nearly any size.

Dynamic tension. The jointed edge of one part helps keep the face of an adjacent part straight. Held together with glue and long screws, these legs are strong and straight.
The legs are held together with #8 x 2-1⁄2” screws and glue. Set one of the leg parts on edge on the bench, and apply glue to the top surface. Put the other part on top, using a piece of scrap to support it while you align the edge with the face of the vertical piece. With the parts aligned, drill countersunk holes and drive three or four screws to connect the two parts of each leg. The frames are glued and butt-joined and these joints are also screwed together.

All together now. With the frames inside the leg assemblies, this table is ready for a plywood shelf and top.
The frames fit in the inside corner of the leg assemblies. Lay two legs on the bench with the inside of the “L” facing up. Put some glue on the inside faces of the legs and put a frame unit in place with one of the long pieces down. Drill holes and connect the frame to the legs with #8 x 2″ screws. With a combination square, mark the location of the lower frame 20″ up from the bottom of the leg and glue and screw it in place. When the three tables are assembled, attach the plywood shelves and tops to the frames with glue and #8 x 1-1⁄4” screws.
The right-hand table has shorter legs so that it can roll on swivel casters. A block of scrap leg material is glued into the inside corner at the bottom of each leg, providing a place to mount the wheels with #10 x 3⁄4” panhead sheet-metal screws. A simple plywood box, the same height as the fence beam, can be placed on top of this rolling table to provide support for material to the right of the saw when needed.
Leave Yourself an Opening
The front upper rail of the saw table is reinforced with a second piece of wood that fits between the legs. I didn’t bother with screws; I just glued it on, holding it to the existing frame’s front with clamps while the glue dried. The plywood on the top of this unit isn’t a solid piece; it is two 7″-wide strips going front to back at the right and left ends. The lower shelf on this unit may need to be slightly lower than the other units to ensure that the trash can fits. I used a Rubbermaid 32-gallon “Brute” that I purchased from the home center, but you’ll need to adjust the opening size if you opt for a different container, or if you change the height of the saw table.
On the Fence

Double check. Checking the width of the strips with a straightedge will help keep the fence beam at the same height as the saw table.
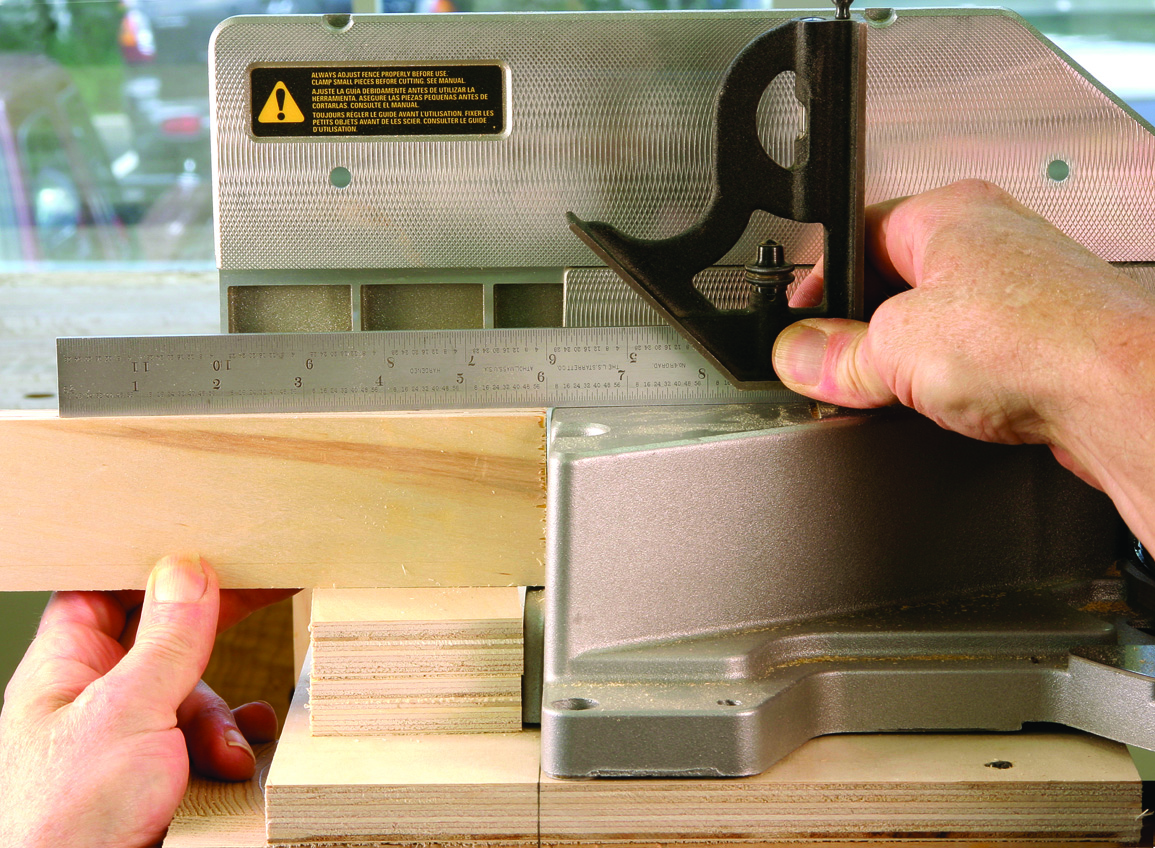
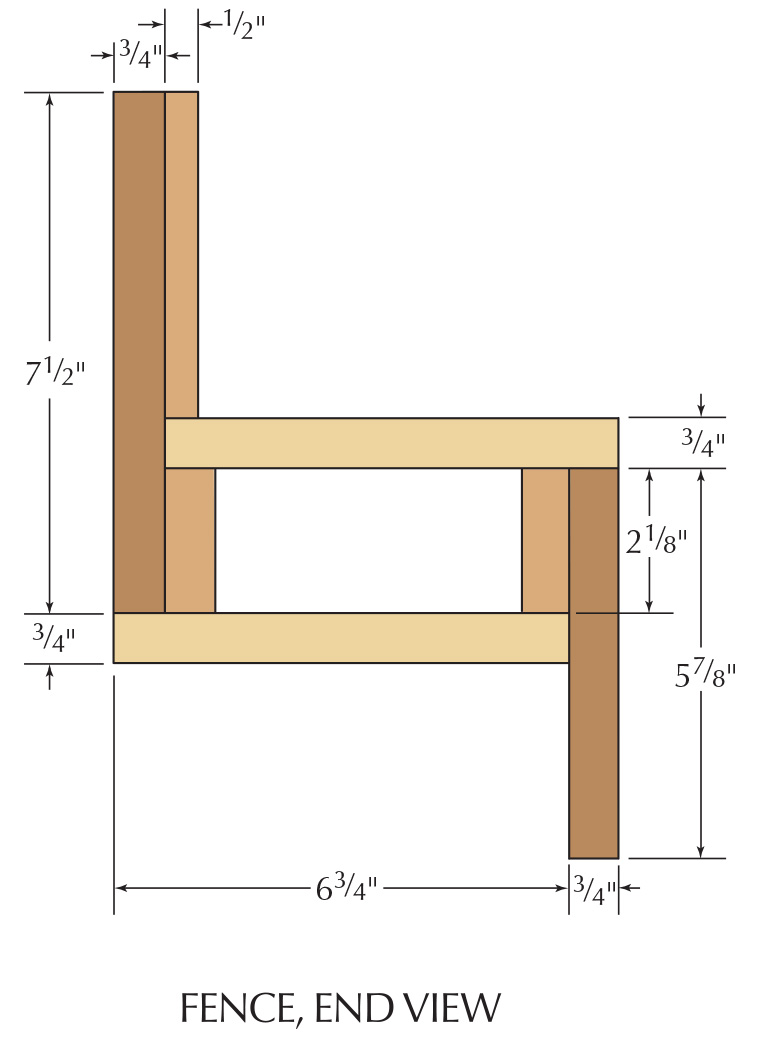
The fence assembly is a plywood box-beam. The extended front and back pieces of the beam are held to the top and bottom with strips of plywood. This beefs up the beam, and the width of the strips helps to level the surface to the surface of the saw table. In this entire project, the width of the strips is the only dimension that is important to hit exactly. This dimension will depend on the exact thickness of the plywood, and on the distance from the top of the saw’s table to the base of the saw.

Gauge the distance. Stacking two pieces of plywood next to the saw table will give you a precise distance without measuring.
Because 3⁄4” plywood is notorious for being undersized, I took two scraps and placed them on top of each other, next to the base of the saw. To get a precise measurement I took my combination square and set the head on the saw table and slid the blade down until the end of the blade rested on the plywood scraps. After cutting a test strip, I put it on top of the scraps and used the blade of the square as a straightedge to check the width. If the strips are a bit too narrow, that won’t cause any problems, as the fence beam can be shimmed up to match the saw table.

Double check. Checking the width of the strips with a straightedge will help keep the fence beam at the same height as the saw table.
One strip is attached to the long edge of each of the front and back pieces. I used 1-1⁄4“-long narrow crown staples and glue, but the strip can also be held in place with nails or screws. Be careful to keep the long edges of the two pieces of plywood flush during assembly. Attach the beam bottom to the edges of the front and back, then attach the top of the fence beam. If you need to notch the end of the fence, you can cut the notch with a jigsaw, either before or after assembly.

Keep the edges flush. The thin plywood strip reinforces the front and back of the fence assembly, and locates the top and bottom correctly.
The box that sits on the rolling table is made from the same size parts as the box beam fence, minus the wider pieces that extend up and down. I glued and screwed the parts together and considered attaching it to the rolling tabletop, but it does its job, supporting long pieces to the right of the saw just as well if left loose.
A material rack is built into the back of the saw stand. It isn’t designed to hold a lot of material; it is more of a temporary place to put material before and after cutting parts to length. Three 80″-long uprights are screwed to the back legs on the left-hand table, and the back left leg of the saw table. A cross piece connects the two tables at the back, keeping the entire assembly from racking, and this provides a place for a fourth upright. The supports are short pieces of 1-1⁄4” x 3-1⁄4” material, held in place with simple plywood brackets.

Quick and strong. The box beam construction keeps the fence assembly straight, and the narrow strips of plywood make it easy to put together.
With the tables and fence assembled, the complete saw station can be put in place and assembled. Start with screwing or bolting the saw to its table, then level the table with shims under the legs as needed. The left table is set in place, and the fence beam is set across the two tables. Check to see that the fence beam is sitting level, and that the fence itself is in line with the metal fence on the saw.

A place to put your stuff. Adding brackets to the back of the stand is a convenient way to store material about to be cut and parts that have just been cut.
When everything is level and in line, attach the fence assembly to the two tables with a couple screws. Attach the 1⁄2“-thick secondary fence to the thicker back fence with #6 x 3⁄4” screws. We used Baltic birch plywood, which comes in sheets that are 60″ square. The permanent portion of the secondary fence is one rip from the sheet.
Making Sacrifices for Accuracy
Rip some extra pieces from the sheet for the replaceable fence sections. Hold one of these against the right-hand edge of the permanent piece and mark the length directly from the right edge of the metal fence on the saw.

Right where you want it. Using the kerf in the subfence allows you to cut inside or outside a pencil line, or split it down the middle.
To provide clearance for the saw carriage, you’ll need to trim the upper portion of the replaceable fence in the middle. Hold it in place, trace the outline of the saw’s fence on the back, then make the cut on the band saw or jigsaw.
The sacrificial fence is held in place with #6 x 3⁄4” screws. Most saws have a few holes in the metal fence that will allow you to run a few screws in from behind, and you can run a couple screws from the face of the fence into the thicker plywood back fence. With the saw set at 90˚, make a cut through the plywood fence.
This cut through the fence gives a convenient and accurate way to line up a cut line on your work with the saw blade. When you need to renew this kerf line, you don’t need to replace the entire piece.

Zero clearance equals accurate cuts. A replaceable sub fence indicates exactly where the saw blade will be during the cut.
Remove the sacrificial fence, cut the edge back to square and put it back, pushing the freshly cut end against the edge of the remaining right-hand fence. This will leave a gap on the other end, but that won’t hurt anything.

Keeping it simple. An offcut of plywood and a clamp make an effective stop system.
The only remaining part is the stop, which is a cut-off piece of 1⁄2” plywood. I nicked off the end at a 45˚ angle to keep sawdust from building up between the end of the stop and the material being cut.

Dealing with the trash. Miter saws can make a mess, but leaving the top open below the saw lets dust and scraps fall into the trash can below.
Here are some supplies and tools we find essential in our everyday work around the shop. We may receive a commission from sales referred by our links; however, we have carefully selected these products for their usefulness and quality.


 Pulling Out the Stops


