We may receive a commission when you use our affiliate links. However, this does not impact our recommendations.

Giant Shop Cabinet
Organize tons and
tons of woodworking
supplies with
room to spare.
By Tim Johnson
|
If your workshop seems cluttered and your
workbench is always covered with stuff,
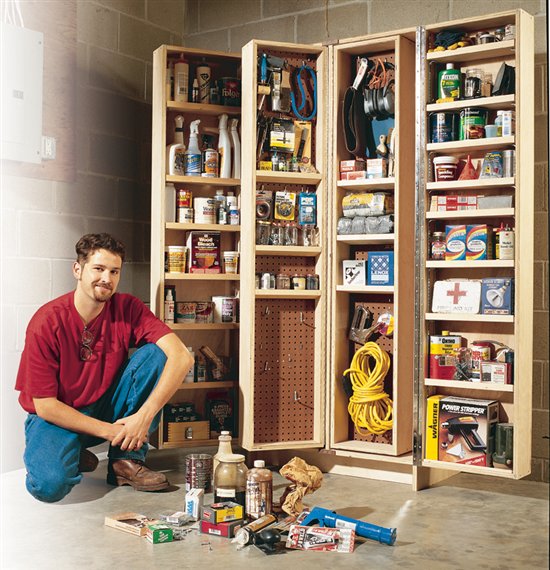
you need this cabinet. It packs 30 cubic ft.of
storage, enough for all of those got-to-have
supplies, from screws to paint cans. Everything
is readily accessible, without reaching, because
the big pantry-style doors open wide. We’ve
packed a room-full of storage into a cabinet the
size of a fridge—only 30-in. wide, 24-in. deep
and 6-ft. tall. Best of all, this cabinet is easy to
build.You and a buddy could whip together a
couple of these beasts over a three-day weekend.

|
|

You may also like…
Modular Shop Cabinets
Tool Cabinet
Hyperorganize Your Shop
|
|
1. Cut the cabinet's long pieces from the short end of
full-sized sheets.You’ll need a buddy to help maneuver the
ungainly sheet and keep the big offcut under control.With
careful measuring, the cut-off piece will be exactly the right length,
ready to be ripped to width.
|
|
Click any image to view a larger version.

|
|
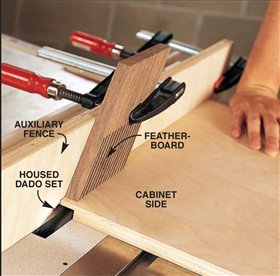
2. Rabbet the cabinet sides for the top and back,
using an auxiliary fence (Part X1) and a featherboard.
By housing the dado set, the fence allows you to
match the width of the rabbet to the thickness of the
plywood top.The featherboard acts as a blade guard and
ensures a consistent depth of cut.
|
|

|
|
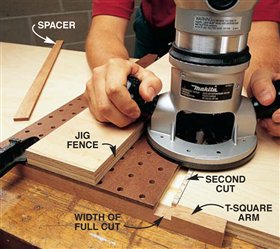
3. Rout perfect dadoes for the shelves
with a 1/2-in. straight
bit and a T-square-style
jig made from scrap.
Make the wide dado in
two passes, the second
with a spacer held
between the jig’s fence
and the base of
the router.
|
|

|
|
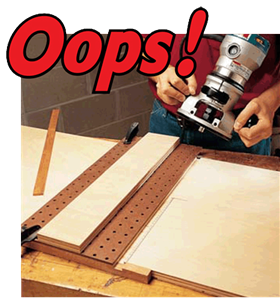
I forgot to stop! The phone
rang just as I was ready to cut the
stopped dado for the middle shelf.
Distracted by the call, I went back
to work and zipped right through
my stop mark.
Oh well, it’s only a shop cabinet.
The through dado won’t hurt
anything but my pride. Had I
thought of it, a clamped-on stop
block, instead of a pencil line,
would have kept me from screwing
up.
Next time I’ll just let the phone
ring. That’s safer, anyway.
|
|

|
|
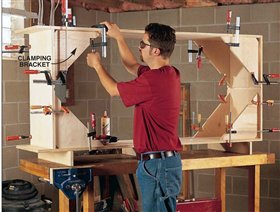
4. Plywood clamping brackets keep the cabinet square and let
you glue and screw it together, one side at a time, without big pipe clamps.
We’ve included the eight brackets you need in the plywood cutting diagrams
(Fig.D, Parts X2).
|
|

|
|
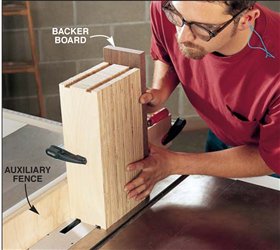
5. Gang the shelves together for dadoing. A
backer board keeps
the dado set from
blowing out the backside
of the last shelf.
The auxiliary fence’s
extra height keeps the
stack steady.
|
|

|
|
6. Nailing the standards is a cinch
because the dadoed
shelves hold them in
place for you. Needlenosed
pliers are much
better nail-holding
devises than your
fingers!
|
|

|
|
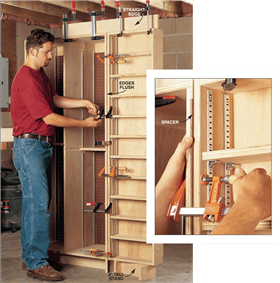
7. Clamp the doors in position before installing the hinges, using a shop-made
stand, a perf-board spacer and
a straightedge extending from
the top of the cabinet. Make
sure the edges of the door
and cabinet are flush.
|
|

|
|
8. Mount the hinges with sheet metal screws. They
have sharp threads that grip much
better than the puny screws supplied
with the hinges.Alternate the screws
between the cabinet and the door so
their heads won’t bind.
|
|

|
Product Recommendations
Here are some supplies and tools we find essential in our everyday work around the shop. We may receive a commission from sales referred by our links; however, we have carefully selected these products for their usefulness and quality.


