Every woodworker discovers
an extraordinary piece of wood once in a
while. What do you do with it? One board is not
enough for a big project. It’s a crime to cut it up into
small pieces for a little project. So you stash it
away, like a pirate burying his treasure, and wait
for the perfect project. Here it is.
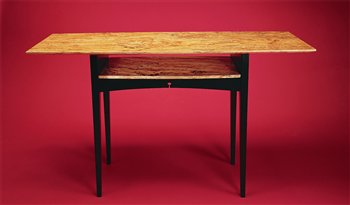
Turn your precious gem into an uncomplicated table
for the hallway or behind the
sofa. The thin black base
recedes from view, leaving
your beautiful wood to glow.
Our treasured board started out as a
bigleaf maple growing on the western
coast of Oregon. After it was felled by
loggers, the tree laid on the forest floor
and started to rot, or “spalt.” Then it was
hauled to a nearby river to be floated to
the sawmill. It didn’t make it to the
mill. The log sank to the bottom of the
river. Years later it was recovered from
the river by a sawyer, cut into planks,
and dried. Sunken treasure, indeed.
The base of the table is made from
yellow poplar, a humble species of wood
with green heartwood. While it may
not be pretty, yellow poplar has appealing
qualities. It’s relatively inexpensive,
even in thick planks. It’s easy to machine
and sand, and its small pores fill quickly
with finish, making a smooth surface to
complement the top. Soft maple has
the same characteristics and would be
another good choice.
All the joints in this table are made
with a plate joiner. The base is light in
weight and won’t be subject to much
stress, so biscuits are a safe bet. The
table rails are fairly thick. There’s plenty
of room for two #20 biscuits for each
joint. All the rails and legs are made
from the same piece of 6/4 lumber.
(Make sure you have enough for a few
extra legs.) The table’s joints are staggered
to keep the thin legs strong.
Preparing the stock
Mill the wood for the base first, but
don’t take it down to final thickness
and width right away. Leave it 1⁄8-in.
oversize all round.
Here’s why: The
legs are narrow
pieces, and when
they’re released
from a wide board
they may bend or
twist. Let them settle
into a relaxed
state over the
course of a few
days, then joint
them again and mill
to size. As for the
rails, they should be allowed to relax
too, because you’re removing almost
1⁄2-in. of thickness.
Work on the top while you wait for
the other wood to settle down.
The top and shelf
Your top may be made from one board or
glued up from a couple of boards. In any
case, take the time to compose it with care.
If your board has been following you
around for a while, that’s great, because
it has reached a state of equilibrium and
won’t distort as you mill it. This table has
no under structure to help hold a top flat,
so you’re relying on the stability of your
special board.
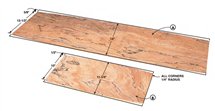
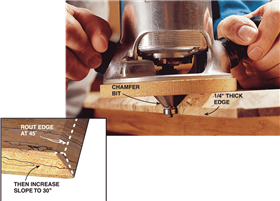
Draw the slight curve of the top with
a bent stick. Bandsaw the
curve and chamfer the underside of the
edge with a router (Photo 1). Stop before
you make the final cut and fair the curves
of the edge. This is easier to do now
than when the edge was at its full thickness.
Finish cutting the chamfer with a
hand plane or belt sander.
Plane the shelf and cut it to width, but
hold off on cutting it to length. You’ll fit
it to the base after the base is glued up.
Then you’ll draw the curves and smooth
them off.
The base
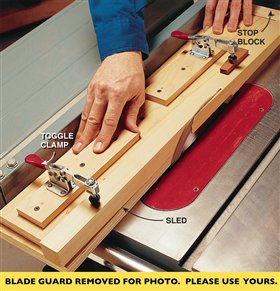
Mill all pieces to final thickness and
width. Taper the legs on two sides before
cutting the joints. With legs this small it’s
safer to build your own tapering jig with
toggle clamps than to use a commercial
jig that forces you to hold the leg in
place by hand (Photo 2). Draw the taper
on one leg in order to set up the jig. Try
it out on a spare leg. After cutting the first
taper, flip the leg so the taper faces up.
You’ll need a shim under one toggle
clamp when you cut the second taper.
Draw a centerline down the outside
face of each rail to locate the slots for the
biscuits. The four main rails are flush
with the inside of each leg, rather than the
outside. This means that the inside face
of the rail will be your reference surface.
Make sure the inside face is down when
you cut the slots.
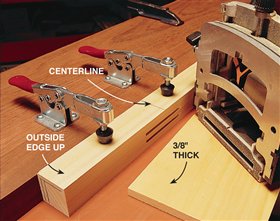
Clamp the rail down to a truly flat surface.
Set your plate joiner on the work
surface to cut the first slot. Then place a
3⁄8-in.-thick spacer under the machine
and cut the second slot.
The front and back rails are as narrow
as possible while still wide enough to
hold a #20 biscuit. The slots go all the way
from side to side and cut into the top edge
of the rail a bit. That’s fine, because these
over-cuts will be covered by the shelf.
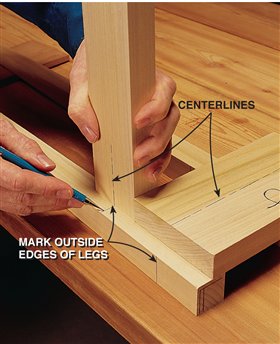
Mark the legs for slotting directly from the
rails. Stand a side rail on a leg, flush with the top
end, and transfer its centerline mark to the outside
face of the leg. The front and back rails fit
directly below the side rails, so it’s easy to mark
their positions (Photo 3).
Make a simple jig for slotting the legs. Hold the
legs in place with the same toggle clamps you
used for the taper jig (Photo 4).
Drill and shape the front and back rails. Round
the lower edge with fine sandpaper. Mark the
inside faces of all the rails so you don’t get mixed
up in the glue-up. Sand the outside faces. Slot the
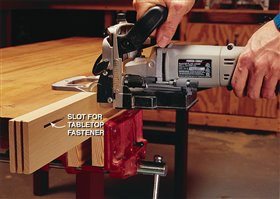
front and back rails with your plate joiner for the
tabletop fasteners (Photo 5).
Radius the edges of the side rails and legs on
a router table using a 3⁄16-in. round-over bit.
Then smooth the surfaces. This will reduce the
radius of the edges a bit. That’s just what you
want to happen on the legs, because the setback
of the rails is also 3⁄16-in., and you don’t want the
radius to come too close to the face of the rail.
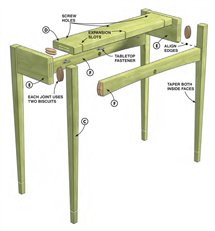
Drill holes for screws to hold the top on one
side of the upper rail. Slot the other side of the rail
on the tablesaw. The slots allow the top to expand
and contract without cracking. This rail is slightly
thicker than the other rails so the screws penetrate
only 1⁄2-in. into the top.
Glue-up and finishing
Glue the ends of the table first. Biscuits don’t align
pieces side to side. You must do that yourself.
Make sure the side rails are flush with the top ends
of the legs before you apply clamping pressure.
Have a mallet handy to knock the parts into
place. You’ll need pencil marks to align the top
edges of the front and back rails. Square across
from the bottom edge of the side rails to make
these marks. Now you’re ready to glue the rest of
the table.
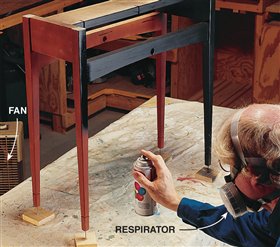
Prime the base by spraying on a sanding
sealer, Krylon, for example. You will need one
can. Sand with 220-grit paper. Color the base
with a matte-black spray paint, such as Krylon
1613 Semi-Flat Black, (Photo 6). You may need
two cans of paint. Screw down the top, attach the
shelf, and bring your buried treasure out into the
light of day.
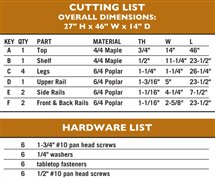
Cutting List & Hardware List

Fig. A: Top and Shelf Details

Cut curved edges on the top and
shelf. A bent stick and three reference
points are all you need to draw the curve.
Fig. B: Exploded View of Table Base

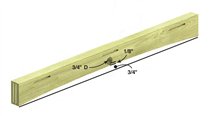
Fig. C: Rail Detail

Drill a hole in the
center of the rail, cut the
angled slot, and bandsaw a slight
curve to lighten the rail’s appearance.
Fig. D: Taper of Leg

Start the taper 1⁄2-in. below the
rail. This will leave
plenty of room for
cleaning up the
saw marks. |
Click any image to view a larger version.

1. Chamfer the edge of the top with
a router. Go around the top four or five times,
lowering the bit for each pass.The chamfer
will make the top seem thinner. Standard
router bits cut a 45-degree chamfer. Increase
the slope of the chamfer to 30 degrees to
improve the floating effect, using a plane or
belt sander.

2. Cut the tapered legs on the tablesaw.
Hold the narrow
leg in place with
toggle clamps
mounted on a
sled.This will keep
your hands well
away from the saw
blade. A stopper
board at the foot
of the leg prevents
it from sliding.

3. Layout the biscuit slots
with center marks. First mark the center
of each rail.Then transfer the marks to
the legs. Use the side rail as a spacer to
determine where the front rail goes.

4. Cut double slots
with a plate joiner for
a strong joint. Hold the
leg in place with toggle
clamps mounted on a
stiff board. Cut the first
slot with the plate joiner
flat on the work surface.
Then raise the plate
joiner with a 3⁄8-in. spacer
to cut the second slot.

5. Cut slots for
tabletop fasteners
with the plate joiner.
Reference with the fence
set on top of the rail.

6. Spray the base with matteblack
paint.Wear a respirator and
exhaust the paint fumes outside with
a fan. Easy-to-sand red primer is used
first to fill the pores and make a
smooth surface.The thin, black lines
of the base seem to disappear while
the beautiful top springs to life! |


