We may receive a commission when you use our affiliate links. However, this does not impact our recommendations.
Sunburst Patio Table
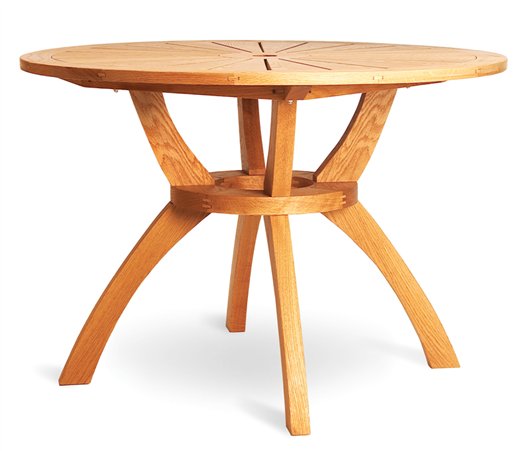
Tired of outdoor tables made of metal or plastic? This table has the richness and warmth that only wood can provide.
By David Radtke
|
It’s built to stand up to the weather, so it’s perfect for a patio, porch or sunroom. The 44-in. top features a stunning sunburst radial design and seats four comfortably. The sturdy base construction makes for a rock-solid table. There’s a center hole for an umbrella canopy and plenty of room beneath for the counterweight. I built my table out of rot-resistant white oak with splines and grooves in the tabletop and dowel joints in the legs. I chose epoxy for strong, weatherproof joints. I simplified the tabletop’s complex construction by using an MDF pattern board that doubles as a machining and clamping jig. The pattern board is used along with a simple trammel to accurately machine the fussy curved joints on the pie shaped slats and to cut the outer ring and the center hub. I’ll show you how to make cam clamps that lock the top’s parts in position for routing and gluing. The base may appear challenging to build, but I’ll also show you a system, using a pair of ordinary handscrews, to make the job go smoothly.
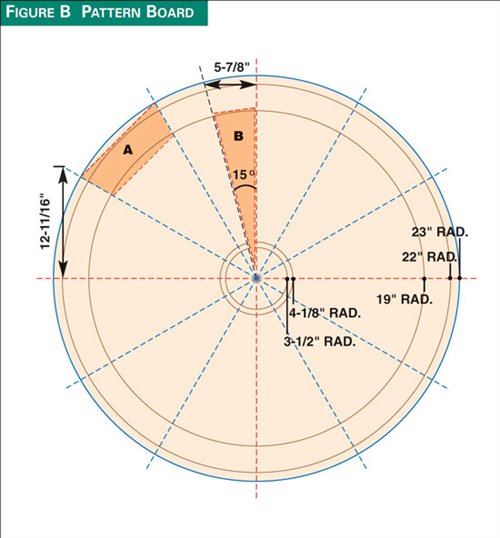
Make the pattern boardThe best way to deal with the geometry and joinery of the tabletop is to draw it out on a 4×4-ft. piece of 3/4-in. sheet stock (Fig. B) I call it a pattern board.
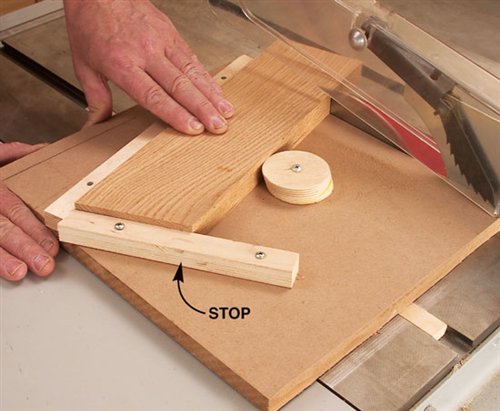
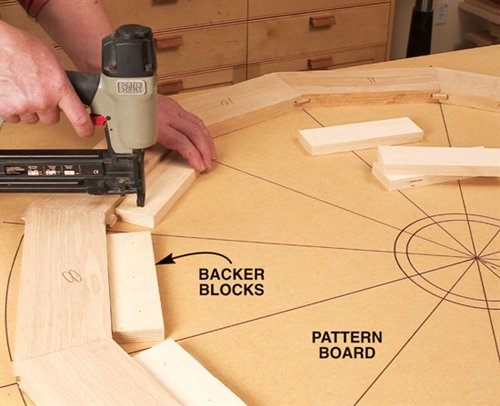
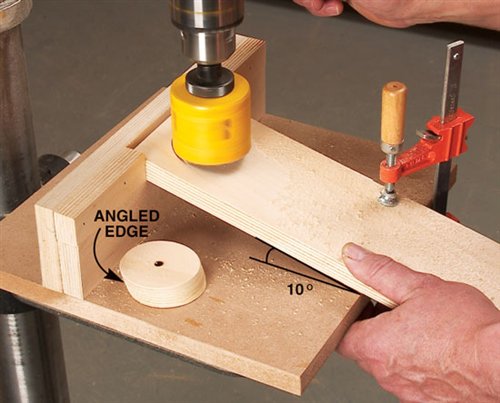
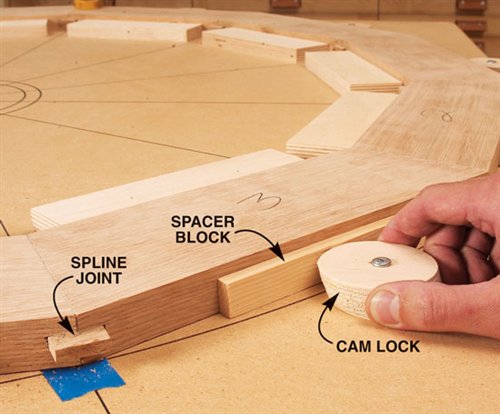
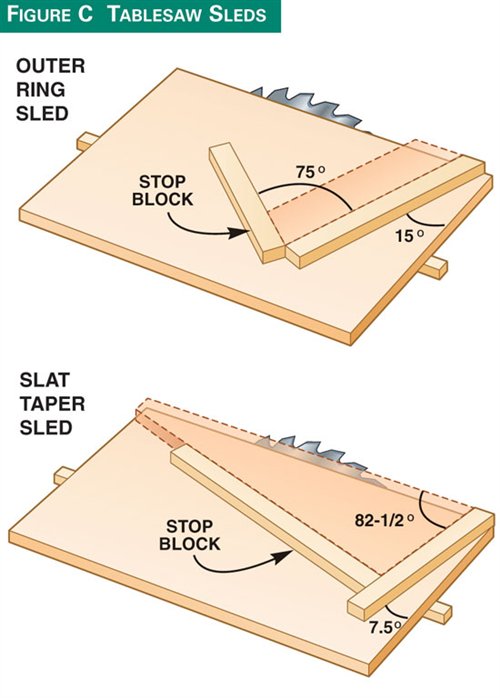
Build the outer ring1. Measure the length (long point to long point) of a section of the outermost ring on the pattern board. Our measurement came to 11-13/16 in. but check yours since it may vary. 2. Cut the outer ring segments (A) to length on a sled (Photo 1; Fig. C). 3. Dry fit the segments on the pattern board to make sure all the miters are tight. You may have to adjust the angle of the last miter. If you do, mark the joint so it can be reassembled correctly. 4. Add backer blocks to support the inside edge of the outer ring (Photo 2). 5. Cut the cam locks on the drill press using a 2-1/2- in.-dia. hole saw and a table that slopes 10 degrees (Photo 3). 6. Screw the cam locks onto the pattern board so the short radius is just shy of the spacer. The sacrificial spacers keep the cam locks from being cut as the ring is routed out in the following steps. 7. Cut the slots in the mitered ends of each outer ring segment on your router table. Cut splines (L) to fit the grooves from scrap oak. 8. Glue up the outer ring (Photo 4).
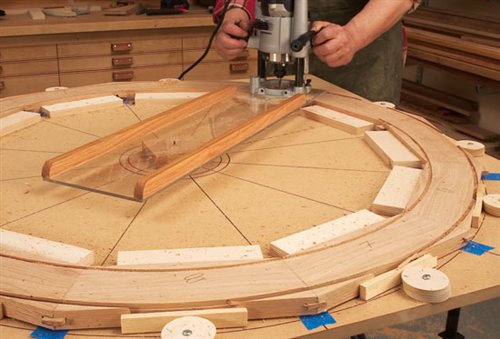
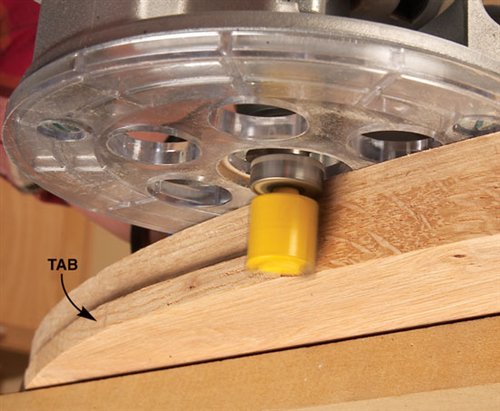
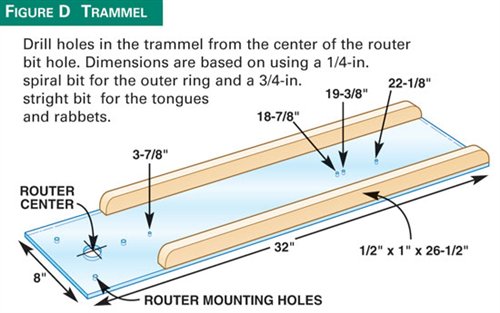
Rout the outer ring9. Screw a 1-in. thick pivot block on the center of the pattern board. 10. Chuck a 1/4 –in. upcut spiral bit in your router and attach it to the trammel (Fig.D). 11. Set the bit to cut 3/16-in deep. Hook the trammel on the pivot block using the 22-1/8-in. hole. 12. Turn the router on and plunge the bit into the ring. Swing the trammel slowly around (Photo 5). Drop the carriage another 3/16-in. and make a second pass. Repeat until there’s about 1/4-in. of material at the bottom of the ring. Important: Don’t cut all the way through the ring. You need enough material so the cam clamps can continue to hold the ring in place. 13. Move to the shorter pivot point and cut the inside edge of the ring in the same manner as the outer edge. 14. Remove the ring from the pattern board. Use a jigsaw to remove the remaining stock from the ring. Don’t try to flush-cut the edges but leave a slight tab. 15. Remove the tabs with a flush trim bit (Photo 6). 16. Rout a centered groove all the way around the inside edge of the ring.
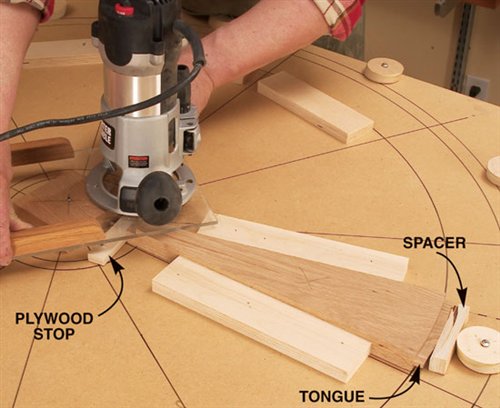
Make the tapered slats17. Cut the table slats (B) to length. 18. Cut the tapered edges on the slats with the slat taper sled (Fig. C). 19. Secure a slat on the pattern board for routing (Photo 7). 20. Set the trammel on the pivot point through the 19-3/8-in. hole. 21. Swing the trammel to make the first cut. Then flip the slat over and make the second cut to complete the tongue. Check the tongue’s fit in the ring’s groove and make any necessary adjustments. Then rout tongues on all the slats. 22. Shape the tongue with a sander to match the arc of the shoulder. 23. Cut the rabbet for the half lap joint on the narrow end of the slat with the trammel set in the 3-3/4-in. hole. Make sure the slat is face-up for this step. 24. Dry-assemble the slats in the outer ring and measure the exact diameter of the center hub.
Make the center hub25. Cut and miter the four hub sections. Rout slots for splines and epoxy the hub blank together. 26. Draw a circle that matches the hub diameter you measured in Step #24. Cut the circle on the bandsaw and sand smooth. 27. Rabbet the underside of the hub (Photo 8) so the hub nestles into the recess created by the slat rabbets. Don’t cut the hole in the center of the hub yet.
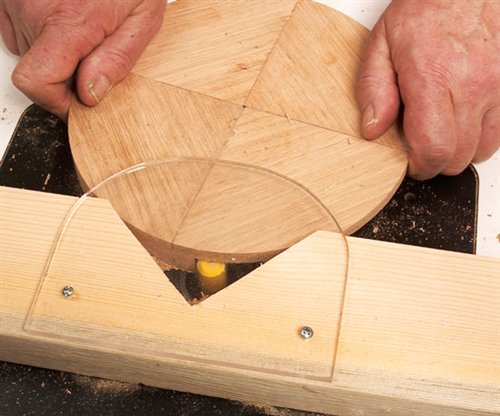
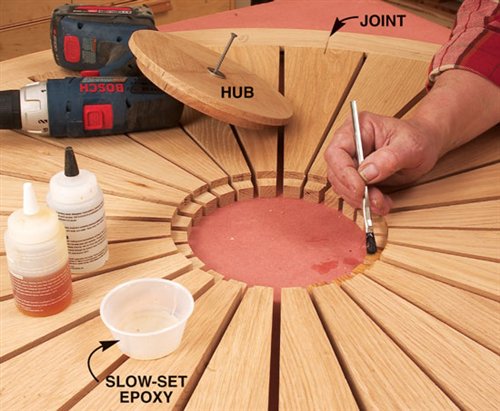
Glue the top assembly28. Chamfer all the top edges of the slats, outer ring and hub with a sanding block. The chamfer creates a detail that’s visually pleasing while it disguises any areas where a joint may be less than perfect. 29. Mix about 4-oz. of slow set epoxy. Glue the slats to the outer ring first. Be sure to wet both the slot and outer tenon before inserting. Scoop up any squeeze-out that is hard to get at with a Q-tip and then wipe the area with acetone. 30. Coat the rabbets on the slats and the hub with epoxy. Carefully position the hub in the rabbets. Then clamp it in position with a screw (Photo 9). 31. After the epoxy has thoroughly cured add the struts and braces (D, E and F)to the underside of top (Fig. A). 32. Use a hole saw to drill a 2-1/4-in. hole through the center of the hub.
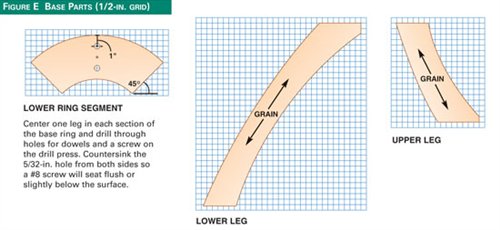
Build the lower ring33. Make a hardboard pattern of a base ring segment (Fig. E). Use the pattern to trace four pieces onto the stock. 34. Cut the miters on a miter saw and bandsaw the curves. Place the four sections together and check the fit. 35. Rout a pair of 1/4-in. slots in each miter. Epoxy the ring together with splines. 36. Once the epoxy has set, sand the inside of the ring with a sanding drum and the outer edge with a belt sander. Label the top and bottom of the ring. 37. Lay out the leg positions on the ring and drill holes for dowels and screws on the drill press (Fig. E).
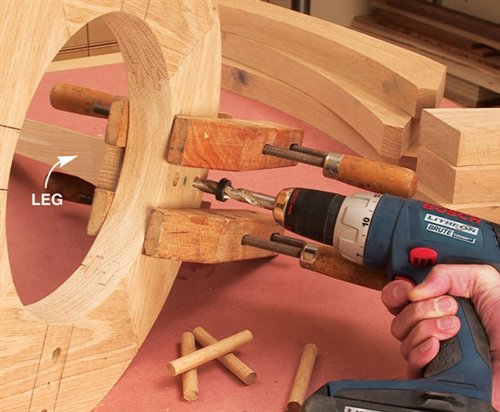
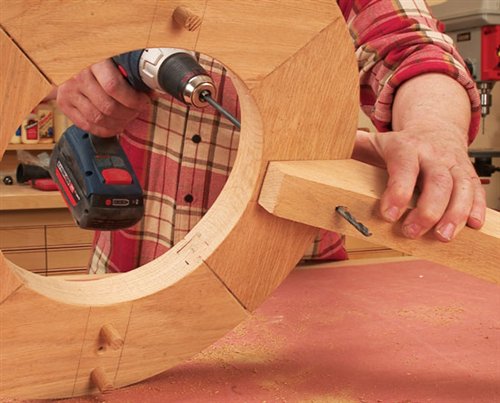
Assemble the base38. Make patterns for the upper and lower legs (Fig.E). Rough-cut the legs with your bandsaw then attach a pattern and rout with a pattern bit. 39. Clamp a pair of handscrews on the lower ring along the leg layout lines. Slip an upper leg snugly between the handscrews. Use an 1/8-in. bit to drill a pilot hole into the upper leg, using the 5/32-in. hole in the ring as a guide. 40. Lock the leg in place with a #8 x 3-in. screw. 41. Drill two 1/2-in.-dia x 1-in.-deep dowel holes into the upper leg (Photo 10). 42. Remove the upper leg but keep the handscrews in place. Insert the lower leg, secure with a screw and drill the dowel holes. Repeat the process for each set of legs. 43. Cut your dowels 1/8-in. shy of the total depth of the hole. Sand a slight flat on one edge to give the excess epoxy an escape route. TIP: If your dowel stock is a little tight, try spinning the dowel in a drill as you sand lightly with 80-grit paper to narrow the diameter. 44. Dry fit a lower leg on the ring with dowels. 45. Drill a 1/4-in. pilot hole all the way through the ring and the lower leg for the lag bolt (Photo 11). 46. Remove the lower leg and repeat the process for the upper leg using a 3/16-in. bit. Do not drill all the way through. 47. Use a Forstner bit to drill a 3/4-in. dia. counter bore in the lower leg that’s deep enough to hide the lag screw head and washer. 48. Mix the epoxy and fasten one pair of lower and upper legs to the ring. Be sure to wet each hole and dowel. Drive a lag screw from the lower leg through the ring and into the upper leg until it draws tight. Repeat for all the legs and let the epoxy fully cure.
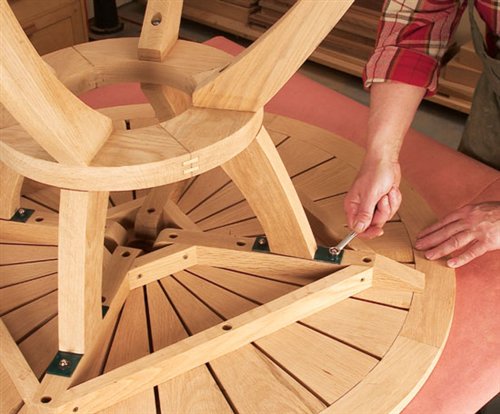
Final assembly49. Cut tabletop fastener plates from 1/8-in. thick steel. Prime and paint the fasteners with a rustproof paint like Rusto-leum. 50. Attach the steel brackets (K) to the tops of the upper legs, then flip the leg assembly upside down and drill pilot holes for the lag bolts. Attach the top with lag bolts and washers. 51. Mount the tabletop to the base (Photo 12). 52. Apply your favorite outdoor oil finish and set the table for company!
David Radtke is a custom cabinetmaker, home design consultant and restoration specialist in Minneapolis, Minnesota. He enjoys archery, bowmaking, woodturning, and cycling whenever he’s not standing behind a tablesaw or sitting in front of the drawing board. Sources(Note: Product availability and costs are subject to change since original publication date.) Wall Lumber, walllumber.com, 800-633-4062, white oak lumber, 5/4 white oak; 8/4 white oak. Rockler, rockler.com, 800-279-4441, T-88 Structural epoxy, #20647. This story originally appeared in American Woodworker July 2007, issue #129. |
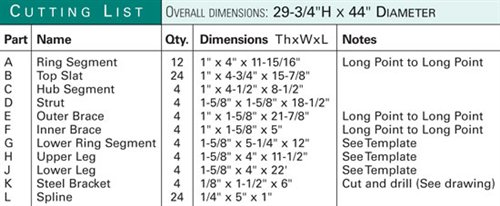
Click any image to view a larger version. 1. The table is built from the outside in. Start by mitering the outer ring segments with a sled. Cut one end of each segment without the stop in place. Add the stop and miter the opposite end. A shop made cam lock holds the piece in place. 2. Dry-fit the ring segments on a pattern board that has a full-size drawing of the top. Pin backer blocks behind each segment. 3. Make eccentric cam locks on the drill press using a 2-1/2-in. hole-saw and a support. The angled edges of the disc act like a cam lock when screwed to a board. 4. Glue and clamp the outer ring with slow-set epoxy and cam locks. Glue sacrificial spacer blocks to the ring so the cam locks won’t get cut by the router in the next step. Tape under the splined joints prevents the ring from adhering to the pattern board. 5. Plunge-rout the outer ring using a trammel and a 1/4” spiral bit. Make several shallow passes but leave about 1/4-in. at the bottom of the cut or you’ll lose the clamping pressure from the cam locks. Swing the router counterclockwise to cut the outer edge and clockwise for the inner edge. 6. Flush trim the tabs left after jigsawing the remaining waste from the edges of the ring. 7. Use the trammel to rout a tongue on the wide end of each slat and a rabbet on each narrow end. Position the slat with the narrow end 3-1/2-in. from the pivot point. Secure the slat with plywood stops, a sacrificial spacer and a cam lock. 8. Rabbet the center hub to fit the rabbeted slats. Clamp a notched, 6-in – wide board to your router table. To cut the rabbet, contact the infeed side of the notch and rotate the hub into the “V”. Spin the disc until the rabbet is complete. 9. Glue the slats into the outer ring. Align the center of every other slat with a joint on the outer ring. Eyeball the gaps between slats. Glue in the center hub and drive a screw through the middle to act as a clamp. 10. Drill dowel holes into the legs using the holes in the ring as a guide. A screw in the middle hole and a pair of handscrews holds each leg in place. Drill holes in one upper leg and one lower leg at each location. 11. Drill a shank hole for a lag screw through the small hole in the ring and through the lower leg. The leg is temporarily held in place with dowels and no glue. 12. Attach the top with lag bolts and washers. The lag bolts allow you to easily remove the top for winter storage. Cutting List
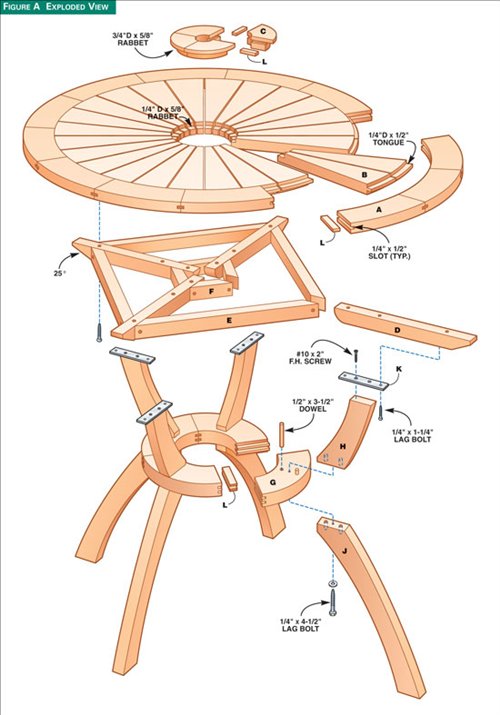
Fig. A: Exploded View
Fig. B: Pattern Board
Fig. C: Tablesaw Sleds
Fig. D: Trammel
Fig. E: Base Parts
|
Here are some supplies and tools we find essential in our everyday work around the shop. We may receive a commission from sales referred by our links; however, we have carefully selected these products for their usefulness and quality.


