We may receive a commission when you use our affiliate links. However, this does not impact our recommendations.
Farm Table
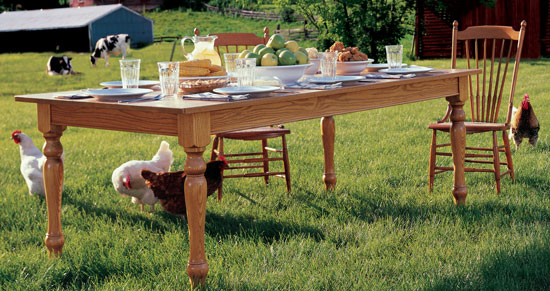
You don’t need a dream shop to build this dream project.
By Tim Johnson
Aside from feeding the occasional flock (when's the last time you had eight dinner guests?), a big surface where you can spread things out is invaluable, for computing, writing, hobbies or for kids' activities. A large table is the perfect gathering place for today's open kitchens and great rooms, and you can build this one even if you don't have a dream shop with lots of huge machinery.
This table is made from white ash, a hardwood that’s beautiful, durable and affordable. The top floats on a base that’s built to last. Strong joinery between the legs and aprons is accomplished using an innovative and inexpensive commercial jig. Internal supporting rails are dovetailed to stiffen the structure, yet you can make and install them in minutes. And don’t worry about the huge top. I’ll show you how to manage gluing it all together, but only after I’ve shown you how to edge-joint its long boards perfectly without using a jointer!
What It Takes To Build
You’ll need a tablesaw, a router that accepts 1/2" bits, four router bits, an electric drill (a drill press is very helpful, but not absolutely necessary), a BeadLOCK doweling jig (see Sources, below), a jig for ripping a straight edge on rough lumber, sawhorses and assorted clamps. In addition to the lumber, buy two 4×8 sheets of 3/4" medium density fiberboard (MDF). One serves as a work surface and the other provides the straightedges for jointing and squaring operations (see Fig. H, Photos 3 through 5 and 10). You won’t need a jointer. You don’t have to own a planer either, because most hardwood lumberyards will mill rough lumber for you. You’ll need a lathe if you want to turn your own legs.
Choosing and Using Your Lumber
The top, aprons and internal support rails are made from 8' long 5/4 boards, about 80 bd. ft., milled to 1" thickness. If you’re having your lumber milled at the yard, have them also make a straight cut on one edge (called SL1E or “straightlining”). Milling and straightlining cost only about 30 cents per ft. and save you the trouble of doing it yourself (Photo 1).
If 5/4 boards aren’t available, substitute 100 bd. ft. of 6/4. You could also use 4/4 stock and rework the dimensions for 3/4" material. A 3/4" thick top will be lighter in weight and appearance (maybe too light for your taste), and the splines will have to be no wider than 3/16" The thinner, 6' long aprons will be more likely to sag. You’ll also have to use smaller loose tenon stock and a different BeadLOCK drilling jig that requires drilling more, albeit smaller holes.
Use 8/4 stock for the legs, milled to 1-3/4" thickness, cut into 30" lengths, and glued up. You’ll need about 25 bd. ft.
White ash looks similar to oak, with one noticeable difference. Its heartwood is a dark brown color that contrasts sharply with its light-colored sapwood. When choosing or ordering lumber, look or ask for pieces that are all sapwood, especially the 8/4 stock for the legs. The 5/4 stock must have one good sapwood face. Heartwood on the back side won’t show, except on the edges of the top.
You’ll need twelve 5/4 boards that are at least 7" wide. Use the seven that look the best together, considering grain pattern and color, for the top (seven boards 6" wide after jointing will make a 42" wide top). The four aprons, including their add-on half-round details, require three of the remaining boards (you can get the four pieces for both short aprons from one board). Use one of the two remaining boards for the internal rails and the other for splines and test pieces.
Make the top first. Don’t worry about making it to exact dimensions. Just use your best-looking boards and come as close as you can. (My top turned out to be 41-1/2" wide.) Then adjust the size of the base, changing the lengths of the aprons to maintain the overhang of the top.
Oops!
Don't ask! Somehow I drilled holes in the wrong leg face.
Fit and glue patches into the holes so that their grain matches the grain direction of the legs. Then plane or sand them flush. Glue a block on top, slightly wider than the leg. If you match the end grain, the face grain on the repair will match the rest of the leg. After gluing, plane the sides of the block flush with the leg.
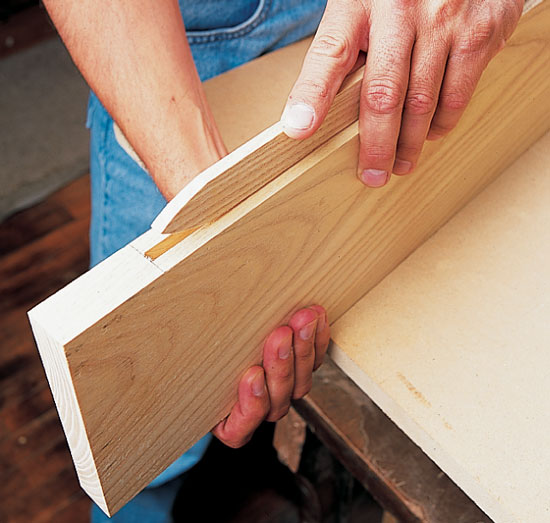
Saw off the waste, leaving a fresh face of thick veneer. Make two passes, one from each direction, with the blade set at half depth. Then trim the ends of the veneer and plane or sand the surface. No one will ever know!
Sources
(Note: Product availability and costs are subject to change since original publication date.)
Steve Wall Lumber Company, walllumber.com, 800-633-4062, White Ash (ask for light color).
Adams Wood Products,
adamswoodproducts.com,
423-587-2942, Factory-turned legs, available in several woods (but not ash).
Woodcraft Supply, woodcraft.com, 800-225-1153, Tabletop fasteners, #27N10, (3 bags required).
Rockler, rockler.com,
800-279-4441, 3/8'' Beadlock Basic Starter Kit, #42350; 1/2'' Accessory Kit (Guide Block, Drill Bit and Shim Set), #34985; 1/2'' Beadlock Tenon Stock, #20783;
Taper / Straight Line Jig, #21597.
MLCS Woodworker,
mlcswoodworking.com,
800-533-9298, 1-1/8" pattern cutting bit, #8809; 1/4" slot cutter with 1/2" shank arbor and assembly, #7648; 1/8" slot cutter, #305; 1/4" radius round-over, #6602.
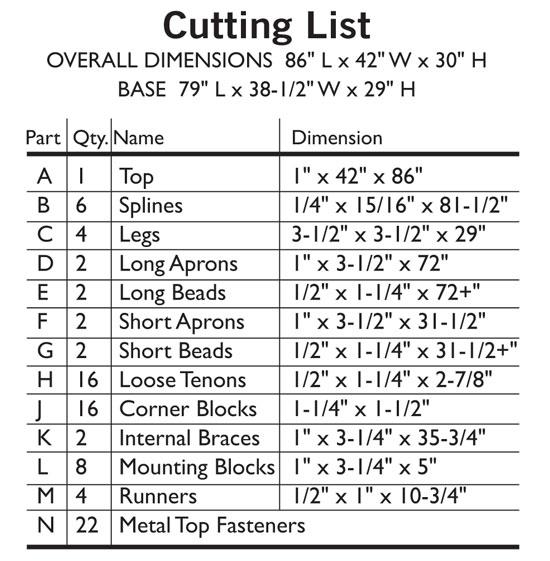
Cutting List
Fig. A: Jointing with a Router – Step 1: Flush Trim Cut
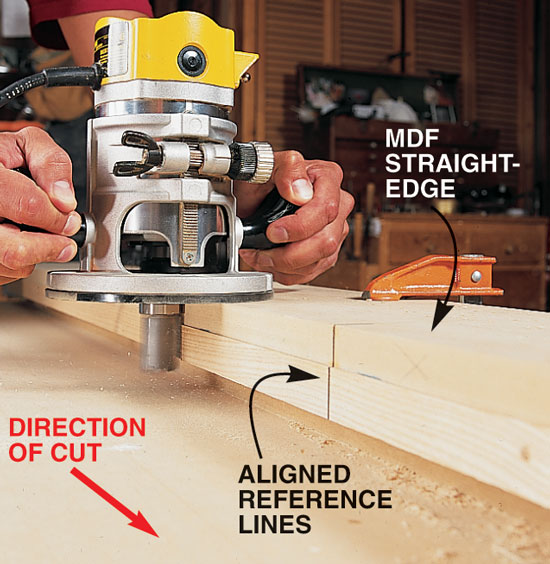
The first cut is an ordinary flush trim (Photo 3). The trick is that both edges of the joint are routed from a single straightedge set-up. That way, the two edges will mate perfectly, even if the straightedge isn’t perfectly straight.
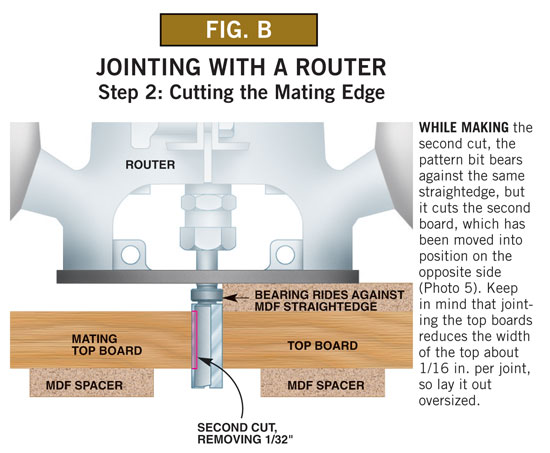
Fig. B: Jointing with a Router – Step 2: Cutting the Mating Edge
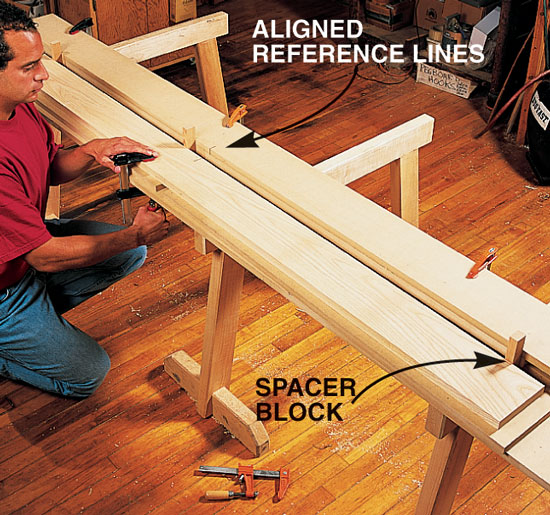
While making the second cut, the pattern bit bears against the same straightedge, but it cuts the second board, which has been moved into position on the opposite side (Photo 5). Keep in mind that jointing the top boards reduces the width of the top about 1/16 in. per joint, so lay it out oversized.
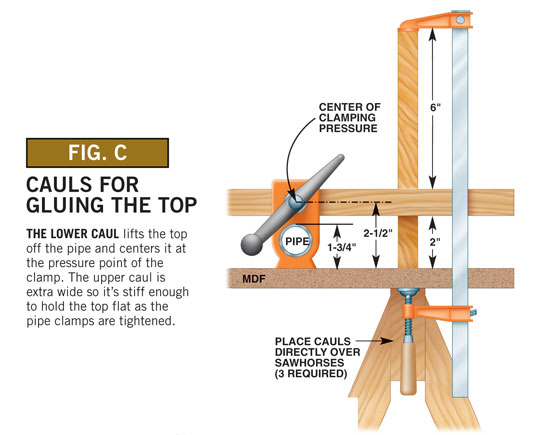
Fig. C: Cauls for Gluing the Top
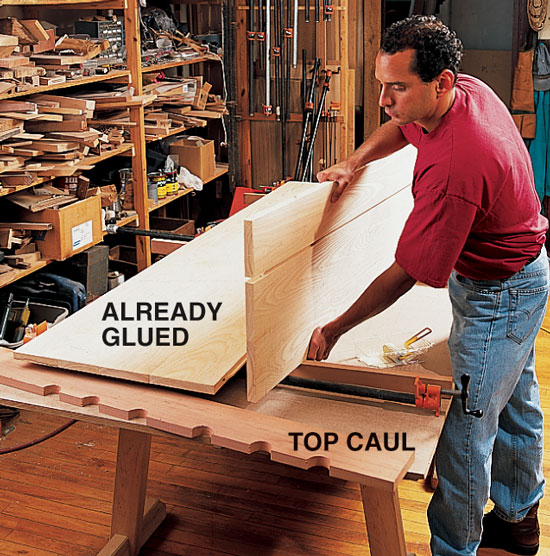
The lower caul lifts the top off the pipe and centers it at the pressure point of the clamp. The upper caul is extra wide so it’s stiff enough to hold the top flat as the pipe clamps are tightened.
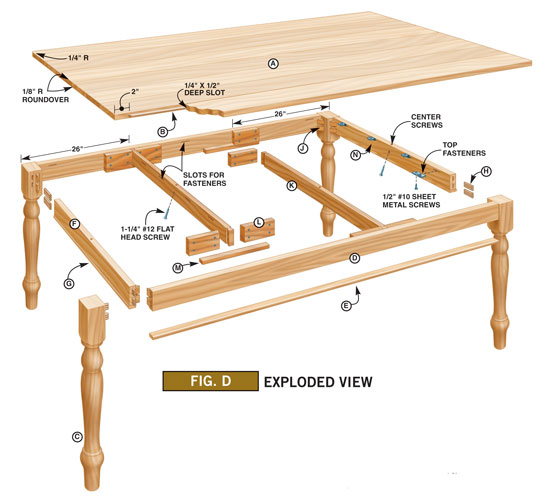
Fig. D: Exploded View
Fig. E: Leg Profile and Dimensions
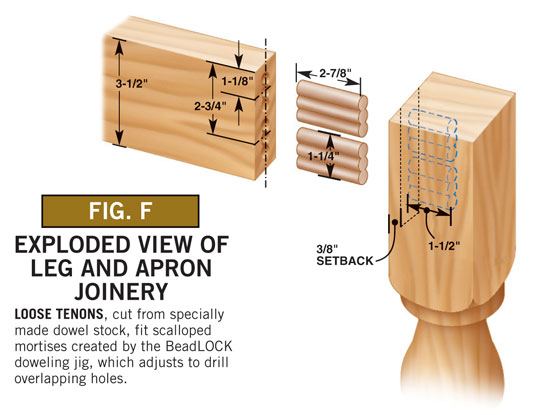
Fig. F: Exploded View of Leg and Apron Joinery
Loose tennons, cut from specially made dowel stock, fit scalloped mortises created by the BeadLOCK doweling jig, which adjusts to drill overlapping holes.
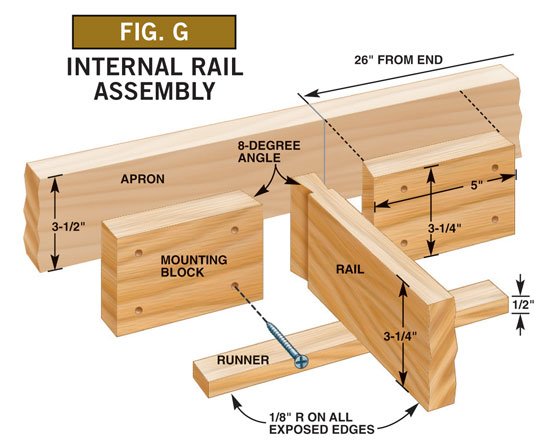
Fig. G: Internal Rail Assembly
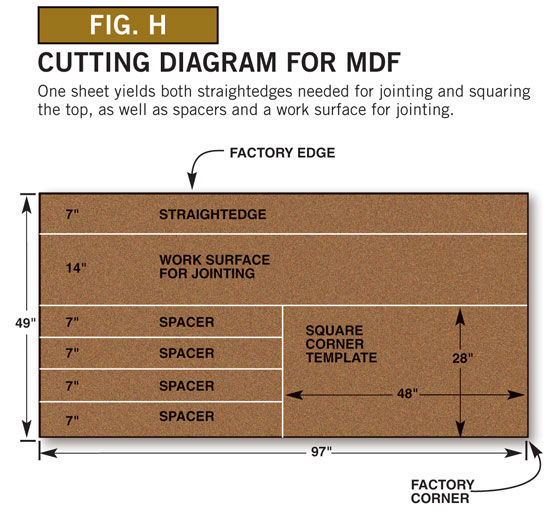
Fig. H: Cutting Diagram for MDF
One sheet yields both straightedges needed for jointing and squaring the top, as well as spacers and a work surface for jointing.
This story originally appeared in American Woodworker October 2000, issue #82.
Click any image to view a larger version.
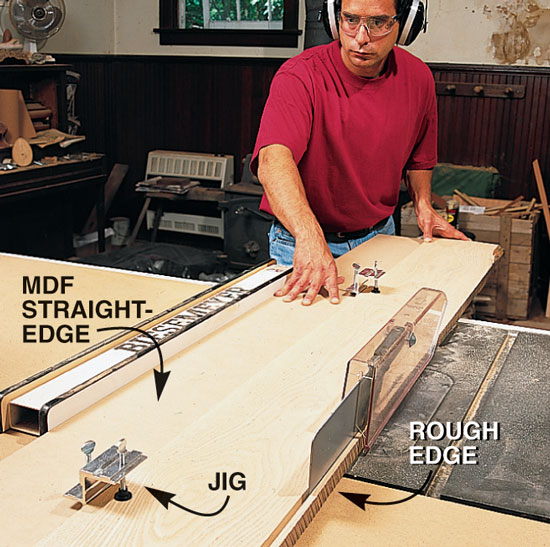
1. Rip straight edges easily with straightlining jigs (see Sources, below). One thumbscrew on each jig holds the rough-edged board, the other grips an 8' long by 7" wide MDF straightedge. After straightlining one edge, remove the board from the jig and rip the other edge parallel. (You can also have straightlining done for you at the lumberyard.)
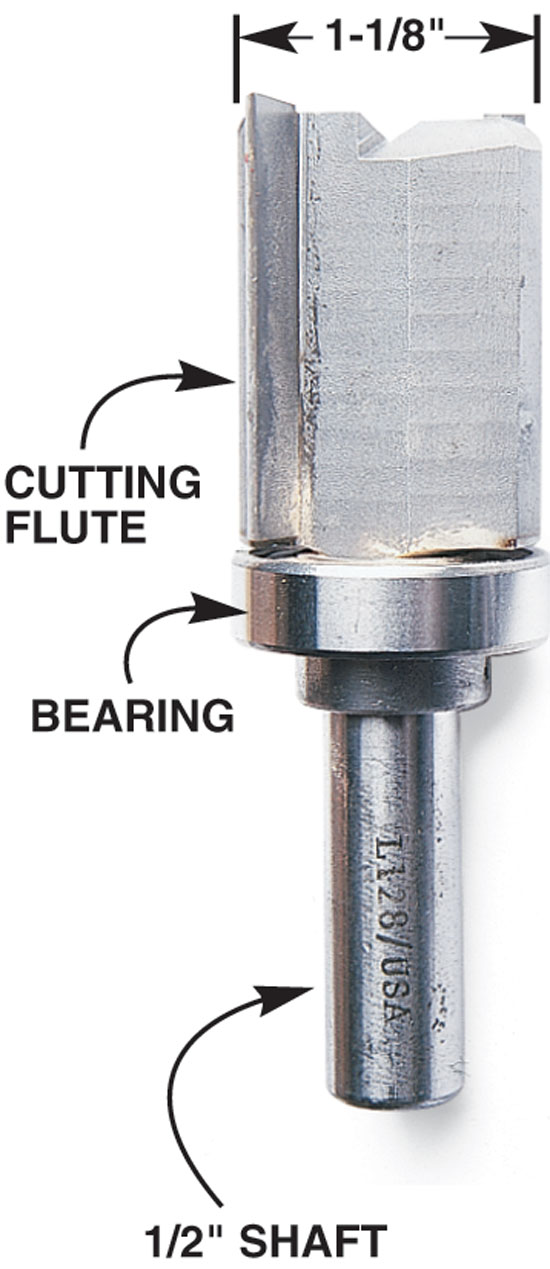
2. A big pattern-cutting bit works best for jointing edges. Its large cutting diameter leaves smooth, chatter-free surfaces.
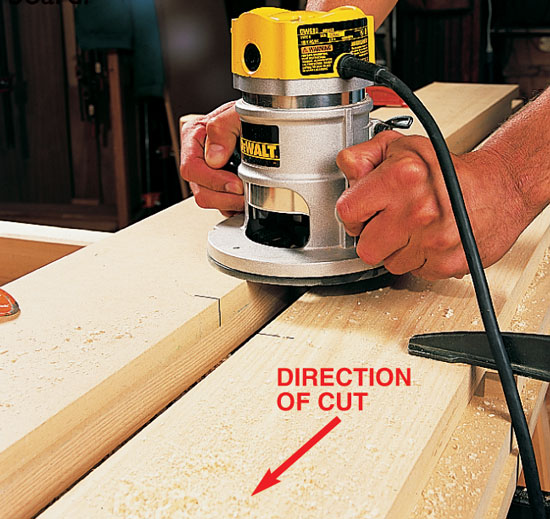
3. Rout the first edge of each joint, using the pattern-cutting bit and an 8' long MDF straightedge. After laying out the boards for the top, draw a line across each joint, halfway from the end. Aligning these lines with a similar line at the midpoint of the MDF guarantees that the jointed edges will fit together.
4. Use three spacer blocks to position the second board for routing and clamp it in place. Make the spacers 1/32" narrower than the cutting diameter of the pattern bit, so the second routing pass will remove only 1/32" from the board.
5. Rout the mating edge of each joint, while keeping the router firmly held against the straightedge. Because the cut is made opposite the bearing point, the edge will be ruined if the bit wanders away.
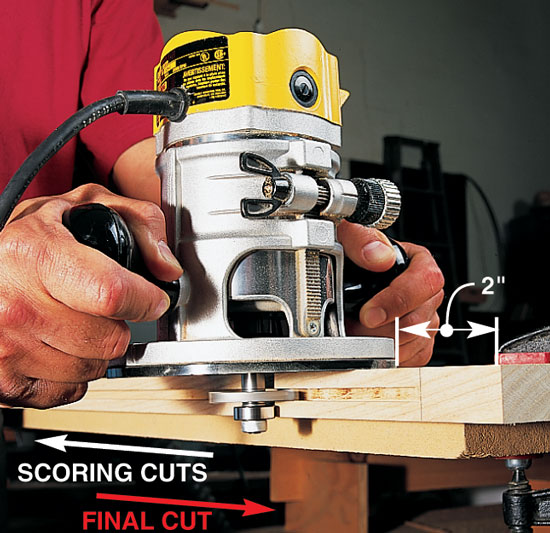
6. Rout a 1/2" deep groove for the spline in several passes, using a 1/4" wide slot-cutting bit. To avoid tear-out, make a couple light scoring cuts, about 1/8" deep, moving from right to left. Then move left to right, full depth. Stop the cut 2" from each end of the board, so the groove won’t show.
7. Test fit the spline. It should slip into the groove freely, but without being loose. It can be one long piece or several short ones. Rounded ends match the ends of the slot. Dry fit each joint to make sure the spline fits inside without binding.
8. Stack the boards as you glue them. Put a bead of glue at the bottom of the groove of the first board and add the spline. Roll a layer of glue onto the edge of the adjacent board, add a bead in its groove and assemble the joint. Don’t put any glue on the splines. The glue causes them to swell and make the joint impossible to fit. Glue the top together in stages, two to four joints at a time.
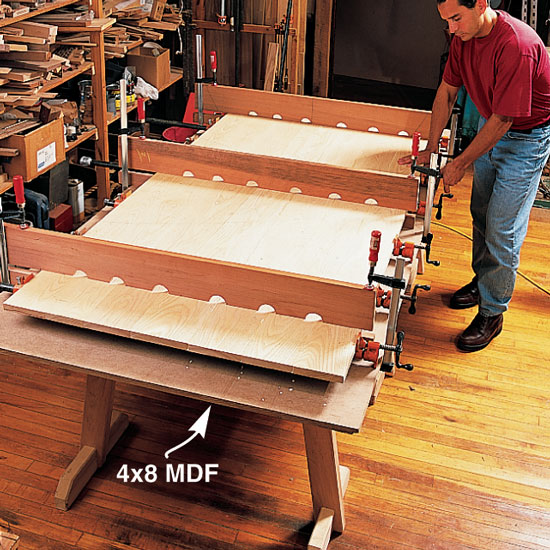
9. Clamp the cauls to the work surface with the top sandwiched between (see Fig. C). Then tighten the pipe clamps, starting at the center and working out to the ends. Remove the glue squeeze-out at the joints after it sets up, but before it hardens. After gluing, trim the long edges with the router and straightedge so they’re straight and parallel.
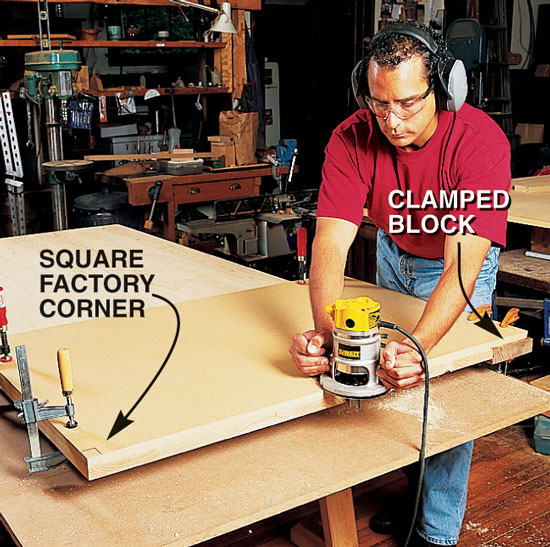
10. Square the end of the top, using a piece of MDF with a factory corner as a template. If you have more than 1/4" to remove, use a saw first, to get close. Align one edge of the MDF with the long side of the top. Clamp a block against the opposite edge of the top to avoid blowout. Then trim the edge square, making shallow passes with the pattern-cutting router bit.
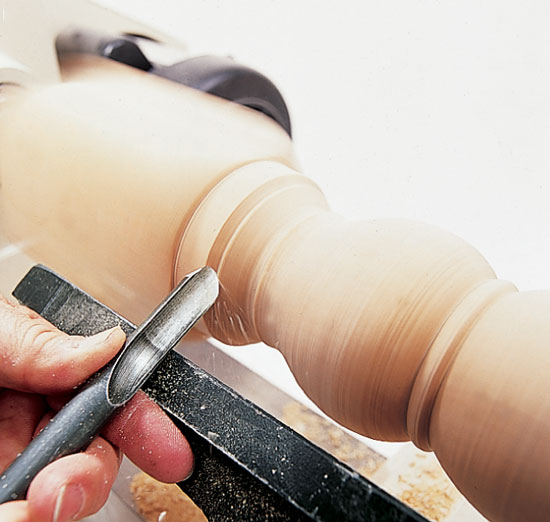
11. Turn the legs from laminated 3-1/2" square blanks, using the dimensions from Fig. E, or order the legs through the mail (see Sources).
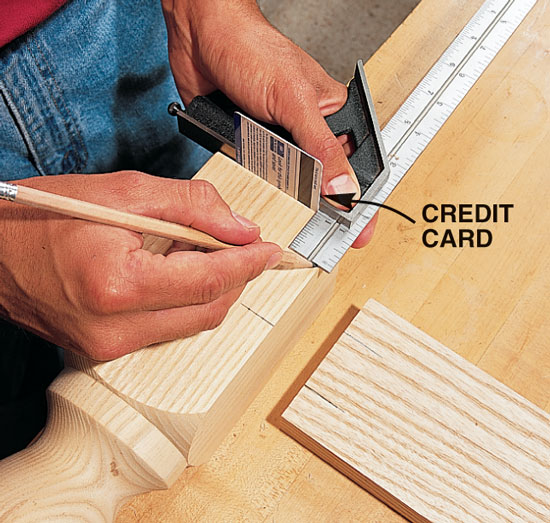
12. Mark reference lines for the BeadLOCK jig on the legs and aprons. Offset the centerlines on the leg by the thickness of a credit card. This slightly raises the rail above the top of the leg, allowing you to plane the apron flush after assembly (see Photo 16).
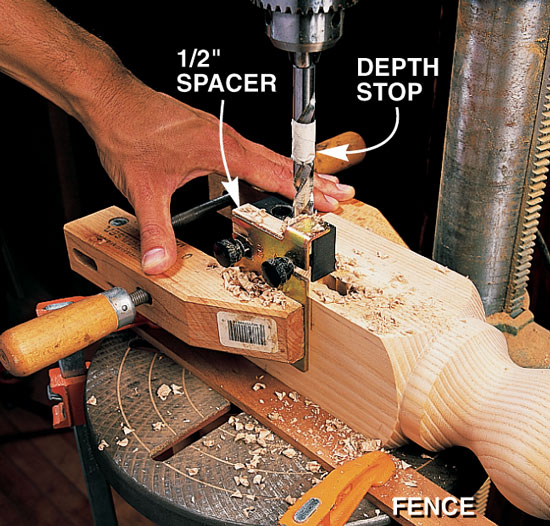
13. Drill the legs. Use a shop-made 1/2" thick spacer in the BeadLOCK jig to locate the holes properly. A drill press works great for this operation. It’s easier, faster and more accurate than drilling by hand.
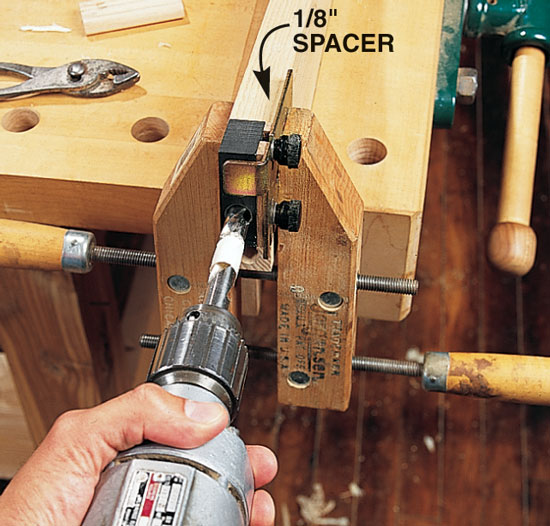
14. Drill the aprons from the end so you can be sure the holes go in straight. If the holes aren’t straight, the tenons will be angled and the joint won’t fit. Center the drill on your body and sight down the apron while drilling.
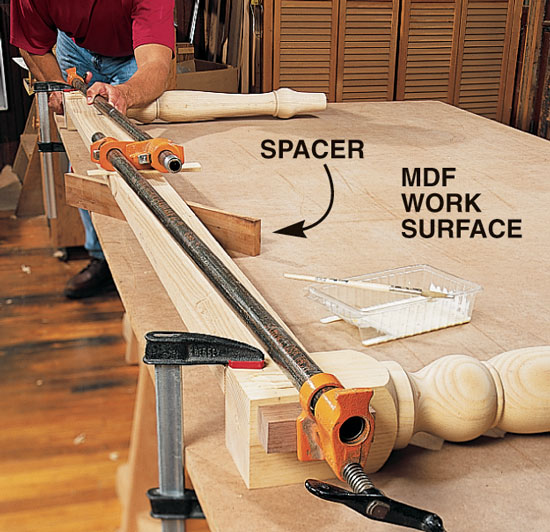
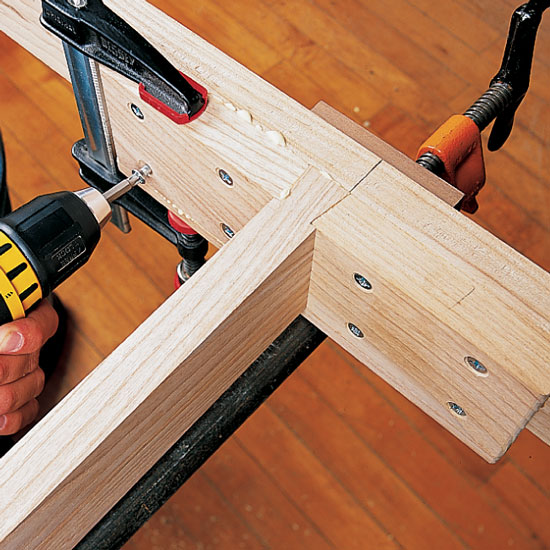
15. Glue the long sides first. Avoid a twisted glue-up by clamping the legs flat to the MDF before you tighten the pipe clamps.Use a spacer to keep the apron from sagging under the weight.
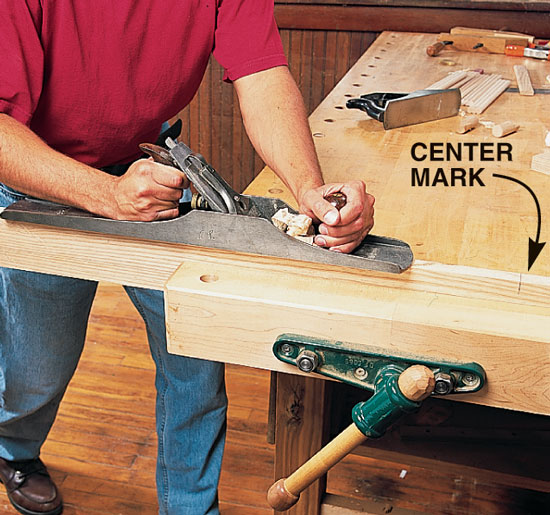
16. Plane the aprons flush with the top of the legs, working from each end to the center. It’s OK to leave the apron slightly crowned at its center, so the top doesn’t appear to sag.
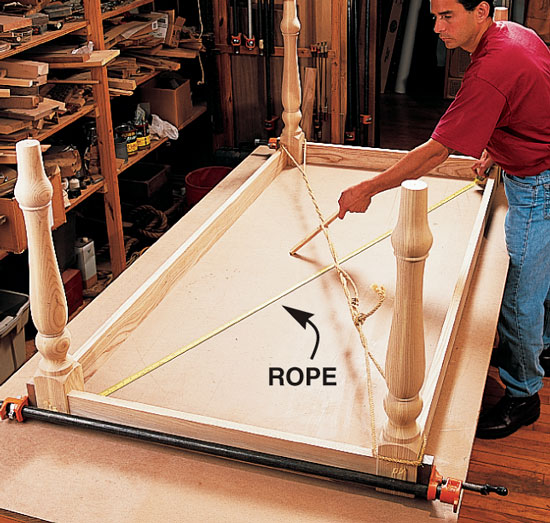
17. Apply a tourniquet to square the base after final assembly. Do this before the glue sets. Shorten the longer side by adding tension until both diagonals measure the same.
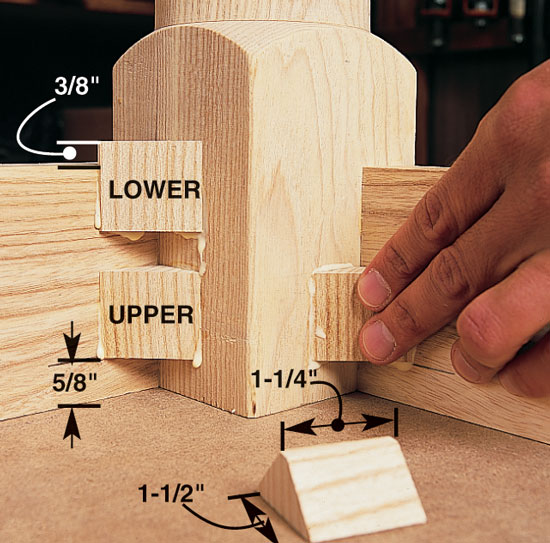
18. Two short blocks reinforce each joint. The upper blocks leave room for top fasteners. The lower blocks extend and serve as stops for the half-round detail.
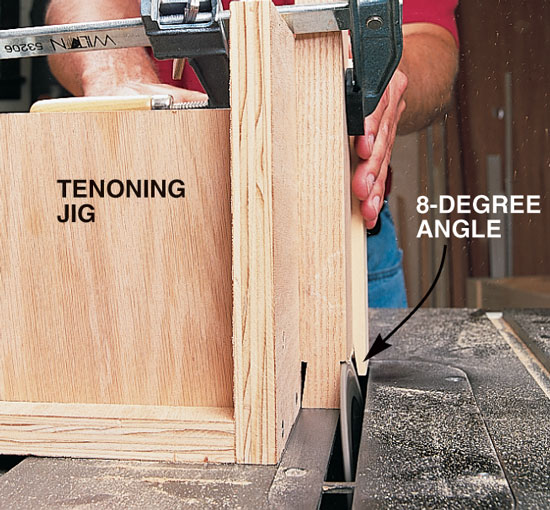
19. Make angled cuts on the end of the rails, using a tenoning jig, with the blade height slightly less than the thickness of the mounting block. Then raise the blade and crosscut the mounting blocks at the same angle.
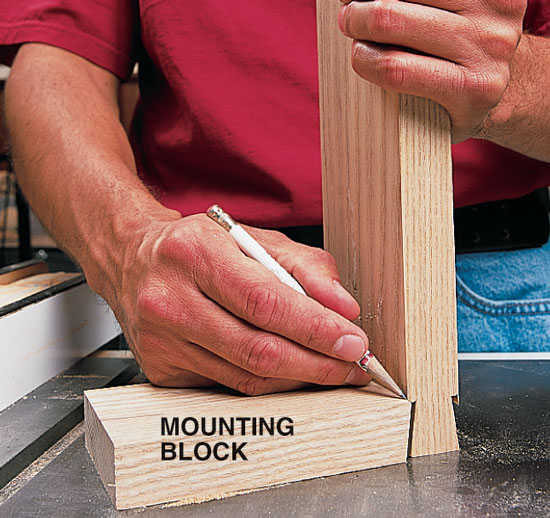
20. Locate the shoulder of the rail’s dovetail by using the mounting block. Then cut the shoulder square, keeping the blade low enough so it doesn’t cut into the dovetail.
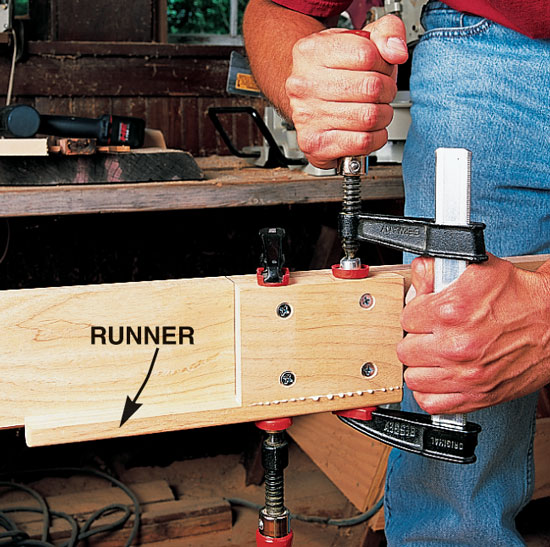
21. Glue the runner in place after the first mounting block has been glued and screwed square to the apron. It’ll hold the rail at exactly the right height. The runner extends below the apron, just like the corner blocks.
22. Capture the dovetailed rail between the mounting blocks. After applying glue, set the rail on the runner and snug it against the first block. Then slide the second block tight against the rail and fasten it.
23. Make half-round molding for the aprons. Round the edges of 1/2" thick stock with a 1/4" round-over bit. After routing, rip the stock into separate 1-1/4" wide pieces.
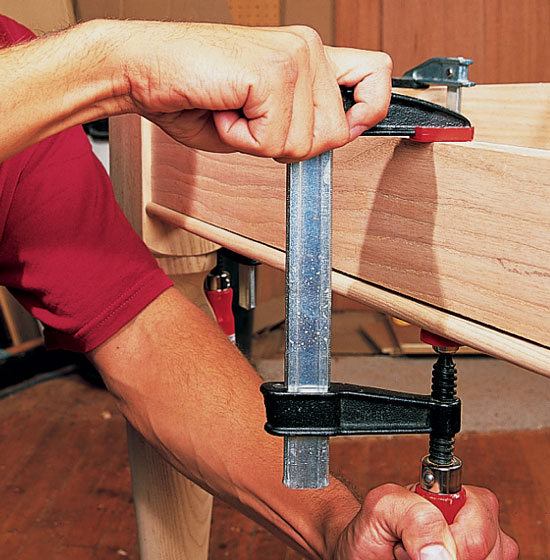
24. Glue the half-round moldings to the aprons. Cut them slightly long and spring them between the legs, pressed against the corner blocks and runners that hang below the apron. They’ll stay in place while you reach for the clamps.
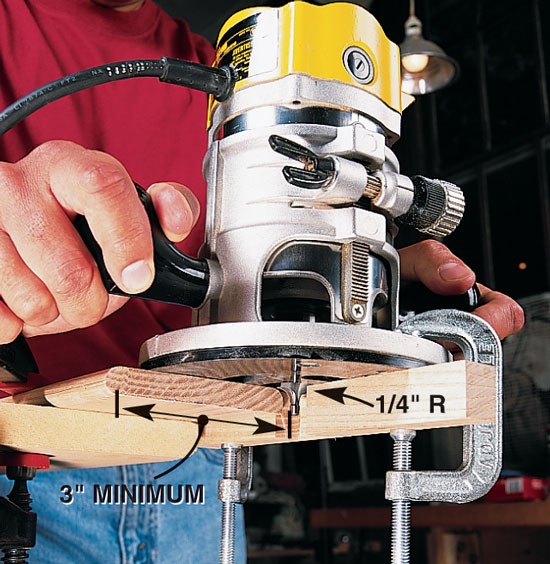
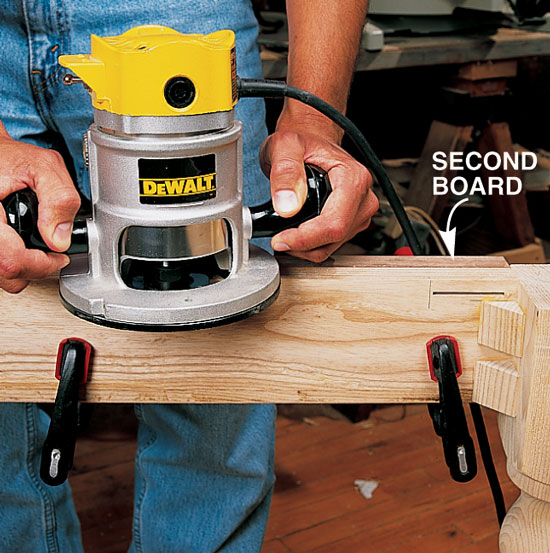
25. Rout slots for the tabletop fasteners, using a 1/8" slot cutter (see Sources). Make a wider surface to support the router by clamping a second board to the apron.
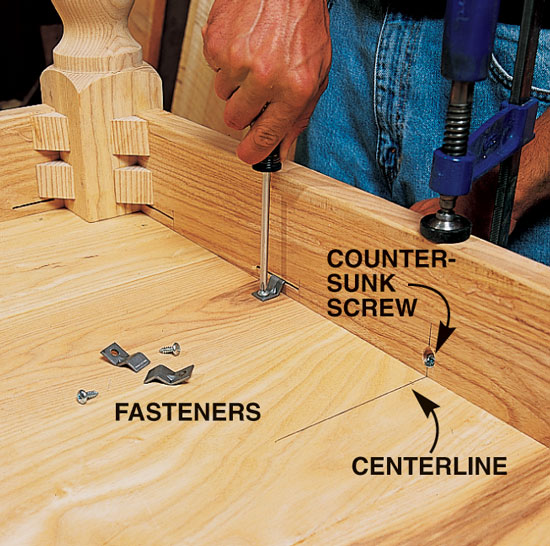
26. Attach the base. Allow for seasonal movement of the top by using screws at the center of each short apron and support brace and S-shaped metal fasteners everywhere else (see Sources). To position the base for fastening, align centerlines drawn on each of its sides with corresponding lines drawn on the top. Then clamp the base in place.
Here are some supplies and tools we find essential in our everyday work around the shop. We may receive a commission from sales referred by our links; however, we have carefully selected these products for their usefulness and quality.


