We may receive a commission when you use our affiliate links. However, this does not impact our recommendations.
Folding Outfeed Table
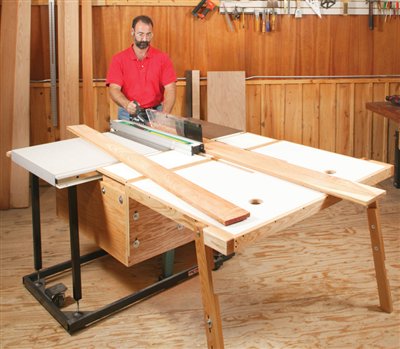
Open, it supports
8-ft. long stock.
Closed, it’s as
compact as
your saw.
By George Vondriska
| Roller stands are okay, but every saw really ought to have an outfeed table. It makes ripping lumber or plywood a lot more convenient and much safer. The bigger the table, the better. But how’s it going to fit into a small shop?
For those of you with a contractor’s saw on a mobile base, we’ve designed the kind of table you’d wish the saw had to begin with. It goes wherever the saw goes. Folded up, it doubles as a sturdy assembly table. Folded down, you still get an additional foot of support for cutting short stuff. We’ve also built in storage space for all the gear a saw needs: a rip fence, miter gauge, push sticks and extra blades. The only thing we haven’t figured out is how to store the legs; if you have a solution, send it in!
Tools and materialsYou’ll need a tablesaw, router and jigsaw, and that’s about it. We used 3/4-in. oak plywood for most of the understructure because it’s strong. The tops are made from melamine; it’s slippery and easy to clean. The edges and legs are oak because they’ll take a lot of dings, but any hardwood will do. The total cost of material and hardware is about $200. We’ve looked at a lot of contractor’s saws to make sure these plans would work, but there’s a chance your saw may be an odd size. The table will still work, but you may have to modify some of its dimensions before you make the first cut (see “Measure Your Saw,” below).
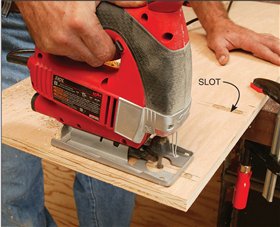
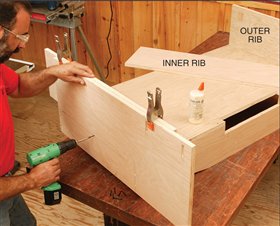
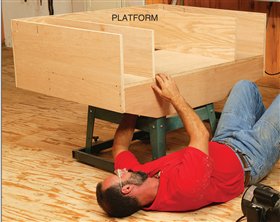
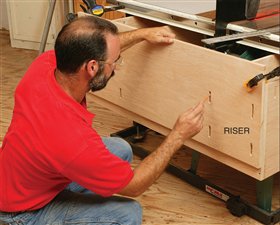
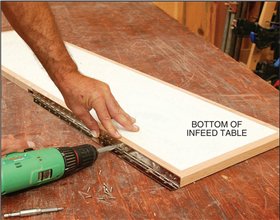
Build the platform1. Cut parts A through F to size. Glue banding (M) on top of the riser (F). Cut slots in the outer ribs (D) by connecting two 1/2-in. holes with jigsaw cuts (Photo 1). Cut recesses for motor clearance in the deck (A) and rear support arm (B, Fig. A, Detail 1, below). 2. Screw the support arms to the deck. Add the outer ribs using one of the inner ribs (C) as a spacer (Photo 2). Add the back (E). 3. Take the motor off the saw. Get some help to remove the upper half of the tablesaw from the stand. Place the platform on the stand with the front support arm pushed tight against the stand. The distance from the left edge of the stand to the outside of the left outer rib is determined by your saw’s Offset measurement (see “Measure Your Saw,” below). Mark the locations of the saw-to-stand bolt holes (Photo 3). 4. Drill the bolt holes through the deck, replace the saw and bolt the saw to the base. Replace the original bolts with longer ones if necessary. 5. Cut slots in the riser (F). If you have moved the inner ribs from the locations in our plan, check the slot locations so they don’t run into the ribs. 6. Clamp the riser to the back of the platform (Photo 4). Use a straightedge to level the riser with the saw table. Trace the slots onto the back. Drill 1/2-in. holes for T-nuts in the center of the slots. Tap in the T-nuts and bolt the riser to the back. Level it again to the saw table.
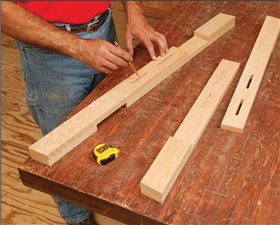
Build The legs7. Make the legs (S and T). Arrange both halves so their total length is 1 in. longer than the distance from the floor to the top of the saw. Mark for T-nuts to go in the center of the slots (Photo 5). 8. Drill 1/2-in. holes for the T-nuts, tap them in place and assemble the legs. 9. Round the top corner of the leg so it can pivot away from the stop (R, Fig. A, Detail 2, below). 10. Drill the pivot bolt holes in both legs and in the side rail (P) of the folding table (Fig. A, Detail 2).
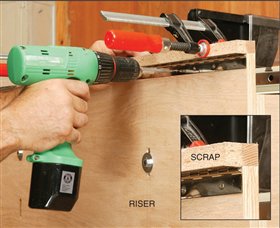
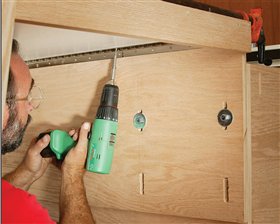
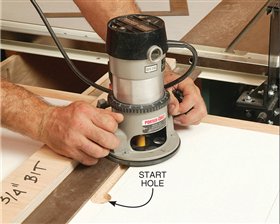
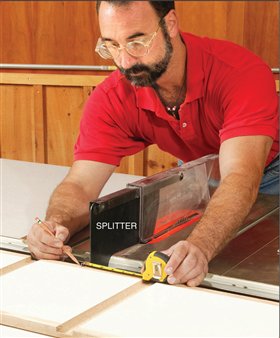
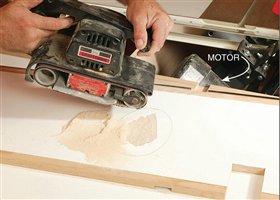
Make the tabletops11. Screw a continuous hinge to the riser (Photo 6). Set it lower than the riser by the thickness of the melamine top. A self-centering drill bit (also known as a Vix bit) makes this job much easier (see ?Source, below). 12. Cut the tops (H and J). Edge them with narrow bands (K, L and N) and wider rails (P and Q). Drill the hand holds in the folding table (see Fig. A, below). 13. Make the leg stops (R) by gluing two 3/4-in x 2-1/2-in. pieces together. Cut the leg stop end at 10 degrees. Glue and screw the leg stops to the folding table. Rout all the table’s edges and corners with a 1/4-in. round-over bit. 14. Drill the pivot bolt holes in the rail of the folding table. Bolt the legs to the folding table and hinge the folding table to the riser (Photo 7). Level the folding table to the saw table by adjusting the length of the legs. 15. Use a straightedge to extend both edges of the miter gauge slots onto the folding table. Rout 1-1/4-in.-wide miter-gauge slots in both tabletops (Photo 8). They’re extra wide so your miter gauge won’t bind. 16. Cut a continuous hinge into three pieces to fit the inner table and screw the pieces in place (Photo 9). Remove the hinges from the inner table and re-attach them to the inside edge of the riser. Keep the top of the hinge even with the top of the riser. Re-attach the inner table to the continuous hinge. 17. Position the inner table parallel to the saw and against the back of the splitter. Clamp the inner table in place and mark the splitter clearance slot (Photo 10). Locate the slot 3/4 in. to the right of the splitter on a left-tilt saw and 3/4 in. to the left of the splitter on a right-tilt saw. Tilt the blade to 45 degrees and mark the other side of the clearance slot 3/4 in. from the splitter. 18. Cut the splitter clearance slot with a jigsaw. Round over the edges. 19. Cut the inner table supports (G). Mark for T-nuts through the slots in D and install them. Level the inner table by adjusting the supports up or down. 20. If needed, sand a relief for the motor in the bottom of the inner table (Photo 11).
Finishing upVarnish the wooden surfaces to protect them from wear. No finish is required on the melamine.
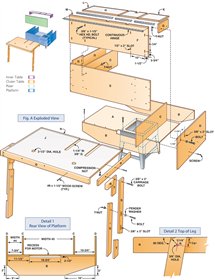
Measure your saw first, then cutOur plans will fit many contractor’s saws, but you may have to modify them to fit your machine. 1. Measure Height #1 on the saw’s box from the lowest hanging point, like the fence rails. If it is less than 11 in., reduce the width of the inner and outer ribs (C and D) by the difference. 2. If the Depth is more than 34 in., increase the length of C and D by the difference and enlarge the inner table. 3. If Width #1 is greater than 22 in., increase the width of the deck (A) by the difference. 4. If Height #2 is less than 34 in., reduce the length of the folding table (J) by the difference. 5. Measure the Offset for use in Step 6. 6. To position the left inner rib (C), measure the Offset and subtract 2-3/4 in. This gives you the distance between ribs C and D (Width #4, see Fig. A, Detail 1, below). Use Width #2 to locate the right inner rib (C) to ensure that it doesn’t interfere with the blade-tilt handwheel. If Width #2 is more than 22 in., add 5 in. to it. This new measurement (Width #5, Fig. A, Detail 1) is the distance between the left and right inner ribs. 7. If the handwheel is on the left side of the saw, measure Width #3. Add 3-3/4 in. for hand clearance and plywood thickness, and deduct this from the Offset. This is the distance (Width #4) between the left inner rib (C) and left outer rib (D). To locate the right inner rib, measure Width #2 and add 5 in. This is the distance (Width #5) between the two inner ribs. Cutting ListFig. A: Exploded ViewSource(Note: Product availability and costs are subject to change since original publication date.) Woodworkers’ Supply, woodworker.com, 800-645-9292, This story originally appeared in American Woodworker May 2004, issue #107. |
Click any image to view a larger version.
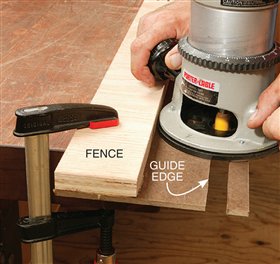
It’s a real space-saver. This outfeed table is permanently attached to your saw but tucks out of the way when you don’t need it. The motor and blade guard are easy to access by opening a hinged lid. The table is rock solid because it’s bolted tight between the saw’s motor and base. 1. Cut adjustment slots with a jigsaw. These slots allow you to accurately align the table with the top of virtually any contractor’s saw. 2. Assemble the platform. It fits between the saw and stand and supports the table. Temporarily clamp an inner rib to an outer rib so their tops line up across the platform in the final assembly. 3. Disassemble your saw and put the platform on the stand. Mark the locations of the stand’s bolt holes on the bottom of the platform. 4. Clamp the riser to the back of the platform. The riser supports the outfeed table. Adjustable slots make it easy to level the table with the saw. 5. Build the legs. They also have adjustable slots so you can quickly level the far end of the outfeed table. Mark a hole for a T-nut in the middle of the slot. 6. Fasten a continuous hinge to the riser. This hinge supports the outer half of the outfeed table. Position the hinge by butting it up to a scrap piece from the table’s top. 7. Attach the folding table to the hinge. Clamp the table to the riser and drive in the screws. 8. Rout relief slots for the miter gauge. First, drill a 1-1/4-in. hole in the top to provide a starting and stopping point for the bit. Then use a straightedge (below) to guide the router. Straightedge Router JigThis basic jig is as easy as pie to make but serves dozens of uses. You can trim big pieces of rough-cut plywood to size (like the pieces you’ll need to build this outfeed table) or rout a dado (see Photo 8, above). Just position the guide edge of the jig right on the line you want to cut. To make the jig, you’ll need a dead straight piece of wood 9. Drill holes for a second continuous hinge. This one holds the inner half of the outfeed table (the part that’s above the motor). This hinge is cut in three parts to clear the miter gauge relief slots. 10. Mark the location of the blade guard’s splitter onto the inner table. Tilt the saw blade all the way and make a second mark. Then cut out a clearance slot between the marks. 11. Sand a hollow in the bottom of the inner table if your motor sticks up too far when it’s tilted. |
Here are some supplies and tools we find essential in our everyday work around the shop. We may receive a commission from sales referred by our links; however, we have carefully selected these products for their usefulness and quality.


