We may receive a commission when you use our affiliate links. However, this does not impact our recommendations.
Walnut Wall Shelves
Versatile go-anywhere shelves to hold books, discs, kitchenware, or anything you want!
By Jon Stumbras
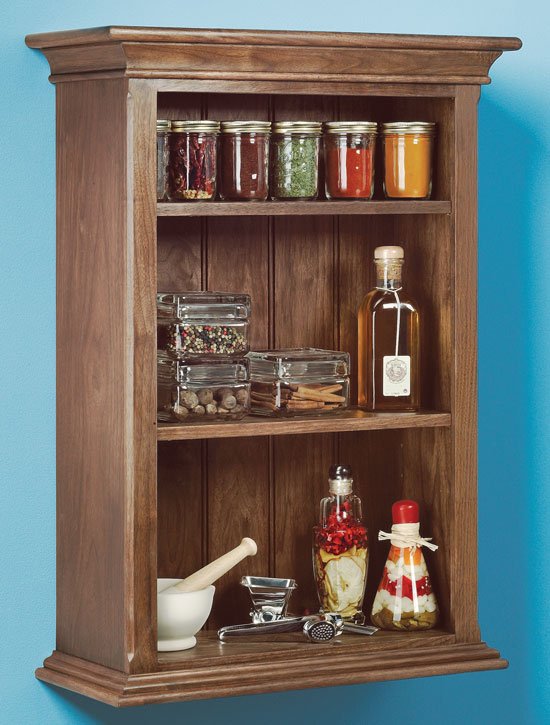
Never enough shelf space where you want it? This little shelf is a great way to add extra storage in just about any room. It’s compact—only 22-3/4-in. wide by 31-1/4-in. tall by 9-1/4-in. deep. Yet it’s tall enough to accommodate three shelves of paperbacks. Hang it in your bedroom, bathroom or kitchen. This cabinet will add a touch of comfortable elegance in any room.
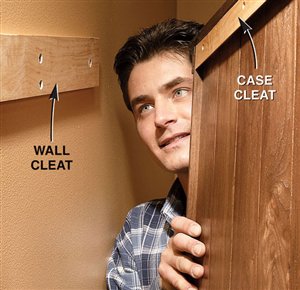
Details Made EasyWe’ve packed a ton of great details into this cabinet, and some great techniques into this story. We’ll show you how to cut cove molding on your tablesaw and how a special beading bit makes quick work of the shiplapped back. Your router and router table can handle all the other moldings. All the parts for this cabinet are made from 3/4-in.-thick lumber, which keeps the materials list simple. An intermediate-level woodworker can plan on two or three weekends to complete this cabinet. And when you’re done, a hidden cleat easily and invisibly secures the case to the wall. Small Changes Make a Big DifferenceIn a small case, changing dimensions by even a fraction can make a world of difference in the final appearance. The top of this case is 11/16-in. thick and overhangs the side by 1/4-in. more at the sides than the front. The bottom is 9/16-in. thick, the shelves are 5/8-in. thick and the face frames are 1/2-in. thick. These carefully chosen dimensions give this cabinet a comfortable and balanced look. Traditional Design, Modern ToolsYou’ll need a surface planer, jointer, router, router table, tablesaw, dado blade and biscuit joiner for the construction. To make the moldings, seven router bits are needed, three round-over bits, a beading bit, a chamfer bit, an ogee bit and a rabbeting bit. You may have several of these already, but if you buy all the bits new, the cost will be approximately $170 (see Sources, below). We used 25 bd. ft. of 4/4 rough walnut for our cabinet at a cost of $125 (see Sources). Build the Cabinet in Stages1. Begin by selecting the wood for each part (the sides require the widest boards). Straight-grained wood looks best for face frames. Match the face-frame stiles to the case sides and they’ll look like one piece when assembled.
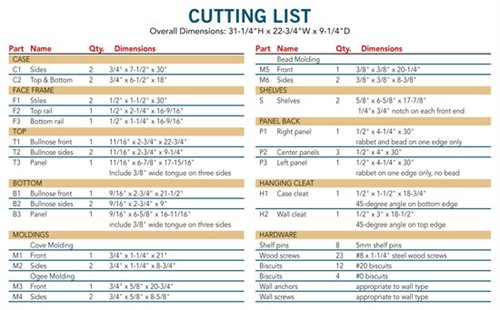
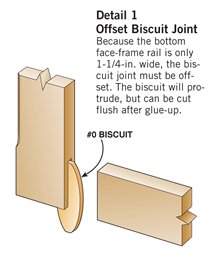
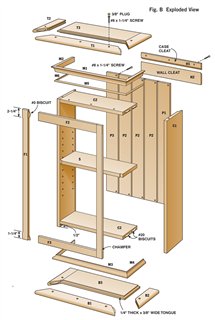
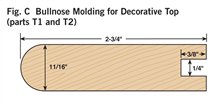
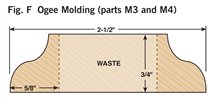
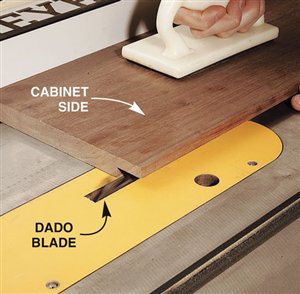
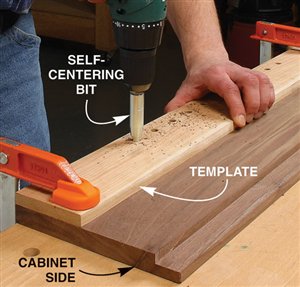
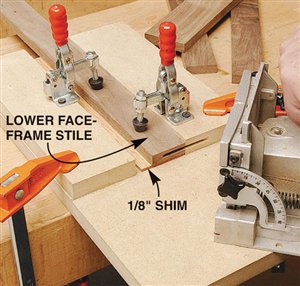
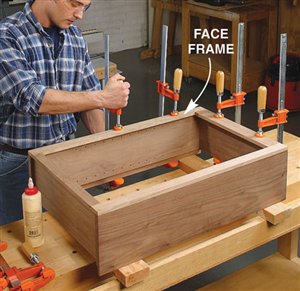
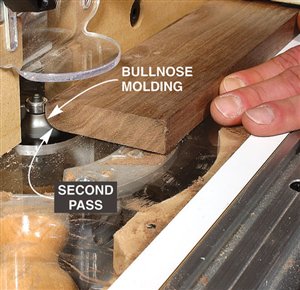
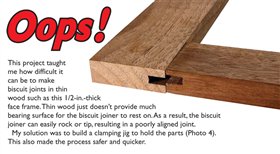
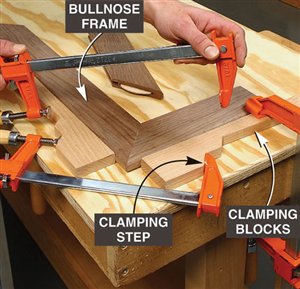
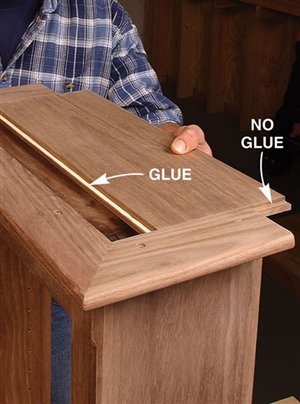
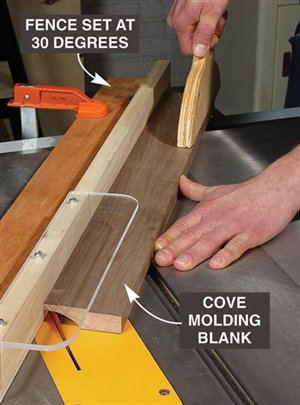
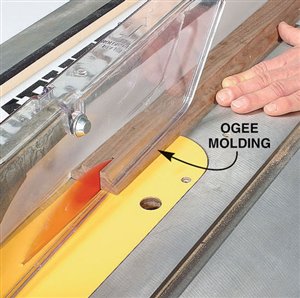
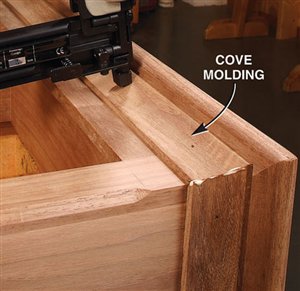
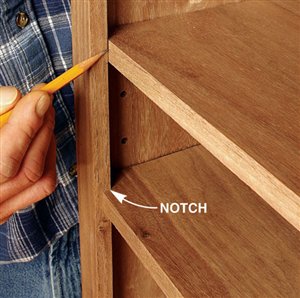
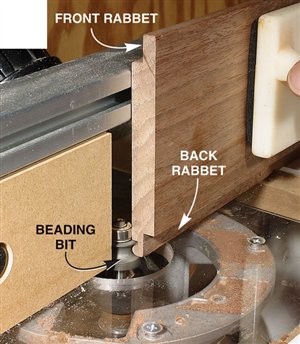
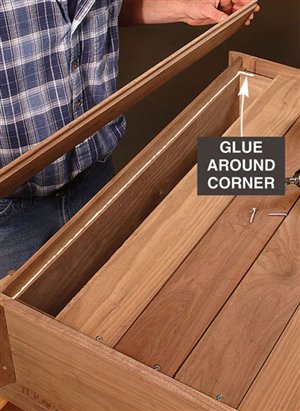
2. Cut all the parts to rough size by adding 1/2 in. to the final length and width (see Cutting List, below) and plane the parts to their final thickness (Photo 1). 3. Next, rabbet the case sides (C1) with a dado blade in your tablesaw (Photo 2). Two passes are needed to make the 1-in.-wide by 3/8-in.-deep dado on the back inside edge of each side. 4. Now cut the case sides, the top and the bottom (C2) to final width and length. 5. Drill the shelf-pin holes next (Photo 3) using a drilling template (Fig. A) and a 5mm self-centering drill bit (see Sources, page 101). It’s a lot easier to do this now because there’s not a lot of room inside the finished cabinet. 6. You can now join the top and bottom to the case sides. Two #20-size biscuits will fit neatly in the panels (Fig. B). Glue up the case, carefully checking the diagonal measurements to guarantee squareness. Note that the case bottom is set 1/2-in. up from the bottom ends of the case sides (Fig. B). This way the case bottom and the bottom face-frame rail will be flush on the inside of the cabinet. 7. Make the face frame next. It’s difficult to cut accurate biscuit joints in 1/2-in.-thick material (see Oops!, below), so we built a simple clamping jig with toggle clamps for better results (Photo 4). This jig makes it easy to cut the partial biscuit joint (Detail 1) for the bottom face-frame rail (F3), which is only 1-1/4-in. wide. To cut the biscuit slots in the stiles (F1), modify your first jig, or make a second jig to hold the stiles parallel rather than perpendicular to your biscuit joiner. Glue up the face frame, making sure it is square. When dry, trim the protruding biscuits at the bottom and glue the face frame to the case (Photo 5). The total width for the face frames is 1/16-in. wider than the overall case dimension. This allows for some wiggle room when gluing the face frame to the case in the event the face frame or case are not perfectly square. The face frame is easily cleaned up with a hand plane, hand scraper, or a flush-trim bit in a router. 8. Next, rout the stopped chamfer along the edge of the face frame (Fig. B). Add the Decorative Top and BottomThe top and bottom bullnose moldings (T1, T2, B1 and B2) are made using two round-over router bits (Photo 6). For the top bullnose moldings, use a 5/16-in. round-over bit. For the bottom moldings, use a 1/4-in. round-over bit. The bullnoses will have a slightly flat spot in the center but a little sanding makes them perfect. Cut the 1/4-in. groove (Figs. C and G) in the bullnose parts with a dado blade in your tablesaw. Finally, miter these parts and cut to final length; then biscuit and glue them together (Photo 7). A stepped clamping block is used to clamp this molding together to make a three-sided frame. The frame is then screwed to the case top (Fig. A). The screw heads are hidden with wood plugs. Next, make the top and bottom panels (T3 and B3) that fit into the grooves of the bullnose trim. To create the 1/4-in.-thick by 3/8-in.-wide tongue on three sides of these parts (Fig. A), use a rabbeting router bit or your dado blade. The panels are 1/16-in. undersized in length to make them easy to slide in. Gluing just the front edge allows the solid-wood panels to move in their frames with seasonal humidity changes (Photo 8). Make the MoldingsFor this cove molding (M1 and M2), set the auxiliary fence at 30 degrees to the blade (Photo 9). A bit of practice is in order here, so start with a scrap 4-in.-wide board for a test run. The wider blank will keep your fingers away from the blade and is less likely to tip toward the blade. Raise the blade in small increments for each cut until you reach the desired depth. When you’ve mastered a practice piece you’re ready for the real thing. After forming the cove, cut the molding to final width (Fig. D). Hand sand or use a curved scraper to remove the saw marks from the inside of the cove. The ogee molding (M3 and M4) is next. Rout the profile with the ogee bit on both sides of a 2-1/2-in. board (Fig. F), then rip the board on the tablesaw to create two separate moldings (Photo 10). One 25-in.-long board will yield moldings for all three sides. The bead molding (Fig. E, M5 and M6) is made with two passes of a 3/16-in. round-over bit in your router table. Also, just like the ogee, rout both sides of a wider board for safety and ease of routing. Using a pneumatic pin nailer makes quick work of applying molding (Photo 11). If you hand nail, it’s a good idea to drill small pilot holes to prevent the wood from splitting. These small holes are easily filled and hidden with a little putty or a wax pencil. Custom Fit the ShelvesMark the shelf notches directly from the case (Photo 12). In theory, this notch should be 3/4-in. long by 1/4-in. wide, but if your face frame was glued slightly to one side, there will be minor differences in the sizes of the notches from one side of the shelves to the other. Measuring directly from the case will give a custom fit and avoid errors that can occur when making inside measurements with a tape measure or from assuming both sides are the same. Traditional Shiplapped BackRout the beaded shiplapped back panels (Figs. B and H) for your cabinet with a beading bit (Photo 13). The interlocking rabbets allow for expansion and the screws at the top and bottom of each section hold the panels securely in place (Fig. B). Back panels P1 and P3 fit into the rabbets along the case sides. Gluing along these case sides and just around the corners provides additional strength and stability to the case (Photo 14). Simple and Classic FinishTo make finishing easier, remove the three center back panels (P2) that are just attached with screws. We sanded our cabinet to 220 grit and applied a walnut stain to even out minor color variations in the walnut. Then we applied a wiping oil finish to give the case a soft glow. An oil finish does not provide much protection against moisture, so if you plan to use your cabinet in the kitchen or bathroom, use a varnish instead. Hang the Case on the WallAttach the case cleat (H1) to the back of the cabinet with screws (Fig. B). Make sure the screws go into the case top (C2). Mount the complementary cleat (H2) to your wall using screws and wall anchors and then hang the case (Photo 15). The beveled cleats interlock and hide neatly within the back side of the case, making them invisible from the outside. Sources((Source information may have changed since the original publication date.) Rockler Woodworking and Hardware, rockler.com, 800-279-4441, 3/16″ Roundover Bit, #27241, $23.99;
Woodcraft Supply, woodcraft.com, 800-225-1153, 1/4″ R x 1-1/2″ D Ogee Bit, #812290, $41; Vertical Handle Toggle Clamp, #143934, $13.50 ea.; Home Center/Hardware Store Minwax Special Walnut Stain, #224, $10 per Cutting ListFig. A: Drilling Template for Shelf Pin HolesDetail 1: Offset Biscuit JointExploded View |
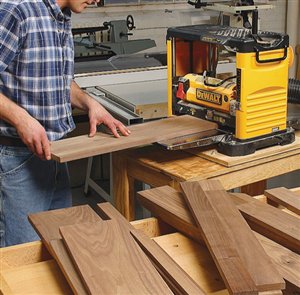
1. Plane your parts to final thickness after you’ve rough cut them to width and length. It doesn’t take long because there are only about two dozen parts. 2. Cut rabbets along the inside edge of the cabinet sides with a dado blade. The cabinet back fits into this rabbet. 3. Drill shelf-pin holes before assembling the case, using a template and 5mm self-centering drill bit. The template guarantees evenly spaced holes and the self-centering bit has a built-in stop to keep you from drilling through the side. 4. Cut biscuit joints in the face frames. Using this simple jig allows you to safely and quickly cut accurate slots in the thin, narrow parts. The bottom face-frame rail is too narrow to hold a whole biscuit so the slot is offset. The biscuit will protrude but can be trimmed after the gluing and will be hidden by the bullnose cabinet bottom. 5. Clamp and glue the face frame to the case. The face frame is 1/16-in. wider than the case to allow some wiggle room during glue up in the event that the case or face frame are a little out of square. 6. Rout a bullnose profile for the decorative top and bottom moldings with a round-over bit. First rout one side, flip the wood over and rout again. Presto, a bullnose! Oops! |
Here are some supplies and tools we find essential in our everyday work around the shop. We may receive a commission from sales referred by our links; however, we have carefully selected these products for their usefulness and quality.


