|
A tablesaw is a lot safer and
easier to use when it’s
equipped with an outfeed
table. Whether you’re ripping long
boards or crosscutting big sheets of
plywood, you really need more support
than just the top of your saw.
Lots of folks have a huge outfeed
table that sits permanently behind
the saw, but that’s impractical in my
compact shop. I’ve gone small and
mobile instead.
I built two tables, which offer a lot
of flexibility. I can butt them right
up to the back of my contractor’s
saw because the folding wings span
the saw’s motor. When I rip a long
board, I can put one table in front
of the saw and one behind. When I
crosscut a big piece of plywood, I can
roll one of the tables to the left side
of the saw. When I need more open
space around the saw, I fold down
the wings and push the tables out of
the way.
As a bonus, these tables are great
shop carts. They’re perfect for wheeling
project parts from
machine to machine. I also
use them for glue-ups and
assembly. Sweet!
Customize your
table’s height
Our dimensions are
designed for a saw of standard
height: about 34
in. The table adjusts from
33-1/2 to 35-1/4 in. high.
This allows you to fine-tune
the exact height of the table
to match your saw after the
table is built. In addition, you
can easily tilt the table’s top
to compensate for an uneven
floor. If you need a table with
a different range (to include
the height of a mobile base, for example),
adjust the cabinet and door dimensions.
Build the case
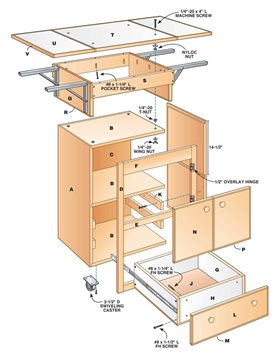
1. Cut the sides (A), subtop, bottom
and shelf (B) and back (C) to size. Cut
rabbets for the subtop, bottom and
back. Cut dadoes for the shelf. Assemble
the case and check it for square.
2. Cut the face frame parts (D, E, F)
to size. When assembled, the face frame
should be 1/16 in. longer and wider
than the case. Use screw pockets to join
the face frame rails to the stiles. Position
the center rail so its top edge is even
with the shelf.
3. Glue and clamp the face frame to
the cabinet. Trim it flush after the glue
is dry (Photo 1).
Make drawers and doors
4. Make a big pile of edge banding. The
entire project takes almost 90 lineal feet.
5. Make the drawer box sides (G),
front and back (H) and bottom (J).
Cutting the drawer front and back pieces
to just the right length ensures that the drawer slides will travel without binding. To calculate this
length, start by measuring the face frame opening. Next, subtract
1 to 1-1/16 in., which is the space needed for two metal
slides. Finally, subtract another 1-1/2 in. or, more exactly, the
combined thickness of two drawer sides. Assemble the drawers.
6. Make the drawer slide fillers (K). Plane them to be
flush with the inside edge of the face frame. Screw and glue
the fillers to the case.
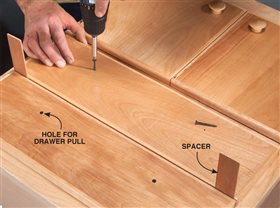
7. Cut and edge-band the drawer fronts (L, Photo 2).
Drill screw holes for the pulls.
8. Cut and edge-band the doors (N). Check the width
of the doors, allowing for the 1/2-in. overlay hinges, edge
banding and a 3/32-in. gap between the doors. Drill for
and fasten the pulls.
Make the top
9. Cut the large and small rim rails (Q and S). Edgeband
two ends and one side of the large rails. Drill screw
pockets into the inside face of the small rails. Glue and
screw the small rails to the large rails, flush with the
unbanded top edge.
10. Cut and edge-band the melamine top (T) and wings (U).
Sand and finish
11. Ease all the corners with a 1/8-in. round-over bit.
Finish-sand the wooden parts.
12. Apply a finish to all the wooden surfaces.
Assemble the doors and drawers
13. Screw the casters to the cabinet bottom. Position and
screw the case slide component inside the case and the
drawer-box slide component on the drawer box (Photo 3).
14. Slip the drawer boxes into the cabinet and lay the
case on its back. Put the hinges on the doors and hang
the doors on the face frame.
15. Position the drawer fronts over the drawer boxes,
and fasten the fronts to the drawer boxes (Photo 4).
Stand the cabinet up.
Assemble the top and wings
16. Drill and countersink holes for the leveling screws
through the main table. Use a drill press to ensure a
plumb hole.
17. Center the rim assembly under the melamine table
top. Fix the rim assembly to the top by driving screws
through the screw pockets.
18. Screw the folding brackets to the bottom of the
wings and then to the large rim rails. It’s easiest to
do this with the table’s top assembly upside down on
your tablesaw. The tablesaw’s flat surface helps align
the parts.
19. Place the top assembly on the cabinet. Insert the
four leveling screws and tap each one with a hammer to
dimple the subtop. This locates the holes for the T-nuts.
Remove the top assembly. Drill and mount the T-nuts in
the cabinet.
20. Push the leveling screws through the top and put
fender washers and Nyloc nuts on from the underside.
(Nyloc nuts are the kind with nylon rings inside them.)
The nuts should be snug but not so tight that you can’t
turn the leveling screw by hand.
21. Set the top assembly on the cabinet. Turn each
machine screw until it engages the T-nut. Adjust each
screw a little at a time so the top doesn’t bind.
22. Position the outfeed tables behind your saw and
span a straightedge from the saw to the table top. Level the
top to the saw by turning the leveling screws up or down;
then lock the screws using the fender
washers and wing nuts. The wing
nuts allow you to lift the cart by its
top without yanking out the T-nuts.
Cost-Saving Options
I went whole hog
when I built these
tables, but you could save
money in a number of ways:
– Use less-expensive brackets. I
looked high and low for brackets
that are rock solid and always open
a perfect 90 degrees to make a deadflat,
rigid work surface. The brackets I
found were a bit spendy, but less expensive
ones will also work.
– Use melamine instead of plywood for the base. Skip
all the banding and simply round over every edge.
– Drop the doors and drawers. You won’t need hinges
and drawer slides.
|


