


We may receive a commission when you use our affiliate links. However, this does not impact our recommendations.
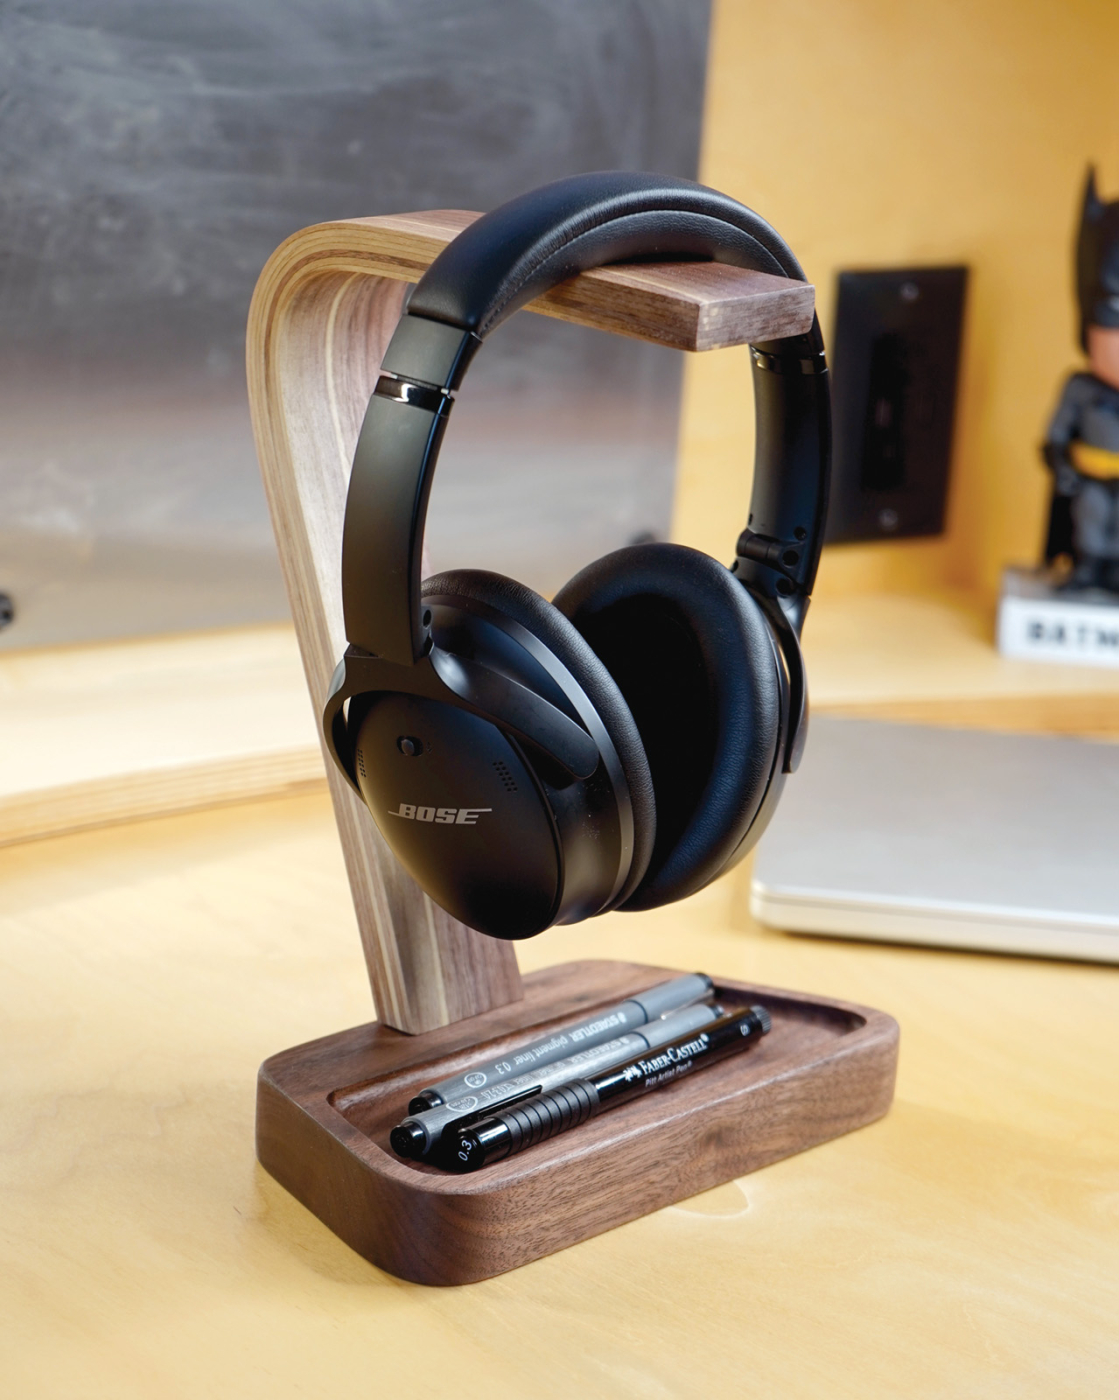
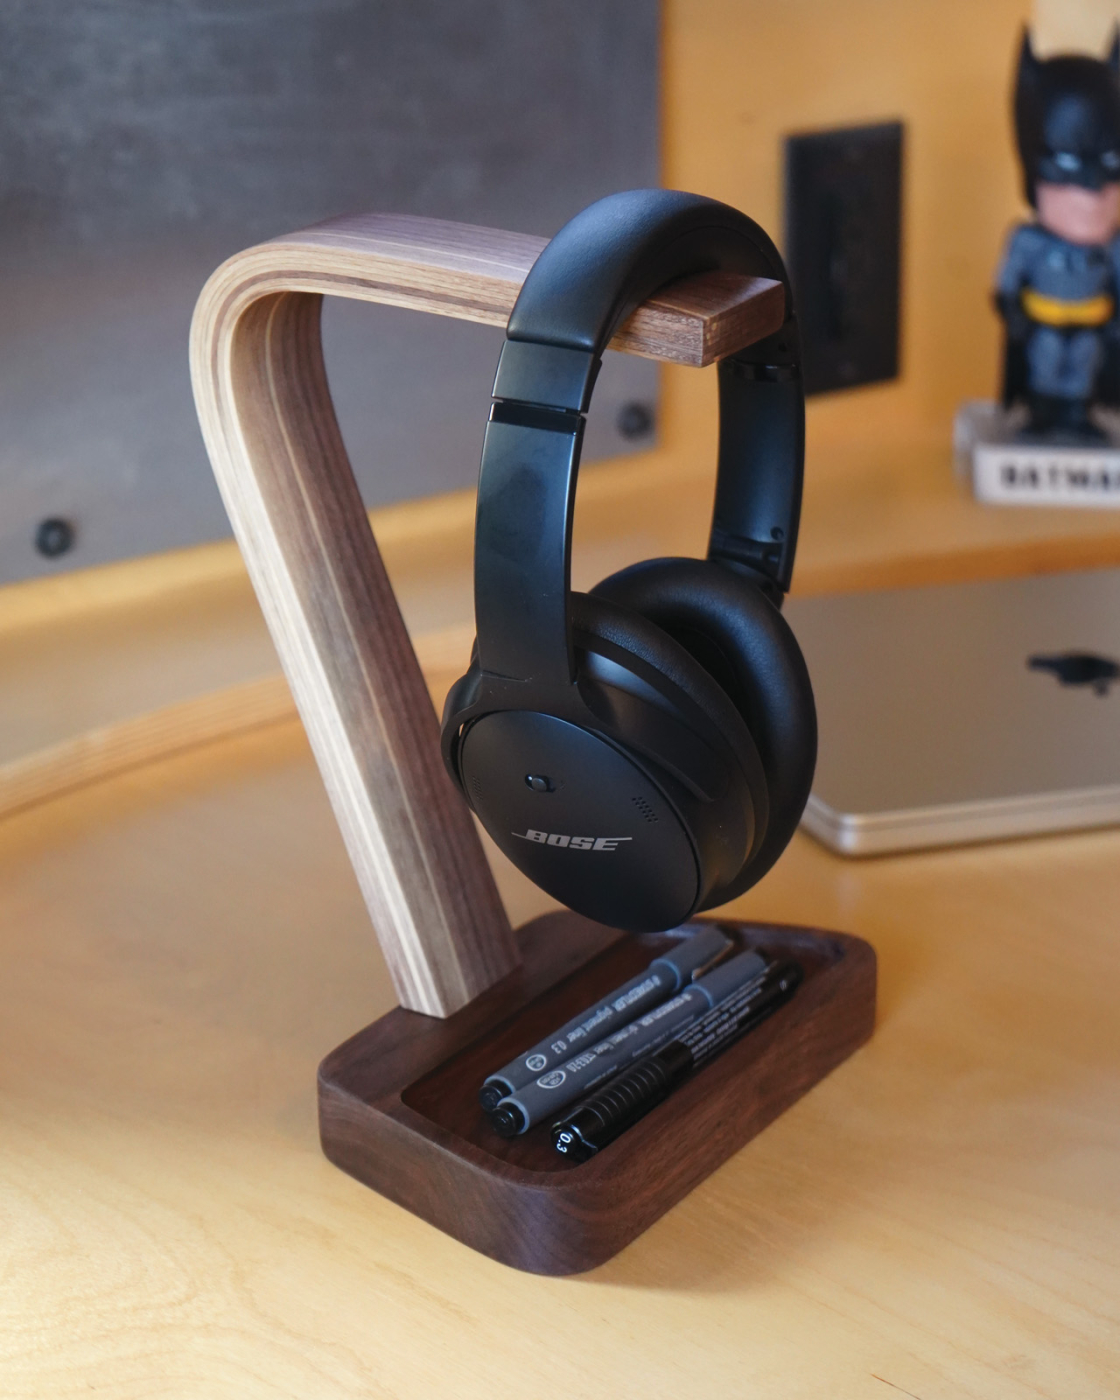
 Practice some mass-assembly techniques to create this elegant stand.
Project #2501 • Skill Level: Intermediate • Time: 2 Days • Cost: $35
You know how it goes, you spot a need that you can fill with a woodworking project. In this case, I needed a place to put my headphones, as well as a tray for my drawing pens that are supposed be stored horizontally. Should be easy enough to build, right? Then again, if I’m taking the time, I could build more than one. Something like this would make a great gift after all. If I’m building more than one, I should probably make some jigs, make things easier on myself…
And without warning you’ve seemingly gone full If You Give a Mouse a Cookie on what was once a rather simple project. But with a project like this one, the effort to make one headphone stand or 30 is nearly the same.
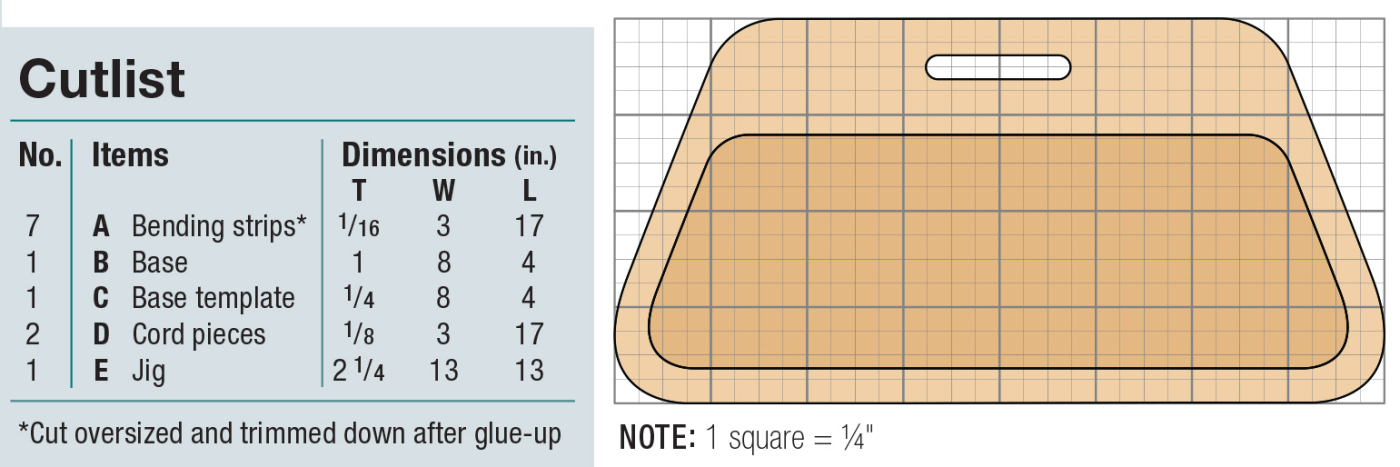
Cutlist and Diagrams

Download: Headphone lamination curve bending template (svg file)
Download: Headphone stand base template (svg file)
Modern-Day Templates
Woodworkers have been making templates throughout all of history, but modern technology has made it easier than ever. The huge strides CNC woodworking have made in the past decade means that more people than ever have access to these useful machines. For this project, I took a spin with the Shaper Origin, which uses some novel tech to recreate the CNC experience with a much higher level of
portability and flexibility.

1 This was my first time really working the Shaper Origin into my project workflow.

2 It’s an impressive and intuitive machine, especially for precision template work.
I created the shape I wanted on my computer, uploaded it to the Shaper, then cut it out. In order to achieve the thickness I would need for shaping the form, I had to laminate three pieces of MDF. With one perfect shape cut already, I quickly roughed out the other two on the band saw and used a pattern bit to cut everything to size.

3 Transfer the shape of the curve with a scriber. Make sure to get it nice and tight in the corner.

4 Glue the rough cut forms to the perfect template form.

5 Use a pattern router bit to trim to size.
For the inner template shape I used a scriber set to the target thickness of my lamination (plus the cork padding) to trace the shape of the inside curve. Then I cut out one perfect copy on the band saw, cleaned it up on the spindle sander, and repeated the earlier steps to created my laminated form. As an FYI, it might seem counterintuitive, but the inner template will not nest exactly inside the outer form. This is normal.
Create the Strips
One of the fun parts of producing a magazine is that you (quite often actually) make mistakes. We shot 128 photos during this project and didn’t manage to capture a single one of making the strips for the lamination. Thankfully it’s a pretty straightforward process.
Start with the usual steps of squaring up your lumber and cutting it to rough width. Then you’re going to head to the band saw to do some resawing. We have a few articles on PopularWoodworking.com that go into great detail, but there are three main things you need. Your band saw needs to be powerful enough, you need a fence that is tall enough and accurate enough, and you need a good blade. If you have a really nice blade you can probably cut strip after strip, but most likely you’ll want to step over joiner between each cut so you have a nice clean edge to hold against the fence. I cut the strips down to about 1/8“ on the band saw, then ran them through the drum sander until they were down to 1/16“.

6 Steam your wood strips until they have regained flexibility.
Get Steamy
Even at that thickness, the strips of walnut will not bend without breaking. Enter the steam bending chamber. Effectively a steam machine hooked up to a box, the goal is to re-infuse the dried wood with moisture so it regains flexibility. I threw my wood strips in there for about an hour, making sure to shuffle them around a few times, and went to work on getting the bending form ready to go.

7 Install the cork with contact cement.

8 Cork protects the bending form and allows compression.
Final Form Furnishing
The bending form needed a few small things to ensure the best result and extend its longevity. One was a layer of cork on both shaping surfaces. The cork keeps the wood and MDF from maring each other during bending, and also allows for a small amount of give during the clamping process. I also added a layer of packing tape over the cork to prevent any glue squeeze out from permanently adhering the form to
the lamination.

9 The packing tape prevents epoxy from sticking to the form.
Bend it Once
With the lamination strips adequately steamed, it was time to bend them to shape. This bending is meant to create a new “memory” shape to the wood, not be a final form, so I only used the outside half of the template. The steamed strips get clamped into place and are allowed to set for at least 12 hours.

10 Clamp the steamed strips to the template to pre-shape them.
Bend it Twice
As you can see in photo 11, the lamination strips are close to the final shape, but it takes a bit more to make it permanent.

11 With the strips pre-bent to the right shape, it’s time to epoxy them together.
I used epoxy for the lamination for several reasons. Epoxy has a long open time, it doesn’t require air to cure, and it is inflexible once it’s set. You can use whatever type of epoxy you prefer, though it should be thin enough to brush.
Apply your mixed epoxy to one side of each lamination strip and stack them into the form. If your strips have specific grain pattern, make sure to keep them in the correct order—I didn’t and you can see it on the front view of the main shot at the top of this article.

12 Epoxy has a long open time, so you make sure everything is lined up just so.

13 Take turns tightening clamps—you want to shift everything into place without any gaps or bends.
Clamping everything up isn’t difficult, it just takes quite a few clamps and a little patience. If you’ve ever learned how to change a tire, you’ve heard that you shouldn’t tighten one lug nut all the way down before the others—it can shift everything out of position. Tighten in a star pattern to properly set the wheel. The same principle applies here. If you clamp down one area tight first, you’ll prevent the form from shifting together as needed. All of that is to say: install all of the clamps to medium tightness and take turns incrementally tightening until everything is fully in place.
Build the Base
The laminated neck mounts to a base that is heavy enough to prevent tipping and provides a nice tray for my aforementioned drawing pens. I used the Shaper Origin again to create the template for the base. I’d be remiss if I didn’t mention that you can actually cut the entire base using Origin, but since not everyone has access to one, I’ll walk your through the steps to make one without a CNC.

14 Cutting a template helps you make quick work of the base with a router.
Once you’ve created your base template, trace the shape onto your stock and rough cut it on the band saw. With a healthy amount of double-sided tape, mount the template to the piece and clean up the edges with a pattern bit on the router table. Use a push pad and be careful; even a high-quality, sharp bit will want to grab on the end grain. I was taught once to let the router take as much material as it wants, and to take multiple passes. That advice served me well here.

15 Really take your time here, and make sure to keep your hands on your push block.
I decided to cut the mortise slot before hogging out the tray. That allowed me to use the template offcut to help support the router. I used a plunge router with a guide bushing to follow the slot in the template. Some grippy non-slip mat helps keep the part in place. Because the base is small, it would be hard to clamp. However, you could use double-sided tape to stick it down to your bench if you’d like.

16 It might take a few passes to hit your target depth when cutting out the tray.

17 The finished base and template. As you can see, the template mirrors the base, and leaves room for router bearings to ride.
For the recess I went back to the router table with a bowl and tray bit with a bearing. I cut the perimeter of the tray first, working in a clockwise direction. Then I made careful passes back and forth to hog out the remaining material. I had a bit of burning on the cross grain cuts, but it worked quite well.
Squaring the Lamination
I gave my lamination a full 24 hours to fully cure before I removed it from the form. If you can still dig your fingernail into the squeeze-out, it needs more time.

18 With one edge of the neck square, you can rip it to width on the band saw.
Freed from its template, it’s time to clean up the edges and cut it to size. If you’re daring, you could flatten an edge on the joiner, rotating the workpiece to follow the grain. Alternately you can use the belt sander or a block plane to flatten it instead. Once you have one good surface, you can rip the form to width on the band saw with the fence.

19 The bending form came in handy squaring up the base. Make sure to leave room for the tenon.
If your shaping form is nice and square like mine, you can use it to cut the bottom of your neck. I simply clamped mine to the miter gauge and ran it through the band saw. I then ditched the template and just used the gauge to cut the top of the neck square.

20 I squared up the top at the band saw too.
Angled Tenon
You might have noticed earlier that I cut a straight mortise in the base. That’s because it’s much easier to cut a tenon at an odd angle than a mortise. It’s even easier to do when you’re using a handy table saw jig, like the one from Infinity you see in photo 21. It took just a bit of time to dial it in exactly, but then cutting the tenon was an absolute breeze. I used a handsaw and some chisels to finish cutting and cleaning up the outside shoulders, and a shoulder plane to finesse everything flush to base.

21 This table saw jig worked great for roughing the tenon.

22 Hand tools delivered the quick and accurate results I needed to finish the tenon.
Assemble & Finish
Normally right about now I would have just glued everything together, but the tenon was such a perfect fit I decided to just friction fit it and leave it as is. If it gets loose this winter I can just glue it then, but in the meantime it’s a nice testament to patience and a job well done.

23 The tenon fit was perfect— no glue needed!
For a finish I used wiping poly, lightly sanding with 220 between each coat and finally buffing up with a soft cloth. If you’re running larger production runs, spray lacquer would also be a good choice.
Speak of production, all of my templates and forms held up great. Whenever I need to make another one (or ten) the process will be a snap. I’ve even considered hitting the craft fair circuit next summer and selling them.
Here are some supplies and tools we find essential in our everyday work around the shop. We may receive a commission from sales referred by our links; however, we have carefully selected these products for their usefulness and quality.


