


We may receive a commission when you use our affiliate links. However, this does not impact our recommendations.

Male tchotchkes. This 19th-century primitive wall box is a perfect place to display some of your treasures … or a hang it by a door for use as a handy receptacle for mail, keys and other small items.
Adapted from a 19th-century example, this wall-hung shelf is perfect for displaying your treasures.
Adapted from an 1840s piece, this canted wall box is scaled up from the one you’ll find in John A. & Joyce C. Nelson’s “The Big Book of Weekend Woodworking” (Lark). Making it just a wee bit bigger allowed me to make use of 1⁄2” x 6″ poplar (which is actually only 5-1⁄2” wide) without having to make any rip cuts.
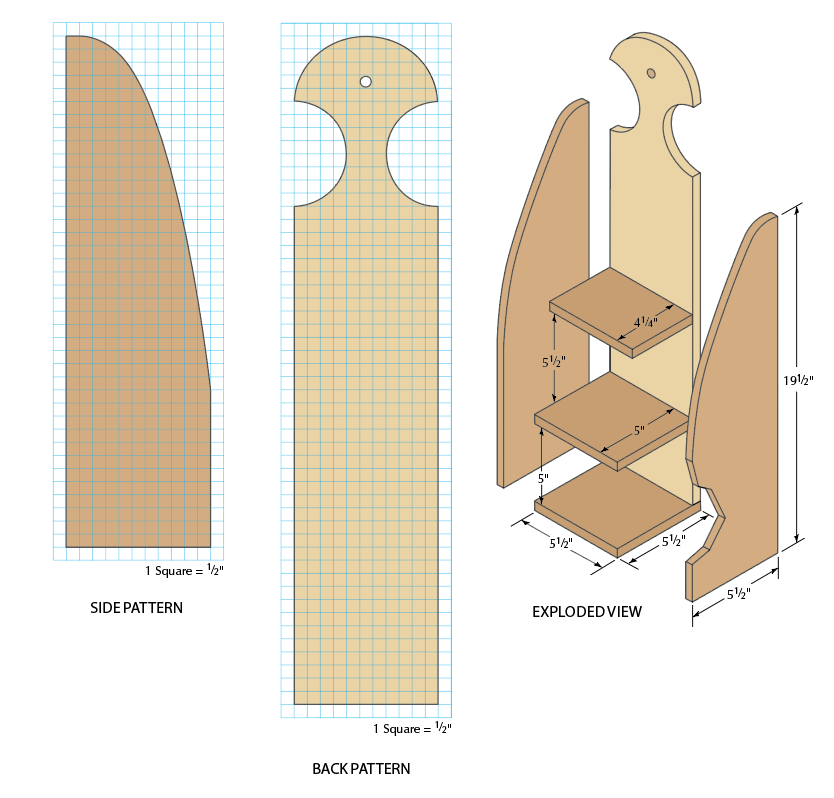
Canted Wall Box Cut List and Diagrams

Cut Your Pieces
First, cut the two sides to length with your miter saw, then draw the side pattern on one piece. Clamp the side pieces together, then clamp them flat to your workbench so the offcut area is overhanging the edge. (To help control the two pieces from slipping, you could use carpet tape to help keep them together.) With a jigsaw, carefully cut to the pattern, leaving your lines intact. (If you need instruction on proper jigsaw use or any other step to construct this project, visit ICanDoThatExtras.com and download the free manual.)
Unclamp the sides from your workbench, but not from one another. Clamp them cut-edge up in your Workmate then use a rasp, file and sandpaper to refine and smooth the curve, then set them aside.
Now cut the back to length and lay it flat on your bench. Lay out the arcs using the pattern to the right, or mark them out with a compass. Each arc is a half circle; the top radius is 23⁄4“, the side radii are 2”. Cut with a jigsaw then refine and smooth the arcs.
While you can certainly cut the shelves and bottom to depth according to the cut list, it’s beneficial to first cut them a little oversized (the shelves should for now extend past the front of the piece), then do a dry fit of your pieces as shown in the picture at left, and carefully mark the final size. That way, you’ll get a custom fit; your shelf edges will match with the front edge of your box. You’ll need to do this for the top shelf anyway because you must mark the angle on the front edge to match the side curves. Cut the angle with a jigsaw, then refine the cut as necessary. Use a file to clean up your saw marks. You could, however, forgo the jigsaw altogether for this cut, and instead use a rasp or block plane to establish the angle, then refine it with your file and sandpaper.
Dry Fit Your Assembly
Now that all the pieces are cut and shaped, do your final sanding prior to assembly. Then dry fit the pieces together as shown, with the back flat on your workbench. Glue isn’t necessary for this project because it’s small and nails will provide sufficient hold, but you can use glue if you wish. Clamp across the sides at the bottom and at each shelf, snugging the bottom and shelves into place. Be careful not to move the pieces as you tighten the clamps, especially the bottom. It’s crucial that the bottom piece be situated properly, as it determines the fit of the back piece.
Using a 1⁄16” standard twist bit, drill pilot holes for 4d nails through the sides and into the back. Be very careful to keep your drill steady; 1⁄2” stock has little forgiveness for sloppy drilling. Now drive your nails through the sides. Then, drill pilot holes through the sides and into the bottom, and through the bottom into the back, and drive your nails.

Fit before nailing. Dry fit your pieces before cutting the shelves and bottom to final size. Notice that the sides overlay the bottom and back, and that the back sits on top of the bottom piece.
Before attaching the shelves, make sure they’re exactly where you want them. If they’ve moved, simply unclamp the workpiece and resituate the shelves. With the back, bottom and sides already nailed in place, you needn’t worry about reclamping; you can simply hold the shelf in place with one hand as you drill your pilots through the sides then drive the nails. Once that’s done, for added strength you may also wish to drill pilots and drive nails through the back into the shelves.
Now, drill a hanging hole centered 13⁄4“ down from the top edge (I used a 1⁄4” bit), then prime and paint the wall box the color of your choice.
Here are some supplies and tools we find essential in our everyday work around the shop. We may receive a commission from sales referred by our links; however, we have carefully selected these products for their usefulness and quality.


