


We may receive a commission when you use our affiliate links. However, this does not impact our recommendations.

An angular front and glass doors lend visual interest to this classic Krenov design.
Through the early stages of my woodworking, when I was sweating away evenings in a Mississippi basement trying to learn the craft using a $99 table saw and an $18 block plane, I devoured the books of James Krenov. They represented an artistic, if idealized, approach to a hands-on craft that appealed to an angst-filled editor and writer in his 20s. Even if I wasn’t up to the tasks, I knew my aim. Then life took over. After editing, writing and running a furniture business for a number of years, I still looked at the Krenov books from time to time, but my tastes and styles slowly became my own. When I started this job, however, I was inspired to revisit Krenov and the designs that kept me wide-eyed in earlier days. I’m glad I did.
I can’t tell you how many Sam Maloof-style rockers or knockoffs of Brian Boggs Appalachian ladderbacks I’ve seen over the years, only to have their makers look me straight in the face and tell me how they came up with their “original” design. With that in mind, I can’t claim that any significant design decision in this piece belongs to anyone other than Krenov.
I’ve only built a few actual reproduction pieces in my life, and while this can’t be called a strict reproduction, it’s about as close as I get. Most times I either come up with something from my head or look through designs from numerous makers and periods until some amalgamation thereof seems to stick. This piece, however, evolved slightly differently.
As I set out to design a small, two-door wall cabinet, I looked through various woodworking and furniture books – Krenov’s and otherwise. As usual, I studied numerous designs, then put them aside and started scribbling away at a sketch pad.
Once you’ve been exposed to good ideas, however, they’re a little hard to shake. While it wasn’t my original intention, time and time again, I found myself returning to design touches I’d seen on a particular Krenov display cabinet. Though at times unconventional, a few of Krenov’s design solutions seemed so obvious after I saw them that I was unable to return to something more traditional.
 This striking but seemingly straightforward display cabinet is a design that Krenov built a few times over the years. The first iteration was made of Swedish ash and appeared in his first book, “A Cabinetmaker’s Notebook” (Van Nostrand Reinhold), and a later version made of Andaman padauk appeared in “Worker in Wood” (Sterling). Krenov built these cabinets in slightly different sizes, but all shared a few essential features: the angled case and doors; center stiles that are recessed and visible only between the rails (rather than the traditional arrangement); and backs made up of bookmatched boards that create an interesting but not overpowering pattern.
In Krenov’s spirit of working with what the wood gives you, my own cabinet is slightly larger in all dimensions and more squat in proportions. And while I never put a scale to Krenov’s door parts, I let my eye steal what it could. The doors are built using bridle joints and hung on straight knife hinges, both of which are common in Krenov’s work.
As for the case, the edge profiles on the top and bottom are more angular and hard-edged on my piece than the originals, and the case joinery is a little different. I can only assume that Krenov assembled the cases using dowel joints, his go-to joint for case construction. I opted for tapered sliding dovetails instead. And though they have the reputation of being fussy, the knife hinges used to hang the doors are actually straightforward and easily installed – you just have to make sure you plan for them before you assemble the case.
Slideshow: See additional step photos on tapered sliding dovetails.
Download the free SketchUp Model of this project.
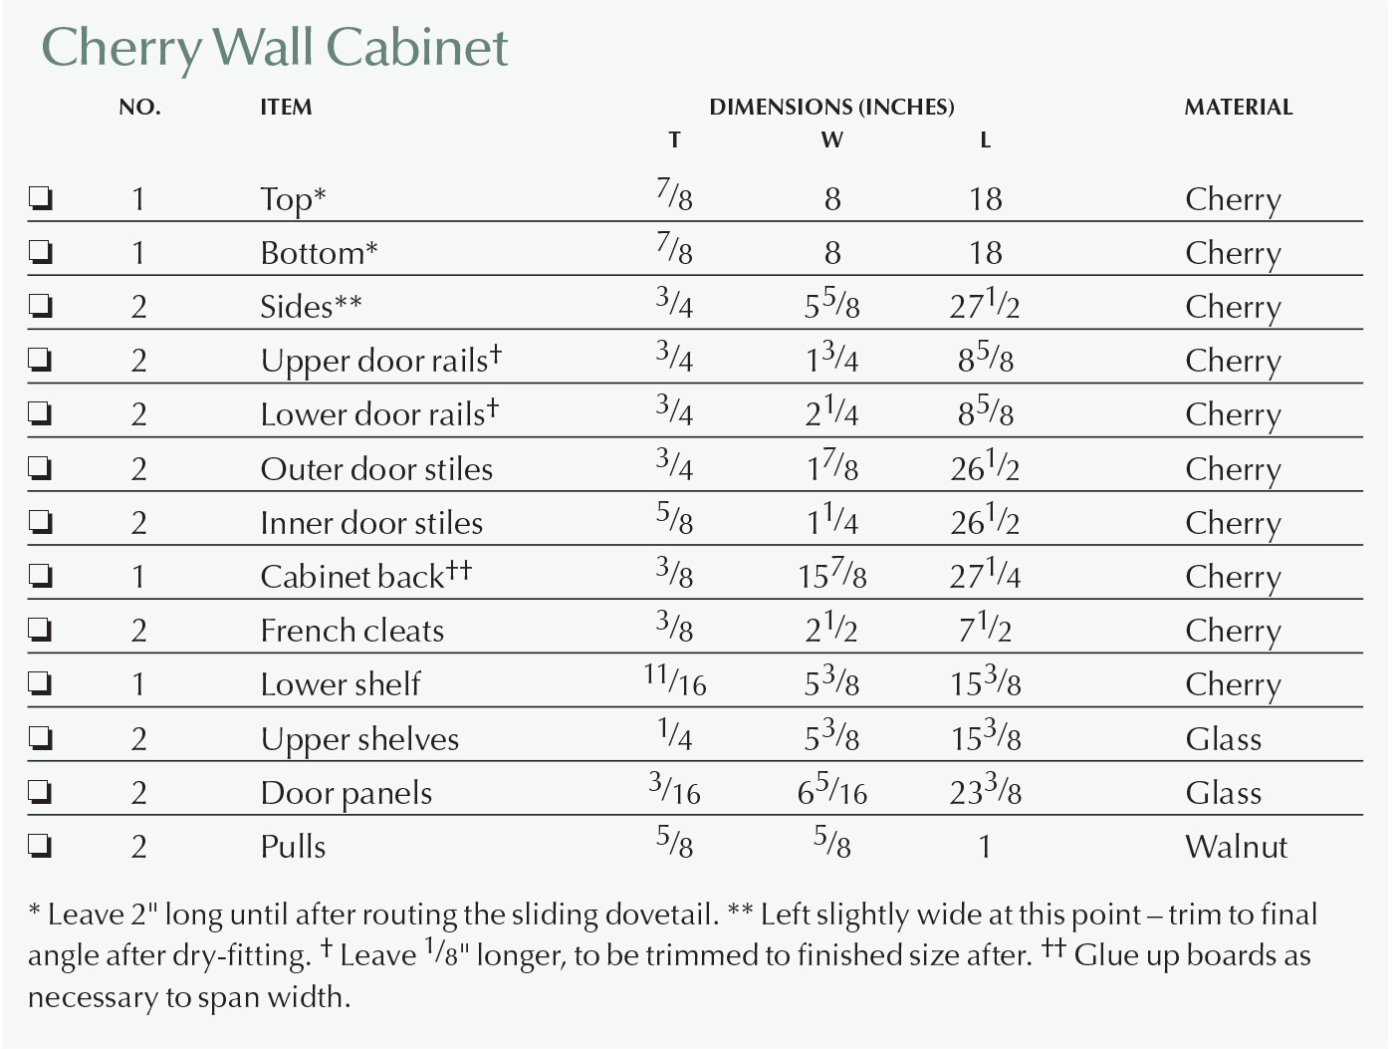
Cutlist and Diagrams


 Tapered Sliding Dovetails

 Tapered Sliding Dovetails
Because the case will be dry-fit and reassembled multiple times, tapered sliding dovetails are a good choice because they don’t bind or even close up until the very end of the joint. Once closed, however, tapered sliding dovetails are strong mechanical joints that need only a few drops of glue to secure them in place. They’re also an ideal joint for bookcases and other instances where long joints are needed. To cut them, all you need is a router, dovetail bit, right-angle guide, a loose length of plywood to use as a fence and a shim.

1. Take two passes. Cut a tapered dovetail slot by shimming out the leading edge of the guide fence and recutting the dovetail slot.

2. Cut a tapered tail. With the same dovetail bit partially buried in the fence, cut a tapered tail by attaching the same shim material to the rear outer edge of the side stock.

3. Test the fit. Remove stock from the tail stock gradually, testing the fit until it slides snugly into the slot.
A Case for Tapered Sliding Dovetails
Many techniques would work for building this case; it could be biscuited, screwed and plugged, or, Krenov’s choice, assembled using dowel joints. Because it’s a more familiar route, I chose tapered sliding dovetails, a strong mechanical joint that works well in cases like this where the top and bottom overhang the sides. While a cabinet of this depth could be assembled using traditional sliding dovetails, the tapered version allows you to easily assemble and disassemble the case numerous times as you test the fit of the hinges.
To rout tapered sliding dovetails you need only a simple right-angle guide, a piece of scrap to work as an adjustable fence and a shim roughly 1⁄16” thick. Create the right-angle guide out of plywood scrap by screwing a short, straight length of plywood (about 2″ wide x 10″ long) square to the edge of a larger scrap – about 4″ x 10″. To cut the dovetail slot use a 1⁄2“-wide by 1⁄2“-long dovetail bit (mine is 14°) set to full depth in your router.
After jointing and planing the stock to thickness, leave the top and bottom an extra 2″ long so that your router has more support as you cut the tapered sliding dovetails. Align the router bit with the centerline for the slot on the top and bottom. Clamp both the right-angle guide and the adjustable fence in place. You can make the cut in a single pass but it causes less strain on the bit and less trepidation for the user if you hog out the bulk of the waste using a 3⁄16“ straight bit before routing the dovetail slot. Mark out and stop the slot about 1⁄2“ shy of the finished depth of the side. Make this same hogging cut for all of the dovetail slots. Then switch to the dovetail bit and repeat the cut. To make sure you position the fence in the same location for both the hogging and dovetailing passes, align the guides using a combination square registered off the end.
After your first pass with the dovetail bit, position your shim along the edge of the workpiece between the guide and the adjustable fence. Make sure the end of the fence is positioned at the point on the bottom or top where the cabinet side ends. To open up one side of the dovetail slot and create a tapered dovetail slot, run the router against the shimmed fence. Then square up the end of the dovetail slot using a chisel.
Cut the dovetails on the ends of the case sides by chucking the same bit in the router table and setting the depth to match the depth of the dovetail slot in the top and bottom. (This is where it pays to make test cuts in scrap stock milled to the thickness of the case parts.) Use masking tape to attach the same shim used to cut the dovetail slot to the outside face of the side stock so that it is flush to the back edge. Alternate taking passes on each side of the stock, slowly adjusting the fence toward the bit until the tail fits snugly in the dovetail slot. Because both the dovetail and its mating slot are tapered, the fit will be loose until it seats itself to full depth. (The fat end of the dovetail should match the opening in the dovetail slot.)
Once you’re happy with the fit, crosscut the top and bottom to length and then cut the angled front edges at the band saw. Clamp the two parts together and clean up the cut with a handplane. Use a 45° chamfer bit at the router table to profile the edges of the top and bottom. Just make sure you don’t chamfer past the point where the cabinet sides meet the faces of the top and bottom.
Streamlined Doormaking
Bridle joints are a handsome exposed joint that puts the maker’s work on display. Using them to join the doors makes the fitting process almost foolproof. Start with stock that fits the opening and then cut your joinery. As long as you glue up the door square, it’s essentially pre-fit to the case. Bridle joints are also straightforward: All you need is a tall auxiliary fence for your table saw and a right-angle guide to help hold the workpieces safely.
The rail and stile arrangement for these doors is simple, but certainly not traditional. The outer stiles run full length, as is traditional, but the inner stiles are inset and visible only between the upper and lower rails. To make the process easy, cut all the joinery on stock that is milled to the same thickness. After the joinery has been cut, the front face of the center stiles are run through the planer again so that their faces are set back 1⁄8“ from the rail faces.
This arrangement allows the top and bottom rails to come to a point at center, highlighting the angled front of the case. It also creates an almost visually seamless frame around the cabinet, which helps draw your eyes to the inside of the case and creates an interesting shadow line reminiscent of Greene & Greene. I like it, but if the doors don’t fit your tastes, feel free to build the doors with the more traditional arrangement.
Start by cutting all your stock to finished length, aiming for about 1⁄32“ of play top-to-bottom. Remember that angles will be trimmed on the stiles after the door is assembled – so cut the stock about 3⁄16“ wider than finished width. It helps guide your milling to draw out the door parts to size on the bottom of the dry-fit case. You can always trim down doors that are too large, but there’s no saving doors that are too small.

4. Cut the mortises. Using a tall fence and a right-angle guide, center the mortise by taking two passes – one with either face against the fence – using a single blade.
Start by cutting the open mortises on the outer stiles and on the inner ends of the rails. For each joint, set the height of the blade to match the width of the mating piece. It makes sense to cut them in batches based on the depth of cut. Position the workpiece upright in a right-angle sled held against the tall fence. Adjust the blade so that it cuts about 1⁄4“ in from the edge and make the cut. To prevent burning, make these cuts in two passes. You’ll want to make this cut on all four joints before raising the blade to final height. Flip the stock so that the opposite face is against the fence and repeat the cut. Taking two passes with a single blade rather than one pass with a dado stack ensures that the mortise is centered on the stock. Depending on your saw blade, you may need to clean up the end of the mortise with a chisel.

5. Cut tenon shoulders. Set the blade to match the thickness of the mortise walls.

6. Then use a stop-block on a table saw sled to cut the tenon shoulder.
Before cutting the tenon cheeks, cut their shoulders with the stock held flat on the table saw and registered against a miter gauge or a crosscut sled outfitted with a stop block set to the tenon length. Cut the tenon cheeks using a setup similar to the one you used for mortising, but with the blade adjusted to remove the faces of the stock. Sneak up on the fit slowly by taking passes on each side. Test the fit against the mortise and aim for a joint that is snug but can be assembled with only hand pressure.

7. Cut the tenon cheeks. Trim away both sides of the tenon, testing the fit and making slight adjustments after each pass.

8. A snug fit. Aim for a tenon that slides into the mortise with a little resistance using only hand pressure.
After all the joinery is cut, run the center stiles through the planer, trimming their front faces down by about 1⁄8“. Assemble the doors on a flat surface and make sure the assembly goes together square by measuring the diagonals. The two measurements should match.
Knife Hinges Lend a Clean Look
Many woodworkers steer clear of knife hinges, assuming that they’re too difficult to fit correctly. But they’re needlessly daunted. Knife hinges are nearly impossible to install if you attempt to do so on a case that has already been assembled, but if you plan for them prior to assembly they’re pretty straightforward. They also add minimal visual distraction to the case, putting the design, the joinery and the wood itself on display.

9. Positioning the hinge. Draw out the position of the door stock to help center the hinge. Then use a marking gauge to establish the front and rear edges of the hinge mortise.
Start by drawing out the location of the hinges on the top and bottom of the case. Dry-fit the case and position a scrap of the door stock against the front edge of the cabinet side; to give it a little breathing room, shim it out by the thickness of a business card. Then find the centerline of the door stock and transfer the location of the hinge.

10. Score around the hinge. Use double- sided tape to hold the hinge in place and then scribe its location with a marking knife.
Center one hinge leaf on the line and hold or tape it in place. Set a combination square so that when it’s positioned against the front of the bottom it abuts the front edge of the hinge. Butt the hinge against the square and position it so that the inside edge of the pivot is flush to the outside edge of the case. (It’s worth noting that on cases without angled fronts, the pivot of the knife hinge is centered on the outer edge of the case.) Once you’re happy with the position of the hinge leaf, use double-sided tape to help hold the hinge in place and scribe a line around its perimeter. Disassemble the case and duplicate these markings for the remaining three hinges.

11. Rout it out. Hog out the waste in the mortise using a small straight bit. Position the edge guide so it makes a clean cut along the rear edge of the mortise.
Use a 1⁄8“ straight router bit that is set to the thickness of one leaf of the knife hinge (the same set up used to mortise the top and bottom). Clamp or use double-sided tape to secure an edge guide to the bottom of your router so that the bit aligns with the rear edge of the hinge mortise. You could use a plunge router to cut the mortise, but I find I get more consistent results using a fixed-base version and dropping carefully into the cut. Work the router in small circles, freehand, to hog off the bulk of the waste. Then take a final pass with the guide fence flush to the front of the workpiece to establish the rear edge of the mortise. Remove as much waste as you’re comfortable removing freehand, and then clean up the edges of the mortise with a chisel.

12. Set the hinge in place. The hinge leaf should be flush to the surface of the workpiece.

13. Drill pilot holes before attaching it with screws.
Screw the leaves of the hinges (make sure it’s the side of the hinge that has a pin and washer on it) into their mortises and reassemble the case. Make sure you drill the pilot holes and use steel screws. You can install the brass screws later but they tend to break unless you first thread the holes with steel ones.
Finish up the Doors & Case
At the table saw, cut the angles on the edges of the assembled doors so that they fit snug between the hinge washers on the top and bottom of the case. Determine the length of the mortise so that the bit matches the distance mortised on the case (from the outside edge moving in toward the center). Then hold or tape the hinge in place and mark the end of the cut with a knife.

14. Rout the door mortise. Scrap stock clamped flush to the top of the door allows you to rout the door mortises in the same fashion as those on the case.
Set a combination square or marking gauge and scribe lines on the sides of the hinge so that it is perfectly centered. Clamp the door upright to the side of your bench or in a vise and clamp a guide block flush to the edge of the door. Attach a guide fence to the router base so that it aligns with the far edge of the mortise. Flip the door horizontally and cut the other edge of the mortise. Routing from both sides of the door guarantees that the mortise is perfectly centered on the door. Repeat this for the remaining mortises.

15. Hang the door. Attach the hinge leaves to the cabinet and one side of the door. Set the leaf attached to the door in place on the hinge. Set the other leaf in place on its hinge and slide the door into place.

16. Double-check the position of the door on the case and then mark out the screw holes. Finish the doors and install the glass before you attach the doors permanently.
Set the mating hinge leaf on the hinges at the top and bottom of the case and then slide the door into place so that the hinge leaves slide into the door mortises. If the door needs to set farther in, you can open up the ends of the mortises on the doors. Once you’re happy with the position of the doors on the hinges, drill the screw holes. You can install the leaf in one end of the door (either the top or the bottom), but leave the other loose so that you can slide it onto the hinge in the case.
Before attaching the doors permanently you need to glue up the case then apply your favorite finish (I used Waterlox). Route a 7⁄16“-wide by 3⁄8“-deep rabbet on the inside edges of the door then square up the corners. Use a small bead of silicone and install wood strips to secure the glass in place.

17. Install the glass. A bead of silicone and wood strips secure the glass in place. Use cardboard to protect the glass as you tap the brads home.
To finish up the case, drill for shelf pins. You can position them wherever you like or to fit the contents you plan to keep in the case. In my own cabinet I installed a lower wooden shelf that sits flush with the top of the lower door rail. This prevents the contents of the cabinet from being hidden behind the door rail. The upper shelves are 1⁄4“ glass.
The back of the cabinet is a good spot to highlight a few bookmatched or especially figured boards you’ve been holding on to for awhile. Rabbet the back of the case about 3⁄4“ deep and 3⁄8“ wide and then install the 3⁄8“-thick back. You can shiplap the boards or glue them up as one solid panel, as I did.
To hang the cabinet, attach a French cleat to the back – simply a 5″-wide board ripped down the center at 45°. The upper length attaches to the back of the case and the lower section mounts to the wall.
My pulls differ from Krenov’s. I band sawed them to shape and then refined them with a carving knife.

18. A comfortable pull. A departure from Krenov’s original, the gently curved walnut pulls emphasize the vertical lines of the doors.
Throughout building this cabinet I was reminded of a story Hunter S. Thompson told: He claims to have once typed out the entirety of F. Scott Fitzgerald’s “The Great Gatsby” simply to know how it felt to type those words. After completing essentially the same task with Krenov’s display cabinet I’m convinced that Thompson’s pursuit wasn’t as crazy as it sounds. At least this one.
Here are some supplies and tools we find essential in our everyday work around the shop. We may receive a commission from sales referred by our links; however, we have carefully selected these products for their usefulness and quality.


