We may receive a commission when you use our affiliate links. However, this does not impact our recommendations.
Craftsman-Style Outdoor Chair
Jigs and fixtures make building this chair a breeze—whether it’s one or a whole yard full.
By Randy Johnson
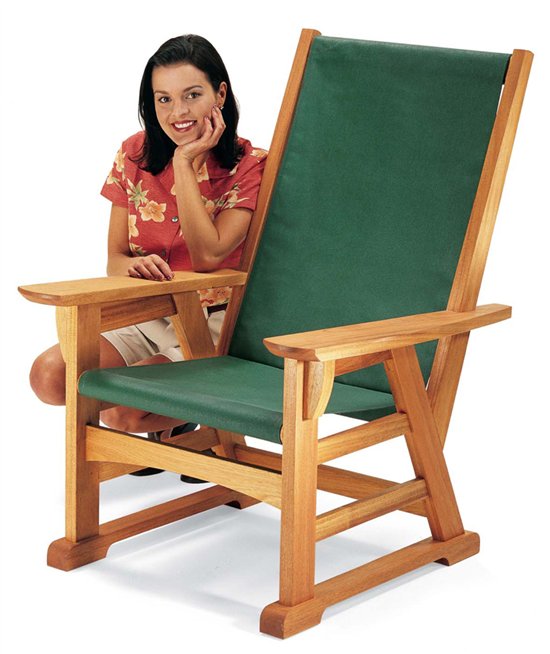
If you’re looking for an outdoor chair that’s comfortable and stable, and yet light enough to move around, you’ll appreciate this Craftsman-style beauty. It’s based on a chair design published in the early 1900s in a Stickley design magazine called, The Craftsman (Fig.A). Originally, I built an exact replica of this chair, but discovered it was too large for the average person and the sling seat was so low and deep that everyone who sat in it responded with “whoa!” and then struggled to get out.
So, I made four additional chairs, changing various parts in an attempt to improve comfort and looks. In the end, I came up with a chair that is smaller and has a stretched-fabric seat. I also added some curves for a softer look.One thing I kept from the original design is the mortise-and-tenon joinery. And for good reason—it’s strong.
Tools and MaterialsThe essential power tools you’ll need to build this chair are a tablesaw, a planer, a jointer, a bandsaw, a router and router table, a belt sander and a drill. A mortising machine is not a requirement, but it’s really handy for the 24 mortises that each chair requires.You’ll also need a variety of hand tools and a sewing machine, if you sew the fabric seat yourself. It takes about 20 bd. ft. of lumber to build one chair. If you use mahogany (as we did), the wood will cost you about $100. A less-expensive option is to use a construction lumber, such as pine 2x4s and 2x6s.Twenty bd. ft. of pine will cost about $15. If you use construction-grade pine, let it dry for a couple of weeks indoors before using it. If you don’t, your parts are likely to warp and twist.The 2-1/3 yards of fabric for the chair seat will run you about $25. You will also need some galvanized screws and weather-resistant glue (see Sources, page 108).
Make One or Make a DozenBecause this project lends itself to being mass-produced, we show you how to use jigs and fixtures to produce multiples. However, if you only want to make one or two of these chairs, you can skip one or all of the jigs and fixtures. If you do skip the jigs and fixtures, you’ll have to be very careful about measuring and cutting, because without them it’s easier to make a mistake.
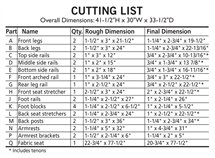
Getting StartedIt saves a lot of time if you cut all the parts to rough dimensions and machine them to final thickness and width as a group.There are a couple of exceptions to this.The feet (J and K), the back posts (M) and the armrests (N) get cut to final width later on. Only machine them to final thickness and joint one edge for now. See the Cutting List, page 72, for dimensions.
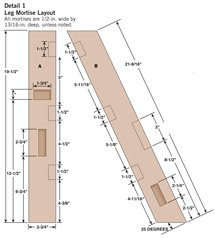
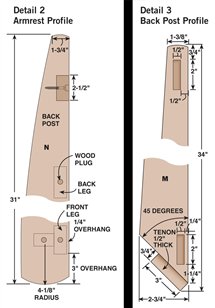
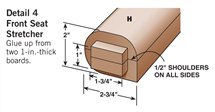
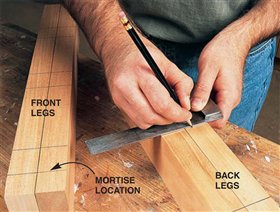
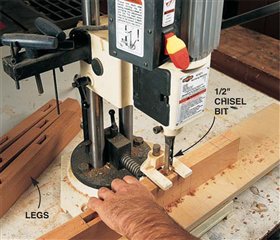
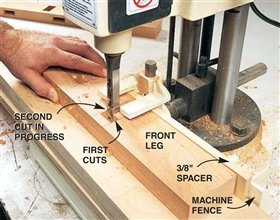
Mortising the LegsWhen it comes to mortise-and-tenon joinery, always make the mortises first and fit the tenons second. It’s easier to fit a tenon to a mortise than the other way around. Start by laying out the mortises (Detail 1, at left, and Photo 1) on the legs (A and B).Then make the mortises in the legs with a mortising machine (Photo 2) or drill and hand chisel the mortises or use a plunge router with a template guide.All the mortises are 13/16-in. deep and 1/2-in.wide, except the mortises for the front seat stretcher (Part H, Detail 4, Fig. B), which is 1-in.wide. I find the easiest way to cut this wide mortise is with the help of a spacer along the fence (Photo 3).
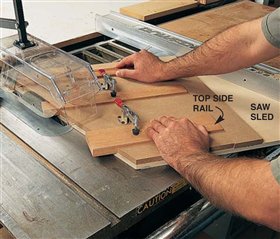
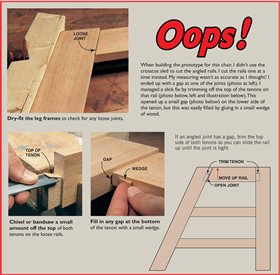
Cutting the Rails and StretchersThese angled rails and tenons can be pretty intimidating, but if you build the cut-off sled (Fig. D) and follow the cutting sequence (Fig.C) they’re quite doable. The main purpose of the cut-off sled (Photo 4) is to cut the side rails (C, D and E) to an accurate length so they will fit the legs without any gaps (see Oops!, page 67). Now cut the front and back rails (F and G) and stretchers (H and L) to length.Also, cut the miter at the bottom end of the back posts (M) (Detail 3, Fig. B and Fig. F). This saves time later on because you only have to set up your dado blade once to cut all the tenons.
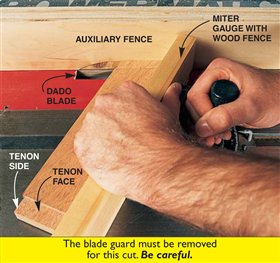
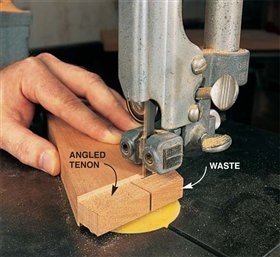
Cutting the TenonsEveryone has their favorite way to cut tenons, and this is mine. (I also think it’s the quickest and easiest way to cut angled tenons.) Start by setting up your dado blade for a 13/16-in.-wide cut. Add an auxiliary wood fence to your tablesaw (Photo 5), and make fence adjustments for a perfect 3/4-in.-wide cut. All the tenons for this chair are 3/4-in. long. Now set the dado blade for a 1/8-in.-deep cut.Cut a tenon on a test rail and check the fit.When the fit is right, cut all four sides of the straight tenons on the rails (C,D,E,F and G).For the angled tenons on the side rails (C,D and E), adjust your miter gauge to match the angle (Photo 5), and cut the tenon faces with this setup.Readjust the angle on your miter gauge and cut the other side of the angled tenons. Cut the shoulders on the angled tenons with your bandsaw (Photo 6) or with a handsaw. Raise the dado blade to 1/4-in. for the back seat stretchers (L) and the angled tenons on the back posts (M). Raise it to 1/2-in. for the front seat stretcher (H).
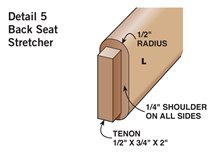
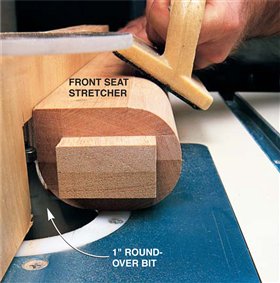
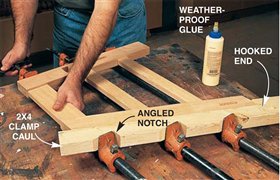
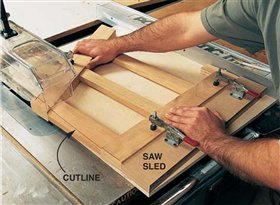
Assembling the BaseI scratched my head a bit about the best way to clamp the angled leg frames. I decided to make a notched clamping caul out of a 2×4 and it worked perfectly (Photo 8). Be sure to test-fit and sand all the parts before final gluing. While you’re waiting for the glue to dry, rout the large roundovers on the front seat stretcher with a 1-in. round-over router bit (Part H, Photo 7; see Sources, page 108). Next, round both sides of the back seat stretchers (Parts L, Detail 5,Fig. B).A 1/2- in. round-over bit in your router table will do the job (see Sources,page 108).Bandsaw the arch in the front rail (Part F, Fig. B) now. The side leg frames need to be tapered at the top so the armrests will slope.A tablesaw sled makes this process quick and accurate (Fig.E and Photo 9).You can now assemble the entire chair base (Photo 10). The foot assemblies are made by gluing the foot blocks (K) to the foot rails (J).After the glue is dry, joint and plane this assembly to final width and cut to final length.The curves can now be bandsawn and sanded. Attach the foot assembly with a single screw at each leg (Photo 11).
Adding the BackComplete the back posts (Parts M, Detail 3, Fig. B) by following the cutting sequence in Fig. F. The planer sled (Photo 12, Fig. G) takes the guesswork out of getting an accurate angle. When you’re done making the back posts, glue and clamp the back frame together (Photo 13).Clamp the back frame to the base with the help of a couple of angled clamping blocks (Fig.H) and a 2×4 clamping block (Photo 14).The real secret to clamping angles is to keep the clamping pressure at a right angle to the joint.
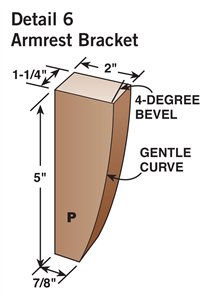
Fitting the ArmrestsTo make the armrests, follow the cutting sequence in Fig. J and fit them to the back posts (Photos 16 and 17).Counterbore for the wood plugs and drill pilot holes for the screws (Fig. B).Attach the armrests with glue and screws (Photo 18). Make the armrest brackets (Detail 6, Fig. B) and glue and clamp them to the front legs.When the glue is dry, add a screw through the armrest from the top. Finally, make the plugs with a plug cutter(see Sources, page 108) and plug all the screw holes.
Finishing for Outside UseIf you want your mahogany chair to weather to a gray patina, leave it unfinished. If you want to maintain the look of new wood, apply a good-quality clear finish.
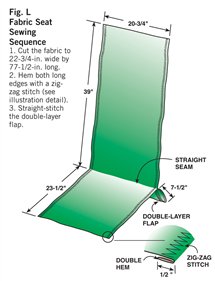
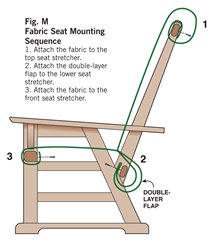
Fabricating the SeatWhen I sat in the sling seat of the replica chair, it felt like I’d need a hoist to get out. I was determined to come up with a better seat. I designed a seat with a flap on the lower backside which fastens to the lower back seat stretcher (L). This keeps both the seat back and the seat bottom stretched taut and makes the chair very comfortable to sit in. Sewing may not be your thing, but the fabric seat for this chair is pretty basic (Photo 19, Fig. L).With the help of someone who knows how to sew, even a thick-fingered woodworker can pull off this one. Another option is to hire an upholsterer to sew it for you.They can also be a source for the outdoor canvas. Stretching the seat is a three-step process (Photo 20 and Fig. M). Be sure the seat goes on square and snug and everything should work out fine.
Sources(Note: This information may have changed since the story’s original publication date.) Steve Wall Lumber Co., walllumber.com, 800-633-4062, Mahogany, Your local fabric store, Outdoor canvas Routerbits.com, routerbits.com, 888-811-7269, 1-in. round-over bit, Grizzly Industries, grizzly.com, 800-523-4777, 45-degree chamfer bit, JesadaTools, jesada.com, 800-531-5559, 1/2-in. round-over bit, # 638-880, $40 ea. Good Hand, Inc., goodhandinc.com, 800-989-5244 ext. 233, Toggle clamps, Your local hardware store or McFeely’s, mcfeelys.com, 800-443-7937,
Click on each image to see a larger version. Cutting List
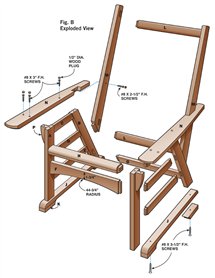
Fig. B: Exploded View
Fig. C: Side Rail Cutting Sequence
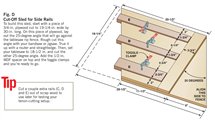
Fig. D: Cut-Off Sled for Side Rails
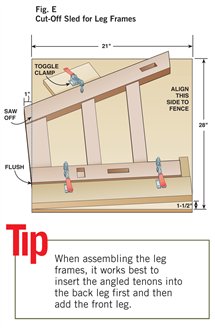
Fig. E: Cut-Off Sled for Leg Frames
Fig. F: Back Post Cutting Sequence
Fig. G: Back Post Planer Sled
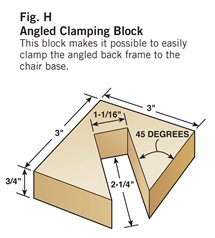
Fig. H: Angled Clamping Block Fig. J: Armrest Cutting Sequence
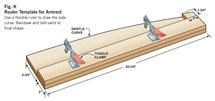
Fig. K: Router Template for Armrest
Fig. L: Fabric Seat Sewing Sequence
Fig. M: Fabric Seat Mounting Sequence
This story originally appeared in American Woodworker April 2002, issue #93 |
Click on any image to see a larger version.
1. Mark the mortise locations on the legs. Pairing up the legs improves the accuracy of the layout. Mortise-and-tenon joinery is a good choice for this outdoor chair because it provides strength and durability.
2. Cut the mortises. With 24 to cut, use a machine if you can, it’s much faster! All the mortises in this chair are 13/16-in. deep.
3. Cut the wide cross-grain mortise for the front seat stretcher in four steps. 1. Cut the first set of holes. 2. Add the spacer and make the second set of holes. 3. Flip the leg end for end. 4. Repeat steps one and two.
4. Cut the angled ends of all three side rails at once using a cut-off sled.This sled takes the guesswork out of measuring and allows you to make multiple parts with ease.
5. Cut the tenons on the rails and stretchers using a dado blade on your tablesaw. For the angled tenons, set your miter to match the angle and run the end of the tenon against the fence.
6. Bandsaw the shoulders on the angled tenons. It takes a careful hand, but it’s quick.A fine-tooth handsaw works as well.
7. Round over three corners on the front seat stretcher with a 1-in. round-over bit in your router table.These large round-overs can also be made by hand planing.The fourth corner is left square. This provides a larger, flat surface to attach the fabric seat to later.
8. Clamp the leg frames using a notched clamping caul. The notches keep the clamping pressure in line with the rails and provide a flat surface for the clamp jaws to hold onto.The hooked end keeps the caul from sliding under pressure.
9. Taper the top of the leg frames with a saw sled. If you are only making one or two chairs, you can forgo this sled and just use a bandsaw and belt sander.
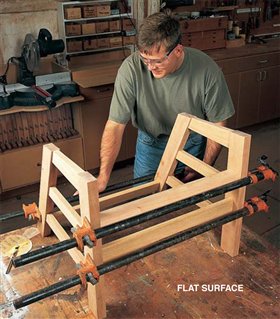
10. Glue and clamp the chair base. Assemble the base on a flat surface and make sure all the legs are touching the benchtop.
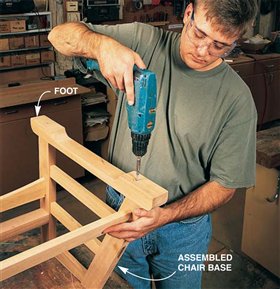
11. Attach the foot assembly with one screw at each leg. Drill pilot holes in the feet and legs to lessen the chance of anything cracking. I don’t use glue here so the foot assemblies can easily be replaced if they become worn or suffer decay.
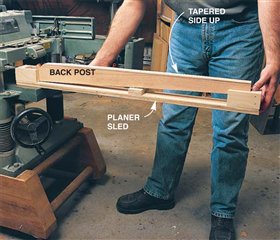
12. Taper the back post with the help of a planer sled. Wax the bottom of the sled so it feeds smoothly through your planer.You can also make this taper with your jointer or a hand plane.
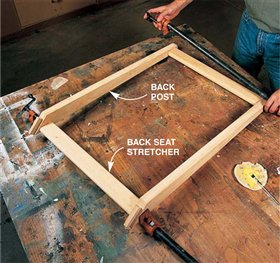
13. Assemble the back frame with glue and clamps. Check for square by measuring corner to corner.
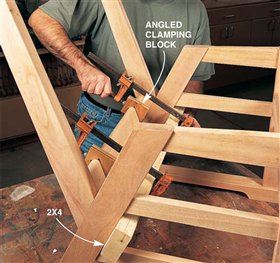
14. Attach the back frame to the base with the help of angled clamping blocks and a 2×4.This arrangement puts pressure at a right angle to the joint and keeps everything tight until the glue dries.
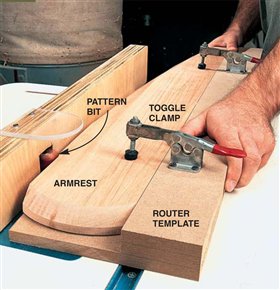
15. Rout the side profile on the armrest with the router template and a large pattern bit. A belt sander can do the job if you are only making one or two chairs.
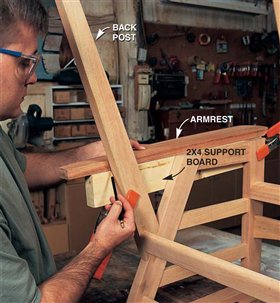
16. Mark the armrest for the notch that connects it to the back post. Be sure to mark this important joint carefully because it helps support the back post. You want the joint to fit snuggly. To simplify this task, clamp a scrap of 2×4 to the side frame to support the armrest while marking the notch.
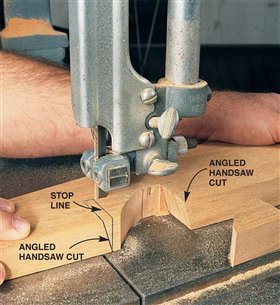
17. Cutting the notch in the armrest requires angled and straight cuts. First make the angle cuts with a handsaw.Then mark a stop line so you don’t over cut when bandsawing the rest of the notch.The waste remains attached by a small amount of wood, but it is easily snapped off. Clean up any roughness with a chisel.
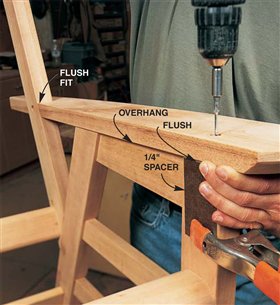
18. Attach the armrest. First screw it to the back post.Then twist the arm slightly to create a 1/4-in. overhang on the inside at the front leg. Counterbore for the wood plugs and drill pilot holes for the screws. Finally, glue and screw the armrest to the legs.
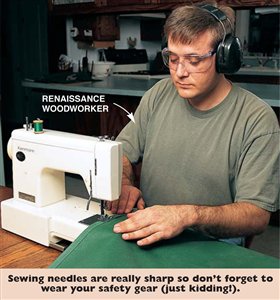
19. Sew the fabric seat. Do it yourself, bribe a relative or hire an upholsterer.Outdoor canvas is available in many colors and patterns (see Sources, page 108). It’s made to withstand sun and rain, and is mildew resistant.
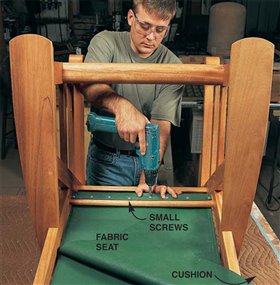
20. Install the fabric seat with small screws. They’re easy to remove if you need to retighten or replace the seat. Stretch the fabric taut when installing it. |
Here are some supplies and tools we find essential in our everyday work around the shop. We may receive a commission from sales referred by our links; however, we have carefully selected these products for their usefulness and quality.


