In Projects, Shop Blog, Techniques

We may receive a commission when you use our affiliate links. However, this does not impact our recommendations.

Dovetailed Step Stool

Three kinds of dovetails
make it extra strong.

By Frank Klausz

After I finish a large commission, I like to surprise my client during the holidays with a gift—this sturdy kitchen stepping stool. Making one is a pleasure because it’s held together by nothing but dovetails, and I love hand cutting dovetails.

A kitchen stool that will face hard use has to be strong. When you stand on the stool and hold onto its tall back for balance, you put extra strain on the joints. That’s why this stool is dovetailed throughout, because dovetails make the strongest connection between wide boards. If they fit tight, the mechanical interlocking alone is enough to hold boards at a rigid right angle. Adding glue is icing on the cake.

You’ll need about six board feet of lumber (about $30), to make this stool. The one in these photos is made of cherry, but any wood will do, including pine. You’ll also need some tempered hardboard, 1/4" and 1/2" plywood for the jigs, and a router and router table. After you’ve made the jigs and tried them out, set aside one weekend to make the stool.

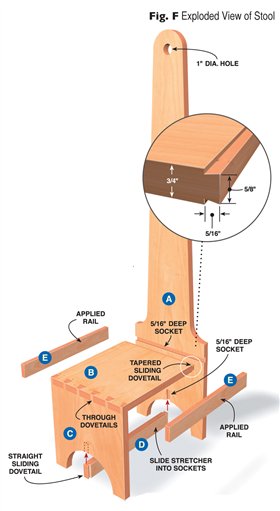
You’ll find three different kinds of dovetail joints in this stool: a tapered sliding dovetail that goes across the grain, through dovetails, and straight-sliding dovetails that go with the grain.


Preparing the wood

Flat wood is essential for successful dovetailing. Boards that are cupped across the grain will be nothing but trouble. Mill rough lumber to 7/8", taking an even amount off both sides. Sticker the boards so air circulates all around. After a few days, see if the boards are still flat. Joint again if you have to, and take the wood down to the final thickness of 3/4".

Mill the wood for the back, seat and front from one wide board if you can. The cathedral arch figure will then flow nicely from one piece to another, especially if you center the arches down the middle of the board. Set aside some extra wood for setting up dovetailing operations. Make sure all your wood is exactly the same thickness.


Making the template

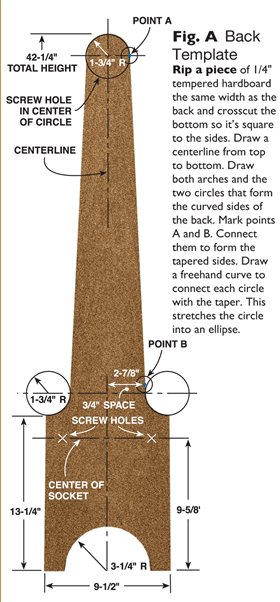
A good template for the back is worth the effort. You could lay out the pattern directly onto your 3/4" wood, but smoothing and sanding it will take more time than preparing a thin template. And having a template will allow you to make multiples.

Make the template from 1/4" tempered hardboard, a material that’s tough but easy to shape. A router bearing won’t dent it. Cut the hardboard with a jigsaw or bandsaw. Smooth the roughly cut curves with a half-round file. Use a block plane to straighten the sides. Run your hand around the template feeling for any hills or valleys. A smooth template will pay off in a back that needs only a light sanding.

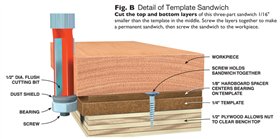
This template is the middle layer of a wonderful router jig that puts the bit right where you want it (Fig. B). Cut the top and bottom layers undersize and leave them rough. Screw the three layers together. Drill holes through the sandwich for screws that will hold it to the back. When you drill the finger hold and rout the dovetail socket you’ll remove the pilot holes made by these screws.


Shaping the back and front

Rip the solid wood for the back, seat and front to the same width. Crosscut the back board a bit longer than its final length. Align the template with the bottom end of the back and trace around it. Saw out the back, staying at least 1/16" away from the pencil line. Fasten the template sandwich to the face side of the back board. Clamp the whole assembly down to the bench.

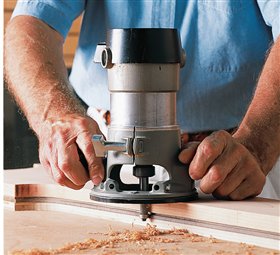
Rout around the back in a counterclockwise direction (Photo 1). You’ll have to re-position the back to avoid bumping into the clamps, but make sure you rout each curve in one continuous pass.

Rout the front board’s arch in the same manner. You won’t be able to screw the sandwich to the board, so use clamps instead.


Tapered sliding dovetail

The seat is joined to the back with a long sliding dovetail. Both the pin and socket are tapered. This joint is easier to fit and glue up than one that isn’t tapered. The pin slides easily into the front of the socket. The last inch is the only tough part—you’ll have to push hard to get the joint home. You’ll be amazed with the strength of this joint!

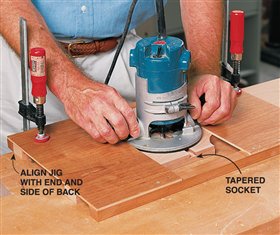
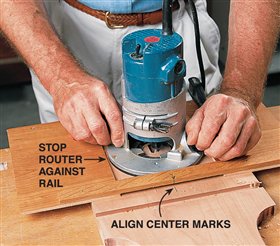
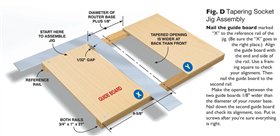
A tapered dovetail sounds difficult to make, but it’s really quite easy. The secret is to create all the tapers with one shim that’s about 1/32" thick. Make the tapered socket with a foolproof jig (Figs. C and D). Use a standard 1/4" shank dovetail bit with a 14° pitch and 1/2" width. Clamp the jig down and rout away (Photo 2).

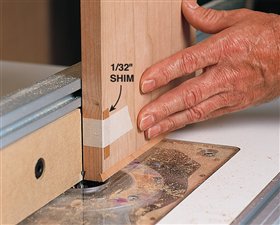
Make the long pin that slides into the socket on the router table (Photo 3). Adjust your router so it cuts a 5/16" pin, exactly the same length as the socket is deep. The easiest way to do this is to unplug the router, lay the stool’s back on the router table and raise the bit until it touches the bottom of the socket.

Tape shims onto both faces of a test piece to create the same taper as the socket. Try sliding the test piece into the socket. It should start easy and gradually tighten up. You should be able to pound it home with your fist. Adjust the fence to change the fit. When it’s right, rout the real seat.

Once the socket is cut you’ll know exactly how long the front board must be. Slide the seat in place and measure from the bottom of the back to the top of the seat. Cut the front board to length.


Through dovetails

The strongest through dovetails are fairly large in section. The width of a full pin should be about the same as its thickness, in this case, 3/4". The half-pins at either end of the joint should actually be a bit more than half the size of a full pin. Here they’re 1/2" wide. The tails should be clearly larger than the pins for the joint to look right, but the exact proportion isn’t important.

I cut my dovetails by hand (see “Four Tips for Dovetailing by Hand,” below). I can make them any size to fit the situation. You can use your favorite router jig to make through dovetails, but if it’s a jig with fixed spacing you might have to alter the width of the stool a bit to make the pins and tails work out. In that case, be sure to lay out the spacing before you mill your lumber.

Glue the front to the seat. Check for square. Plane or sand the dovetails flush. It’s easier to hold two pieces in your vise now than the whole stool later.


Non-tapered
sliding dovetails

A stretcher just above the arches locks in the front and back, making a rigid structure. This sliding dovetail isn’t tapered because a taper isn’t really necessary over this short distance.

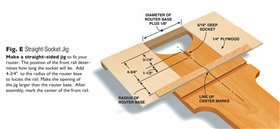
Make another socket jig to guide the router (Fig. E). Again, you’ll need to size it to fit your router. Cut both sockets (Photo 4).

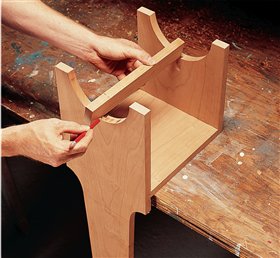
Assemble the stool without glue before cutting the stretcher to length (Photo 5). Shape the dovetailed end of the stretcher on the router table. Test the fence setting with a scrap. The stretcher is pretty narrow and it’s not safe to merely stand it up on end on the router table. Clamp a backer board alongside the stretcher so you have a wider bearing surface.


Assembling the stool

Glue the seat to the back first, then turn the stool upside down and drop in the stretcher. You won’t need any clamps. After the glue is dry, plane all the sides flush. Trim the side rails to exact length and glue them on. Sand them even with the seat.

Apply your favorite finish. Hitch up the sleigh and deliver a great holiday gift!

Sources

(Note: Product availability and costs are subject to change since original publication date.)

Amazon, amazon.com, 866-216-1072, Video: “Dovetail a Drawer with Frank Klausz”.

MLCS Woodworking, mlcswoodworking.com, 800-533-9298, 1/2" dovetail bit, #5405.

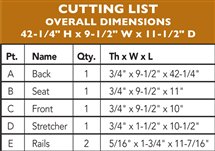
Cutting List

Click any image to view a larger version.

1. Follow a template with a router to shape the back of the stool. The template is the middle layer of a sandwich that allows your router bit to clear
the bench top.
Shape the stool’s front board with
the same template.

2. Cut a perfect tapered socket with this simple jig. The two pieces of plywood are tapered, so the opening between them is wider at one end than the other.

3. Cut the seat dove-tail on a router table. Shim both sides of the seat to make the same taper as the socket. Adjust the fence by trial
and error, using scrap wood to test the cut.

4. Rout the stretcher socket with a second jig. This is a straight sliding dovetail. The jig’s opening has parallel sides. When you bump the router into the top rail, you’ve reached the end of the socket.

5. Mark the length of the stretcher directly from the stool, which is not yet glued together. Cut the stretcher and dovetail the ends on the router table.

Fig. A: Back Template

Fig. B: Detail of Template Sandwich

Fig. C: Tablesaw Tapering Technique

Fig. D: Tapering Socket Jig Assembly

Fig. E: Straight-Socket Jig

Fig. F: Exploded View of Stool

4 Tips from Frank Klausz for Dovetailing by Hand

Tip 1. Cut by Eye

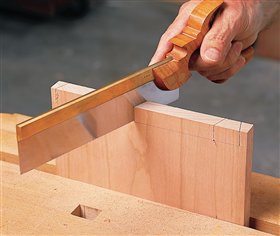
When dovetailing by hand, be bold. Don’t bother with a try square or sliding bevel. After gauging a line across the board, lay out the pins with your saw as you make each cut. Trust your eye to find a pleasing dovetail angle and repeat it over and over. Trust your hands with a sharp saw to cut straight down. If you’ve never done this before, let go of your anxiety and just do it. Practice, practice, practice. You’ll be amazed at how easy it becomes.

I’m not worried about the exact sizes of the pins or the spaces between them. In fact, a little variation is a good thing. Your right and left hands aren’t perfectly symmetrical, so it’s okay if your dovetails aren’t, either.

I follow a “rule of halves” when I saw the pins. First I cut the two outer half pins. Next I cut the other side of one tail.

Then I eyeball
half the distance between the tail and half pin and make another cut.

I divide the remaining spaces in half again.

Turning the saw in the other direction, I saw each complete pin. I judge their width by looking at the thickness of the board.

Tip 2. Chop with Vigor

"I chop out the pins like there’s
no tomorrow. Good, solid blows
on a very sharp chisel get the
job done in no time."

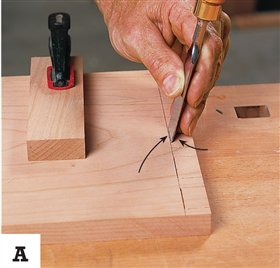
A. To start, I plant the chisel very close to the gauge line, but not exactly on it, and give it a whack with a round-headed mallet. The slope of the chisel’s bevel carries it right into the line. Experience tells me how far to set it away from the line. I march across the board, repeating the same cut.

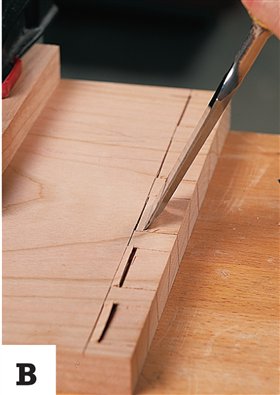
B. Next comes a sloped cut that defines the shoulder. The chisel is facing the same direction. That’s an economy of movement common to all good handwork. This cut carries the chisel pretty deep, almost up to the first cut.

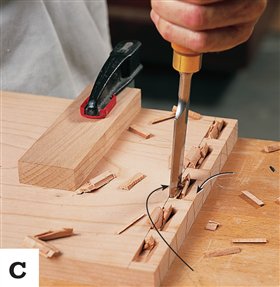
C. A combination of vertical cuts and sloped cuts remove most of the waste. Actually, I lean the vertical cuts. This “undercutting” saves a lot of time in cleaning up the dovetails.
   

Notice that I leave a flat spot at the end of the waste. If you’ve ever torn out the interior of a hand-chopped dovetail, you’ll appreciate this tip. I chop halfway down one side of the board, brush away the chips and turn the board over. The flat spot supports the waste so there’s no tearout.

Tip 3. Mistakes Happen! Just Fix 'Em

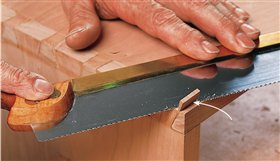
Don’t worry about making a few mistakes. Learn to fix them. Here I had to insert a thin wedge in the joint to make up for a mistake in cutting. While the glue was still wet, I sawed out a couple of wedges and lightly tapped one into an open joint. After the glue dried, I cut the end of the wedge off.

Tip 4. Level Quickly

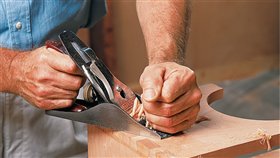
I use a plane to clean up dovetails. When finely set and super sharp a plane slices right across the end grain leaving a smooth, flat surface that you can’t get with sandpaper. I plane from the corners into the middle and take out any ridges the plane may leave with a cabinet scraper.

This story originally appeared in American Woodworker December 1999, issue #77.


Product Recommendations

Here are some supplies and tools we find essential in our everyday work around the shop. We may receive a commission from sales referred by our links; however, we have carefully selected these products for their usefulness and quality.

Recommended Posts

Start typing and press Enter to search