


We may receive a commission when you use our affiliate links. However, this does not impact our recommendations.
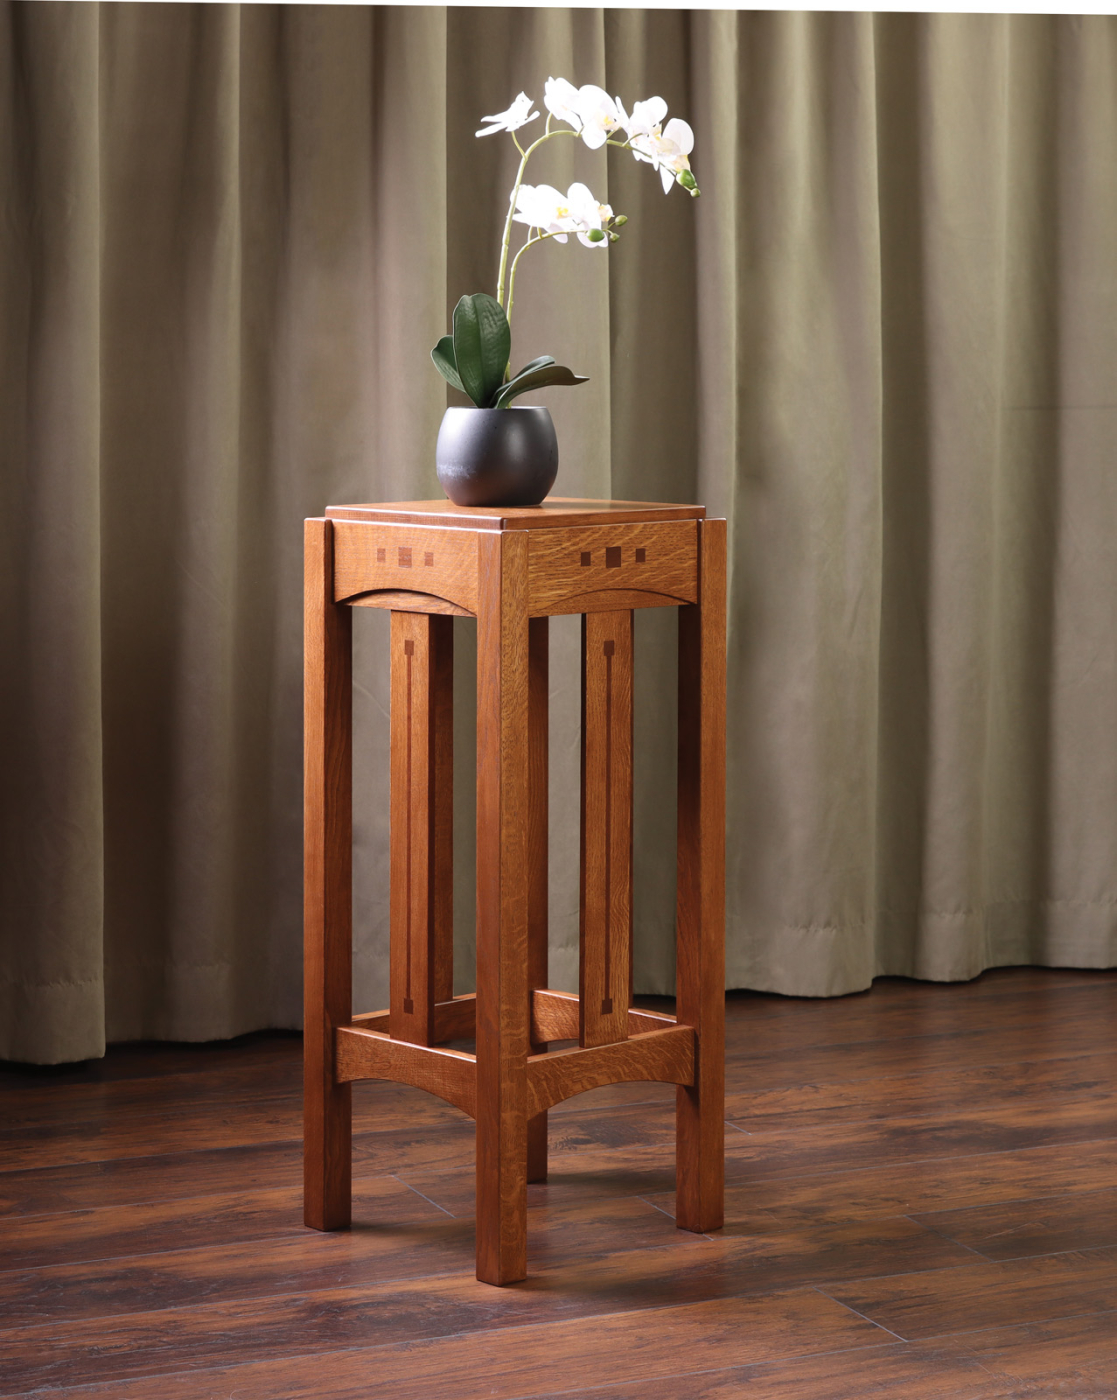
This Charles Limbert table was sold as a fern stand, but it’s a great addition to any home.
Project #2503 • Skill Level: Intermediate • Time: 3 Days • Cost: $250
At first glance, Arts & Crafts style furniture often looks simple to build. Afterall, there are no turned legs or intricate moldings to contend with. But most notable antique pieces from this era have a deceiving level of complexity. This Limbert style #802 Fern Stand has several features that you notice on closer inspection. A series of “Ebon-Oak” inlays adorn this compact plant stand and give the piece a unique aesthetic. In fact, there are 20 individual square inlays, some connected by thin strips of inlay. Then you may notice a subtle arch detail on the upper rails that echoes the curve on the lower rails. This detail seems to elicit a universal woodworker response; “How’d they do that?” And while there are certainly two or three ways to accomplish this detail, I’ll share a simple method that helps keep the parts centered on the legs, so the slats will fit as intended. Finally, there’s the inset top panel detail, a hallmark of later Charles Limbert desks and occasional tables. This exposes the top of the legs and a bit of the top rails, so make sure your joinery looks good before gluing this fern stand together!
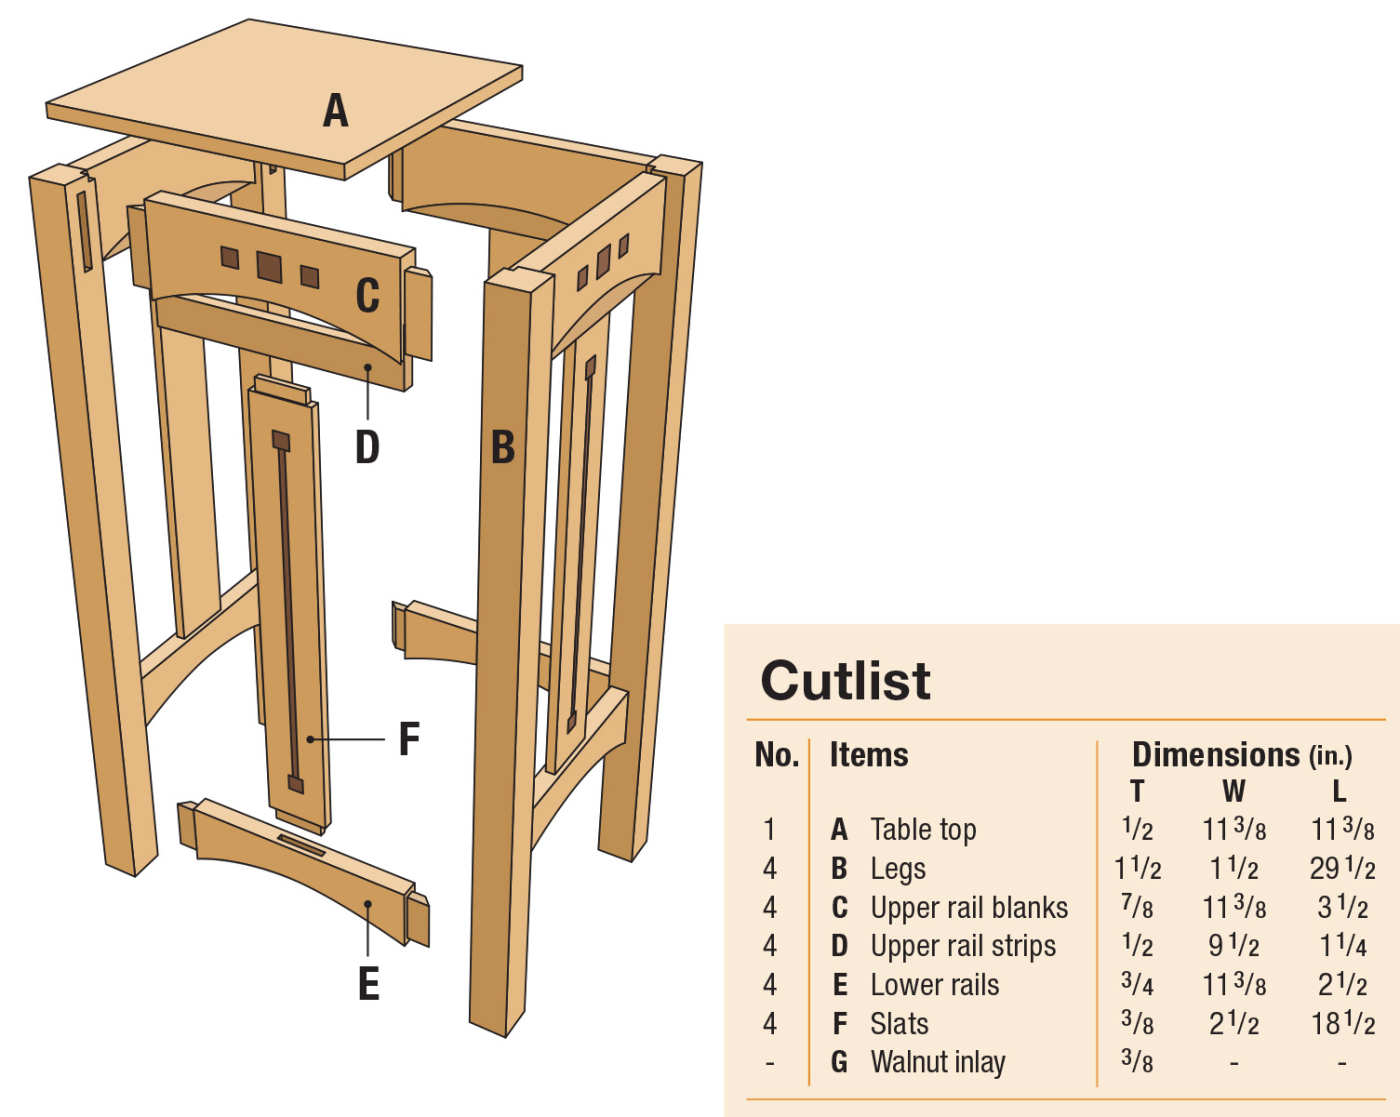
Cutlist and Diagrams
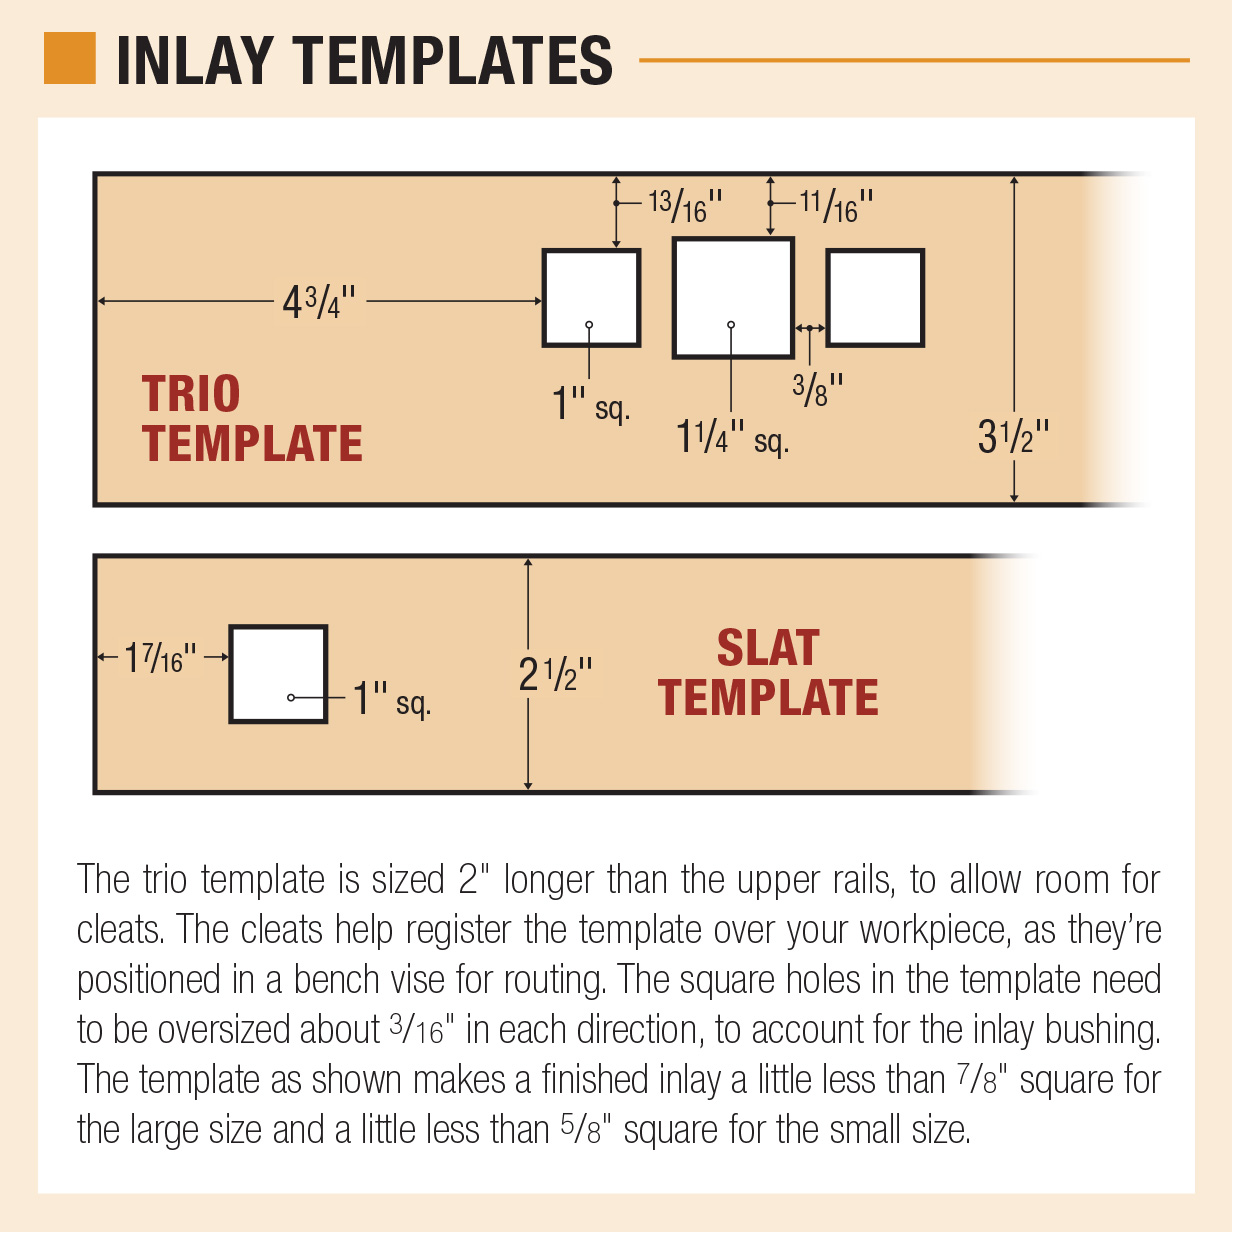
Download: Fern Stand Inlay templates
Legs are Straightforward
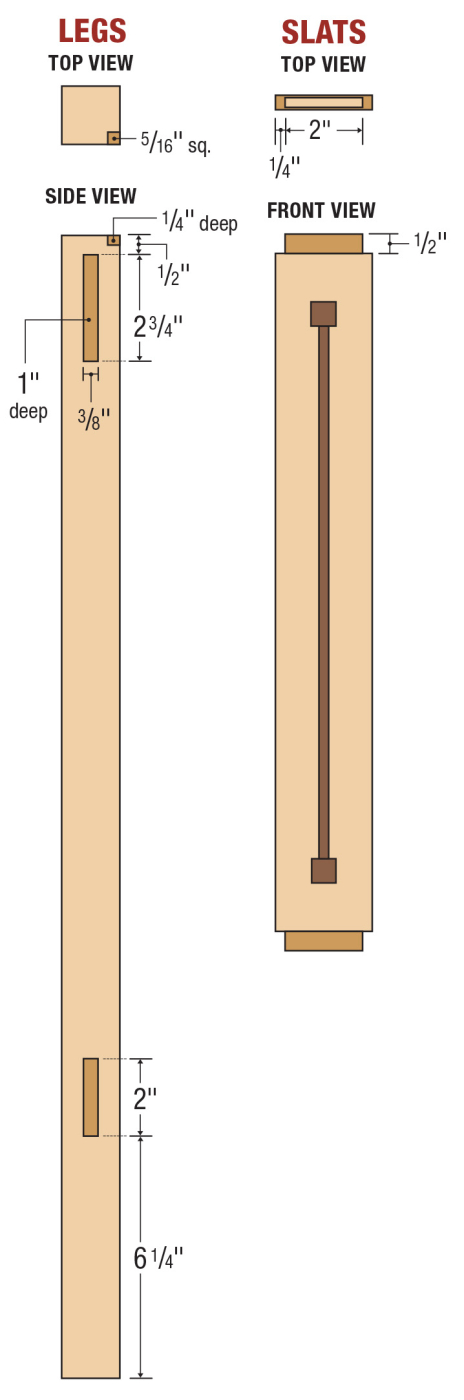
As with most tables, we’ll start by milling the legs flat and square. Then plane the leg blanks to 1-1/2“ square and trim them to a final length of 29-1/2“. The inset top panel will add another half inch of height, for a finished table that stands 30“ tall. With projects featuring particularly thick legs, I’ll sometimes laminate them for quartersawn figure on all four sides. With the relatively slender legs in this project, it’s probably not worth the extra effort. Straight-grained riftsawn white oak will work just fine in this case. Next, break out your favorite mortising tools, whether that be a router or a dedicated mortiser. We don’t have any through mortises in this project, so there’s no real advantage either way. Just use the method you’re most comfortable with. Create four intersecting mortises in each leg, as shown in the detailed rendering above. The mortises are all 3/8“ wide and centered on the thickness of the legs.
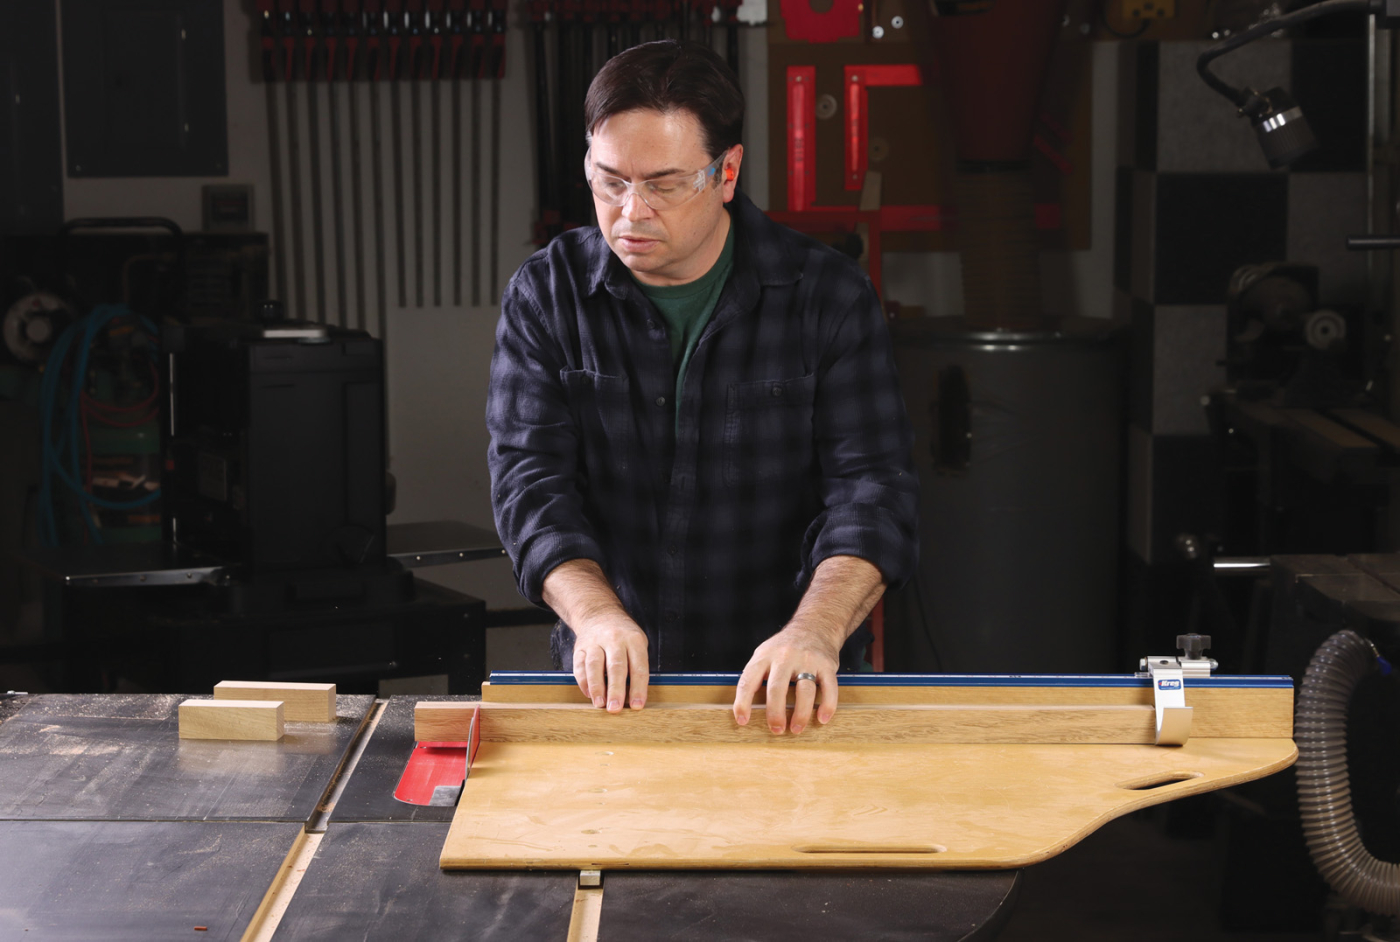
1 Mill leg stock 1-1/2″ square and crosscut them to 29-1/2″ long. A single-runner sled works best because it allows a taller blade height than double-runner sleds.
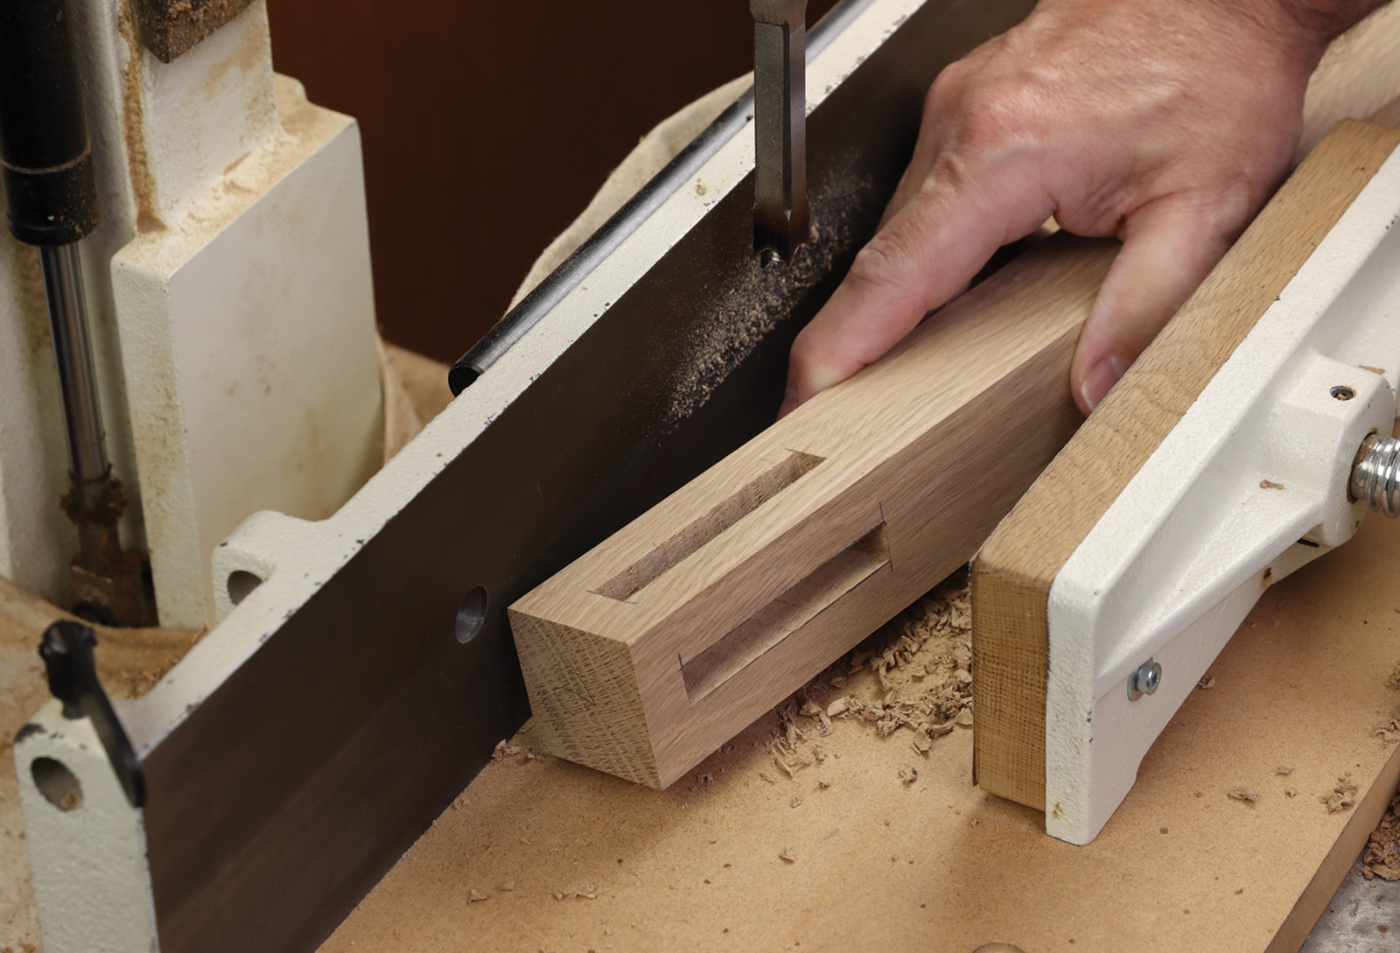
2 Cut 3/8″ wide mortises. If you use a hollow chisel mortiser, set depth of cut slightly less than 15/16″ , to preserve the mortise walls where the 2 cuts intersect.
3 Use a chisel to remove excess wood from the inside corner.
Inlays Come Next
Cut the rails and slats to size and begin laying out the square inlay patterns on MDF template stock.
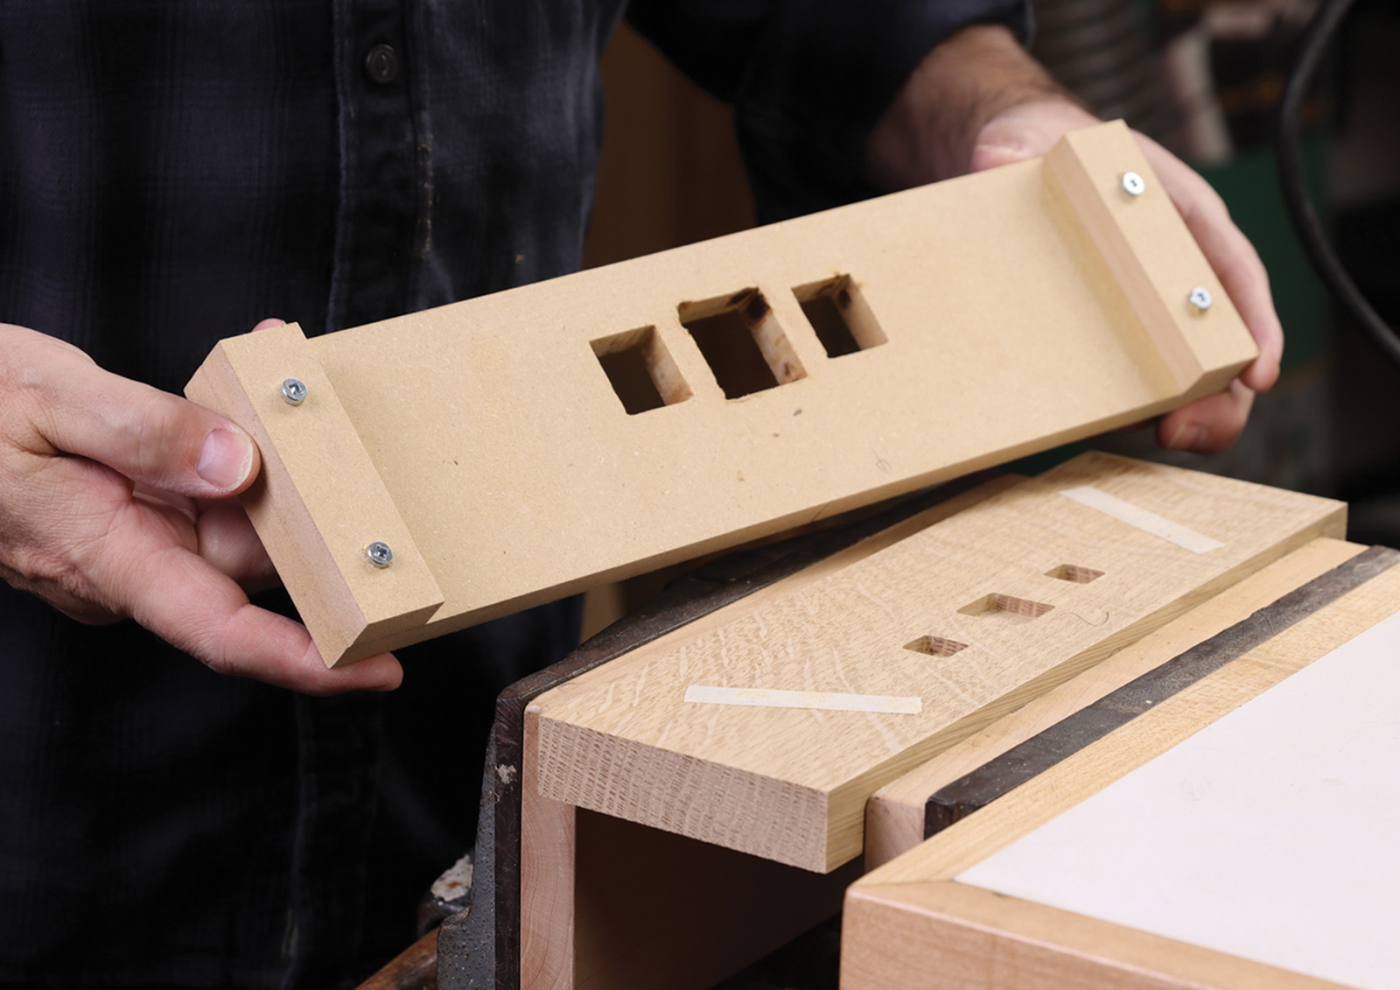
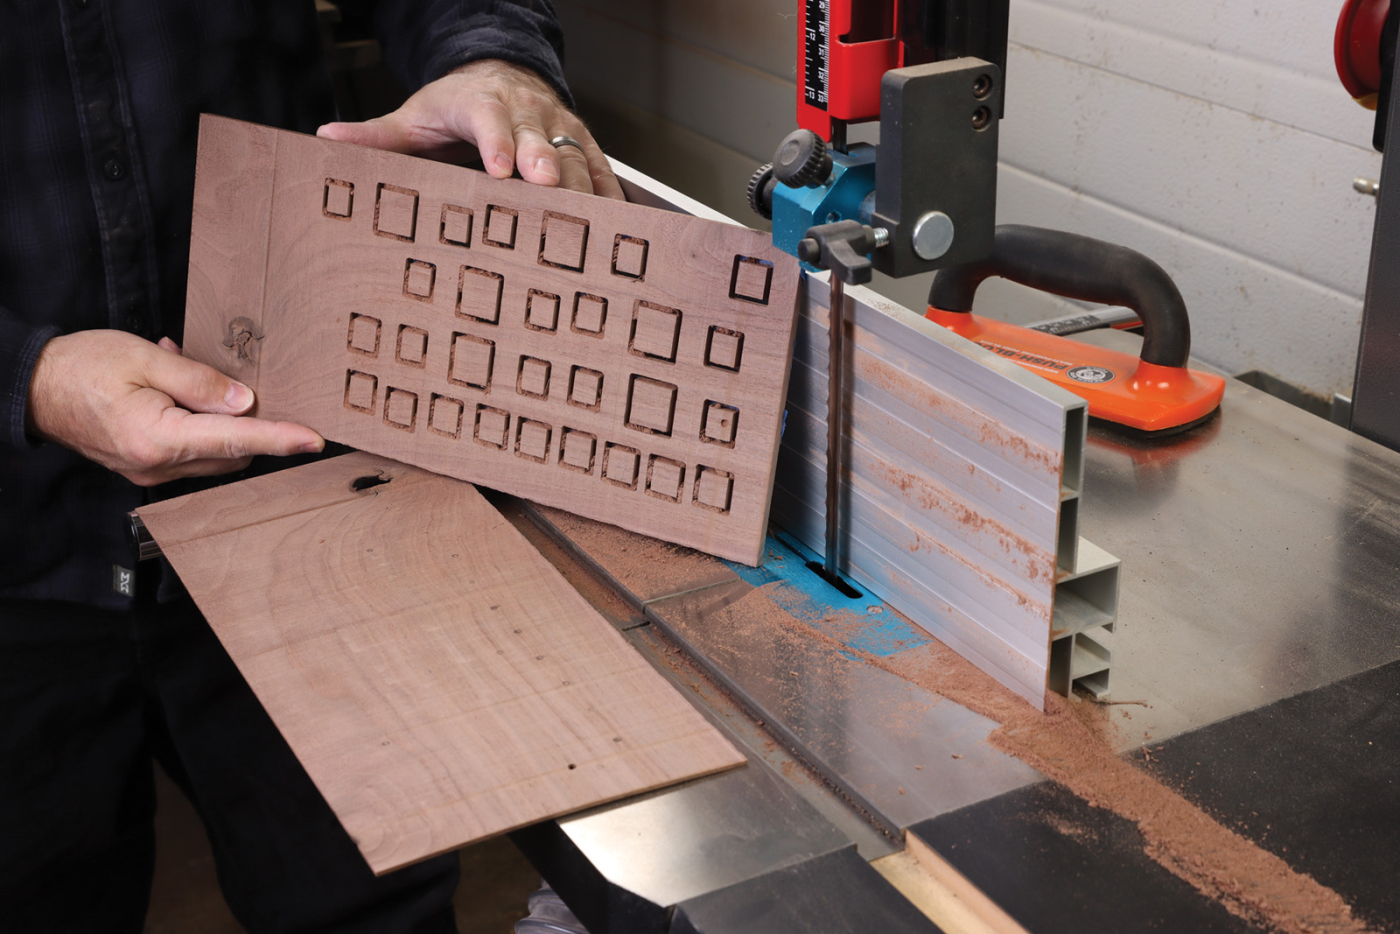
On several occasions, I’ve made similar square inlays with a hollow chisel, however this project calls for odd-sized inlays such as 5/8“ and 7/8“. Plus, the thin slats would be very difficult to mortise with a hollow chisel bit. By the time the recess had adequate depth, the drill bit would be coming out the other side. So, I opted to use an inlay bushing kit and shop-made templates to rout the inlays. 1/2“ thick MDF works well for the templates, and you’ll need one piece for the rail inlay and one piece for the slat inlay. Layout the squares as shown in the template rendering and cut them out with your best method. I cut out the template openings with a hollow chisel mortiser, but a drill and jigsaw would work fine. Either way, you’ll want to use a flat file to tune the square shapes right to your pencil line.

4 Cut out the openings and use a file or sanding block to fine-tune the 1/2″ MDF inlay templates.
5 Attach 1″ wide cleats to the back of the trio template with screws. Don’t glue strips in place. They are removed later in the inlay process.
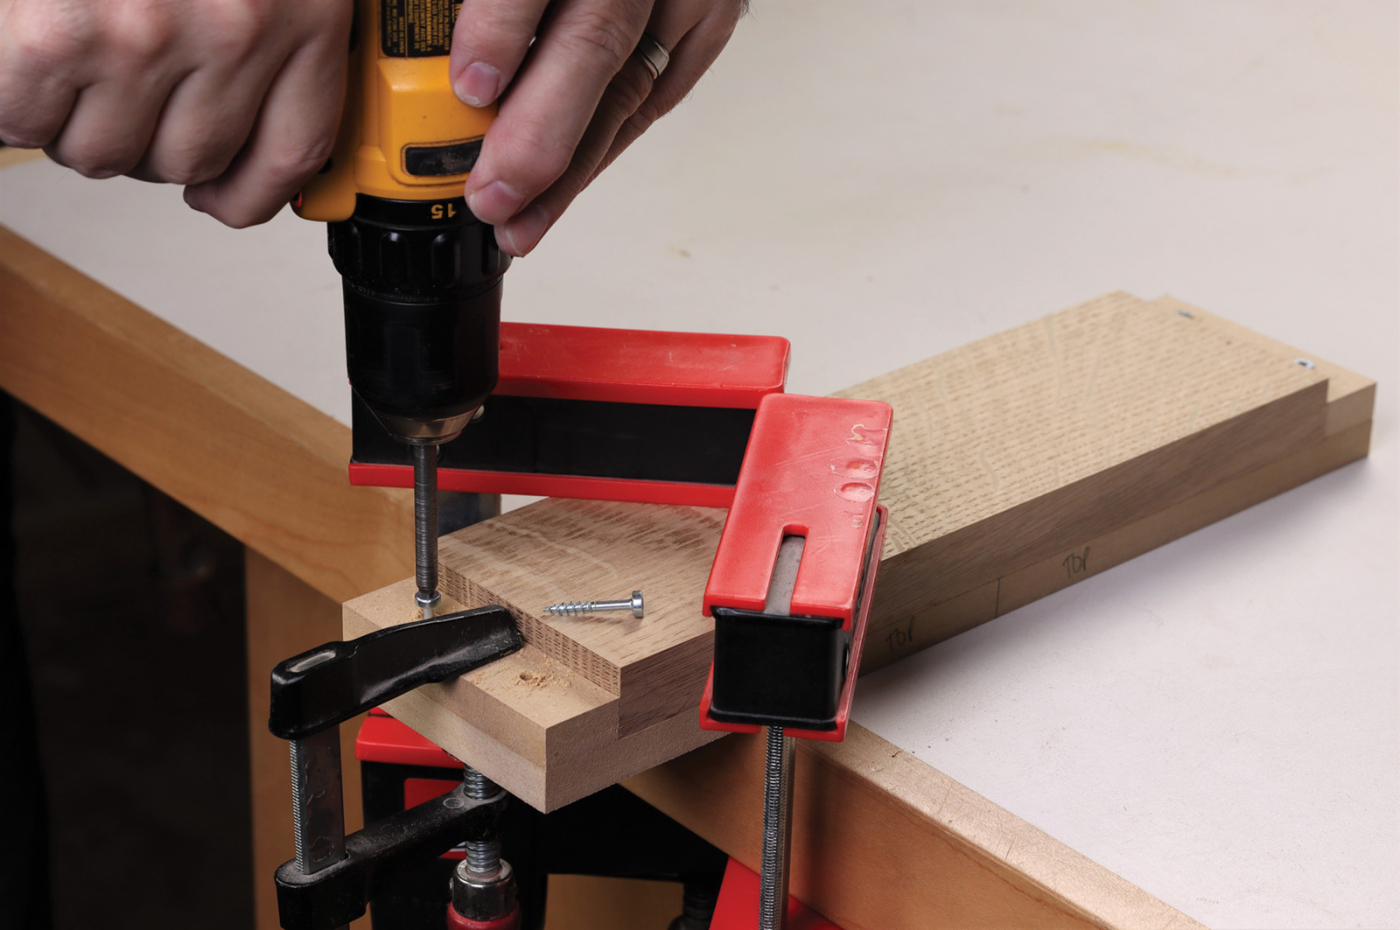
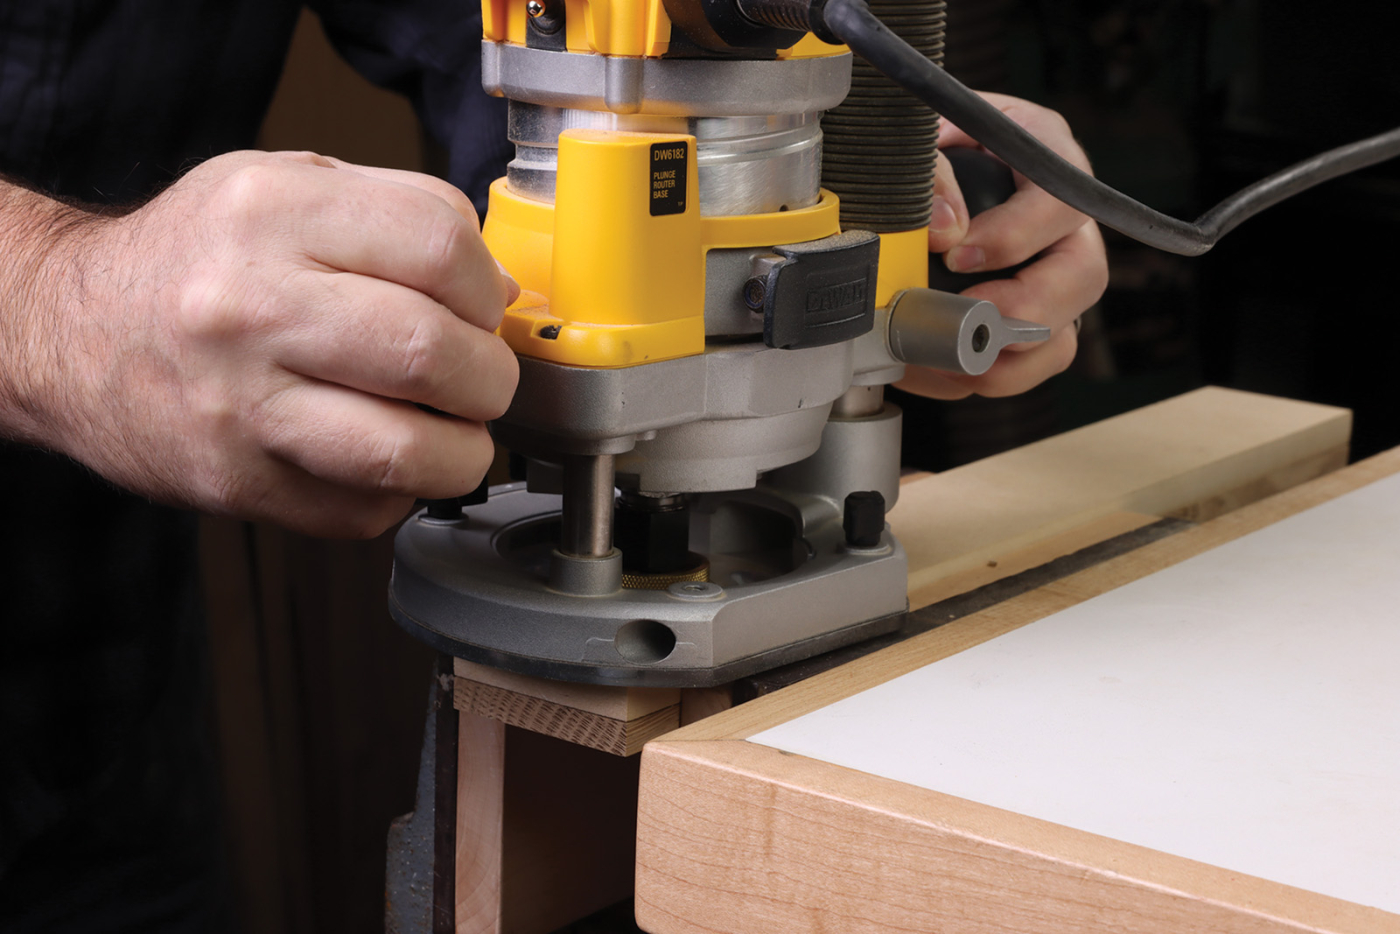
Once you’re satisfied with the trio template, add 1“ strips of MDF on either end. These will act as cleats and help register the workpiece to the template. For short workpieces such as these, I like to position the whole operation in a bench vise, set just proud of the workbench surface. That way, there’s no clamps to interfere with the routing operation. A couple strips of double-sided woodworking tape help ensure the parts don’t shift as you rout the recesses. Make sure your router sub-base is centered and install a template inlay kit such as Whiteside #9500. For the first step of routing the recess in the white oak rails, you’ll need the brass spacer ring installed on the guide bushing. Set the 1/8“ spiral router bit to a depth of 3/16“ and rout each recess in a clockwise direction. Work around the perimeter of the square first, then remove the interior waste in a circular motion. Once all three recesses are formed, pop the template off and square the corners with a chisel. If you’re accustomed to squaring inside corners formed by larger router bits, you’ll be amazed how quick and easy it is to square corners formed with this small bit.
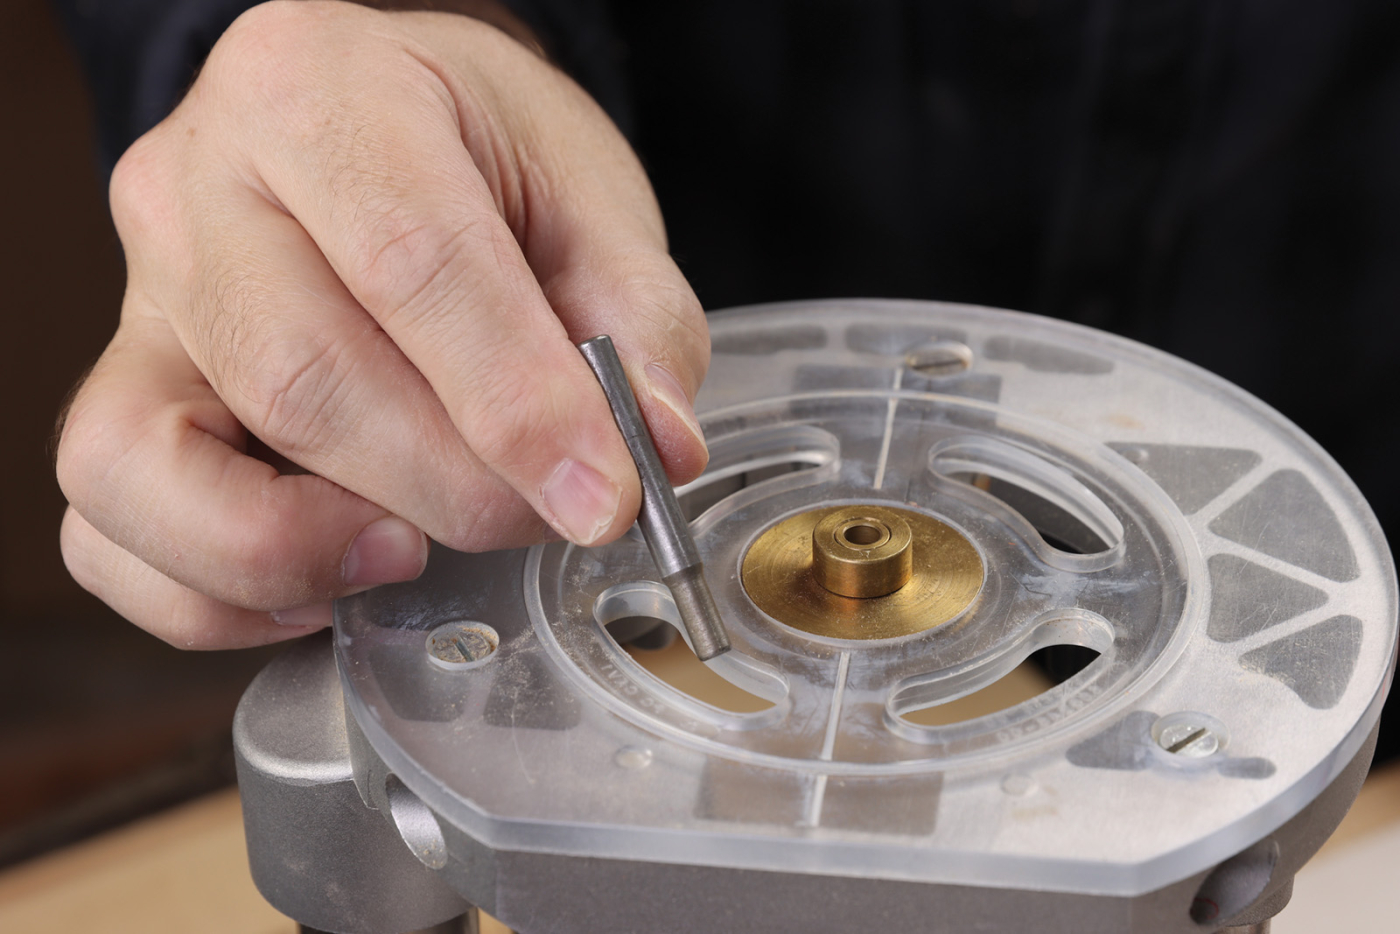
6 Prepare your plunge router by installing an inlay bushing kit. Some kits, such as Whiteside #9500, come with a special centering rod to center your router sub-base.
7 Use double-sided tape to attach the trio template to an upper rail and clamp in a bench vise. With the brass spacer ring installed on the router, rout in a clockwise direction. Continue with circular passes until the waste is removed.
8 Remove the template and square the corners with a chisel.
Now prepare a piece of walnut for the inlay by planing it to roughly 3/8“ thick. Remove the MDF cleats from the template as needed, and again use double-sided tape to attach the trio template to your thin walnut board. Increase router bit depth to about 1/4“ and remove the brass spacer ring from the guide bushing. Wedge the router in one corner of a square as you plunge the bit to start the cut. Carefully trace the perimeter of each square in a clockwise direction, maintaining contact with the template. Before moving the template, take a moment to label the squares “1, 2, 3,” Remember, the template was cut by hand, so the left and right squares may have subtle variances. Also pay attention to grain direction as you mount the template to the walnut board. I generally make the inlay with the grain running the same direction as the workpiece, but that’s up to the builder, I guess.

9 Rout a centered groove in the slats and glue in a 1/4″ wide strip of walnut.
10 Trim the strip flush with a low-angle block plane.
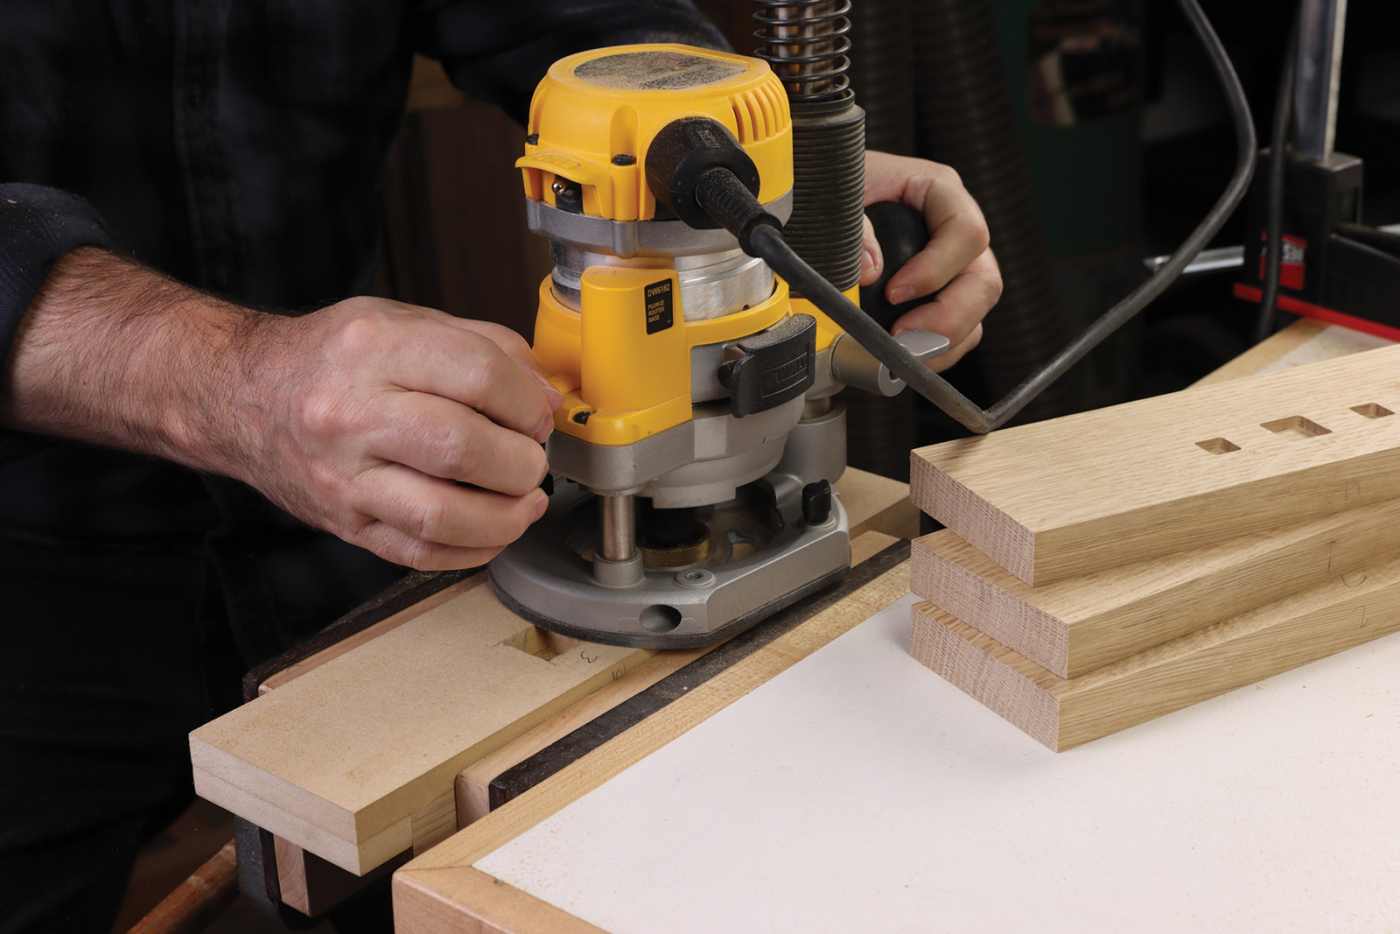
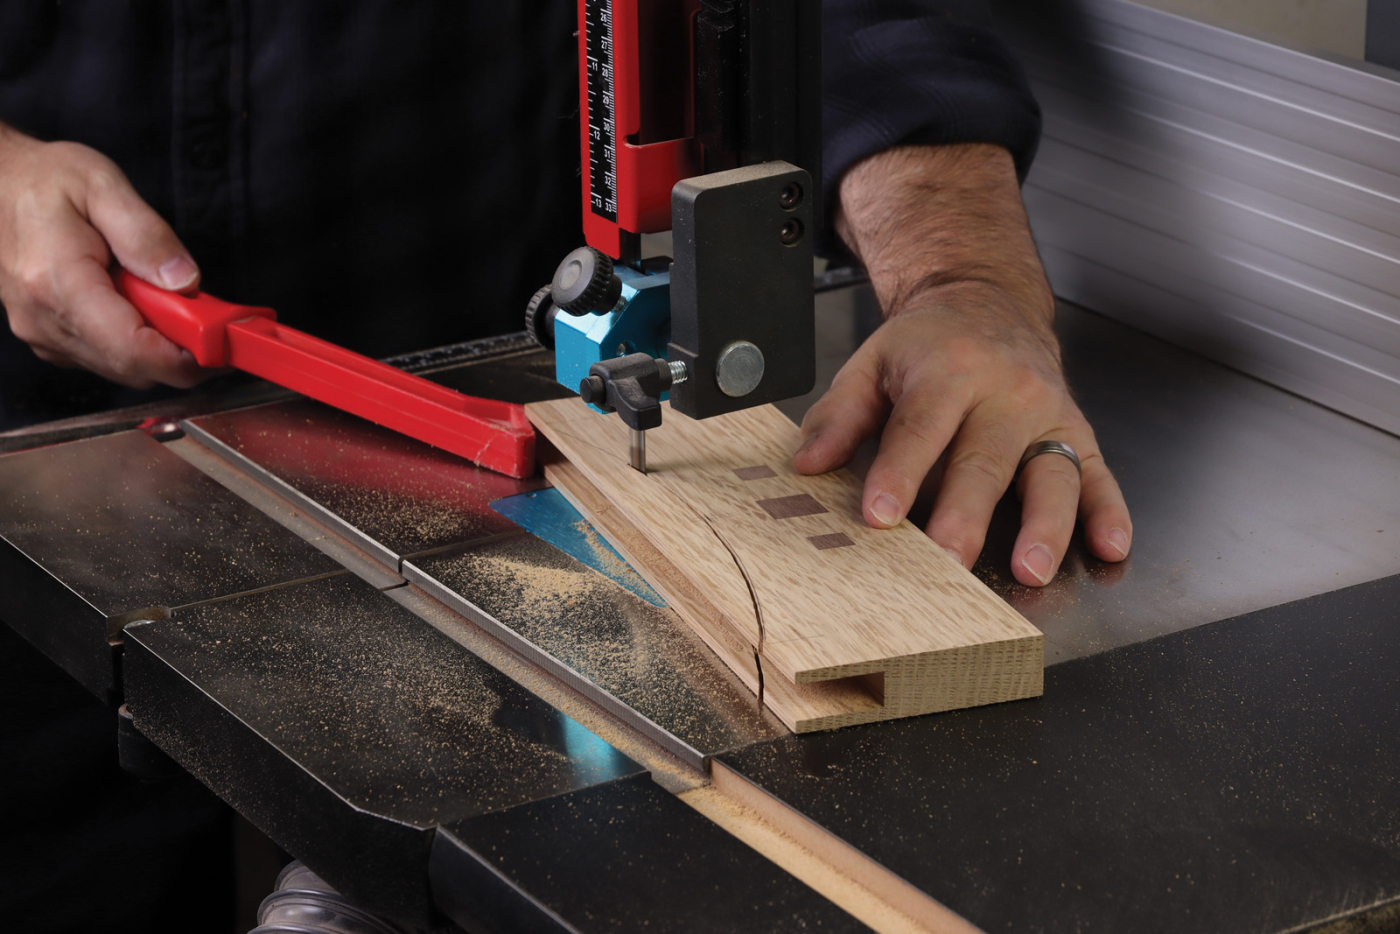
11 Attach the single template to a slat and rout the square recess as before.
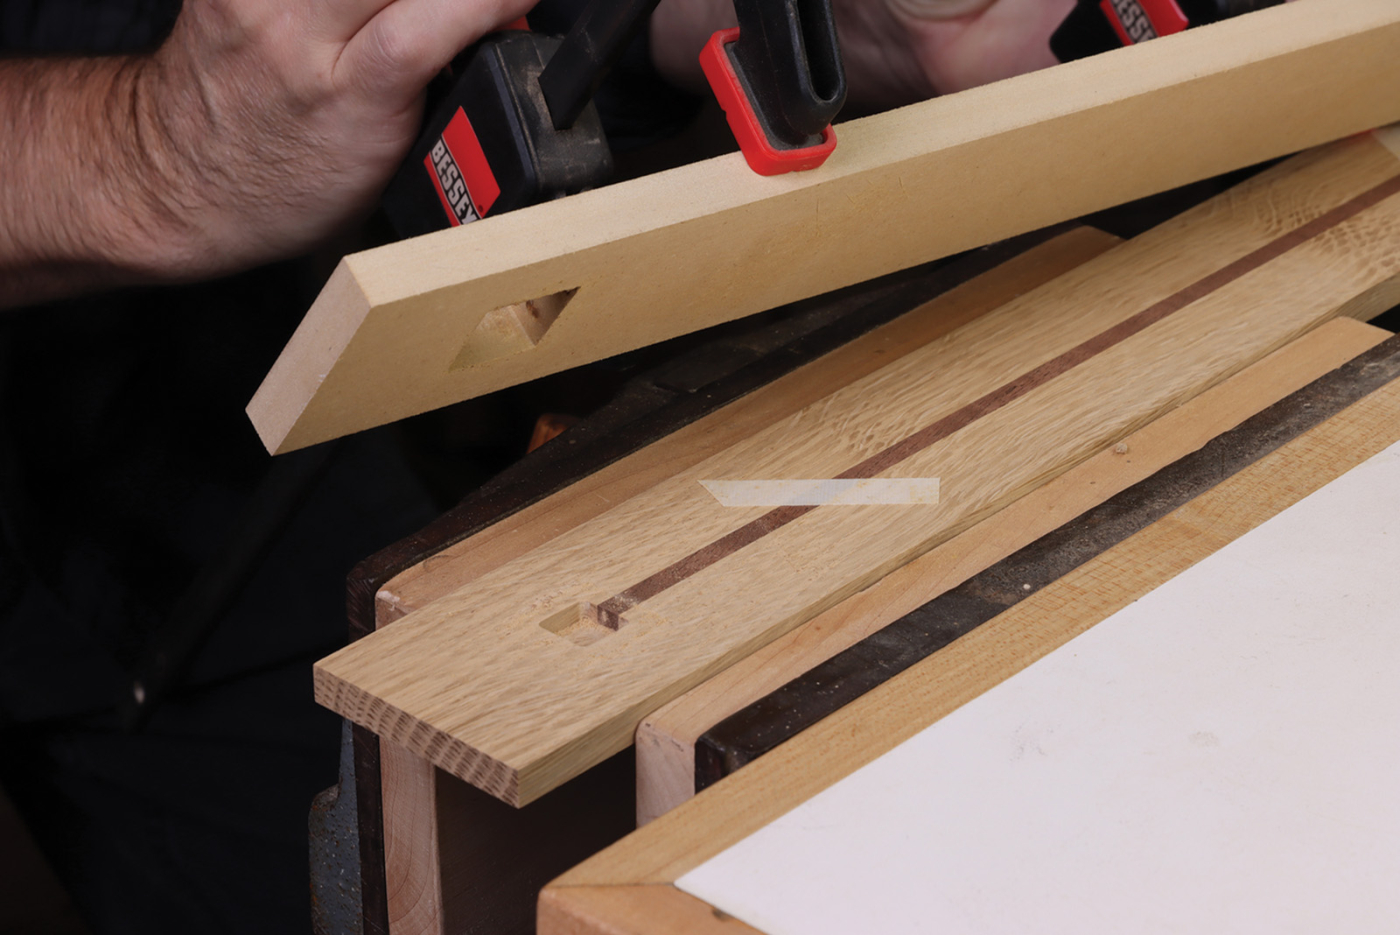
12 A pair of clamps help break the template free. Note how the router has now defined the length of the walnut strip automatically.
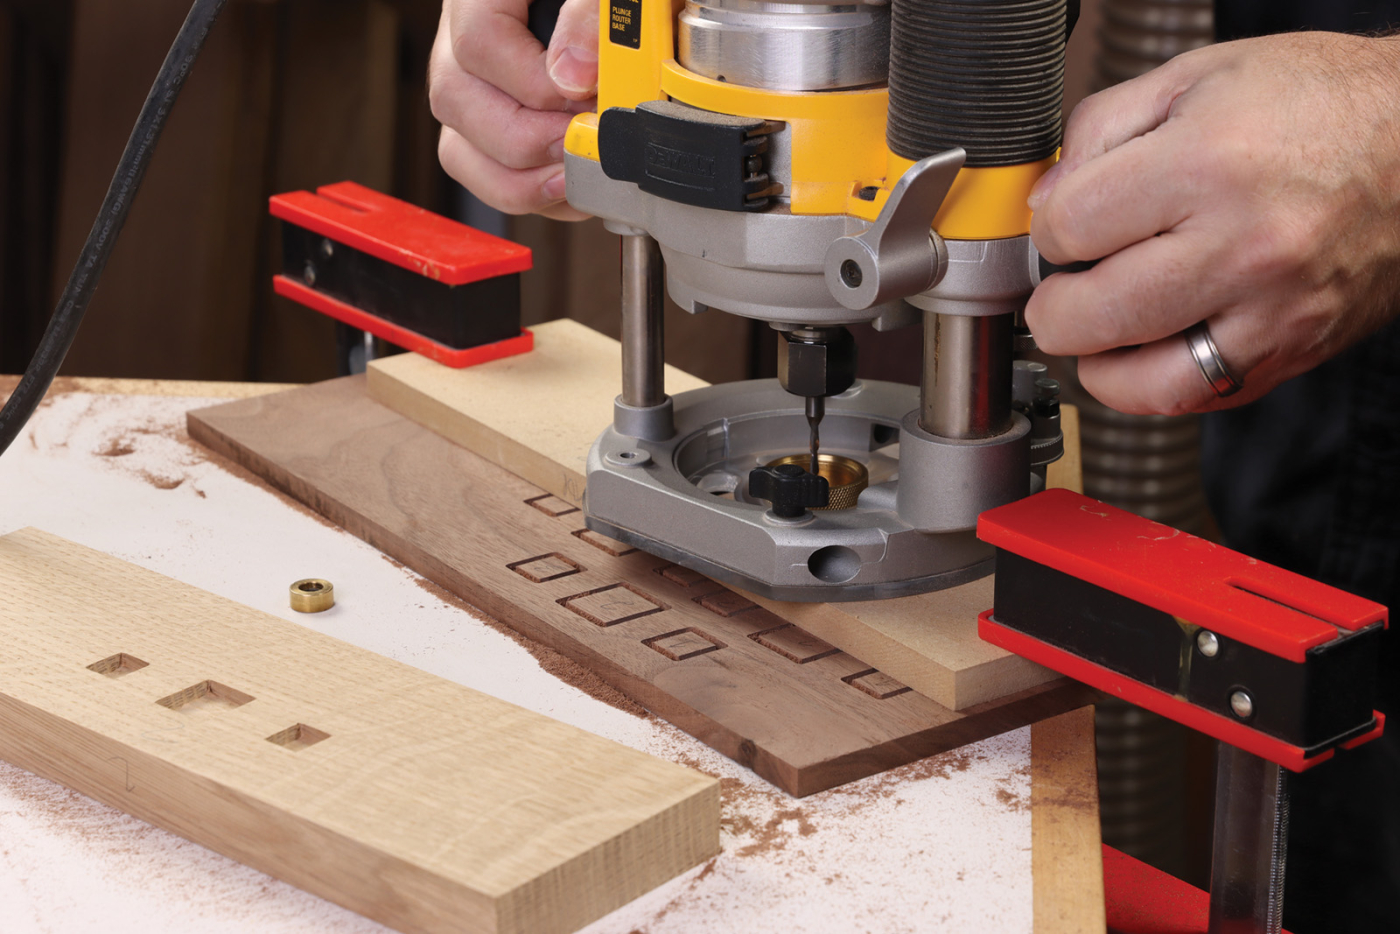
13 Remove the brass spacer ring from the inlay bushing. Attach the trio template to a walnut board and carefully rout out the squares. Make one clockwise pass, maintaining contact with the template as you work.
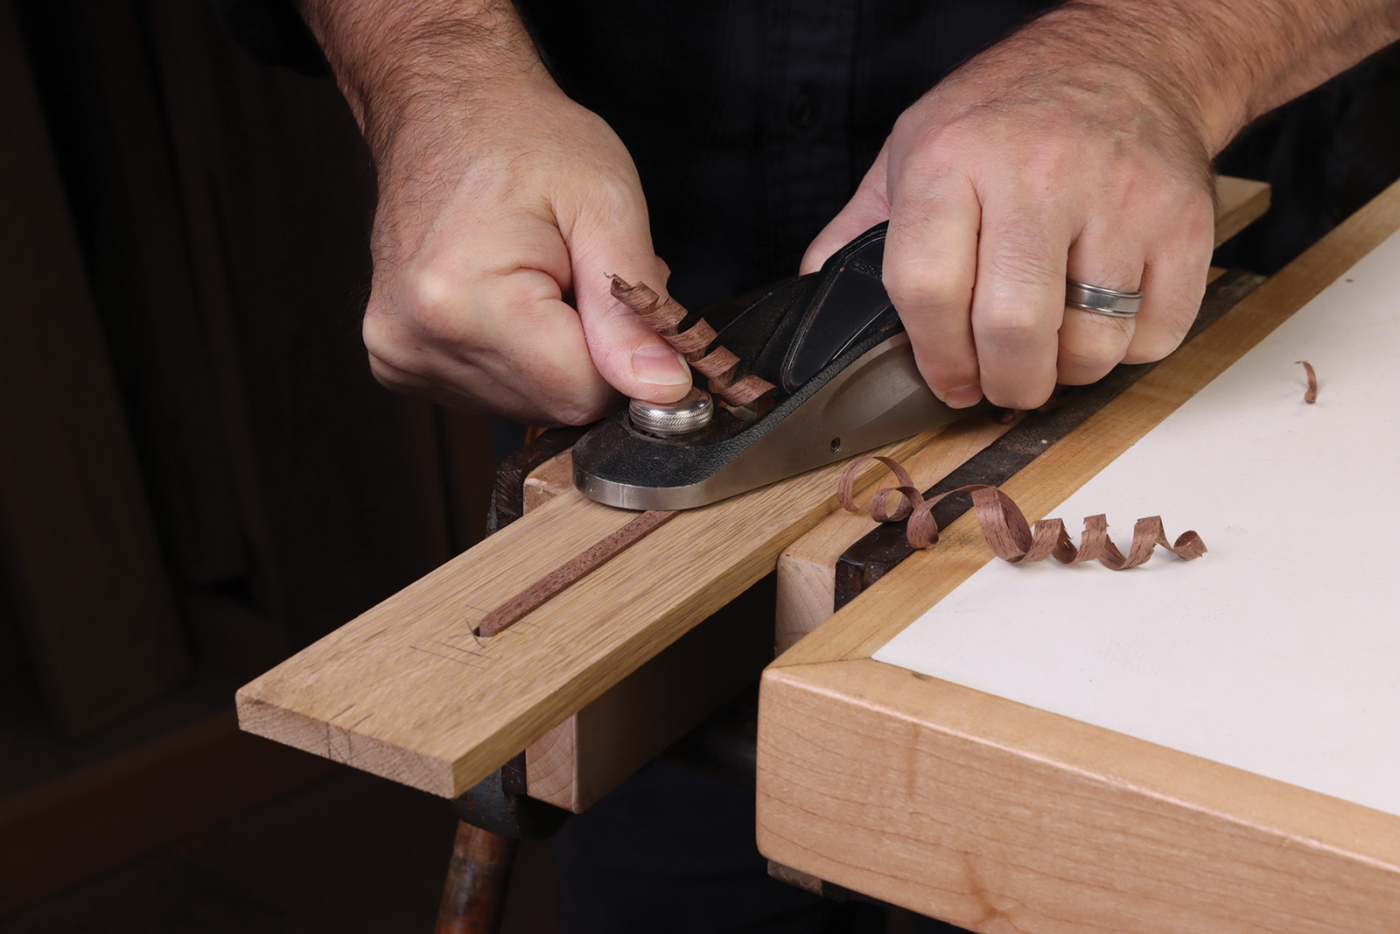
Finally, head to the band saw to release the walnut pieces. Set up the band saw to resaw and position a tall fence 1/4“ from the blade. Place a strip of painter’s tape over each series of squares to hold them in place as you resaw the walnut board. Once you complete the cut, simply peel back the tape to retrieve the squares. Ease the back edges of the walnut squares with a sanding block and glue them in place. A gentle tap with a hammer or mallet should easily seat the inlays—but remember—they stand proud by design. Just sand them flush to complete the inlay pattern. It’s a detail that gives this little fern stand its signature look. The inlays for the slats proceed just the same way, although I like to add the inlay strip before routing the squares. Label the slat template and slat inlays “4” for clarity.
14 Using a tall resaw fence at the band saw, release the squares from the board.
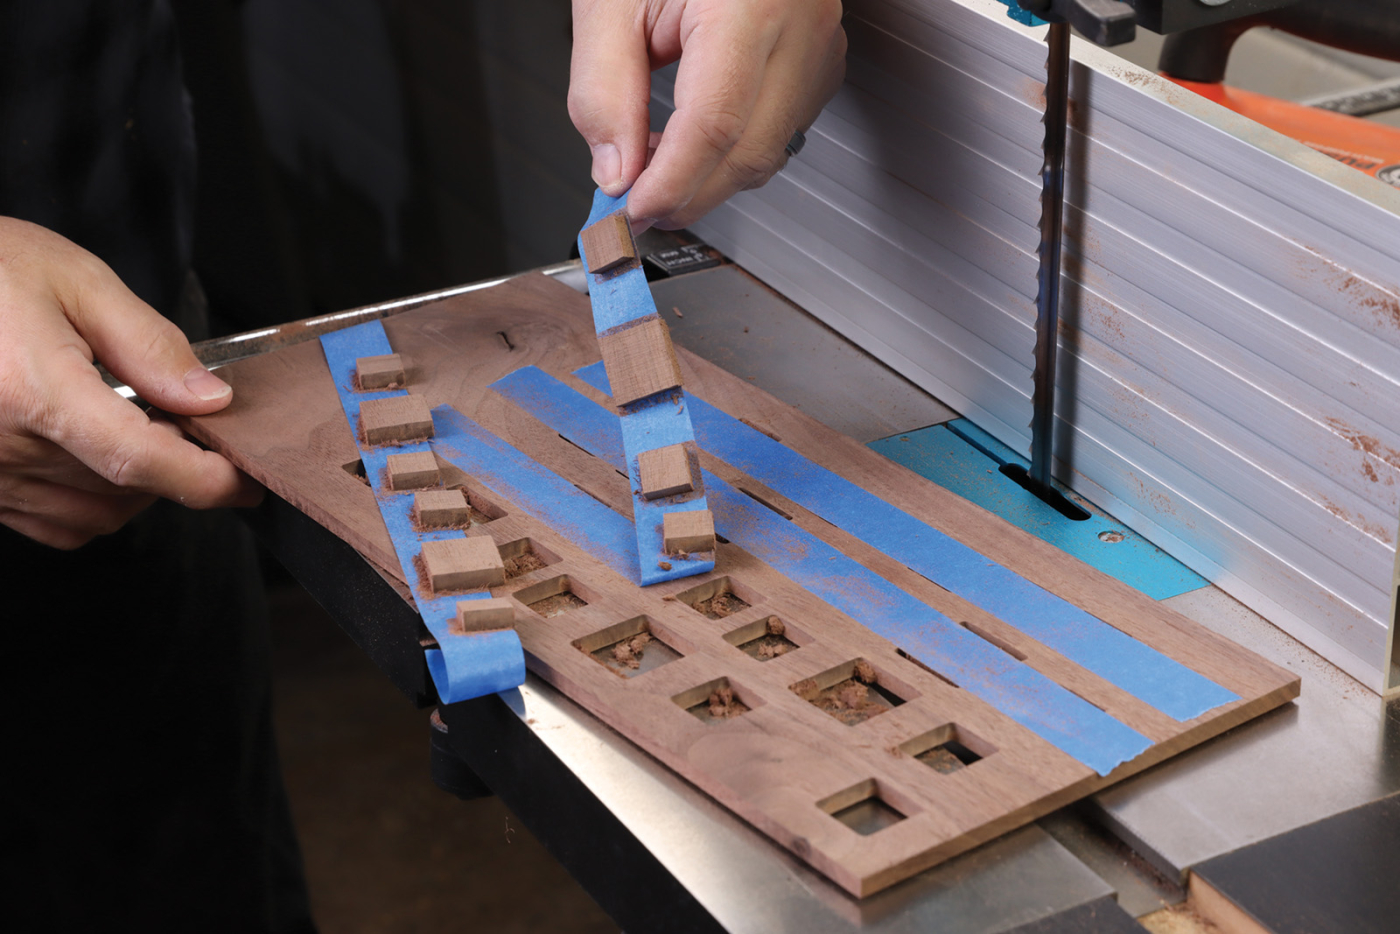
15 Painter’s tape holds the squares in place and prevents damage as you make the cut.
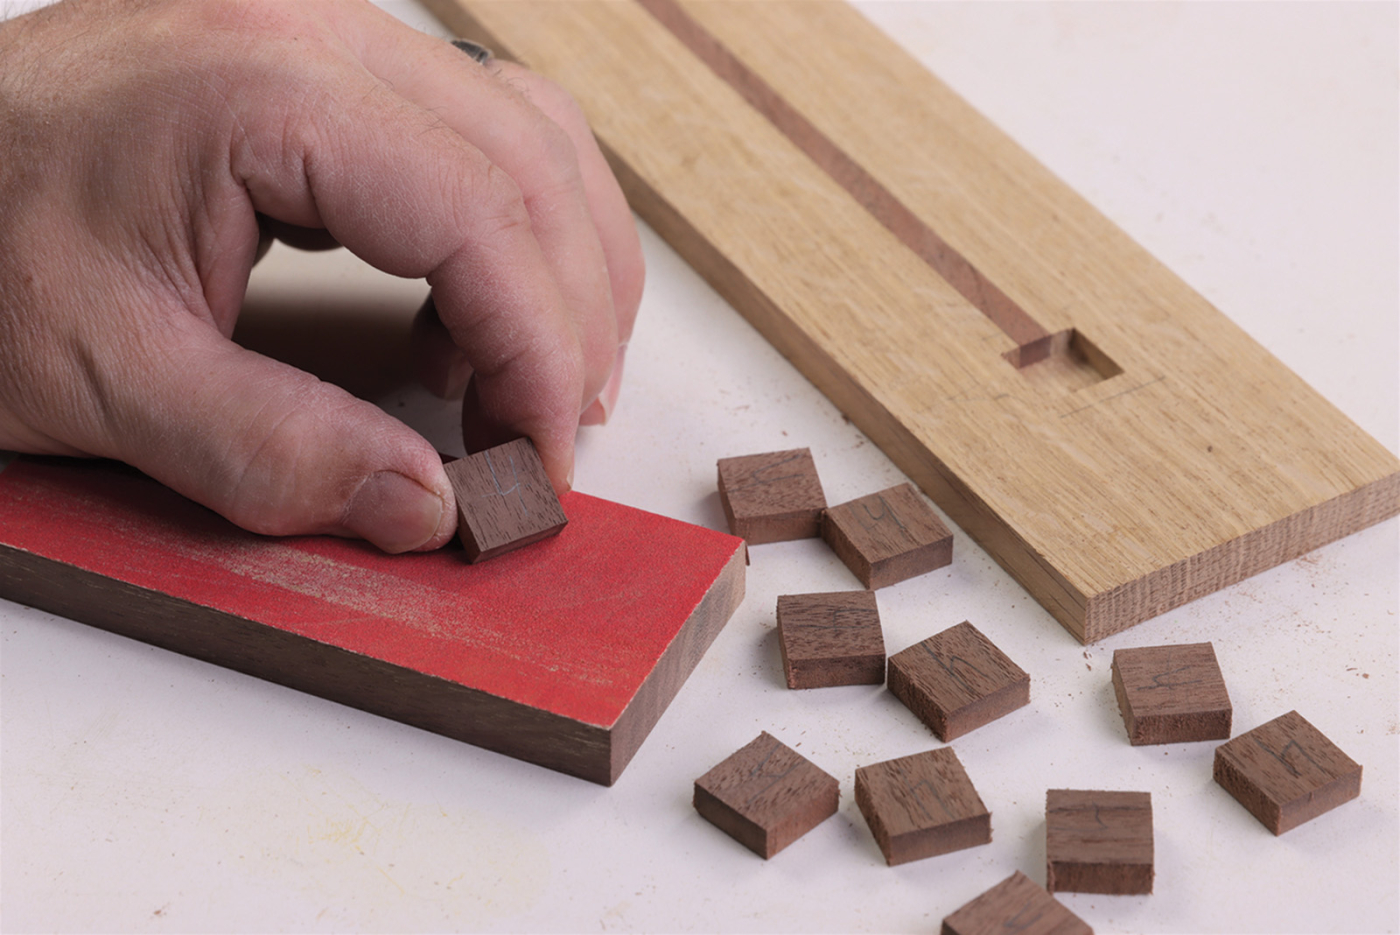
16 Lightly sand the back corners of the inlay to help ease the fit.

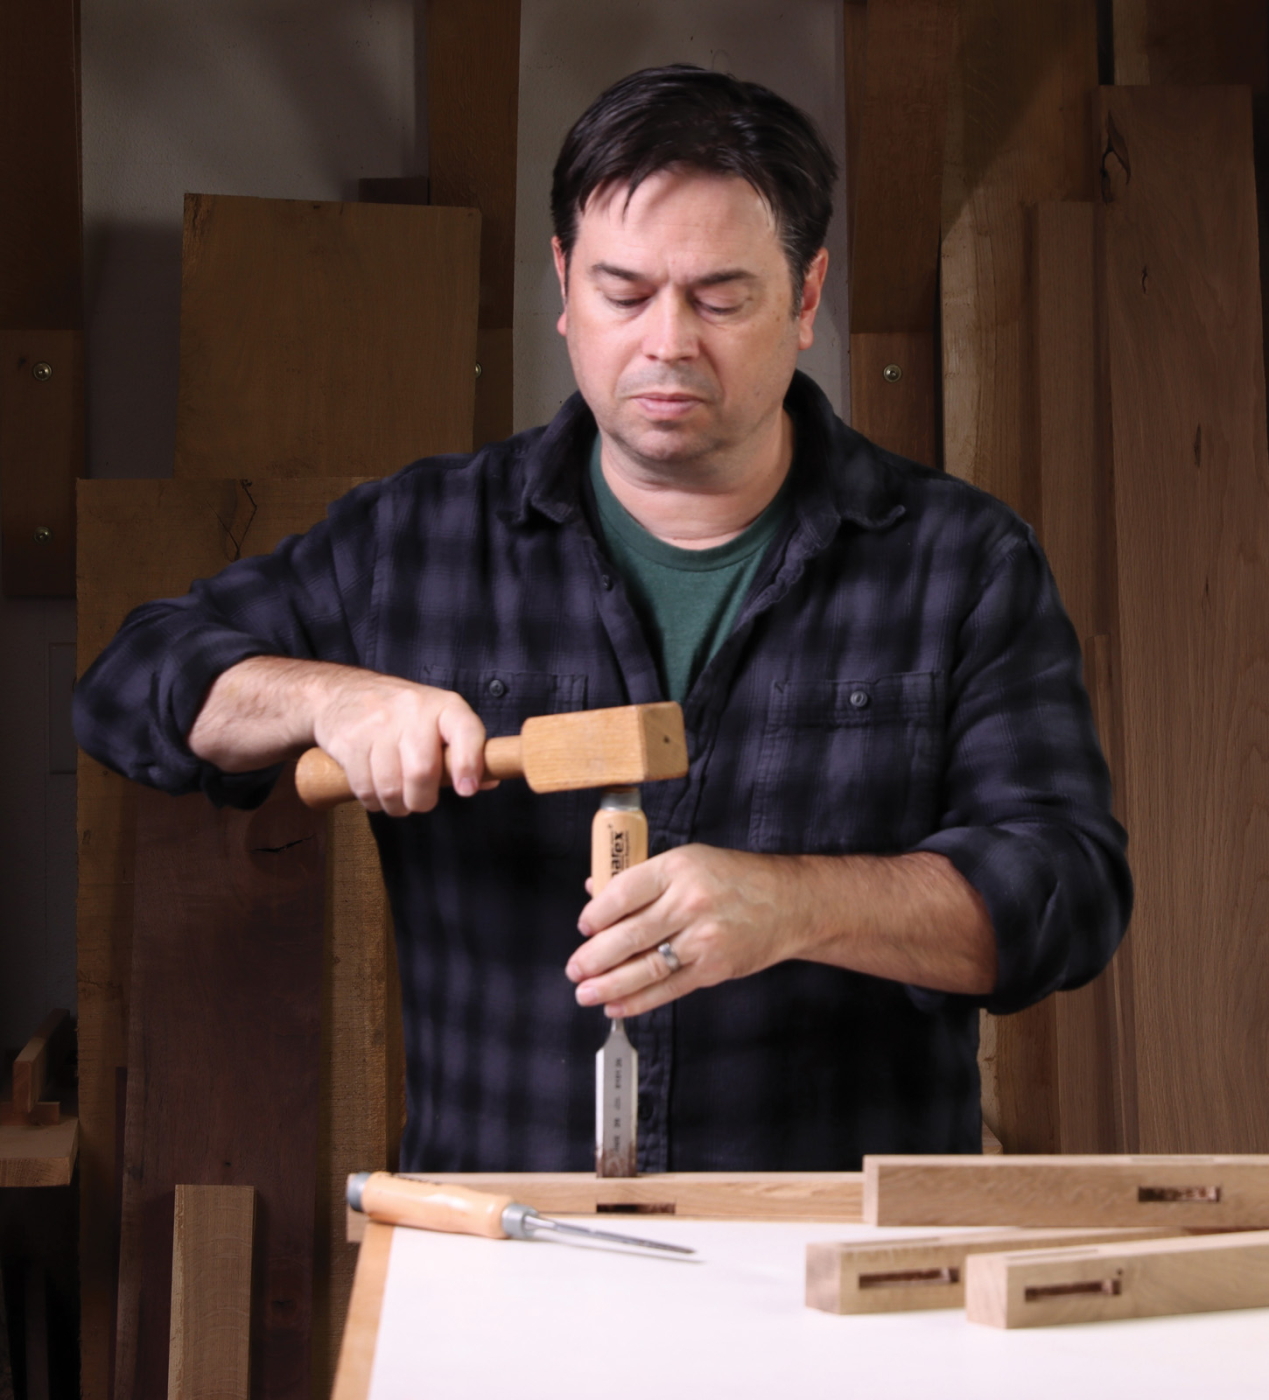
17 Number the inlays to keep track of where they go and glue them in place.
Curved Rail Detail
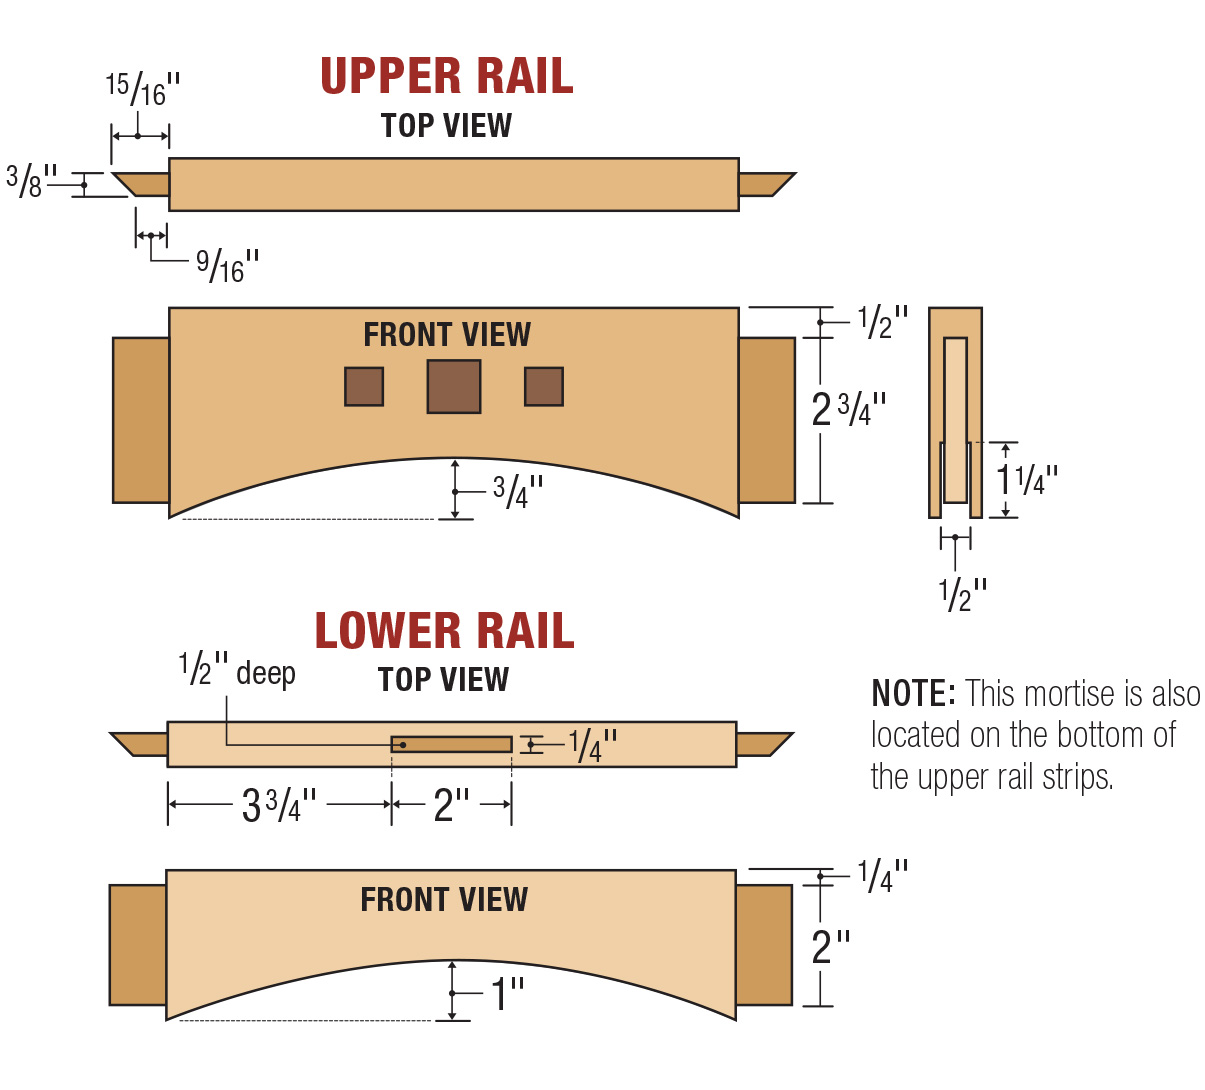
Looking at the unique shape of the upper rails may conjure up images of a trommel attached to a router with a ridiculously long radius. Rest assured, we’ll take the easy route on this project, and focus on simple techniques that are easy to execute. To accomplish the arched detail, we’ll first plow a deep groove in the upper rail blanks. Using a 3/8“ wide dado stack, make multiple passes for a centered groove that’s 1/2“ wide by 1-1/4“ deep. I like to establish the correct width first and make an initial pair of passes with the blade raised halfway, then raise the blade and complete two more passes.
18 Cut a 1/2″ wide groove in the upper rail, using a 3/8″ dado stack. Make the centered groove in multiple passes for a finished depth of 1-1/4.”
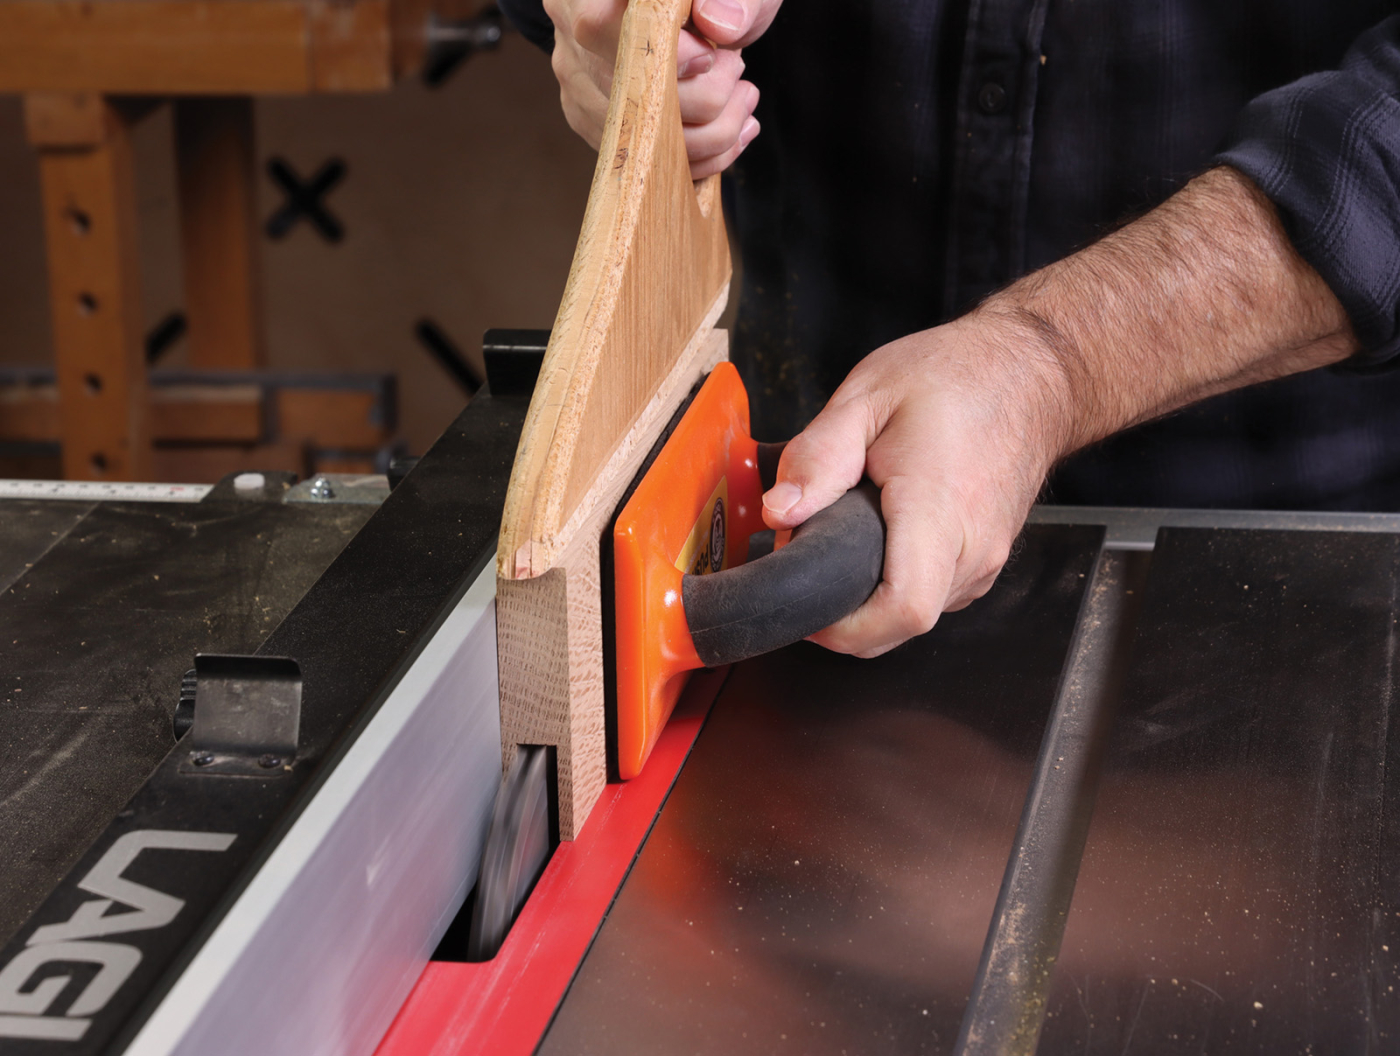
Next head to the band saw and cut the curved shape along the bottom of the upper rails. This step should make you do a double-take. Normally, you’d cut the tenons before you dare make any curved cuts, because a curve will remove one reference edge. This is a special circumstance, and we’ll break the rule “joinery before curves” just this once. After the curve is cut and faired, ease the edges with sandpaper, and mill strips of wood to fit the groove. Glue the strips into the grooves of all four upper rails and clamp them securely. I found it best to cut the strips exactly the same length as the rails but leave them slightly wider than 11/4”. That way, the excess can be trimmed at the table saw after the glue dries. Now, we’ve essentially restored our reference edge, so the joinery can proceed as usual.
19 Band saw the curve just outside your layout line.
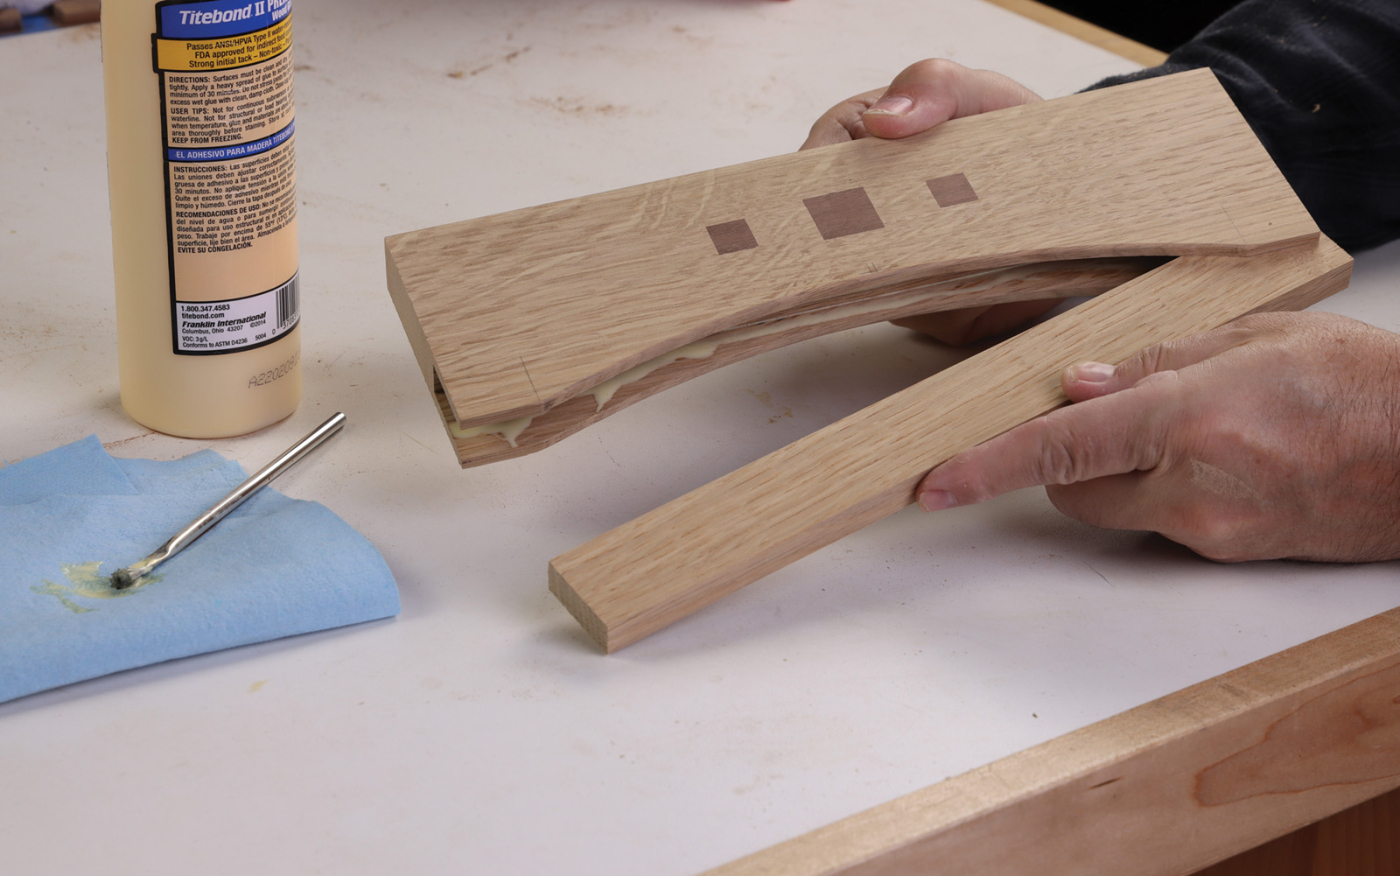
20 Action! You’ll feel like a director as you install the strip into the groove to assemble the upper rail.
Mortises & Tenons
Then cut 2“ long x 1/4“ wide mortises for the slats. These mortises are just 1/2“ deep and will be made in both the upper and lower rails. Note that the upper rails are 7/8“ thick and the lower rails are just 3/4“ thick, which will affect your joinery layout. However, as long as everything is centered, the slats will be positioned correctly. Continue work on the rails by cutting the 1“ long x 3/8“ thick tenons. Start with the lower rails, then raise the dado blade slightly to tenon the upper rails. Most of the shoulders are 1/4“ wide and the only exception is the top shoulder of the upper rails, which is 1/2“ wide. Finish work on the rails by band sawing the curved shape on the lower rails and sanding them smooth.
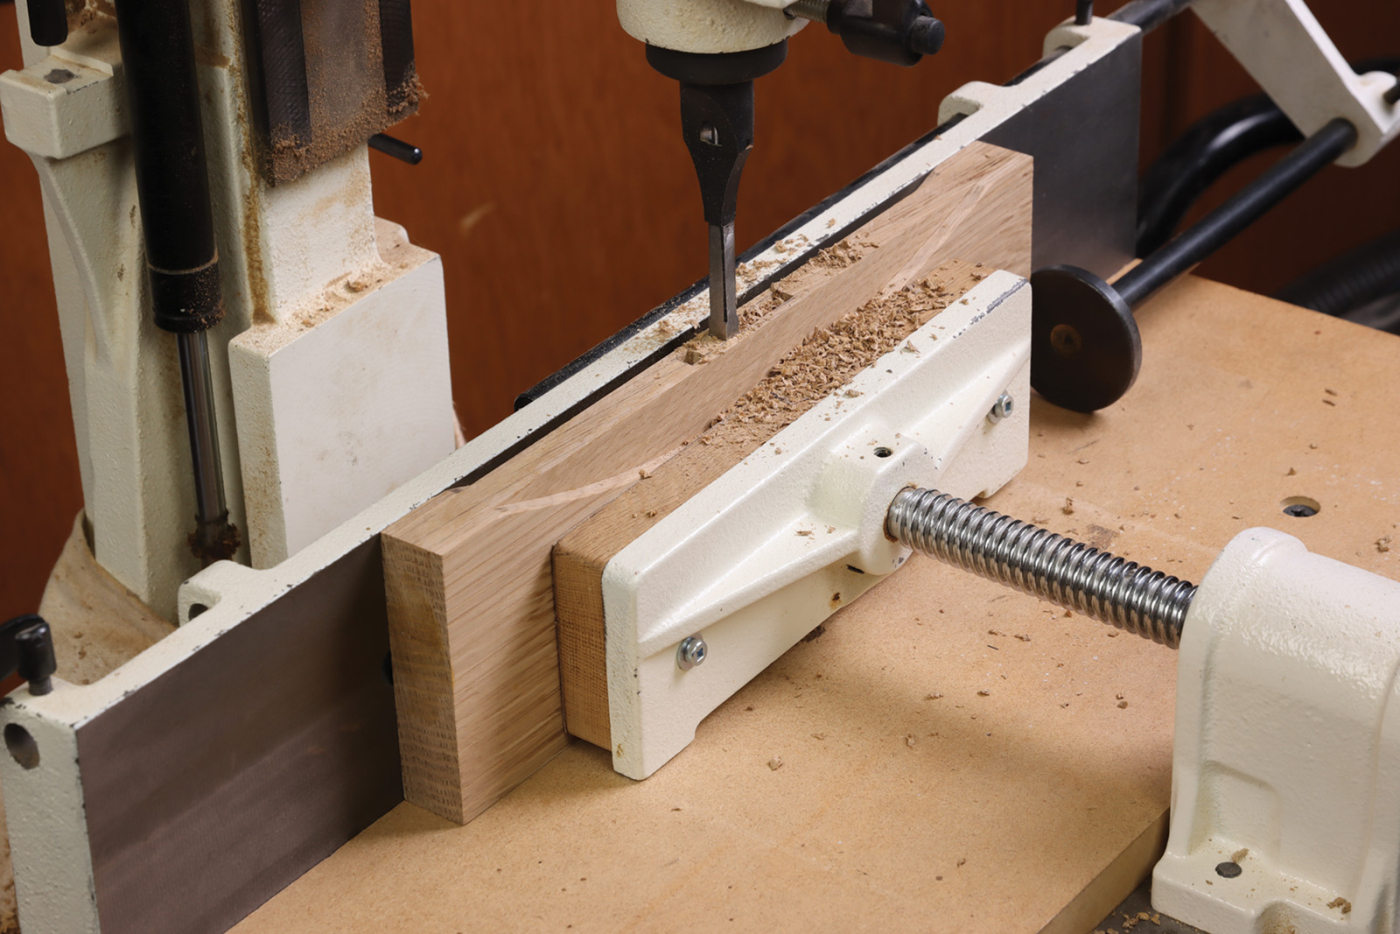
21 Despite the interesting shape of the upper rail, joinery proceeds in the customary way. Chop 2″ long x 1/4″ wide mortises in the rails. Just remember the upper rails and lower rails are a different thickness, so your settings will change.
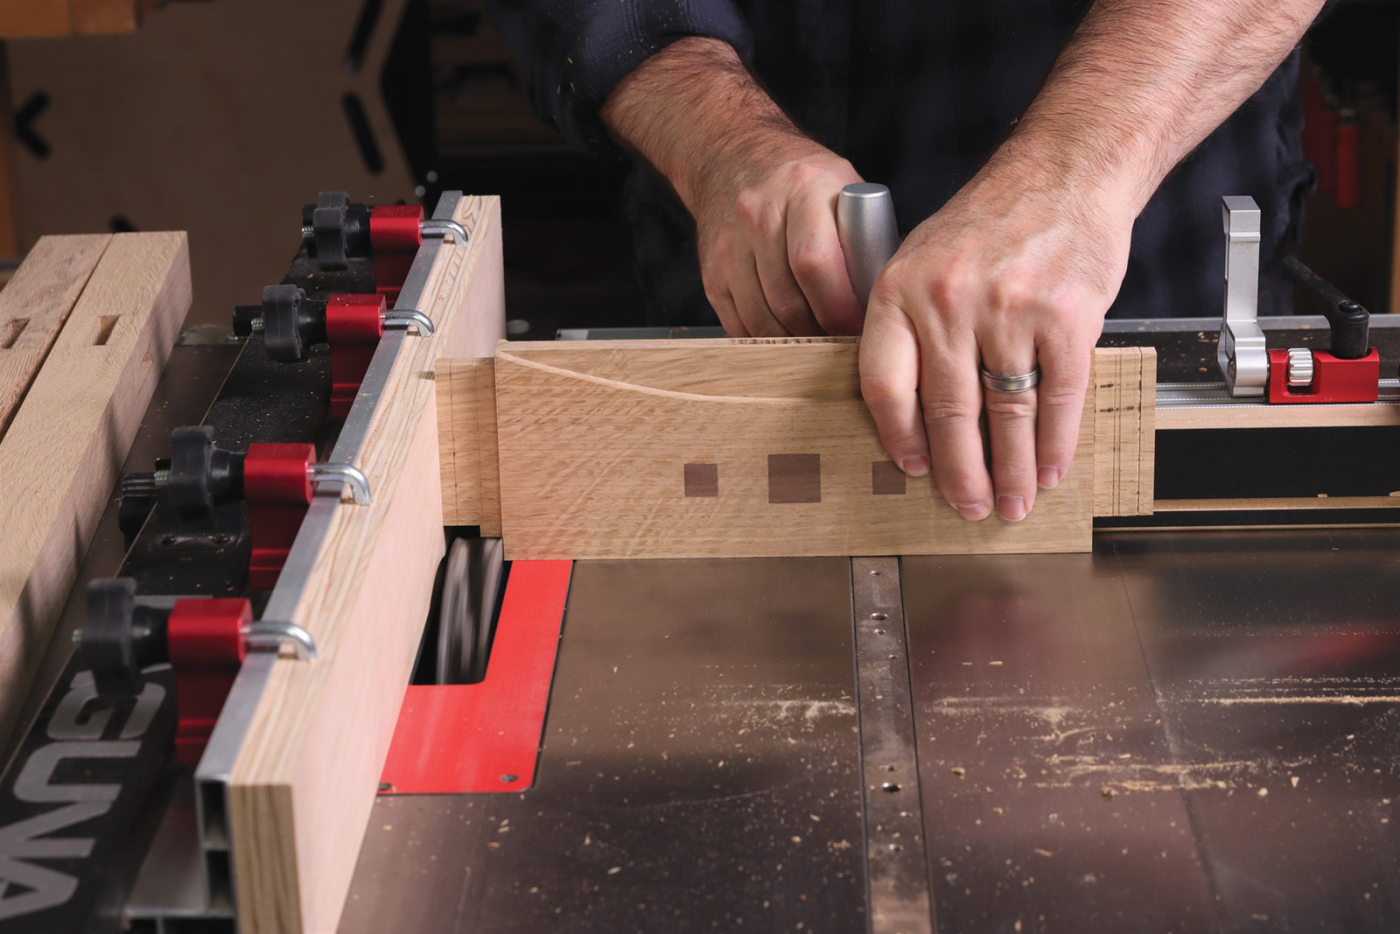
22 Raise 1″ long tenons on the rails, until they fit into their respective mortises. The top shoulders of the upper rails are deeper than the others at 1/2″. This allows the rails to sit flush with the top of the legs.
Dry Assembly
Miter the ends of each rail, so the intersecting tenons will come together inside the leg. In fact, you’ll need to remove about 1/16“ of tenon length as you do so. Also, take a minute to notch the inside corner of the legs, so the rabbeted top panel will fit into the stand. The notch just needs to remove 5/16“ square of material from the top of the legs and can easily be done with a chisel. Once the stand fits together as it should, take measurements for the slat length directly from the carcass. If it’s 18-1/2“ overall and 17-1/2“ shoulder-to-shoulder, you’re in good shape. Go ahead and cut the tenons on both ends of the slats, until they seat fully into their mortises. The cheek cut for the operation only requires a dado blade height of 1/16“, so carefully sneak up on the final tenon size.
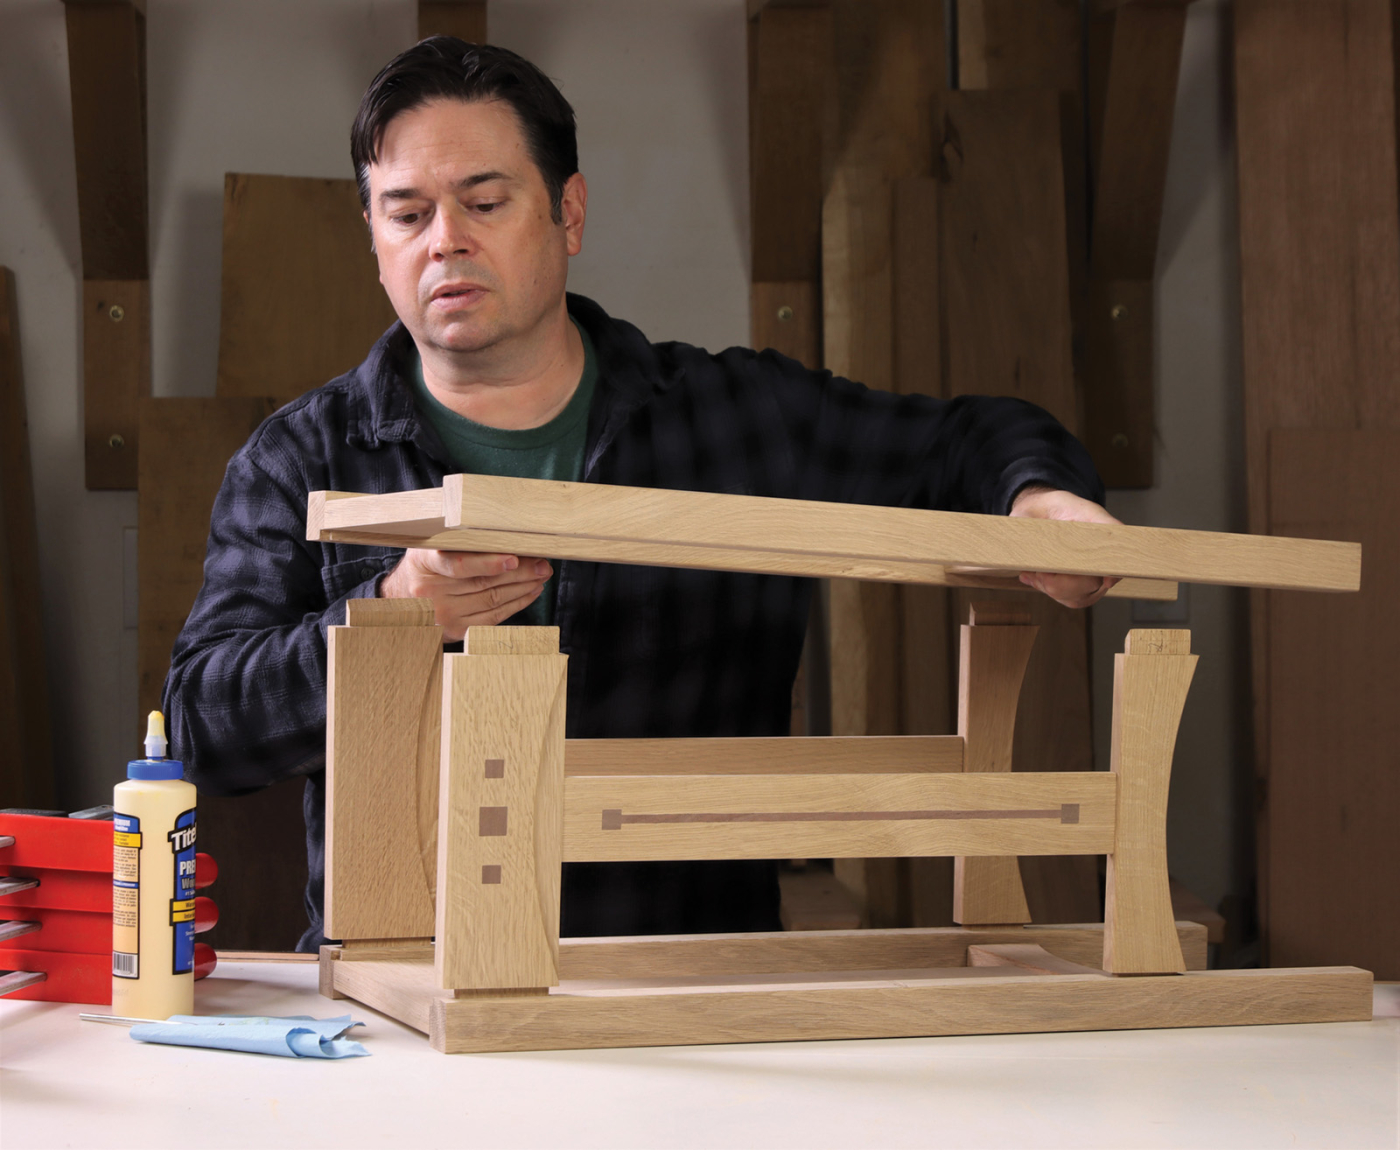
23 Insert the slats into pairs of rails first, then add the legs to make two side assemblies, and sandwich the remaining parts between. Focus on setting the top rails flush with the legs for this step.
Top it Off
The last part to build is the top panel. Glue a pair of boards together to net the 11-3/8“ square top panel. While the glue cures, sand all the parts you’ve made, and ease the edges as appropriate. Finally, trim the top to final size and rabbet the underside until it fits inside the frame. The rabbet should be 1/4“ deep, to leave 1/2“ standing proud of the upper rails. A 1/8“ roundover along the exposed edge of the top panel matches the look of the original Limbert fern stand.
Finishing Details
Add the finish of your choice, which in this case was an oil-based stain and lacquer topcoat. Add the top panel after the finish is applied and secure it with wood buttons or tabletop fasteners. Because of the inset top, figure 8 fasteners won’t work for this application. PW–Willie Sandry
Check out a quick demonstration of the inlay process on Willie’s YouTube channel The Thoughtful Woodworker. https://www.youtube.com/c/TheThoughtfulWoodworker
Here are some supplies and tools we find essential in our everyday work around the shop. We may receive a commission from sales referred by our links; however, we have carefully selected these products for their usefulness and quality.


