Design Features
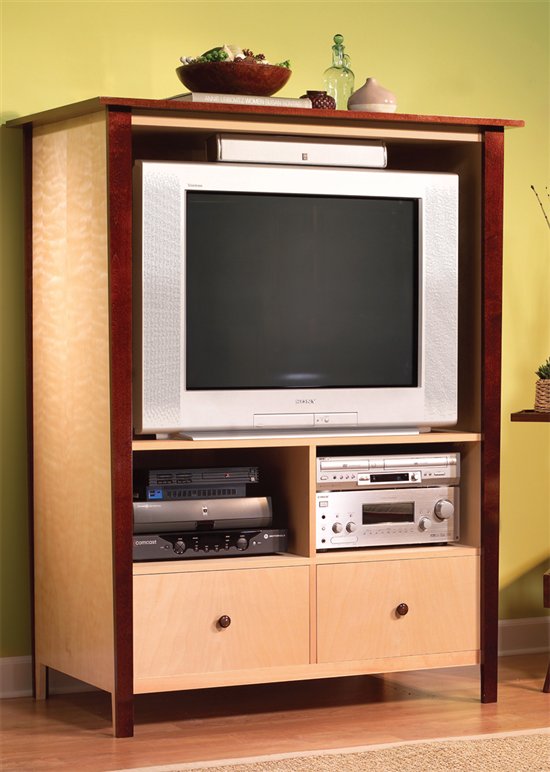
• The TV space is 39 in. wide by 30-1/2 in. tall by 23-3/4 in. deep, and will accommodate most 36-in. TVs, but measure your TV before building this cabinet.
• The two large component openings will accommodate stacks of high-tech TV gear. Each one measures 19-1/8 in. wide by 11-1/4 in. tall by 23-3/4 in. deep.
• Cutouts in the back of the TV shelf make it easy to run wires between the TV and the components.
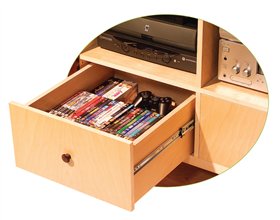
• Two deep drawers provide lots of room for videotapes, DVDs or video-game junk.
• To create the bold color contrast, we stained the stiles and top with a dye before assembly.
Tools and Materials
This project requires a jigsaw, tablesaw and router. You’ll also need a dado set for your tablesaw, a pattern bit for your router and clamps with a reach of at least 25 in.
It takes only three sheets of 3/4-in.-thick plywood, one sheet of 1/4-in.-thick plywood and about 6 bd. ft. of lumber. Shop for plywood sheets that are similar in color and grain on at least one side and be sure to face these sides out when you build your cabinet. The sheet of 1/4-in. plywood for the back is less critical since it will be almost totally hidden once you install your TV and components.
We bought the birch plywood for this cabinet at a home center, but we had to sort through half the pile to find three sheets that were similar. Two of the sheets had curly grain, which was a lucky find. We used them for the sides of the cabinet. It’s easier to find matching plywood at a lumberyard. It will probably cost you more, but it may also save you some time and hassle.
We bought the birch lumber from a lumberyard because our home center didn’t carry it.
Prepare the Plywood Parts
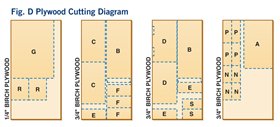
1. Cut out plywood parts A through G according to the Cutting List, and the Plywood Cutting Diagram, (Fig.D). Rough cut your sheets of plywood into manageable sizes with a jigsaw or circular saw, and then do the final cutting on your tablesaw. Use a router and straightedge on parts that are too big for your tablesaw.
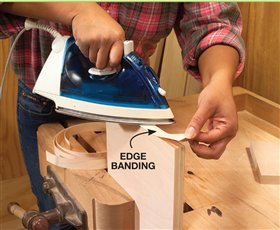
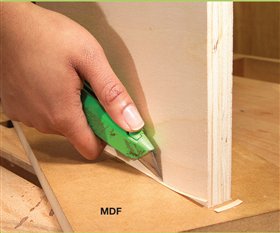
2. Edge band the plywood edges that will be visible when the project is complete (see Notes column in Cutting List). Pre-glued edge banding (see Sources,) is simple to apply with an old iron and easily trimmed with a utility knife (Photos 1 and 2). Rubbing the banding with a wood block helps it adhere to the plywood edge.
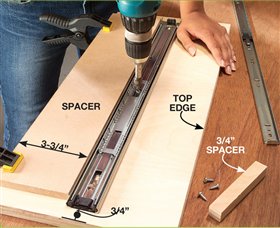
3. Screw the cabinet half of the drawer slides to the drawer divider
and sides (F). It’s easier to attach the slides now with the parts flat
and before the cabinet is all assembled (Photo 3). We used ball-bearing
slides with a weight rating of 100 pounds (see Sources).
4. Glue and clamp the rails (L) to the front edge of the bottom and sub top (C).
5. Cut out the wiring slots in the TV shelf (D) with a jigsaw.
6. Sand all of the plywood parts before moving on to assembly; 180-grit paper on an orbital sander is all it usually takes.
Assemble the Inner Drawer and Component Boxes
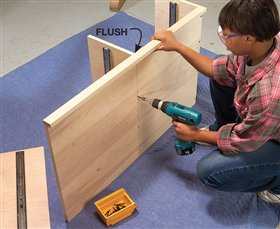
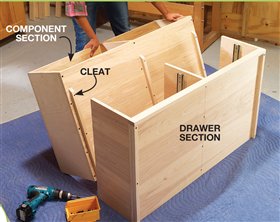
7. Screw together the upper and lower sections of the inner boxes
separately (Photo 4). Then add the cleats (H) and join the two sections
together (Photo 5). We used a 5/32-in. drill bit for pilot holes and a
countersink bit for the screw heads. Be careful that you don’t go too
deep when drilling pilot holes (see Oops!).
Rabbet the Sides and Rout the Feet
8. Router the rabbet on the back edges of the sides (B) to accept the 1/4-in. plywood back (Detail 1). Stop the rabbet 4 in. from the sides’ bottom.
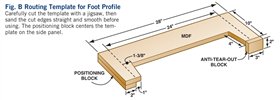
9. Trace the foot profile on the bottom of the sides using the foot template (Fig. B).
Rough cut the foot detail with a jigsaw. Leave about 1/8 in. of extra
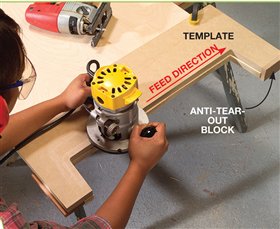
material. Then trim this rough edge with a router and the template
(Photo 6). You’ll need a pattern bit for this routing (see Sources,).
10. File the inside corners at the top of the feet square and then edge
band the exposed plywood edges around the foot opening. The edge
banding will help protect the veneer on these edges from chipping due
to bumps from shoes or a vacuum cleaner.
Add the Sides
11. Fasten the sides to the inner box assembly (Photo 7). They attach
at the bottom with the cleats (J) and screws through the component and
drawer section sides (E, F, Fig. A). The front edges of the sides (B)
must be aligned flush with the front edge of these inner boxes. The
back edges of the component and drawer sections should now align with
the rabbet at the back of the sides.
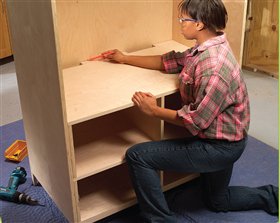
12. Attach cleats (J, K)to the sub top. Then screw the sub top (C) to the sides.
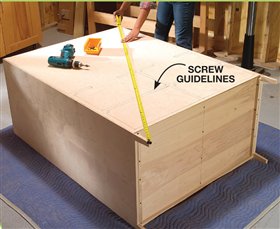
13. Stand the unit up and mark the location for the screws that will
attach the back (G, Photo 8). Then lay the unit down and attach the
back with screws every 6 in. (Photo 9).
Attach the Stiles and the Top
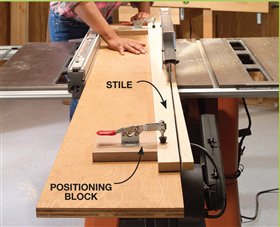
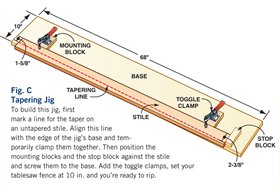
14. Build the stile-tapering jig (Fig. C).
You’ll spend an hour making the jig, but it’s worth it, because it
makes quick and easy work of tapering the stiles (M, Photo 10). Before
you remove each stile from the jig, label the tapered edge. This taper
must face out when attached to the cabinet and it’s easy to mix up the
tapered edge with the straight edge. Completely sand the stiles at this
time.
15. Next stain the stiles, the top (A) and the drawer knobs (T). We
used a dark brown alcohol-based dye stain for our cabinet (see
Sources). Dye stain is easy to work with and it won’t interfere with
the gluing in Steps 16 and 17. We used 12 oz. of alcohol and added 1
oz. of dye. This makes a very dark dye solution, but that’s what it
took to get the wood as dark as we wanted. Let the dye dry thoroughly
before moving to the next step. (If you plan to use an oil stain, skip
step 15. An oil stain will interfere with the gluing that takes place
in Steps 16 and 17. Instead, wait until the front stiles and top are
glued on. Then tape around them to keep stain off the rest of the
cabinet.)
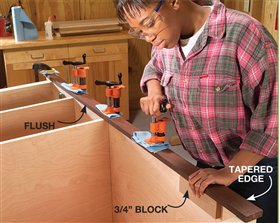
16. Glue the front stiles in place (Photo 11). Attach the rear stiles
with screws. This allows you to remove them and the plywood back for
easier finishing later on.
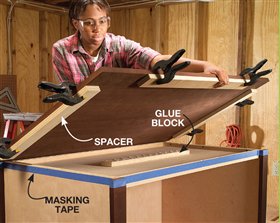
17. Glue the top in place (Photo 12). Don’t use too much glue around
the perimeter of the case; you want to avoid a squeeze-out mess.
Masking tape is still a good idea to catch any drips. The top should
overhang the front by 2-1/4 in., each side by 2-7/8 in. and the rear
stiles by 3/4 in. We used spacers to help us center the top on the
case. Once the top is aligned, weight it down and then immediately
remove the spacers, or any squeezed-out glue might bond them to the
top. Leave the weight on the top until the glue is dry.
Build and Install the Drawers
18. Cut out drawer parts N through R. Make the length of the drawer
fronts and backs (N) so that when the drawers are assembled, they are 1
to 1-1/16 in. narrower than the width of the drawer opening (Fig. A).
This is the space required for most ball-bearing-type slides.
19. Cut dadoes in drawer parts N and P (Detail 2) and then edge band
the top edges of these parts. Sand these drawer box parts at this time.
20. Install the drawer bottoms (R) in the dadoes and assemble the
drawer sides with glue and screws. Strips of masking tape along the
joints will protect the sanded parts from glue squeeze-out. Wipe any
glue squeeze-out off the tape, but leave the tape on until the glue in
the joint has set up.
21. Center the drawer half of the drawer slides on the outsides of the
drawers and attach them with screws. Put the drawer boxes into the
cabinet.
22. Cut the drawer faces (S) 1/4 in. smaller than the drawer opening
and edge band all four edges. This will produce a clearance space
around the sides of the drawer faces that is slightly less than 1/8 in.
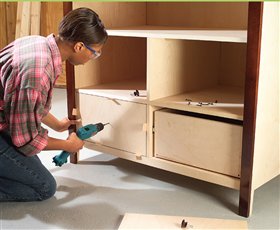
Attach the drawer faces to the drawer boxes with screws (Photo 13).
Add the Finishing Touches
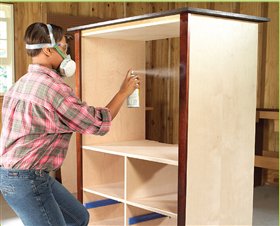
23. Seal the whole cabinet with spray-on shellac (Photo 14 and
Sources). The spray-on shellac will seal the dye stain, which will
bleed and smear onto the unstained parts if you try to brush or wipe a
finish over it. Use shellac in a well-ventilated area and wear a
respirator with organic vapor cartridges (see Sources). Lightly sand
the shellac after it is completely dry and then topcoat the cabinet
with a brush-on satin polyurethane varnish. Shellac makes a good seal
coat but polyurethane is a lot more durable.
Drilling a pilot hole is no time for guessing, especially when
there’s a risk of drilling too deep and going through the other side.
To avoid this, mark the correct depth on the bit with a masking tape
flag. When the flag gets close to the wood, slow down until it touches,
and then stop drilling. I got lucky on this drill-through. The bit
pushed out the veneer, but it didn’t break off. I was able to work some
glue behind the veneer with a tiny nail and stick it back in place.
After the first coat of clear finish, I added a speck of matching wood
filler for a near-perfect repair.
Sources
Source information may have changed since the original publication date.
Woodcraft , woodcraft.com, 800-225-1153, 6×1-3/4” toggle clamps, #143938, $12 ea.;
TransTint dye, #128484 medium brown, $17 per 2-oz. bottle; Two sets of
22” full-extension drawer slides, #131200, $15/set; 7/8″ white birch
edge band, #123273, $15 per 50 ft. roll; 1/2” x 1” top-bearing pattern
bit, #129640, $18; 1-1/4”-dia. wood knobs, #130270, $2/pr.
Zinsser, bullseye@zinsser.com, 732-469-8100, Bulls Eye clear spray
shellac, 12 oz. aerosol can, $5 at paint stores and home centers, or
contact Zinsser for a distributor near you; Organic respirator, $30
each at home centers and paint stores.
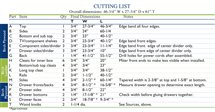
Cutting List

This story originally appeared in
American Woodworker May 2004, issue #107.

May 2004, issue #107
Purchase this back issue. |
|
Click any image to see a larger version.


1. Iron on edge banding to cover the exposed edges of the uprights, shelves, top and drawers. A cheap or old iron works for this.

2. To trim the banding, set it on a flat surface and
use a sharp utility knife. MDF or hardboard makes the best trimming
surface because it has no grain. Wood grain can steer your knife off
course

3. Screw the drawer slides onto the sides
and center divider of the drawer section. It’s easier to do it now
while the parts are lying flat. A spacer makes centering the slides
foolproof. Set the slides 3/4 in. back to allow for the inset drawer
faces

4. Assemble the drawer and component storage
separately. Drill a pilot hole for each screw and make sure the front
edges of the parts are flush.

5. Join the component section, which is
simply a screwed-together plywood box, to the drawer section. The
cleats keep the parts aligned.

6. Rough cut the feet with a jigsaw and then trim the
rough edge using a template and a pattern bit in your router. A small
block glued to the right end of the template will prevent the plywood
from tearing out at the end of the cut.

7. Screw the sides to the component and
drawer sections from the inside. Fasten the cleat along the bottom
edge. It should align flush with the foot opening.

8. Temporarily install the back panel with a couple of
screws, but put it in backwards. Then trace around the shelves and
sides to show you where the screws should go when you turn the back
around.

9. Screw on the back. Begin by fastening
one edge with a few screws. Then nudge the unit one way or the other
until you get equal diagonal measurements, which means it’s square.
Then fasten the other edge, top, bottom and shelves with screws.

10. Taper the stiles that will be applied to the sides
of the cabinet with a shop-made tapering jig. After sanding, stain the
stiles.

11. Glue and clamp the front stiles in
place with the tapered edge facing out. Position the stiles flush with
the inside of the drawer and components cabinet. Overhang the stile by
3/4 in. on the inside of the TV space.

12. Glue on the top. Spacers position it exactly and
masking tape catches any glue squeeze-out. A plywood glue block
provides extra bonding area. Stack weights on the top and then remove
the spacers before the glue dries.

13. Position inset drawer faces using
spacers and drive a temporary screw though the center of the front,
where the knob will be attached later. Then pull out the drawer and add
screws from the inside.

14. Spray on a light coat of clear shellac. This seal
coat keeps the dark dye stain from bleeding onto unstained wood areas
and makes a good sealer for the polyurethane topcoat.
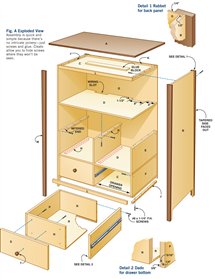
Fig. A: Exploded View

Fig. B: Routing Template for Foot Profile

Fig. C: Tapering Jig

Fig. D: Plywood Cutting Diagram

|


