We may receive a commission when you use our affiliate links. However, this does not impact our recommendations.

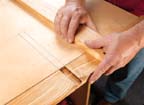
When routing the dados, use a T-square jig. The jig shown here is designed to cut 3/4"-wide dados. First mark on your work the location of the dados. Line up the dado that's plowed in the T-square jig with your lines.
I seem to be setting up a lot of workshops lately. So far, our little band of pioneer aviators have set up two shops in Dayton, Ohio, where we are manufacturing the parts of Wright airplanes and assembling them, and a third shop in Kitty Hawk, N.C., which serves as a repair station to take care of the inevitable wing-dings these primitive aircraft suffer when you fly them. And because the heart of any good shop is its workbench, I seem to be building a lot of benches as well.
With time and materials at a premium, I’ve developed a simple and economical design for a bench that we use in these shops. It’s strong, true, offers loads of storage and with the addition of a few casters, can serve as a movable work island. We find this last feature especially important, because we must constantly reconfigure the shops as the Wright airplanes grow during construction.
A Sandwich of I-beams
The base of the bench is made entirely of 3/4″ plywood. The plywood parts form three “I-beams,” each beam consisting of two caps and a center beam. The shelves and dividers in the bench make up two small I-beams – the shelves become the caps and the dividers are the beams. These are sandwiched together inside a large I-beam that consists of the two workbench ends (the caps) and a center divider (the beam). The resulting structure is very strong.
It’s also very true, another important characteristic of a good bench. The benchtop should be flat if you are going to use it for precision work. I cut up the plywood sheets so the factory edge – the outside edge of the plywood as it comes from the factory – is the top of the center divider and the top of the two ends. As a rule, factory edges are pretty straight even if they appear a bit rough. When I attach the benchtop to the base and draw it down tight, the factory edges brace the top perfectly flat.
Making the Sandwich
The bench can be made almost any size – it’s only limited by the size of the sheet materials you use. The dimensions shown in the plans are just suggestions – make the bench whatever size you need. Most craftsmen, I know, will immediately want to make the top a bit higher – 34″ is somewhat low for a work surface for most people. But it works for me because I’m a short guy.
Once you’ve decided on the overall dimensions of the bench, cut the plywood parts and rout a few dados to help you assemble and align the parts. Cut the bench ends with three intersecting dados in each – one vertical dado to hold the center divider and two horizontal dadoes to hold the shelves. Make each of these dadoes 3/4″ wide and 1/4″ deep. Also make 1/4″-deep dados in the shelves to hold the shelving dividers. Then rout horizontal dadoes in the center divider, 3/4″ wide and 1/8″ deep. You must make these dados on both sides of the center divider – that’s why they’re only 1/8″ deep.
Assemble the base parts with glue and screws (use pocket screws to attach the shelves to the center divider). To make sure that the top edges of the ends and center divider remain true to one another while the glue dries, stretch two strings diagonally from the outside corner of one cap to the outside corner of the other.
The two strings should cross the base, forming a large “X.” The strings should just kiss each other where they cross over the center divider, and they should rest lightly on the edge of the divider. If the strings aren’t laying properly, level the parts of the workbench’s base with small wedges and shims before the glue dries.
Topping the Sandwich
You can put a variety of tops on this base – I’ve used both butcher-block tops made from rock maple and less-expensive tops laminated from particleboard and hardboard. Any hard material about 1-1/2″ thick will do. To attach the top, screw wooden cleats to the center divider and the ends, flush with the top edges. Position the top over the base and drive screws through the cleats and up into your top piece.
You can customize this work island to serve your own needs with vises, work lamps and other workbench accessories. The first thing I usually add are swivel casters to make the bench easy to move. If you want more shelves, drill 1/4″-diameter holes in the ends and shelving dividers for shelving support pins, then rest the shelves on the pins. To add drawers, mount guide rails to the ends and divider, then build wooden boxes to slide on the rails. PW
Click here to download the PDF for this article.
Nick Engler is a contributing editor for Popular Woodworking.
Here are some supplies and tools we find essential in our everyday work around the shop. We may receive a commission from sales referred by our links; however, we have carefully selected these products for their usefulness and quality.


