


We may receive a commission when you use our affiliate links. However, this does not impact our recommendations.
 As special as the treasures it will hold.
 As special as the treasures it will hold.
An old, nearly disintegrated steamer trunk in my grandfather’s basement held forgotten treasure—letters, photos, and a hand-written recipe for figgy pudding from my grandmother’s early life on a Kansas farm during the depression. Not pirate’s gold, of course, but treasure to me, nonetheless. So, when a gentleman asked me to design and build a dozen keepsake trunks for his twelve grandchildren, I leapt at the chance. “Who knows what treasures will get stashed in these trunks?” I thought.
The trunk’s rounded lid is made by gluing together narrow strips with beveled edges (called “staves”). I chose Luan (Philippine mahogany) for the strapping, because it responds very well to hot-pipe bending, the method I used to mold it to the arched top. I used the tablesaw and bandsaw to cut the finger joints.
You’ll need only about 14 bd. ft. of 4/4 lumber to build this trunk. Although it’s no crime to glue together narrow boards, I think the trunk looks best when its sides and ends are made from single, wide boards. As these pieces are fairly short, it’s worthwhile to check out the #1 Common pile at the lumberyard. You may find beautiful wide boards that were downgraded just because they have a defect smack in the middle. Paying considerably less per board foot is always nice, too.
Cutlist and Diagrams

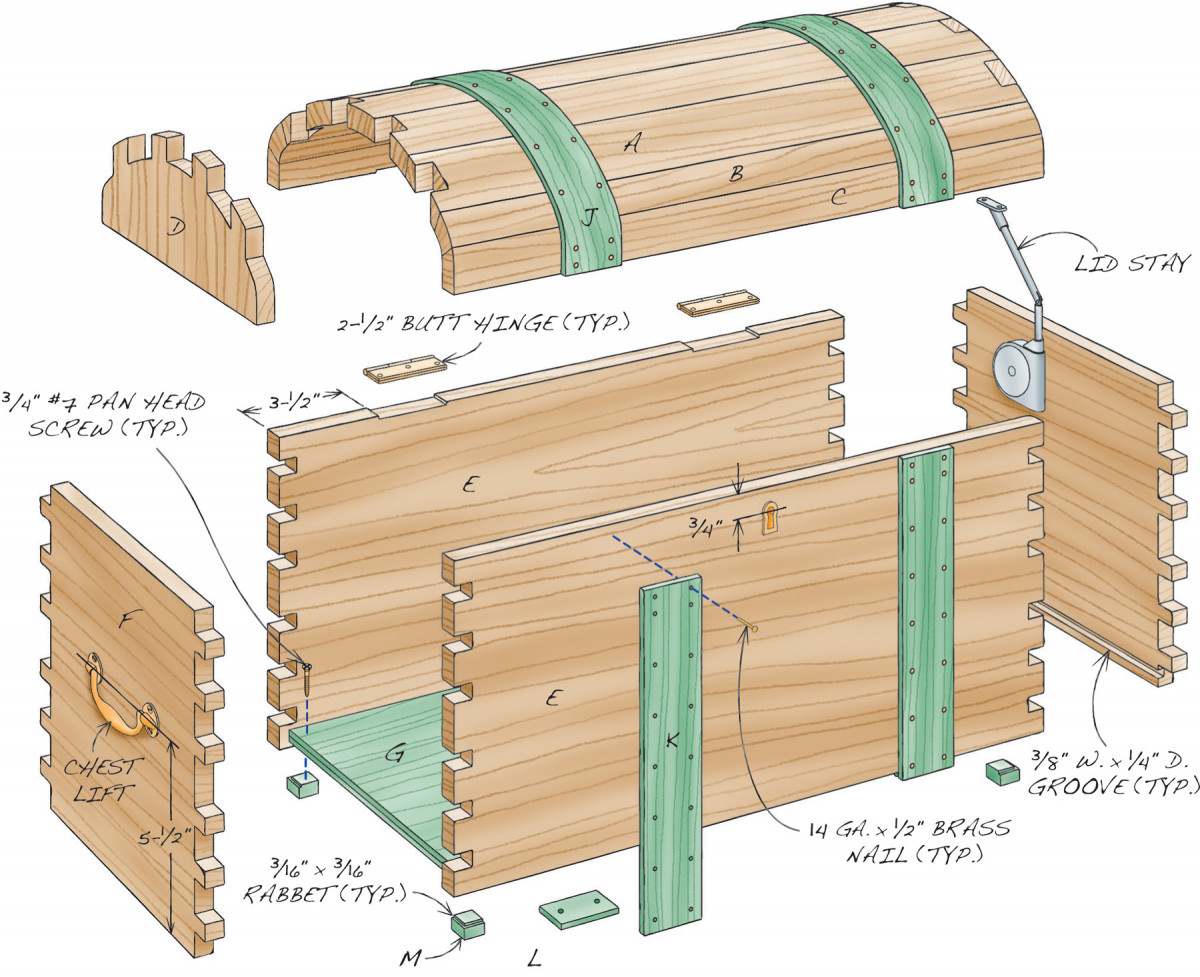
Fig. A) Exploded View
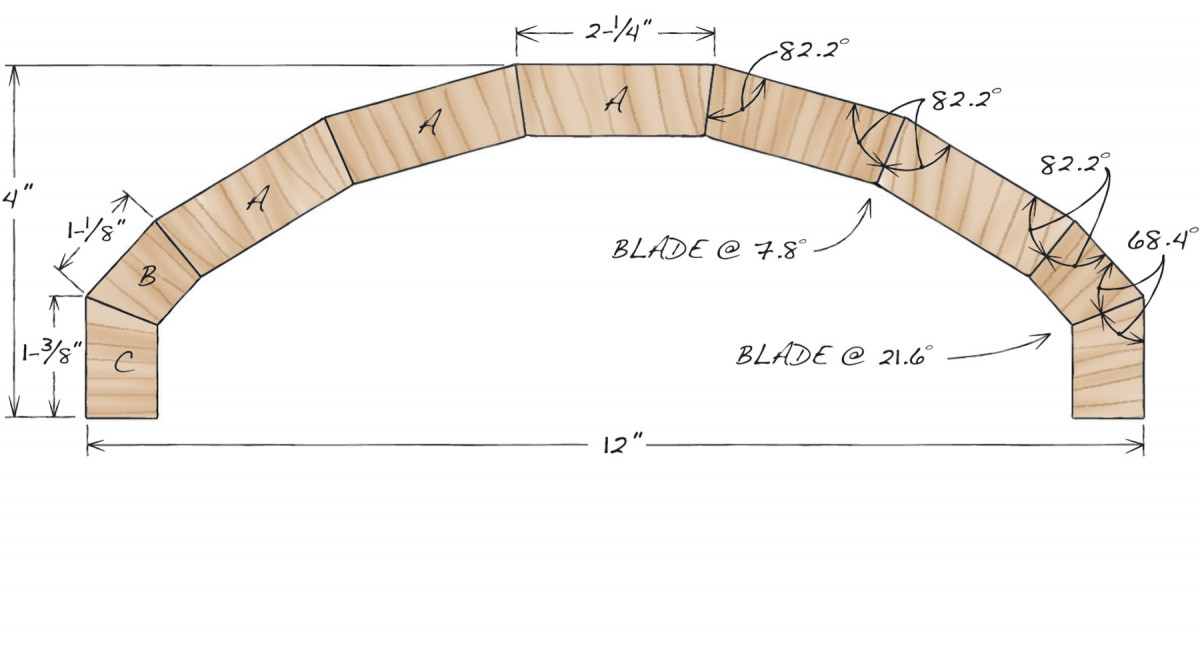
Fig. B) Lid Staves
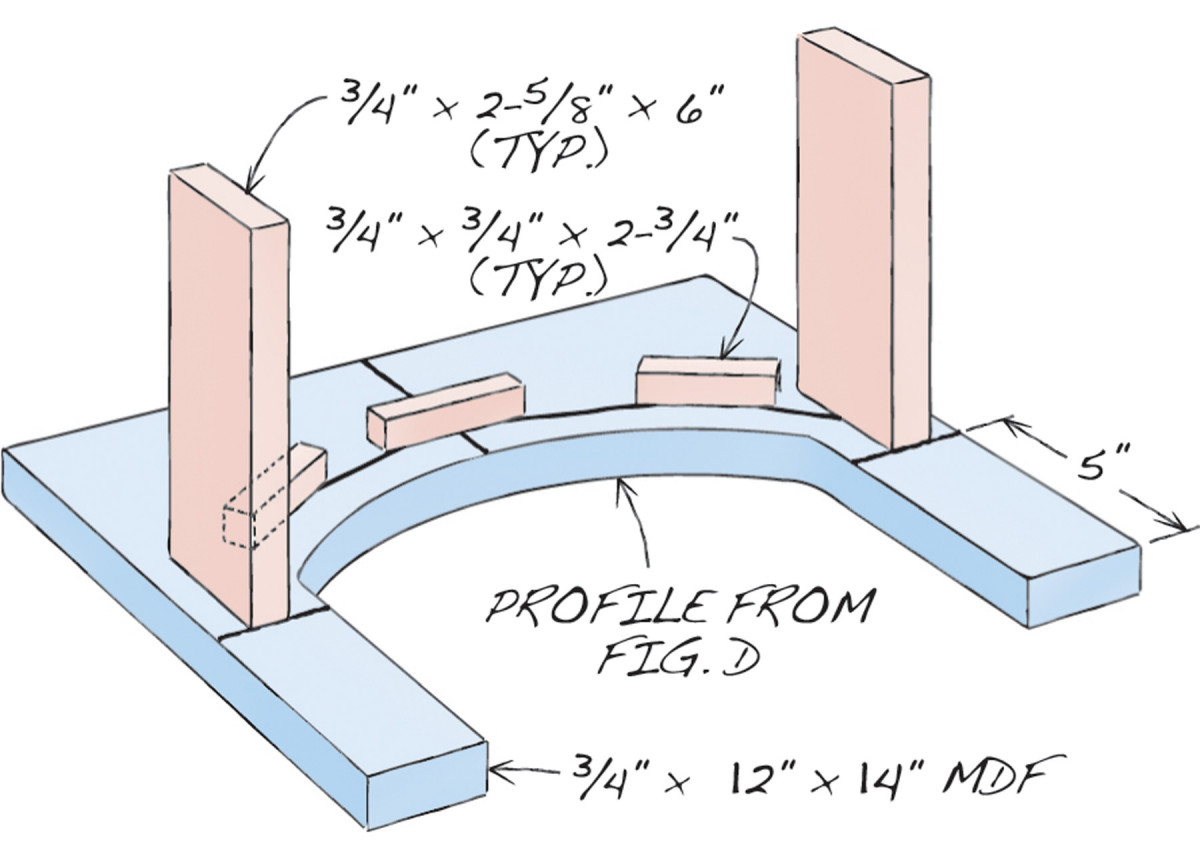
Fig. C) Routing Jig
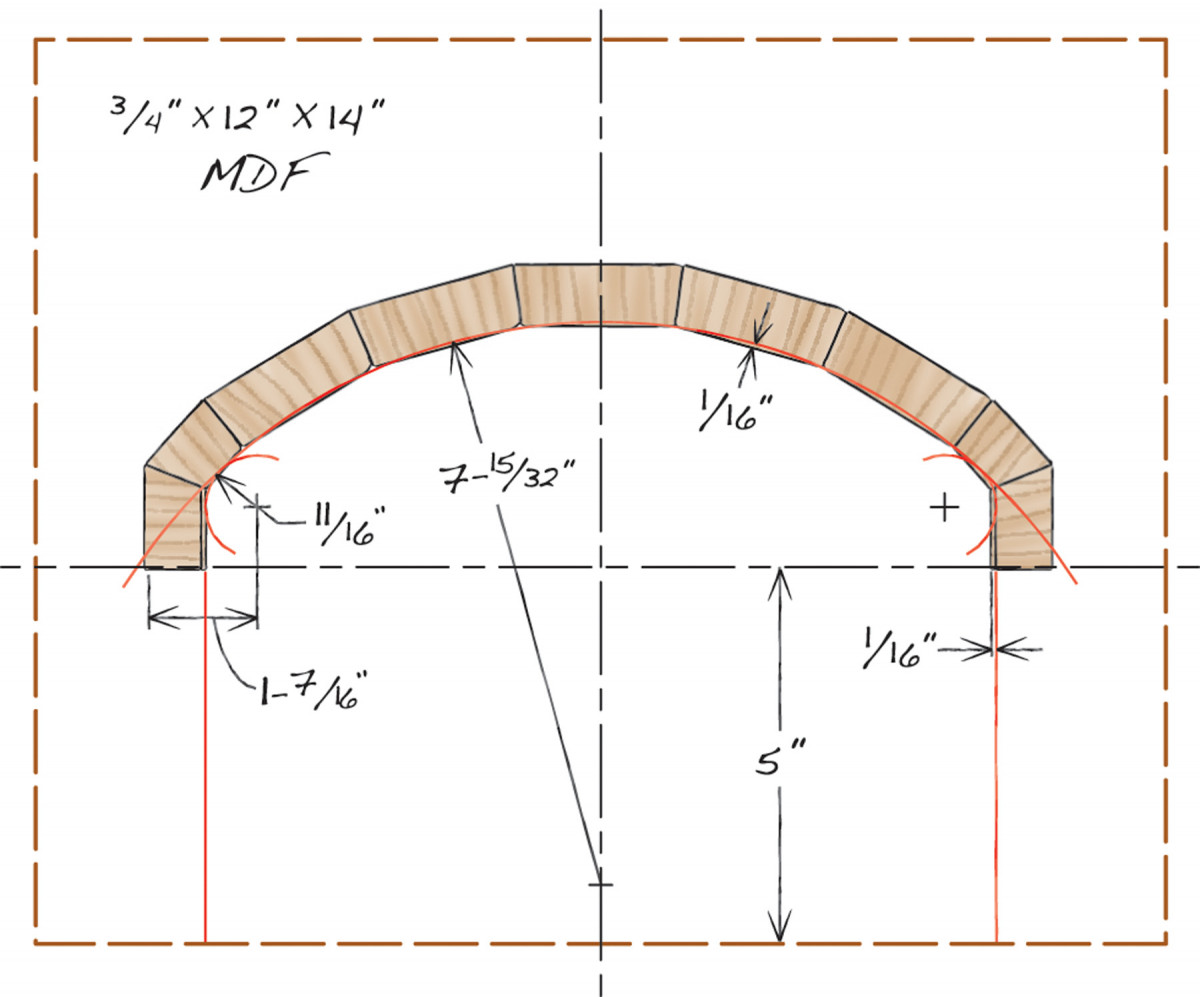
Fig. D) Routing Jig Layout
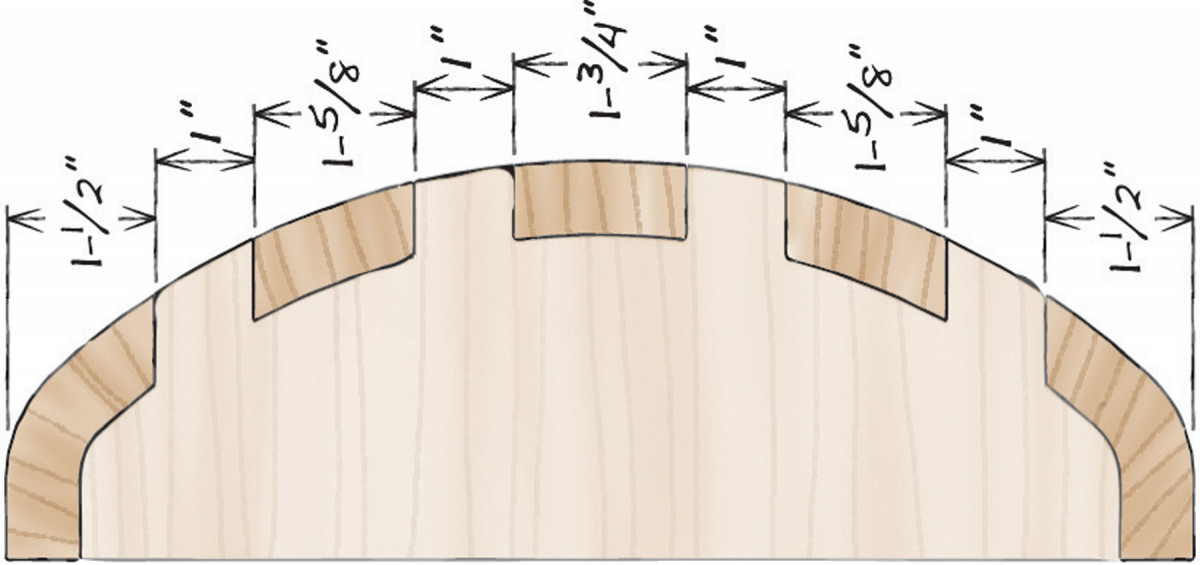
Fig. E) Lid Sockets
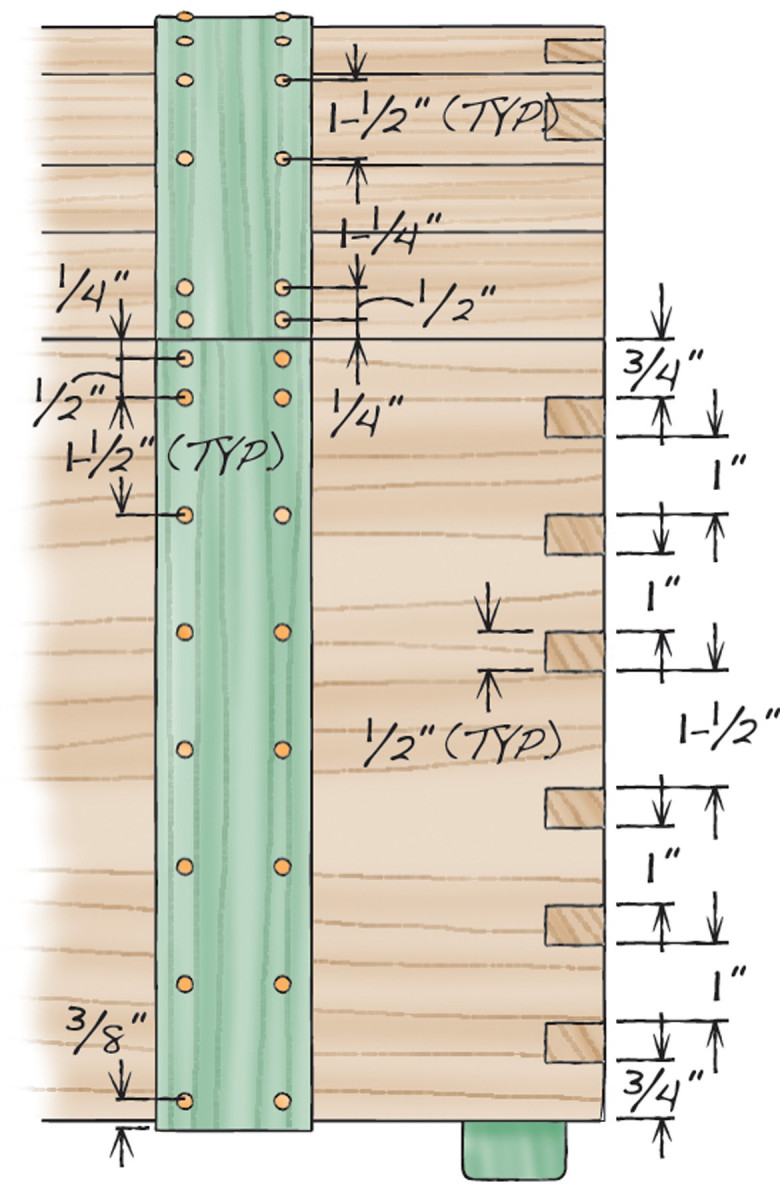
Fig. F) Front View
Bevel the staves
The lid’s beveled staves form a faceted arch when they’re glued together. (The facets disappear later, when the top is rounded.) Cutting the bevels is fussy, because even a 1/10˚ variance in the angle, repeated over nine staves, will change the shape of the lid’s curve and its overall width. But don’t worry. Just plan to build the box to to match the lid’s dimensions, whatever they end up to be. The bevel angles are specific to 1/10˚, so I recommend using a digital angle finder to set up your tablesaw.
1. Start by beveling the edges of the pieces that make the curved lid. These pieces are called “staves.”
Start by planing blanks for the staves to 13/16″ and ripping them 1/8″ oversize in width. Note that there are three types of staves: main, transitional and end (A–C, Fig. A, and Cutting List, page 46). Stack and sticker the blanks overnight, or longer, to let them acclimate–toss any that bow or twist. Bevel the edges of the “true” staves (Photo 1 and Fig. B). Then crosscut them to length.
Glue the staves together
Lay out the staves in order, wide side up. Make sure that the transitional staves (B) have the shallow (7.8˚) bevel towards the center and that the grain in every piece runs in the same direction–this will reduce the risk of tear-out later, when the facets are rounded.
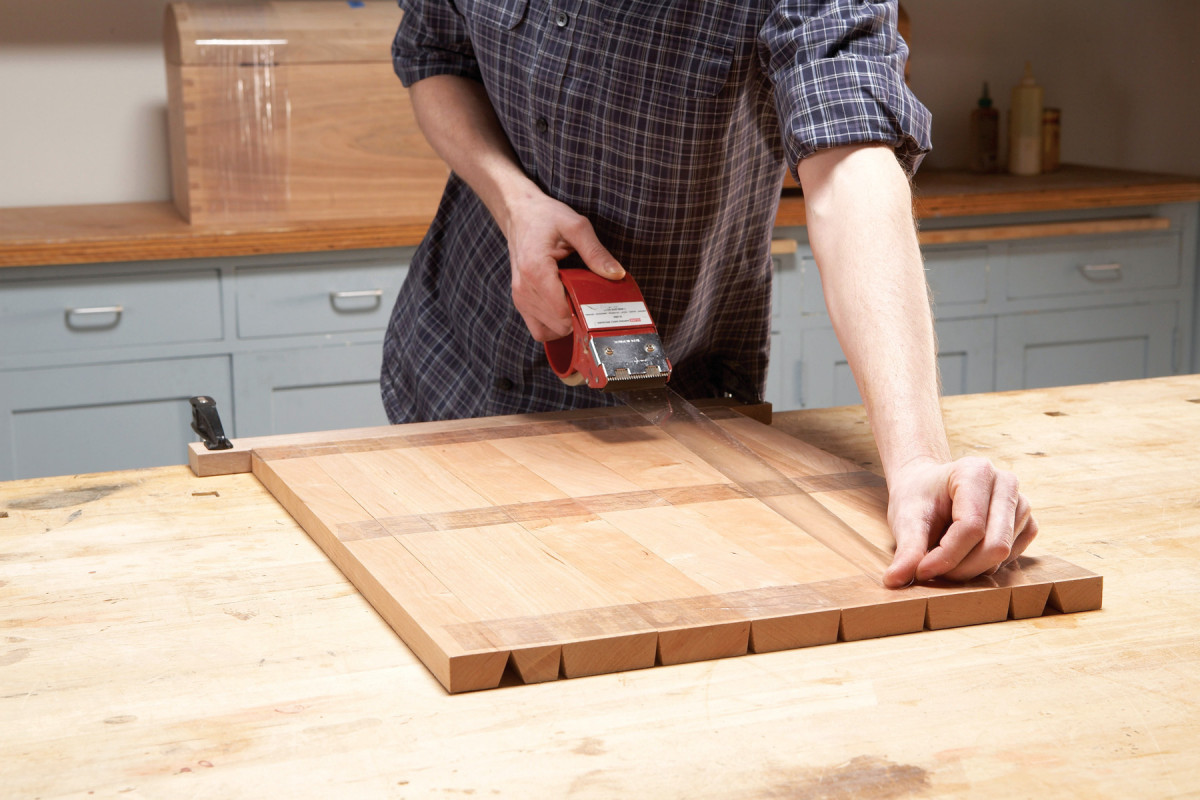
2. Arrange the staves in order and use tape to hold them together for gluing. Flip over the assembly and drizzle glue into the open seams. Then draw the assembly together, using tape to close the seams and form the lid.
Carefully align all the ends and make sure there are no gaps between staves. Then secure the assembly with clear packing tape (Photo 2). Plastic packing tape works better than masking tape: It’s more elastic, so you can pull the joints tight, it reveals the entire joint, and it costs less. First, tape across both ends and in the middle. Next, tape the length of each seam. Rub down the tape with a plastic burnisher or a library card. When you lift the middle stave, the arch should automatically form, by hanging down on both sides.

3. Confirm the lid’s 12″ width. Packing tape is elastic, so you can make slight adjustments to the width by changing the amount of tension on the tape. If your lid ends up to be a different dimension than 12″, simply alter the box dimensions to match.
Flip over the stave assembly, so the open seams face up, and drape the assembly over an upside-down bowl, to fully open the seams. Drizzle a bead of glue into each open seam, making sure that it gets all the way into the point of the “V”. The glue will get squeezed away from that point when you pull the assembly together. Pull the assembly into an arch, and hold it together by adding more bands of packing tape. Check the width and make adjustments, if necessary (Photo 3 and Fig. B). Remove the tape after the glue has dried.
Rout a rounded lip
Make a jig (Fig. C, near nop of article) to rout a lip for the end cap (D) around the inside of the lid’s arched ends.
To make the jig, draw vertical and horizontal lines centered on a 15″ square piece of MDF (Fig. D). Stand the lid on end and place it on the MDF, so that its bottom edges rest on the horizontal line and the vertical line bisects the center stave.
Trace both sides of the lid’s faceted shape onto the MDF. Using the vertical centerline, strike a long arc that intersects the points on the inside edge where the staves meet. This arc will extend about 1/16″ above the bottom edge of each of the five main staves at their centers.
Draw a vertical line 1/16″ inside the inner edge of each end stave. Continue these lines all the way to the bottom of the MDF. Strike a small arc inside each corner, to ease the transition between the large arc and the vertical line.
Precisely cut out the arched shape you’ve drawn and sand it smooth. Glue blocks along the outside profile to precisely position the lid on the jig.
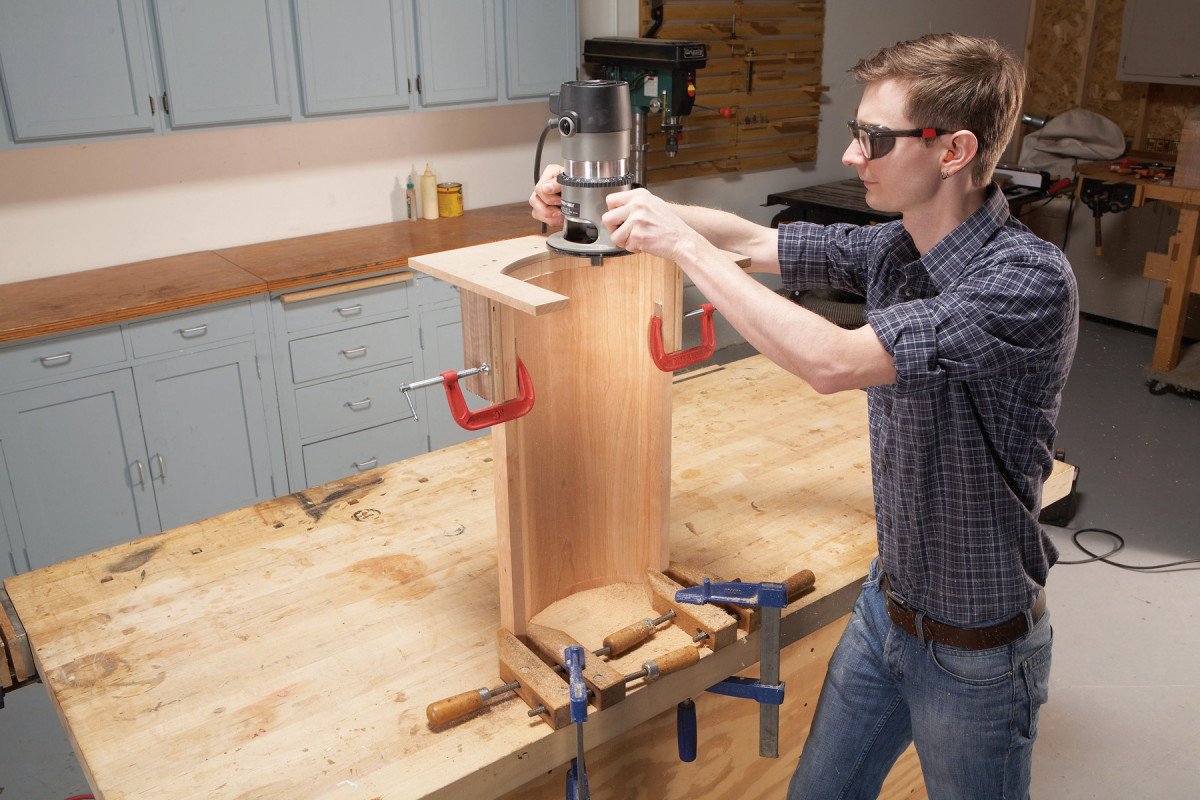
4. Use a jig to rout an arched rabbet inside both ends of the lid. This rabbet rounds the lid’s inside edge, so that when the end cap is installed, the lid will appear to bend around it.
Stand the lid on end and clamp it to your bench. Install a flush-trim bit in your router and set its depth-of-cut to match the end cap’s thickness. Clamp the jig on the lid and rout the rabbet (Photo 4).
Cut finger joints
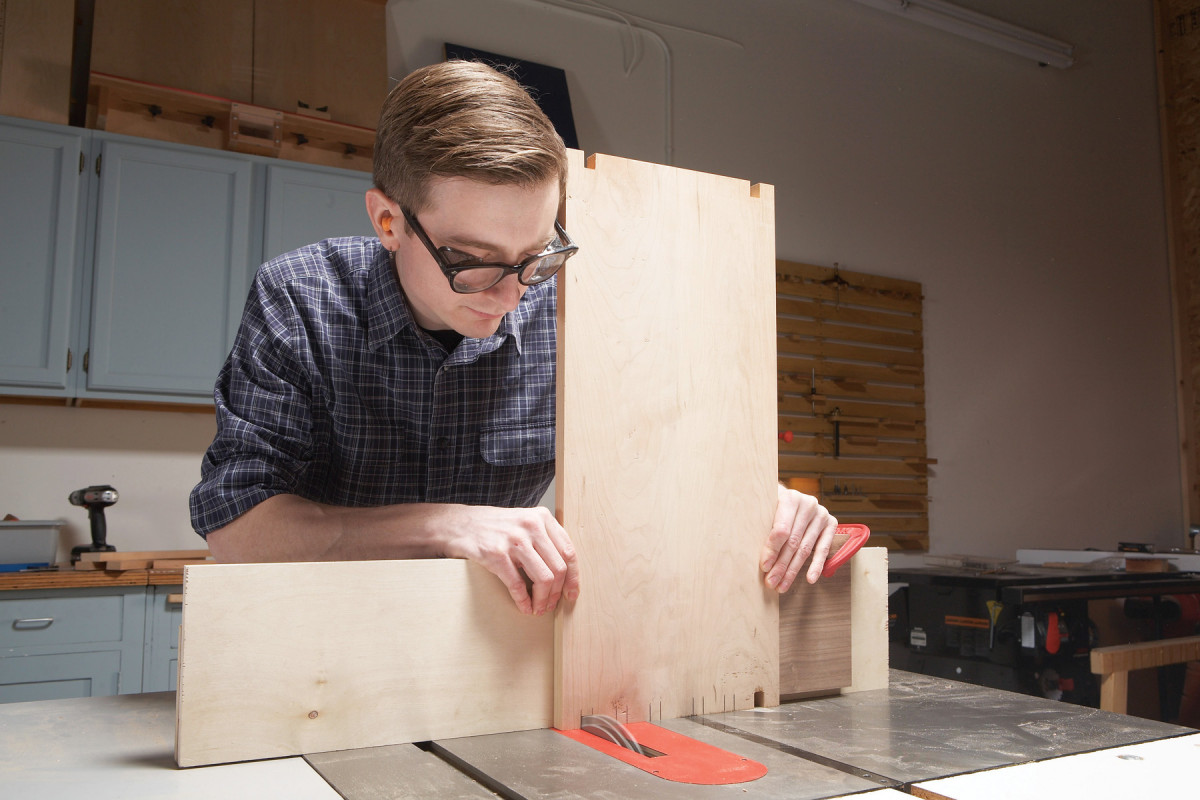
5. Cut finger joints in the lid, using a miter gauge with a tall fence. Two sockets (one in each end) can be cut from each setup. Reposition the workpiece and the stop blocks after cutting each pair.
Lay out the finger joints on one end of the lid (Fig. E), and clearly mark the four sockets that you’ll be cutting out. Use a dado set and a miter gauge equipped with a tall sacrificial fence to make the cuts (Photo 5). The sockets are wide enough to require two passes to complete. Position the lid against the fence, align the dado set with the first layout line and set the first stop block. Shift the lid to align the opposite layout line with the dado set and set the other stop block. Raise the dado set to make a 3/4″ deep cut. Bear against one stop block to make the first pass and against the other block to make the second pass. Flip the lid end-for-end to cut the same socket in the other end. Then reposition the lid and the stop blocks to cut the next socket. Four different setups are required to complete all of the sockets.
Complete the lid
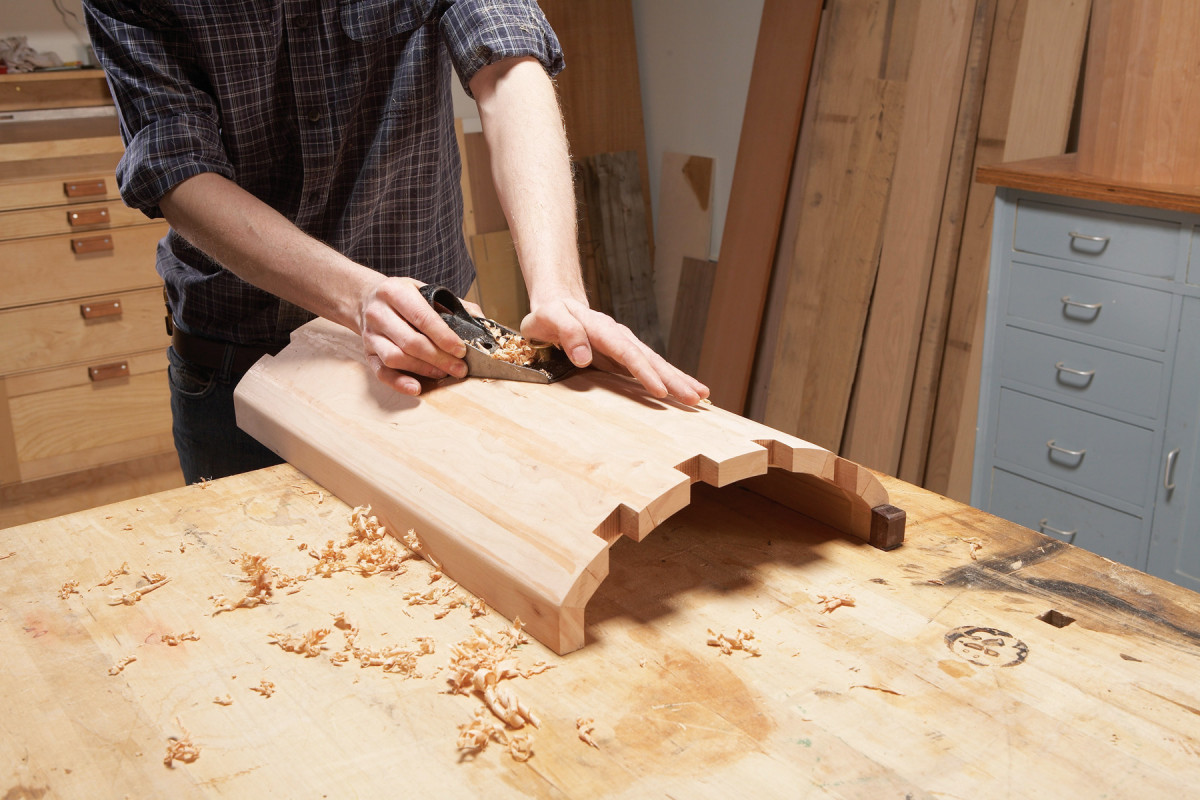
6. Round the top by removing all the high spots. Use your hands to find irregularities in the curve that need additional attention.
Use a hand plane to round the lid (Photo 6). If you use a belt sander for this step, wait until you’ve glued on the end caps.
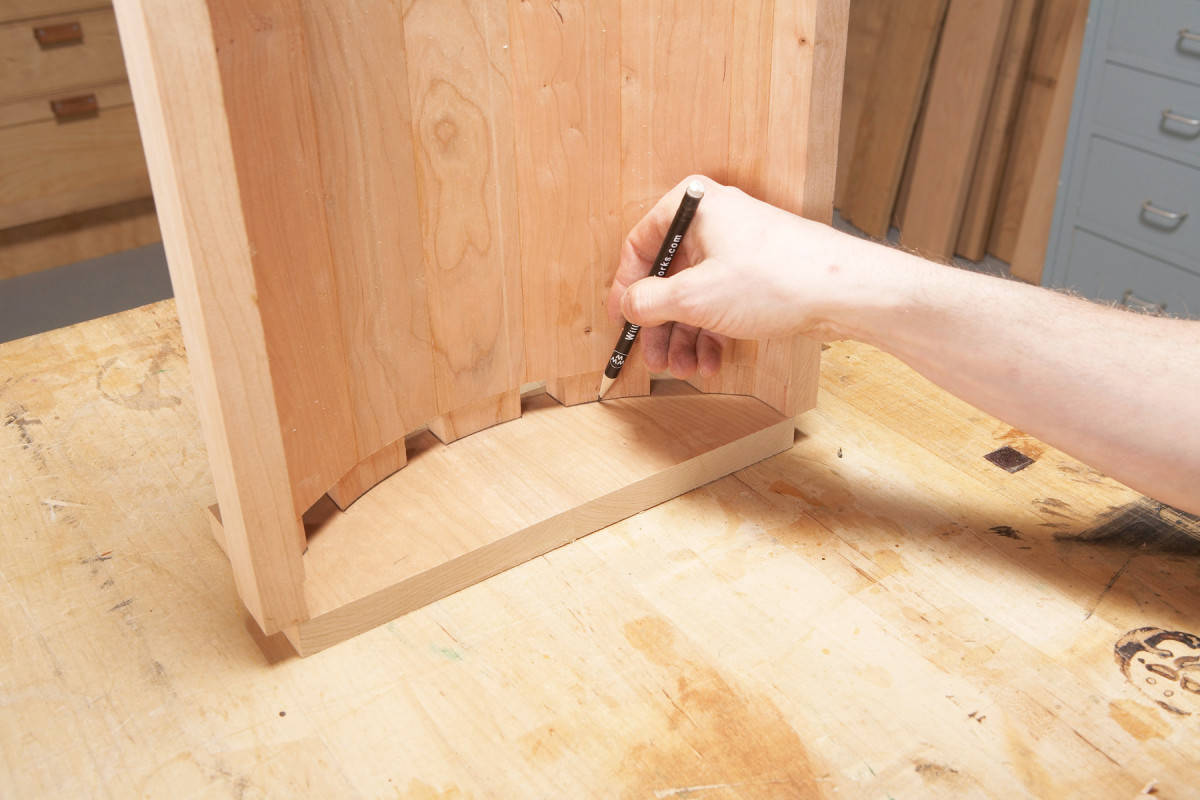
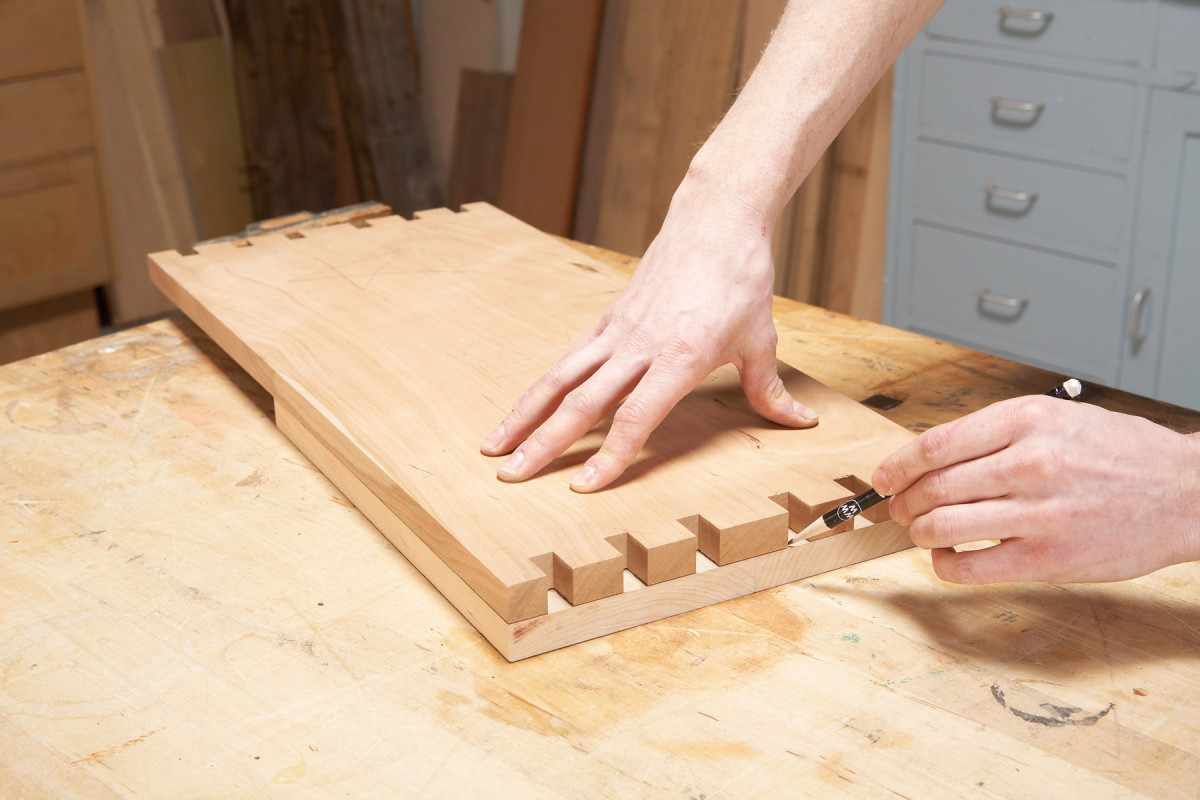
7. Transfer the lid’s round shape and finger locations onto each end cap blank.
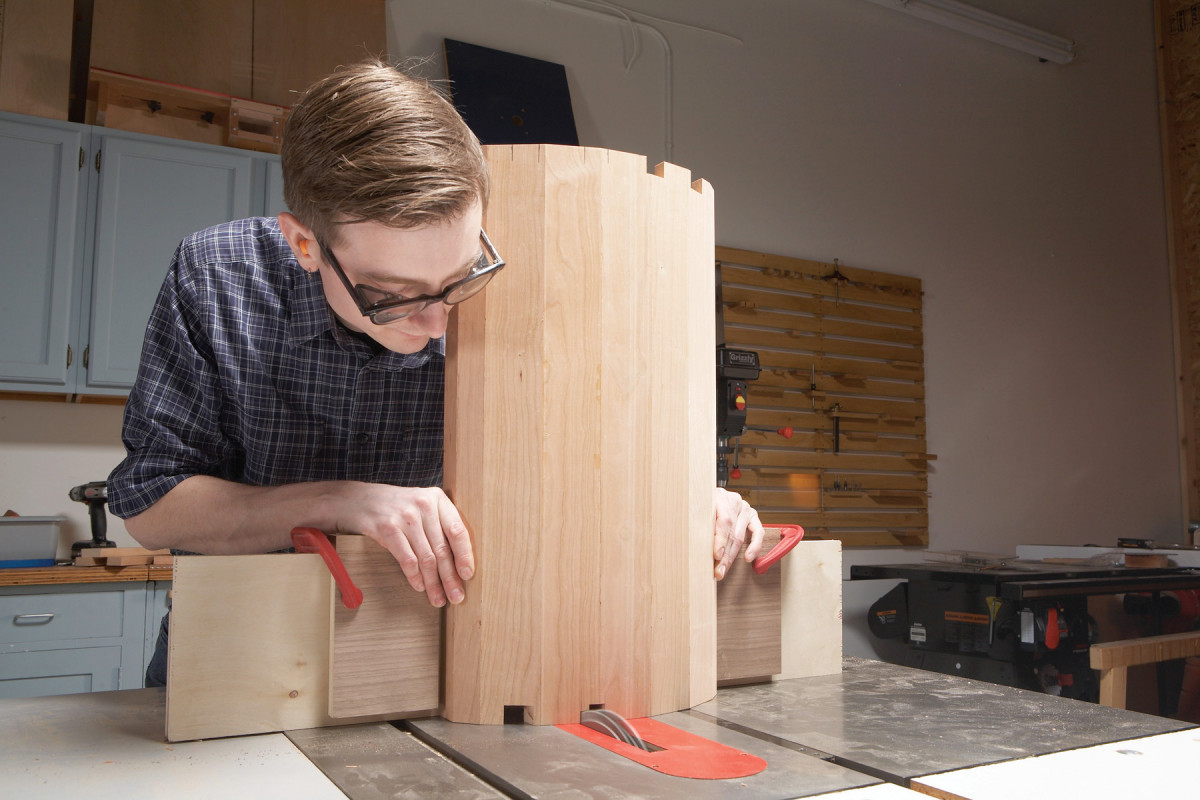
Position the lid on each end cap blank, flush at the bottom. (Note that the grain runs vertically on the end caps. ) Then transfer the lid’s edge profile (Photo 7). Carefully bandsaw the profile, cutting on the waste-side edges of the lines you’ve drawn (Photo 8).

8. Saw out the fingers and rounded profile on each end cap. Use a fine-tooth blade and cut to the outside edges of your marks.
The joints probably won’t slide together perfectly when you first dry-fit the end cap. I use the bandsaw, chisels and a 1″ wide stationary belt sander to fine-tune the trouble spots. When the fit is satisfactory, glue in the end caps and sand the protruding fingers flush.
The box
9. Cut finger joints in the box sides. The setup is similar to the one used earlier, but this time the sockets are only 1/2″ wide, so you only need one stop block, and you can cut four sockets from each setup.
Measure the length and width of the completed lid and build the box to those dimensions–change the dimensions in the cutting list accordingly, as necessary. Cut the box sides and ends (E and F) to final size. Lay out the finger joints on one of the side pieces (Fig. F). Then cut the sockets, using a setup similar to the one used earlier to cut the lid (Photo 9). At each setting, flip the board over and rotate it end-for-end to create four perfectly symmetrical fingers. Be sure to cut sockets in both side pieces before you change each setting.
10. Transfer the finger and socket locations from the box side to a test piece that’s exactly the same width and thickness as the box ends. Use this test piece to verify the socket locations before cutting the real end pieces.
Mark the sockets on a test end piece (Photo 10). These sockets are wide, so you’ll have to set two stops and make two passes to complete each one. Use the test piece to set the stop blocks and test-cut each socket before you commit to the real end pieces. As with the side pieces, you can cut four sockets from each stop block setting.
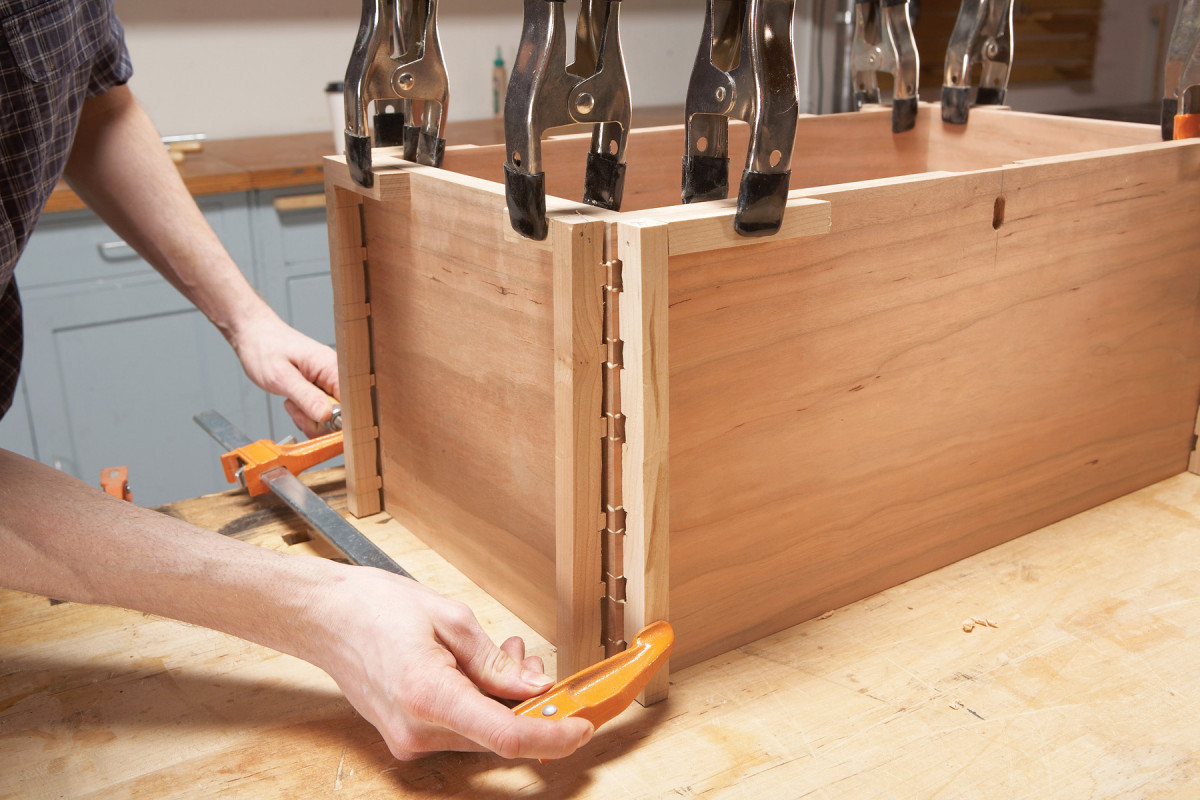
11. Glue the box together. Use toothed cauls on both sides of each joint to make sure all of the fingers are fully seated.
Make a super-strong bottom by gluing together two pieces of 1/4″ luan plywood (G; note: 1/4″ plywood is usually about 3/16″ thick). Glue the pieces A-sides-out, and you’ll create a bottom that looks good on both sides. Rout 3/8″ wide grooves for the bottom in the box ends and sides—the grooves in the sides are stopped, so they don’t ruin the finger joints. Install the bottom and glue the box together (Photo 11).
Cut a mortise for the escutcheon in the front of the box. The escutcheon is purely decorative, unless you decide to install a lock. Cut mortises for the hinges in the back of the box and in the back of the lid.
Bend the straps
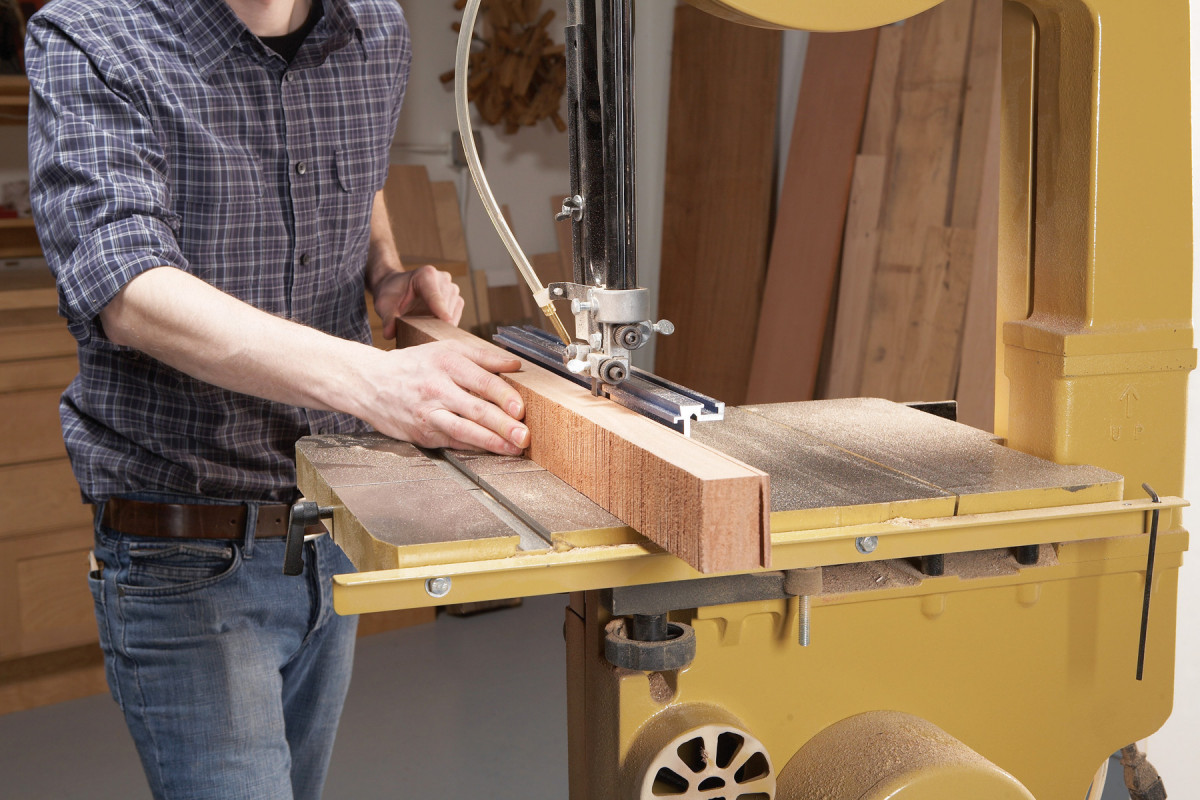
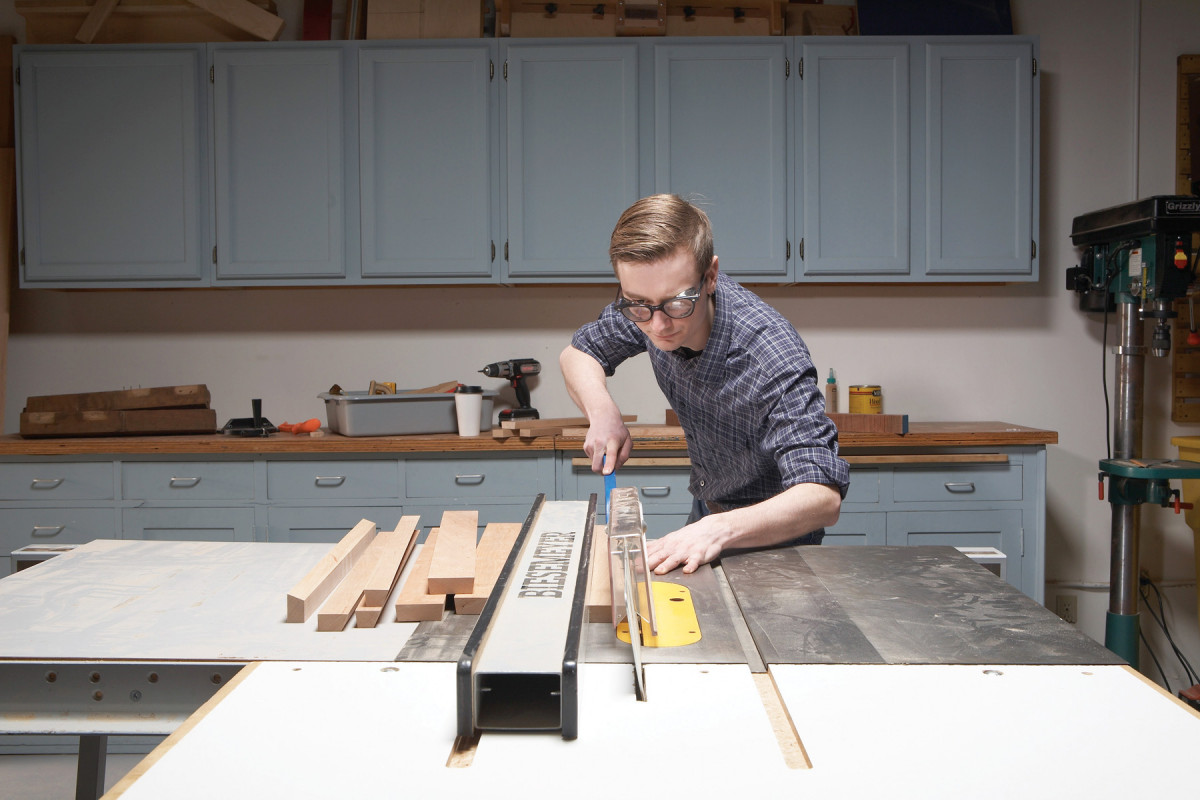
12. Resaw two long blanks to make the straps. Crosscut each blank into five pieces, preserving their order and orientation, so they’ll appear to wrap around the box.
Re-saw a pair of long blanks to make the straps (H and Photo 12). Remove the saw marks by planing or sanding to final 1/8″ thickness.
Cut each strap blank into the pieces that will wrap around the box and lid (J–L). Cut the lid straps (J) about 4″ long, to facilitate the bending process. Mark the back sides of these pieces, to keep them correctly oriented. Use a permanent marker, so the marks don’t disappear during the bending process.
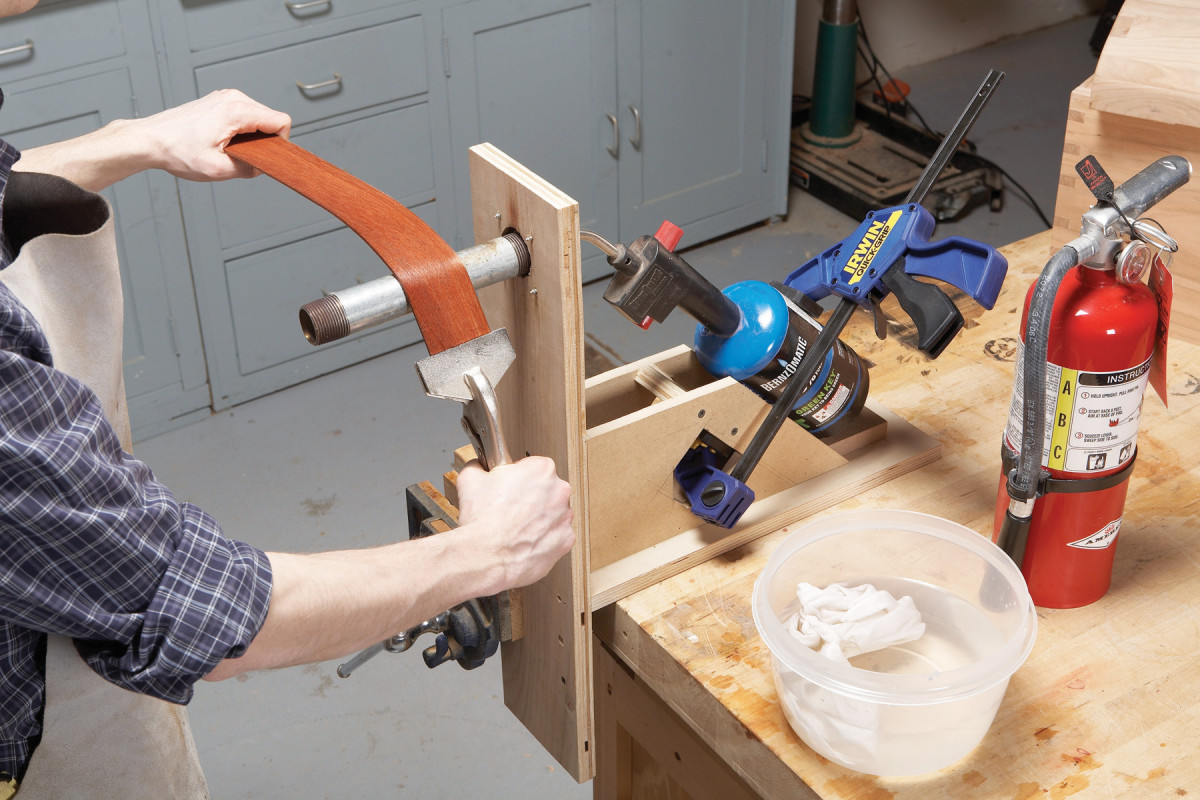
13. Bend each strap over a hot pipe. Use a sponge to keep the strap wet and apply steady, gentle pressure. Rock the strip slightly against the pipe until you feel the wood relax. Then increase the pressure.
Soak the lid straps in water overnight. If you don’t have a large enough container to completely immerse the straps, wrap them in a soaking wet towel sealed in a plastic bag. Then use a hot pipe to bend the straps to match the curves of the lid (Photo 13).
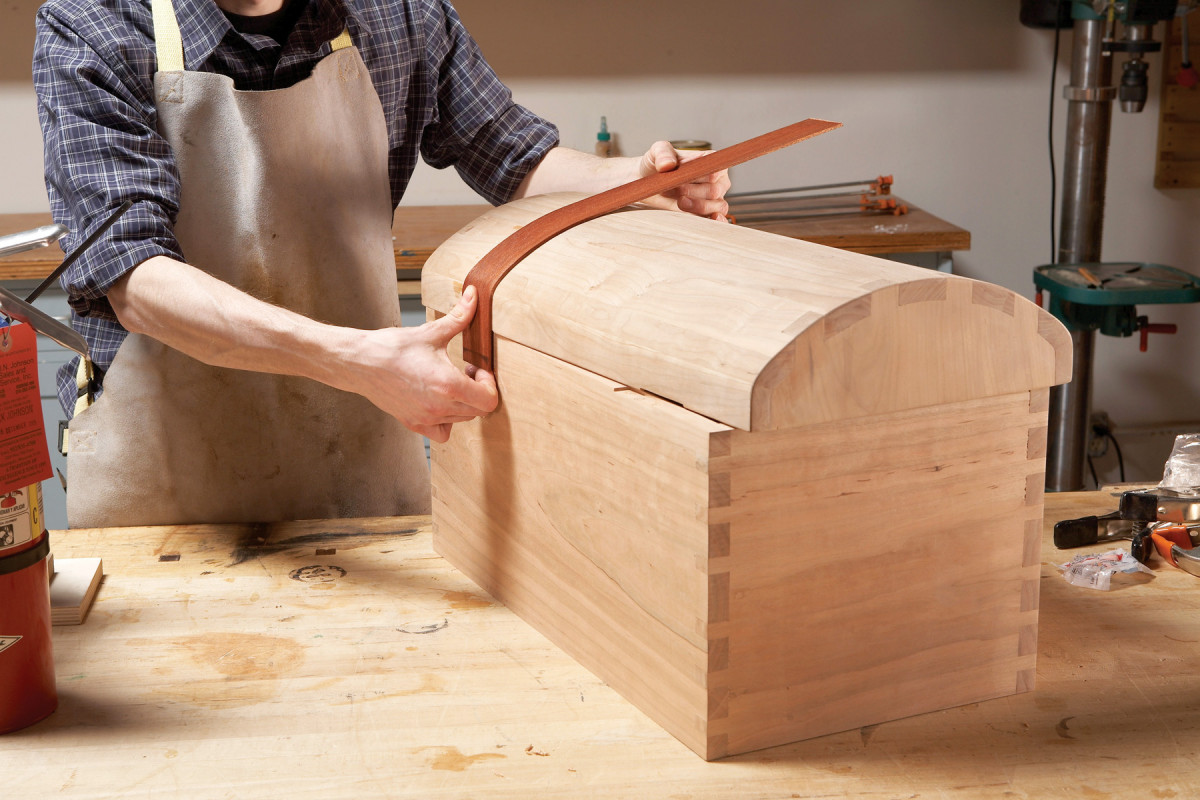
14. Shape each curve gradually, stopping often to check the fit.
Fit the lid’s first sharp curve by bending the strap about a third of the way around the pipe. Nest the bent strap at the first curve, roll it over the lid (without sliding) and mark in pencil where the second sharp curve will start. Then create the larger, more gradual arc by bending a series of micro-curves (Photo 14). When the strap fits around the lid all the way to the pencil mark, make the second sharp bend. Both sharp bends need to be accurate, but it’s okay if the larger arc is a little off–nailing will draw the strap tight against the lid. When the straps have dried enough so that they can be sanded smooth, they’re dry enough to be installed. Nailing the straps to the lid takes care of any springback.
Install the straps
Clamp the bent straps in place on the lid. Then mark the edge of the lid in the front and the top of the hinge mortise in the back. Remove the straps and use the marks to determine the spacing of the decorative brass nails that are used fasten the straps. Mark and pre-drill 5/64″ dia. holes for the nails in all of the strap pieces. To allow seasonal movement, lengthen the holes vertically (following the grain) to about twice their width, by waggling the drill bit back and forth in the hole. You might want to try this move out on a piece of scrap first–too much waggle and the hole won’t be covered by the nail head.
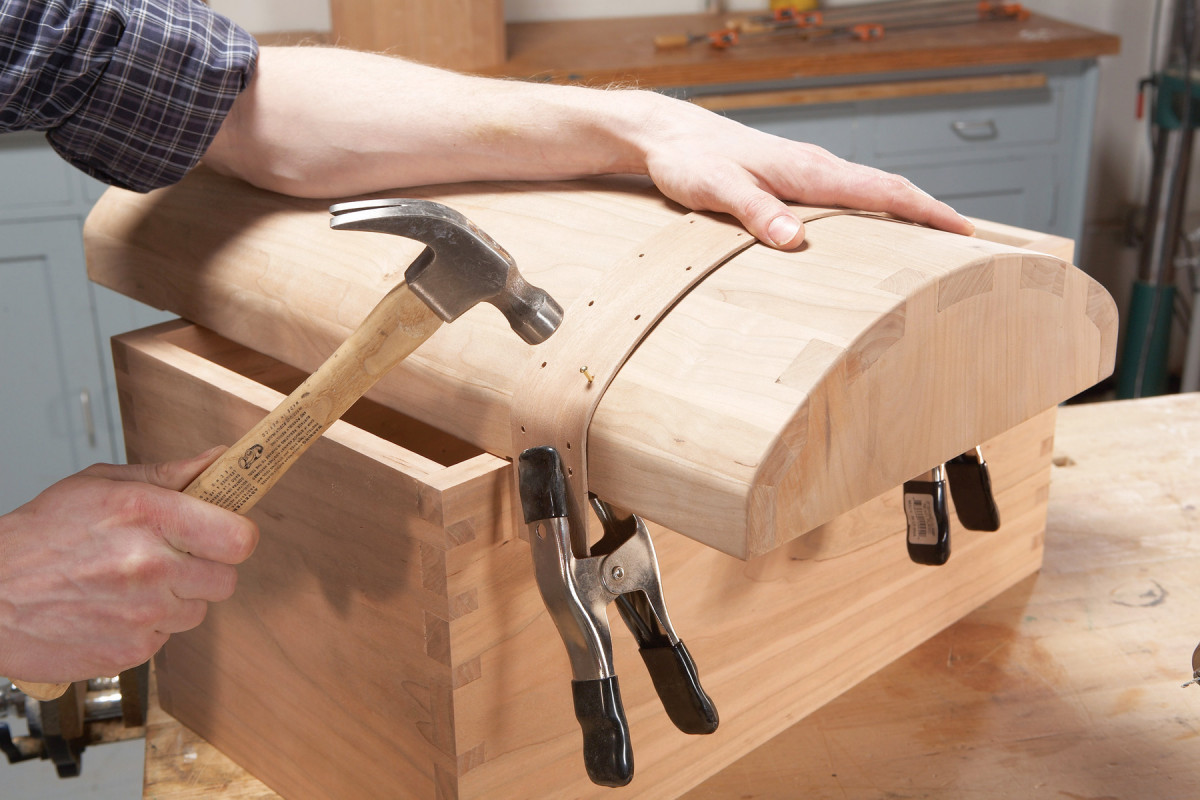
15. Fasten the lid straps with nails through pre-drilled holes. First, drive in nails near the ends. Then drive in the rest randomly, checking and adjusting the strap’s placement as you go.
Finish-sand all the parts. Then clamp the lid straps in place and drill centered 1/16″ pilot holes in three of the elongated holes in each strap, one near each end and one in the center. (If you drill all of the holes right away, some of them may not line up properly as the strap draws tight to the surface of the lid.) Hammer nails into the three holes, checking the strap’s position as you go (Photo 15). When you are sure the strap is correctly seated, drill pilot holes and hammer in the rest of the nails.
Trim the straps flush with the edge of the lid in the front and the top of the hinge mortise in the back. Place the lid on the box and use the lid straps as guides to mark the locations of the box straps (K). Install the box straps. Then install the wraparound straps (L).
Final details
Cut out the feet (M). Rabbet two adjacent top edges, so the feet will nest inside the bottom of the trunk. Gently round the remaining edges. Drill shank holes in the box bottom and attach the feet with pan head slotted screws.
I applied a Danish oil finish. If you plan to finish your box with a film finish such as polyurethane, apply it before you attach the straps; otherwise it will be difficult to avoid drips. You won’t have to sand around all those nail heads between coats, either.
Install the escutcheon, the hinges (Horton Brass PB-409), the lid stay (Lee Valley 00T0210), and the chest lifts (Horton Brass H-558L), and your trunk is ready for treasure.
Here are some supplies and tools we find essential in our everyday work around the shop. We may receive a commission from sales referred by our links; however, we have carefully selected these products for their usefulness and quality.


