We may receive a commission when you use our affiliate links. However, this does not impact our recommendations.

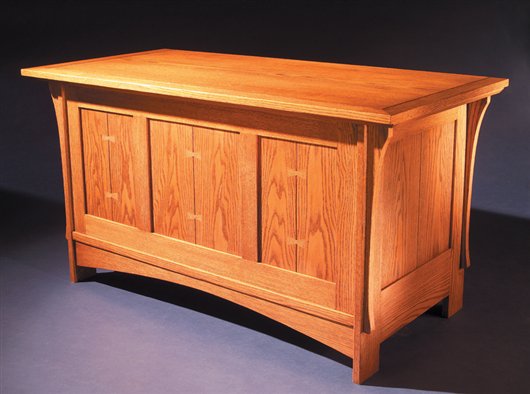
Mission Blanket Chest
If you love
Mission-style
furniture, here’s
the perfect
complement to
your bedroom.
By Tom Caspar
|
Store blankets, bedding and memories inside this huge chest. Three frames and a plywood back make up its basic structure, and all the other parts are added on, one by one, so building it is about as easy as making frame-and panel doors with a router table. One do-it-all router bit cuts virtually every joint and another basic bit adds a design element that saves a ton of work. This story also contains an entire section devoted to showing how to make and install the distinctive butterfly inlay.
|
|

You may also like…
Shaker Blanket Chest
Frame and Panel Hope Chest
Pennsylvania Blanket Chest
|
|
Select the best
figure for the panels,
legs and rails before you
cut up your wood. Cut a
window out of a piece of
cardboard that’s the size
of one of the two boards
that make up a full panel.
Arched figure looks
great in panels, as long as
the arches are centered.
Straight figure works
best for legs and rails.
|
|
Click any image to view a larger version.

|
|
Assemble the
frames without glue.
Double-check the width
of the opening before
cutting your panels to
size. The panels float in
the grooves and are cut
undersize so they can
expand and contract side
to side.
|
|

|
|
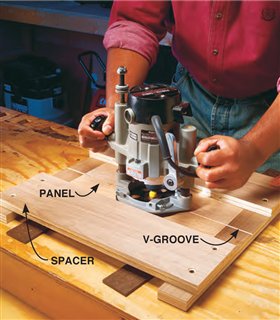
Rout a v-shaped
groove down the
glue joint in the middle
of each of the panels.
Build a simple jig to
ensure the V-groove is
perfectly straight and
centered on the glue
line. Support the panel
with 1/4-in. spacers.
|
|

|
Glue the butterflies
Cut the corners of the recess with a chisel or
knife. They’ll be rounded after routing, but they
must be cut to acute angles so the inlay fits.
Spread a thin layer of glue in the recess, put in
the inlay, scrape off any glue squeeze-out, and
cover the inlay with a small piece of white
paper. Clamp a thick board over the inlay and
let the glue dry. The paper will absorb any
further glue squeeze-out. After the glue dries,
remove stuck pieces of paper by lightly wetting
them. Level the inlay with a block plane or by
scraping and sanding.
|
|

|
|
Stain all the panels
before gluing the case
together. If you stain the
panels after the whole
case is assembled, you
can’t get stain all the
way to the outer edges.
These edges will show
as unsightly bare wood
when the panel shrinks
in dry weather.
|
|

|
|
Glue the case
together. Use flat
2x4s to spread out the
pressure of the clamps.
While you’re tightening
the clamps, make sure
the case is square with
a carpenter’s framing
square. You can also
measure from corner
to corner and adjust the
clamps until the diagonals
are within 1/16 in.
of each other.
|
|

|
|
Add the ledge
frame to the case.
The ledge covers all the
grooves, splines and any
uneven joints along the
top of the case.
|
|

|
|
Attach the hinge to
the top and case. A long
continuous hinge is easy
to align and install. We
liked this particular hinge
because it wraps over
the plywood back, allowing
you to run screws
into the back’s face and
edge for extra strength.
|
|

|
|
Stain the entire
case. Raise the case
off your worktable with
blocks of wood that have
screws driven through
them. Now you can apply
stain all the way around
the bottom of the legs
without smearing.
|
|

|
Product Recommendations
Here are some supplies and tools we find essential in our everyday work around the shop. We may receive a commission from sales referred by our links; however, we have carefully selected these products for their usefulness and quality.


