We may receive a commission when you use our affiliate links. However, this does not impact our recommendations.
Mission Bookstand
Display your scrapbooks, photo albums and woodworking skills.
By Tom Caspar
|
Woodworkers like to see how things work, right out in the open. We love looking at gears, levers and cams, and when it comes to furniture, there’s nothing more fascinating than exposed joints, like dovetails and wedged tenons. This bookstand is held together entirely with wedges: no glue, screws or dowels. When you give the wedges a satisfying tap home, the stand is solid as a rock. These joints are extra strong because the wedges fit into precisely tapered holes. Wedged joints look awfully complicated to make, but take heart. We’ve worked out a surefire method that’s really quite simple. The key tool is a router equipped with a top-bearing flush-cutting straight bit. It works so well with a shop-made jig that you could use it to build virtually any size bookcase or shelving unit with tenons that extend all the way through the sides. |
You may also like…African Mahogany Dictionary Stand |
|
Plane every board 1 in. thick. To prevent snipe (that nasty depression at the end of a board), butt one piece up against another as you feed them into the planer. |
Click any image to view a larger version. |
|
Rout grooves down the entire length of every glue joint for the sides and shelves. A slot cutter with a bearing on top makes a consistently accurate cut. Offset the groove from the center, so you can always be sure which side is the face. |
|
Push a spline into a groove, without glue, then spread glue alongside the spline. The spline aligns the boards amazingly well when it fits very snugly in the groove. If you put glue on the spline or in the groove, you might have trouble assembling the joint. |
|
Clamp the boards together and check for flatness with a straightedge. Be fussy and adjust the heads of the clamps up or down until the boards lay absolutely flat under moderate clamp pressure. |
|
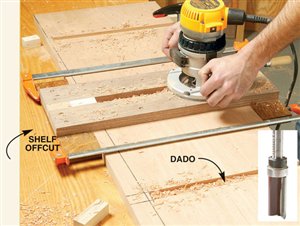
Rout stopped dadoes with a jig and a top-bearing pattern bit (see inset). Scrap pieces of shelf built into the jig make the width of the dado exactly match the thickness of the shelf. |
|
Rout the dado for the slanted top shelf. Remove the guide boards from the end of the jig and screw the jig directly to the side of the bookstand. The screws go in waste areas that will be cut off later. |
|
Screw temporary spacing blocks into the dadoes. Remove two of the blocks. The openings outline the mortises you’ll be cutting through the bookstand sides. |
|
Drill out the bulk of each mortise with a Forstner bit. Support the workpiece on a large board attached to your drill press table. Drill over a clean area of the support board so you don’t get any chip-out. |
|
Rout all around the mortise with a top-bearing pattern bit. The spacing blocks and the edges of the dado guide the bit. You get mortises with perfectly straight sides. |
|
Finish the mortises by chopping the corners square. Guide your chisel with the spacing blocks. Chop only halfway through from this side, then flip the workpiece over and chop from the other side. Remove the spacing blocks. |
|
Mark the ends of each shelf’s tenons directly from the mortises. Also, clearly mark each piece so you can put them back together the same way. |
|
Cut the sides of the tenons. Fasten a tall backer board onto a crosscut sled for support. The backer board has a 1/4-in.-thick ledge attached to its bottom. Line up the tenon marks with the kerf on this piece to make an accurate cut right on your line (see inset). Make four cuts side-by-side. |
|
Rout a straight shoulder on each shelf with a plywood template and pattern bit. You don’t have to rout the area where the four saw cuts are. |
|
Drill out the mortises in the shelves with a Forstner bit. Hold the shelf against a fence. Drill the end holes first, then come back and clean out the middle. |
|
Cut wedges on the tablesaw. Build a simple jig with toggle clamps and a stop to safely hold these small pieces. Bandsaw most of the waste first so there’s no dangerous offcut. Caution: The guard must be removed to use this jig. |
|
Chop the end of each mortise at the same angle as the wedge. This jig uses an actual wedge to guide the chisel. Just as it comes off the saw, the bottom end of the wedge has exactly the same taper as its long side. |
|
Assemble the bookstand and mark each wedge for a specific mortise. Some wedges may go in a bit farther than others. Cut them all so they stick up the same amount. |
|
Rout the front and top of the bookstand’s sides with a straightedge and pattern bit. Cut close to the line first with a jigsaw or bandsaw. Fasten the straightedge to the side by screwing it into the dadoes. |
|
Finishing is easy because you can tackle each piece separately. This way, you won’t have any troublesome inside corners to deal with. |
|
Assemble the bookstand and pound in the wedges with a few hard taps. The power of the wedges to stiffen the case is truly awesome! This story originally appeared in American Woodworker May 2004, issue #107. |
|
Here are some supplies and tools we find essential in our everyday work around the shop. We may receive a commission from sales referred by our links; however, we have carefully selected these products for their usefulness and quality.


