


We may receive a commission when you use our affiliate links. However, this does not impact our recommendations.
 A few key elements push your hand tool skills.
 A few key elements push your hand tool skills.
Project #2106 • Skill Level: Intermediate • Time: 2 Days • Cost: $50
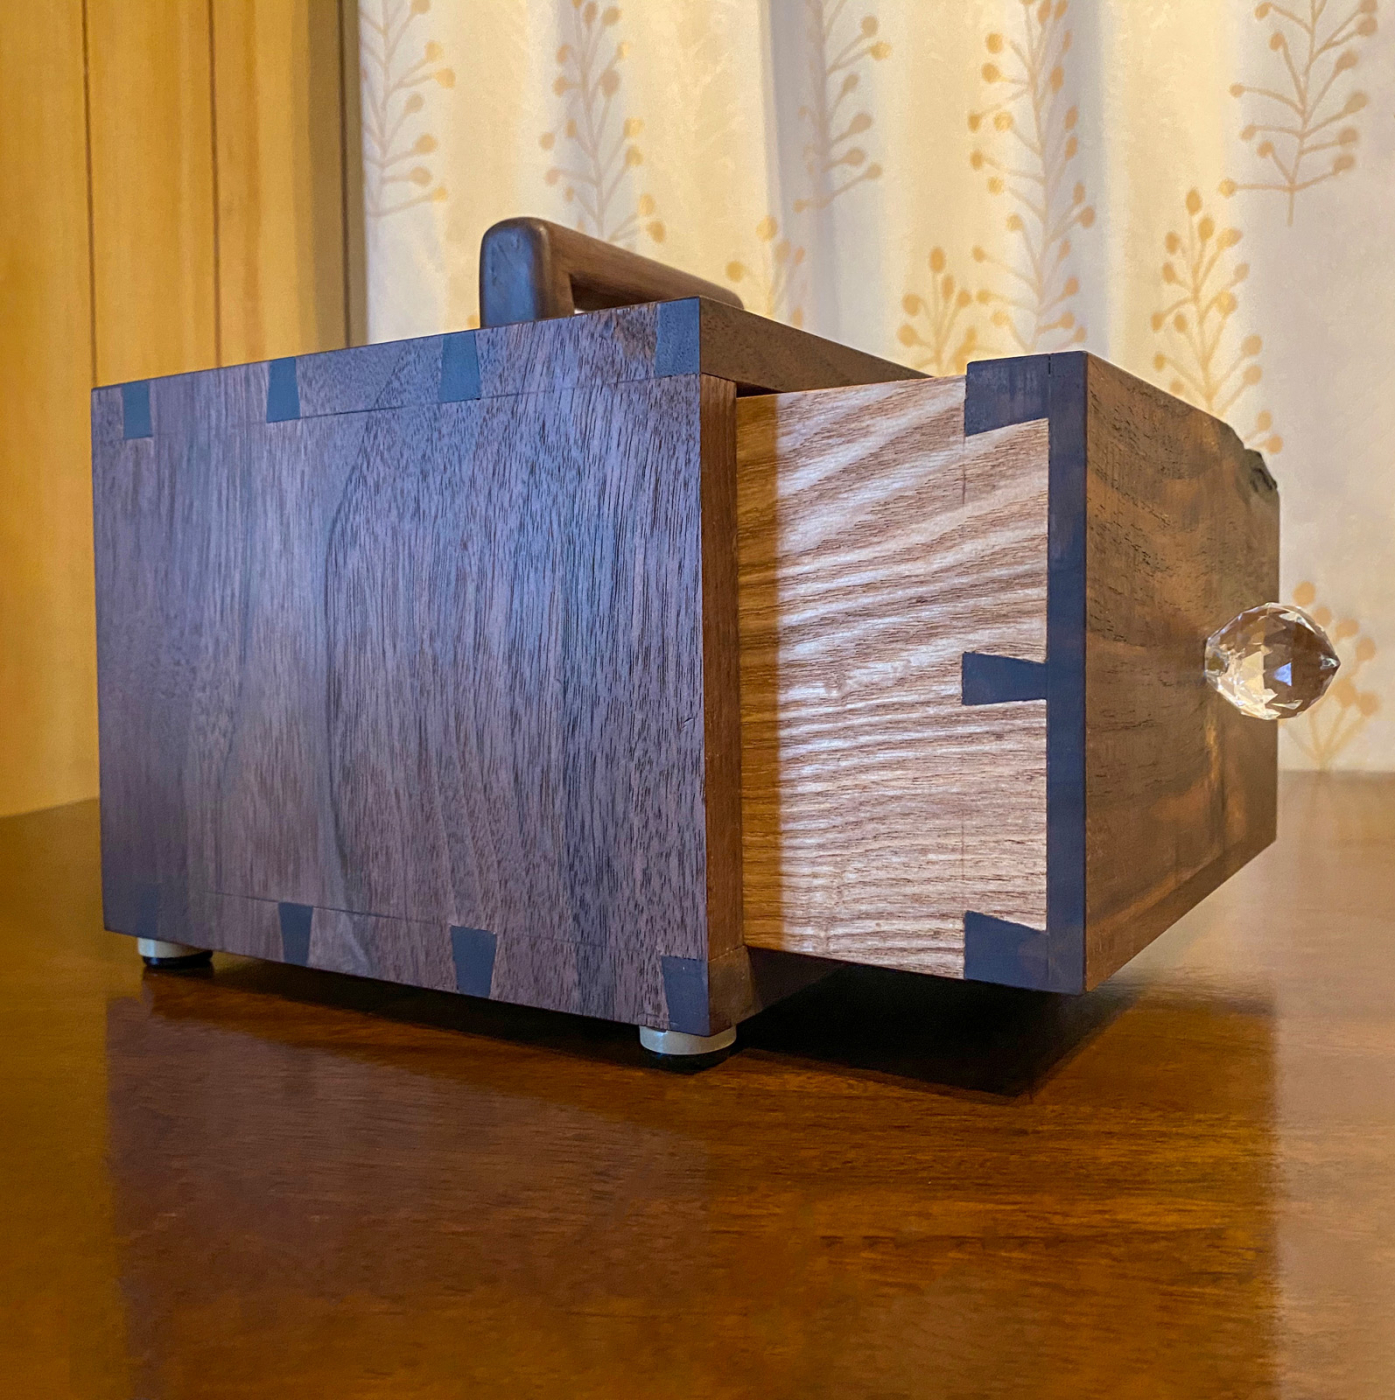
When my wife asked that I build her a box to contain a growing collection of aroma oil containers and associated accouterments for her piqued interest in aroma therapy, I was thrilled. Besides the house smelling great, I had spousal approval to build something—a win-win proposal.
 Design
 Design
The requirements were a single box with enough space to store current aroma oil bottles and any new items acquired. My wife purchased a drawer pull that caught her eye and asked that I incorporate it into the build. The final design was a single drawer carcass with a handle on top.

1 A design session with my life led to the choice circled in green.
This project was a perfect opportunity for dovetail practice. The outer carcass design was well-suited for a first attempt at a mitered dovetail while the inside drawer was perfect to hone my half-blind dovetails. For the carcass, a groove was to be cut in to support a back panel. The bottom panel for the drawer was to be a panel set into a rebate.
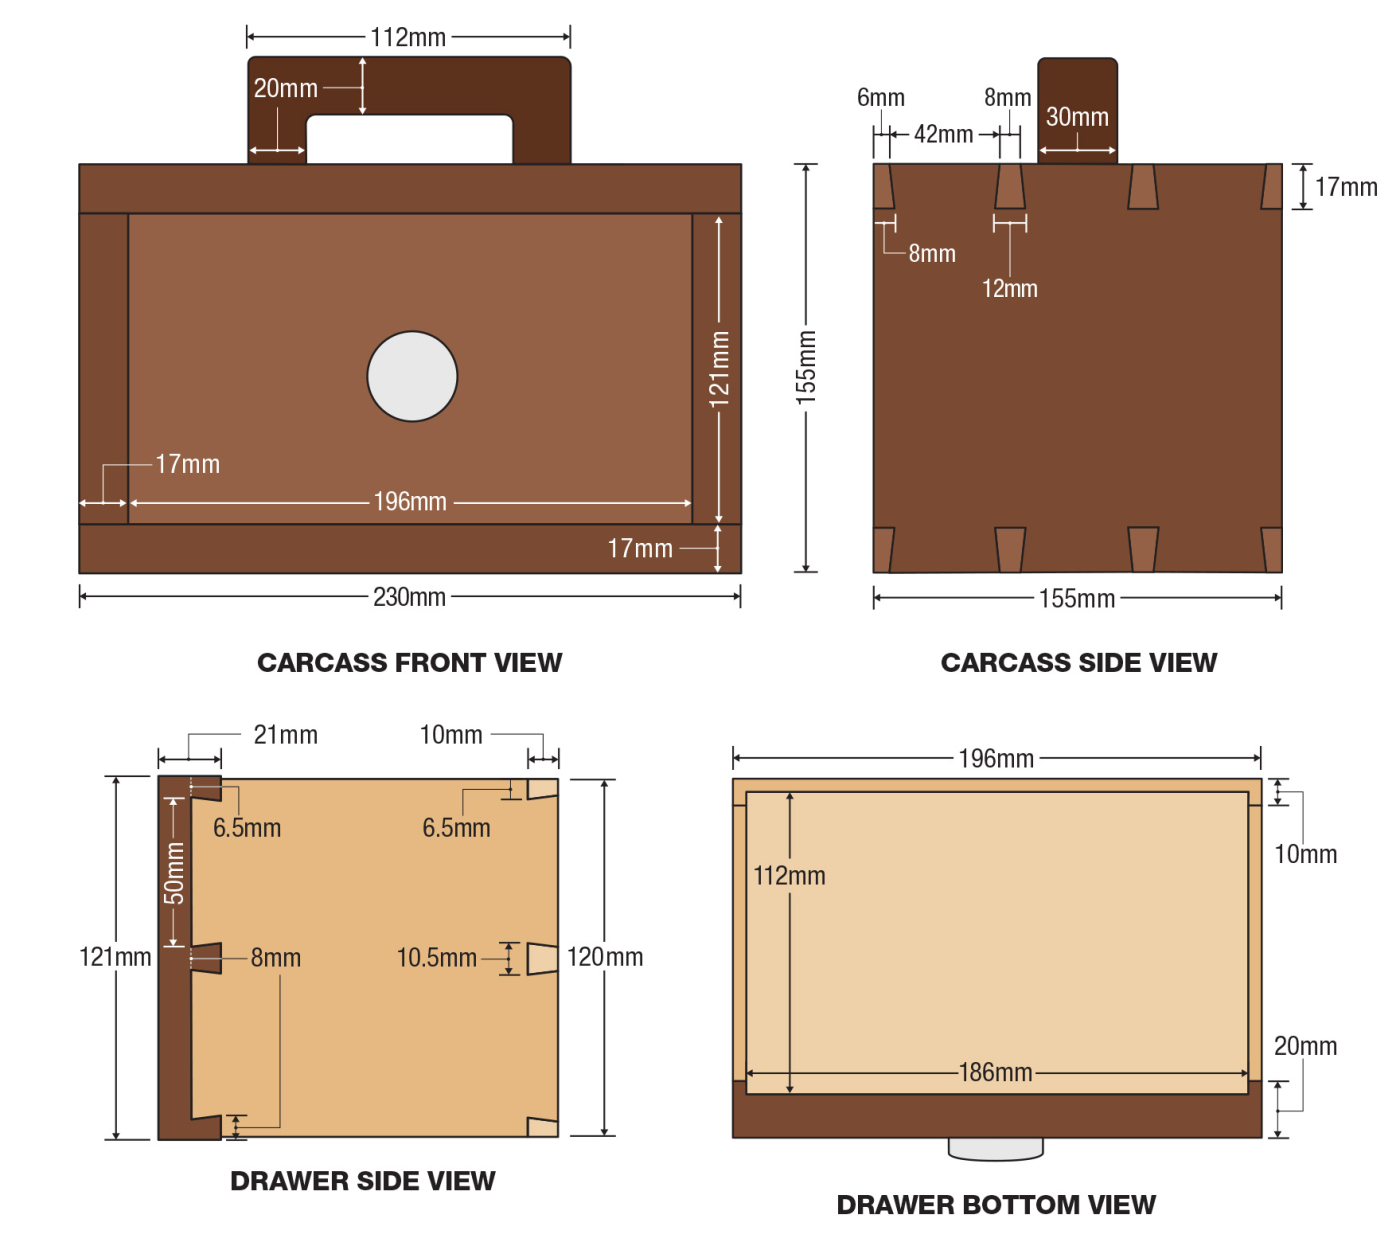
Cutlist and Diagrams

 Lumber Selection
 Lumber Selection
Black walnut is a rarity in Japan. It Is imported from the United States and I was lucky enough to get my hands on some through an auction. This felt like the perfect project to use it. Prior to this project, I purchased several Japanese ash slabs with the intent of milling them up for drawer parts. The ash would provide a nice contrast to the dark tones of the black walnut while being softer which would perform favorably when knocking the dovetails together.

2 Stickered and stacked black walnut, a rarity in Japan.
Cutting a Mitered Dovetail Joint
Stepping up to the bench, a mitered dovetail can seem intimidating. However, if you have experience with a standard through dovetail, you will be fine. With proper planning and a well sorted layout, it becomes a simple matter of finessing away the waste.

3 Blue tape gives a clear indication of where to cut, especially in dark woods like this black walnut.
Outside of the standard tool requirements for through dovetails, you may also need a second marking gauge that will be set to the width of the mitered portion of the dovetails. A 45° chisel guide block cut to precision on a table saw or similar machine will also be useful.
To begin marking out the joint, set a marking gauge to the thickness of the material and mark the baseline all the way around the tail board except for the edge to be mitered. Then mark both faces of the pin board, skipping the edges, just like in through dovetails. It is important to note that for this joinery method, the material for both tail and pin boards must be the same thickness. Different thickness will create a misaligned miter.

4 Two marking gauges come in handy for marking the baseline and the miter.
You can reuse the same gauge setting to set the width of your mitered portion but if the width of your mitered area will differ however, use a second marking gauge. I like to keep all marking gauges set for a single purpose until the entire operation is complete. My mitered edge will be a panel that will be inset 15mm from the edge. My material thickness is around 17mm which means two marking gauges are in order. To mark out the tailboard, using the edge where the miter will be, score a line across the end grain followed by a line on the inside and outside face to the baseline. Then, with a bevel gauge set to 45°, on the edge to be mitered, align the rule against the inside face’s baseline and draw a line with a pencil at 45° towards the corner to the outside face. If the baseline was marked correctly these two points should connect.
Starting from the mitered portion’s offset from the rear edge, the rest of the board should be treated like through dovetails. Use whatever layout method you desire. I use dividers to get tail size, starting 1cm in from the edges when I layout dovetails. I then square the points on the end grain with a face edge, use a dovetail marker at 1:8 ratio, mark my waste, and cut. The outer edge of the gap between the mitered edge and the tail is cut to 90°, following the marking gauge line set easier. I leave about 1mm to be chiseled on this corner to make up for potential sloppy sawing.

5 I use a scrap piece of wood under the miter as a backer, to prevent my saw from cutting into the adjacent tail.

6
At this point, the tail board is complete save for the miter. Between the miter and first tail there is a gap that, if not careful when cutting the miter, the saw may plunge into the tail as it drops. To prevent this, I place a scrap piece that fits in the gap and secure it downwards into my Moxon vise so that the scrap rests against the corner to be mitered. With this method, the saw does not drop and only cuts the scrap piece.
If attempting to cut a perfect 45°, this is a good opportunity to execute a first-class saw cut. Instead of a pencil, use a marking knife to scribe the line from the baseline to the corner. Start with a shallow stroke followed by a few progressively harder strokes. With a sharp chisel, pare away the waste area to begin a wall to use as a guide with your saw. Make the wall as deep as you are comfortable with and then saw away the waste.

7

8 To get an almost perfect miter, use a first class saw cut by paring away some waste before cutting.
On the pin board, using the edge to be mitered as reference, with the same marking gauge settings (for this particular project, the 15mm setting), score a line on the end grain and the inside face only. Using blue tape for contrast, I transferred the tails and removed the waste.
For the miter on the pin board, take great care when cutting the edge wall against the pin. The saw should tilt at 45° so as to not cut into the front face of the pin board. Once the cut is established, rotate the workpiece 90° in the vice and cut the miter just like the tailboard, taking care not to cut into the pin.

9 I check the miter with a combination square.
To finalize the miter, use a 45° block to assist with the paring. It is a simple piece of scrap cut at 45° with a long enough edge to support a chisel for paring downwards. Aligning the guide to the baseline can be tricky. I use my widest plane blade (my No. 7), and lightly set the blade into the marking line. I then butt the guide block into the blade and secure it with clamps or holdfasts. Use a freshly sharpened chisel against the guide block and pare down the miter to fit.

10 Aligning the tail board to the pins is key. I use the flat back of a chisel against both edges as a reference.
With the miter finalized cut the groove in the fashion you see fit but be careful with the mitered edge as it is a very delicate area. It is easy to bruise or completely chip the edge. The outer carcass is ready for glue up.

11 Use holdfasts or clamps to secure the guide in place and begin paring. This is the most satisfying activity of cutting this joinery.
The Drawer
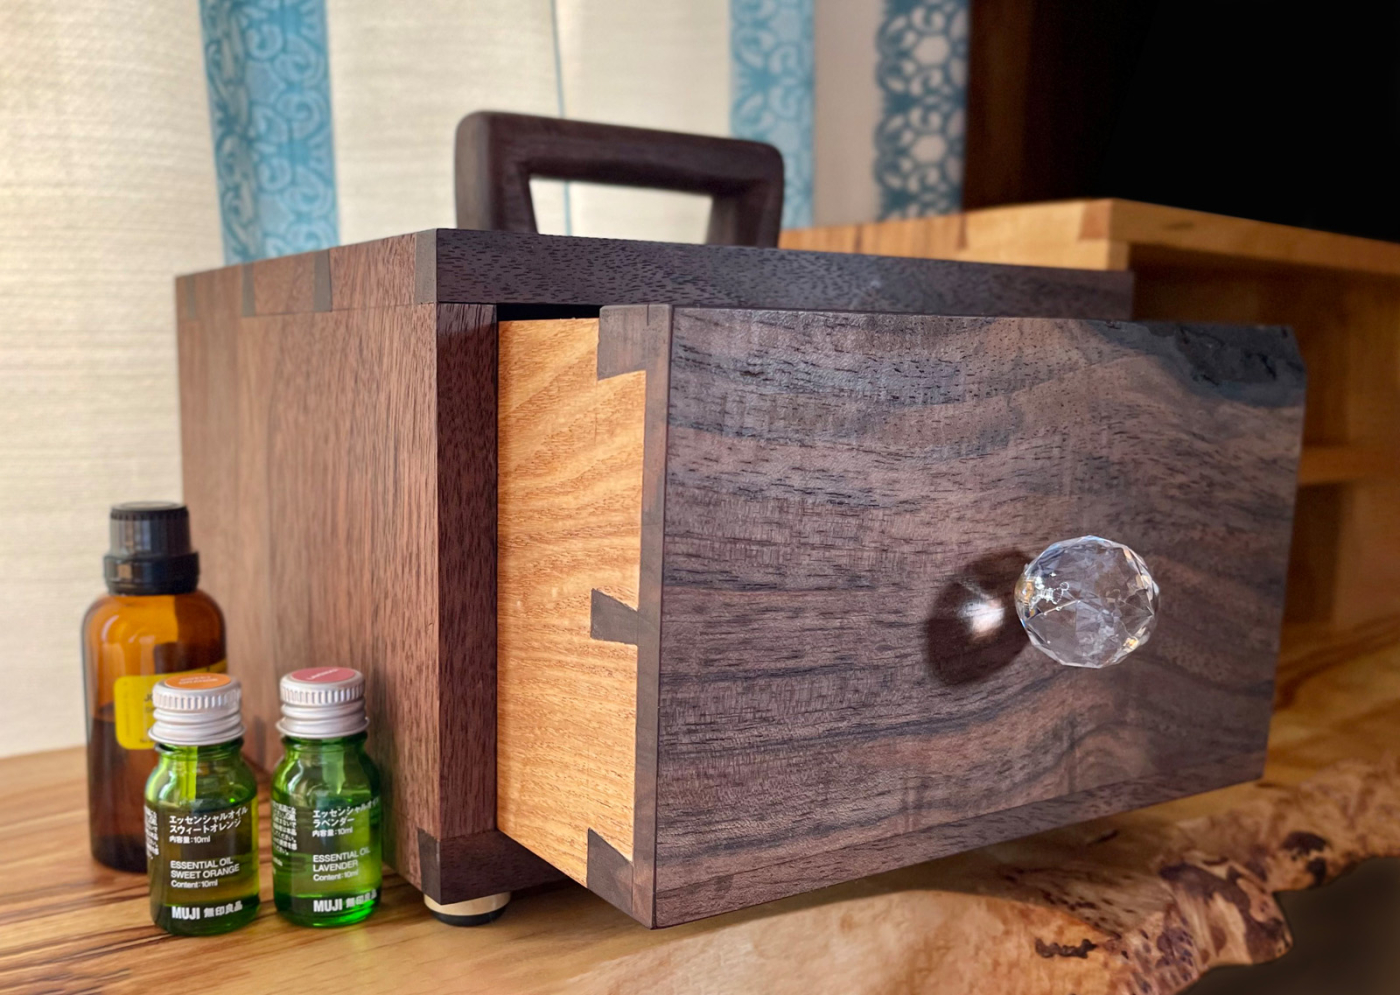
The drawer front is a thicker piece of black walnut perfect for half-blind dovetails. It has a bark inclusion in one of the corners which provides visual appeal. Once the outer carcass had finished drying, I sized it to fit perfectly into the carcass, leaving it a little snug to allow for play room later. I milled up a portion of my ash slab and cut the tails into the ash pieces. The contrasting ash with the black walnut made marking the tails on the pin boards easy to follow.
I applied the same technique for the outer carcass back panel for the drawer bottom. This time however, the raised portion sits inside rather than outward. To simplify the drawer, I used a simple rebate to house the bottom, making sure to not cut all the way through to accidentally expose the rebate in the pins.

12 Use an arrow to note grain direction for half-blind dovetails. Orient grain to run towards the back of the drawer which allow for easier planing of the pin board end grain when sizing the final fit.
When marking baselines for dovetails, it’s common to aim for the pins to remain proud. However, for this drawer, I made the tail boards proud of the pins. With the drawer front sized to fit the carcass, it was easier to plane the whole tail board rather than risk accidentally resizing the drawer front. It involved some forethought into the layout but after cutting the final through dovetails on the back and finalizing the glue up, sizing was much easier and the drawer fit like a glove.
Final Details and Finish
Seeing the box and feeling the weight of it, my wife requested I affix a handle to the top to provide better support for carrying. I had an off cut of black walnut left over that fit the bill. Opportunities to practice with my various shaping tools are rare so I took my time when designing, roughing out, and shaping the piece. The box was designed with 1:8 ratio dovetails so I incorporated that ratio into the inside taper of the handle. Slowly and carefully I used spokeshaves, rasps, files, and sandpaper to round over the edges, added little dimples, in the corner, and created something that my wife could hold easily while also being aesthetically pleasing. With a little finesse, I was able to glue and screw the handle into place. This process would have gone more smoothly had it been completed before glue-up but I managed to make it work.

13 A handle shaped for the top of the box.
I chose a simple boiled linseed oil for finish. Yellowing was not a concern since black walnut is dark and ash would rarely be visible. To apply the boiled linseed oil, I did an initial heavy application after sanding to 600 grit. After about 15 minutes, I wiped away excess oil and let it sit for a full 24 hours. I repeated this step 3 times over four days and I was left with a very smooth, beautiful finish that still allows for the wood texture to be felt.
Here are some supplies and tools we find essential in our everyday work around the shop. We may receive a commission from sales referred by our links; however, we have carefully selected these products for their usefulness and quality.


