We may receive a commission when you use our affiliate links. However, this does not impact our recommendations.
Quickly Print to Scale in SketchUp
 Trimble released its new version of SketchUp and to no surprise they didn’t fix the problems with printing to scale which has plagued SketchUp users from day 1. So one again I will post a mini-tutorial on how to cope with printing to scale in SketchUp.
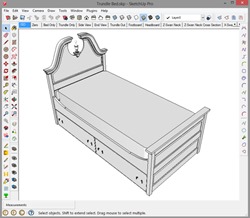
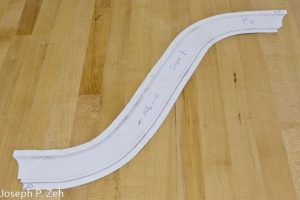 I use printing to scale frequently to create shop templates. One such example is the swan neck that frames the top of a trundle bed headboard shown left. This swan neck is much larger than one 8 ½” x 11” sheet of paper, but my printer only prints 8 ½” x 11 paper. What I did was print at a 1:1 scale in SketchUp, whichSwan Neck Template Printed to Scale of 1:1 required about nine sheets of paper. Most of them were blank, so I returned the blank sheets to the printer tray. The three sheets that contained printed information I taped together connecting the lines of the swan neck precisely. Then I backed the paper with self-adhesive clear plastic, which can be purchased at any office supply store, and cut the template out with scissors. The clear plastic provided stiffening for the template and edges that will not collapse as you trace the template unto your stock. See picture at right.
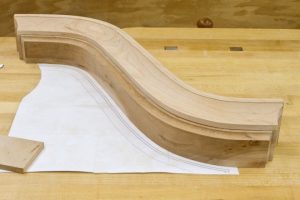 The picture at left shows the swan neck milled using the template above right. Also shown below is a template used to shape the headboard itself. Owing to symmetry I didn’t need both left and right swan neck templates, and a full headboard template; I only needed one side for the templates because they can be flipped to produce the mirror image.
I also use SketchUp to create shop drawings. Because I print off fully dimensioned drawings for all milled pieces, there is usually no need to print my drawings to a predetermined scale, I just read the dimension off the drawing. However, there are times when a scaled drawing is necessary. For example, when printing standard views of an architectural drawing a standard scale such as ¼” = 1’- 0” is needed. So let’s get into the “how to” of printing to scale.
Print To Any Scale in SketchUp
Printing to scale in SketchUp is not difficult; you can print at a scale of 1:1 or any other scale you desire by following these six steps.
1. Select Parallel Projection on the Camera menu. (Camera/Parallel Projection)
2. Select one of the Standard Views (Camera/Standard Views/…..)
3. Adjust the window and model size to minimize the amount of white space around the model. This is to compensate for what I consider a software bug, and is the toughest and most critical part of the process.
4. Depending on the aspect ratio of your window in step 3, you may need to choose Landscape instead of Portrait in the File/Print Setup dialog box.
5. Set your scale in the Print Preview dialog box (File/Print Preview) and uncheck both “Fit to page” and “Use model extents” .
6. Choose print.
Steps One and Two are very important. SketchUp does not permit printing to scale using either of the other two Perspective views because it is impossible for perspective views to yield a scaled drawing.
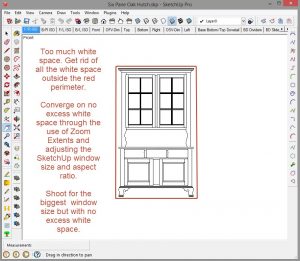
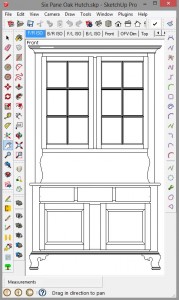 Step three is required because there is a printing behavior that I consider a software bug when it comes to printing to scale. If you are going to print to any scale, including 1:1, first resize your drawing window so there is a minimum amount of unused drawing area SketchUp Window with Correct Aspect Ratio and White Spaceon all sides of your drawing. Failing to do this will result in multiple pages being printed when you need only one, or far too many pages when more than one is needed. The trick here is to estimate and fix in your head, the aspect ratio of the model you want to print. Next shape the window area to the same aspect ratio. Then use a zoom tool to center and enlarge the model to use all the window area available. You may have to iterate these last three steps to get the optimum setting. Try to make your window as large as possible while leaving almost no unused white space on either side, top or bottom of the window. The image centered above shows a case where there is too much white space on all four sides.
The aspect ratio of the window has been adjusted in the image at right to get a near optimum fit. Notice how little white space exists around the periphery of the model. This model is correctly “cropped”.
When resizing the window you will find that your toolbars get scrambled. On SketchUp 7 & 8 you should use menu View/toolbars/Save Toolbar Positions before executing the window resizing. After printing you can restore the toolbar positions with View/Toolbar/Restore Toolbar Positions. On SketchUp Make and SketchUp Pro 2013 you simply restore the window size.
We have completed steps 1 – 3 above and the SketchUp window looks like Portrait will be the best option for printing; in the Print Setup dialog box I chose Portrait. Now we have to decide what we want to do next. If this printout is to be used as a template then we need to use a scale ratio of 1:1. However, this model printout is not likely to be used as a template, but likely an elevation view of the hutch; which means it will be printed to scale on one page. The question is what scale?
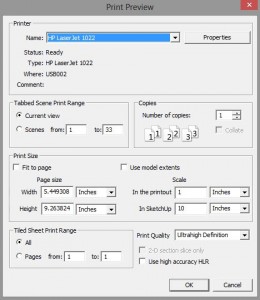 The scale can be determined analytically or empirically. Analytically we start with the size of page we are going to use and then subtract the unprintable margin dimension from each edge. For example, if we are printing on 8 ½” x 11” paper with an unprintable margin of ¼” per edge, then the printable area is 8” x 10 ½”. This hutch has overall dimensions of 52” wide by 88” tall. Printing the page in portrait view is the most efficient selection for this case. This means the 88” dimension must fit in the 10 ½” height of the page. Similarly, 52” must fit in the 8” width. Use these two sets of numbers to calculate two scale factors; 8.3:1 and 6.5:1 respectively. We must use the same scale factor for both dimensions and so we need to use the larger one. However, 8.3:1 is a difficult scale to use so we can go with 9:1 or 10:1. Either will work in this case, but 10:1 is probably more useable in terms of making measurements on the printout and calculating the actual dimension. The image at left above shows the setup for this case.
In the Print Preview window above notice that “Fit to page” and “Use model extents” are both unchecked. There are four Scale inputs which the user needs to fill in. In the “In the printout” input box I entered 1 and in its dropdown box chose Inches. In the “In SketchUp” input box I entered 10 and in its drop down box chose Inches. These inputs define a scale of 1” = 10” or architecturally 1” = 0’-10”.
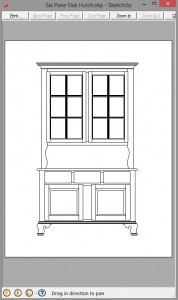 Here is an important little trick to print to scale in SketchUp; after entering the four inputs in the scale area, place your cursor in the Page size “Width” and then “Height” input boxes. Don’t attempt to input anything or change what is there, simply place your cursor in each input box. This will cause SketchUp to calculate the page dimensions required to print your model. When this happens the numbers in the Scale input boxes may change slightly; using this example on SketchUp 8 10 was changed to 10.000001. It might just as well have been changed to 9.999999. This has to do with the precision the software is using to make calculations. Don’t worry about this. Also, placing your cursor in the Width and Height boxes may change the value in “In the printout” or “In SketchUp” box; simply change it back to the correct setting and repeat this step. The important part is that when you have completed this step look at the “Tiled Sheet Print Range”. If the radio button chosen is All and the “Pages from” input boxes says 1 “to:” 1, then you are assured that you can print your model on one page with a scale of 1” = 10”. Hit OK and you should see a Print Preview shown at right. Choose Print to print the model to scale.
You can empirically determine the scale required to fit the model on one page. After completing step 3 above open the Print Preview dialog box (File/Print Preview). Place 1 in the Scale “In the printout” input and Inches in its dropdown box. These parameters are a guess based on my knowledge of the model. If I were printing an elevation view of a house I might start with ¼ in the input box. Next choose Inches for the “In SketchUp” dropdown box (if the model were a house I would probably choose Feet). Now enter pure guess in the “In SketchUp” input box. Place your cursor in both Page size input boxes to instruct SketchUp to calculate the page size. Then look at the results in the “Tiled Sheet Print Range” area. If it indicates more than one page increase your guess for the “In SketchUp” input and enter your cursor in both Page size input boxes again and check your results. If your first guess resulted in only one page try decreasing it until the number of pages is greater than one. Use this iterative process to choose a scale you are happy with.
Printing to a scale of 1:1 is the same for steps 1 – 3. After that you enter 1 and the same units for both Scale inputs. Then you print all the pages required. Put the blank sheets back in the printer tray and assemble the remaining pages as discussed earlier.
Good luck and I hope this tutorial helps you print to scale in SketchUp.
Here are some supplies and tools we find essential in our everyday work around the shop. We may receive a commission from sales referred by our links; however, we have carefully selected these products for their usefulness and quality.


