


We may receive a commission when you use our affiliate links. However, this does not impact our recommendations.
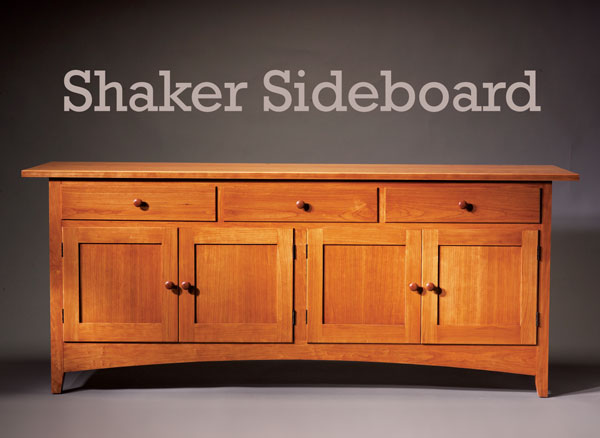
Shaker Sideboard
Traditional looks, but an updated construction
By Randy Johnson
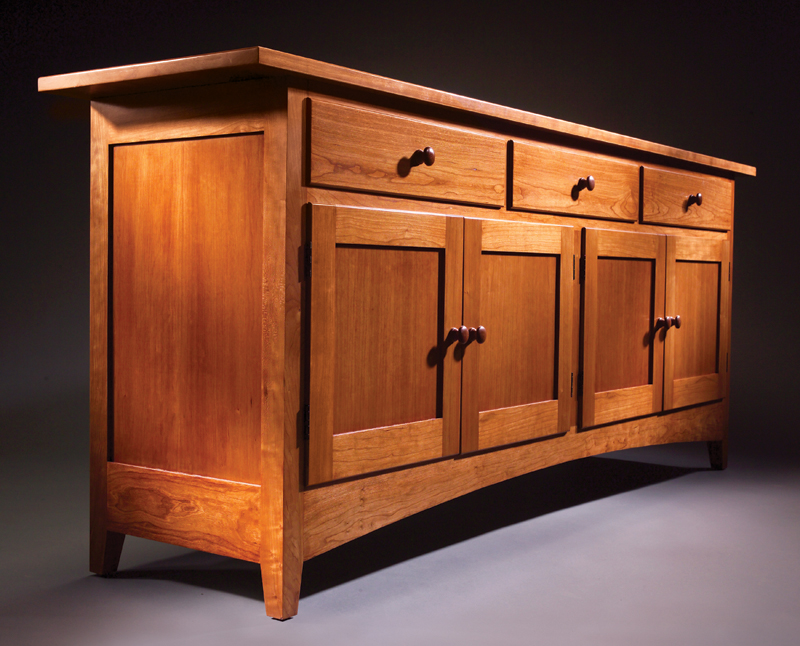
The essence of Shaker design is simplicity. Although I didn’t use traditional construction techniques in this project, I did keep it simple. Behind this sideboard’s elegant front and sides is a very easy-to-build birch-plywood box joined with biscuits. It’s strong and durable. The front and sides are assemblies that are added onto the box. The result is a beautiful, traditional-looking piece that doesn’t require complicated joinery.
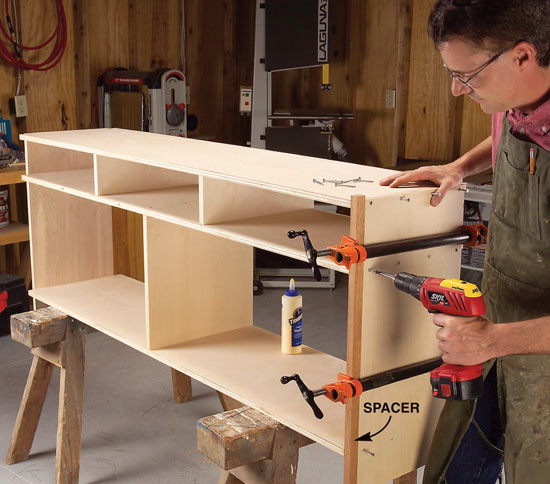
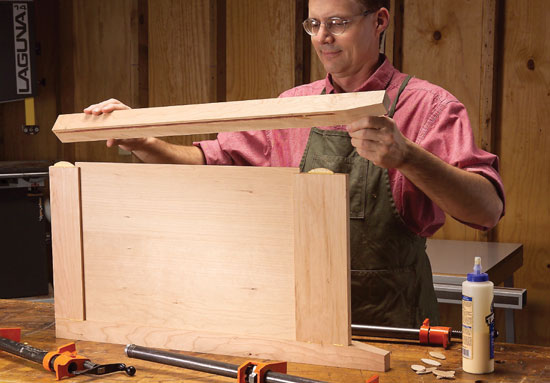
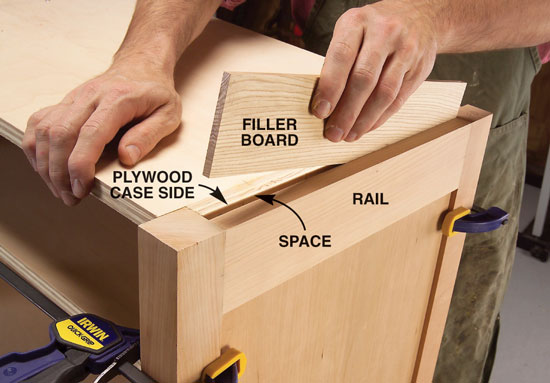
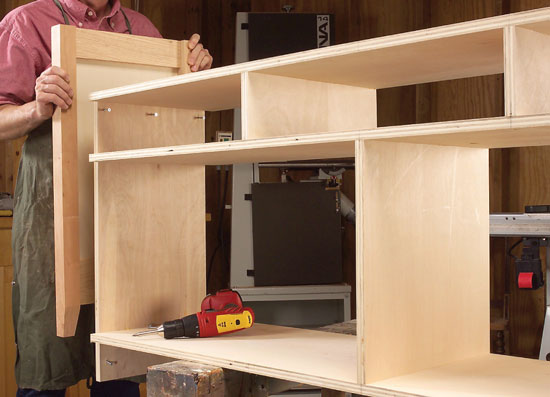
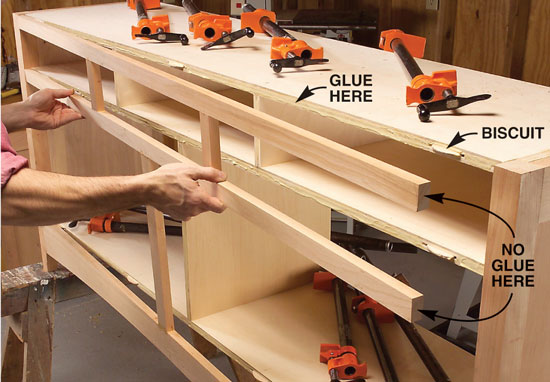
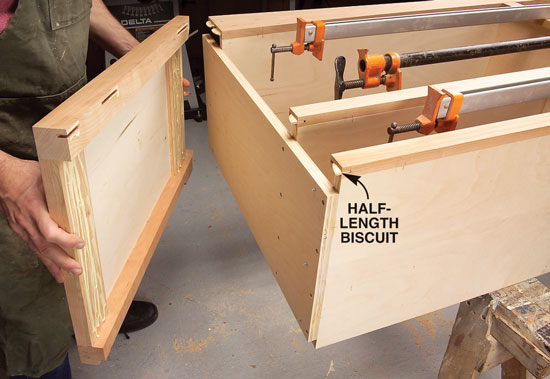
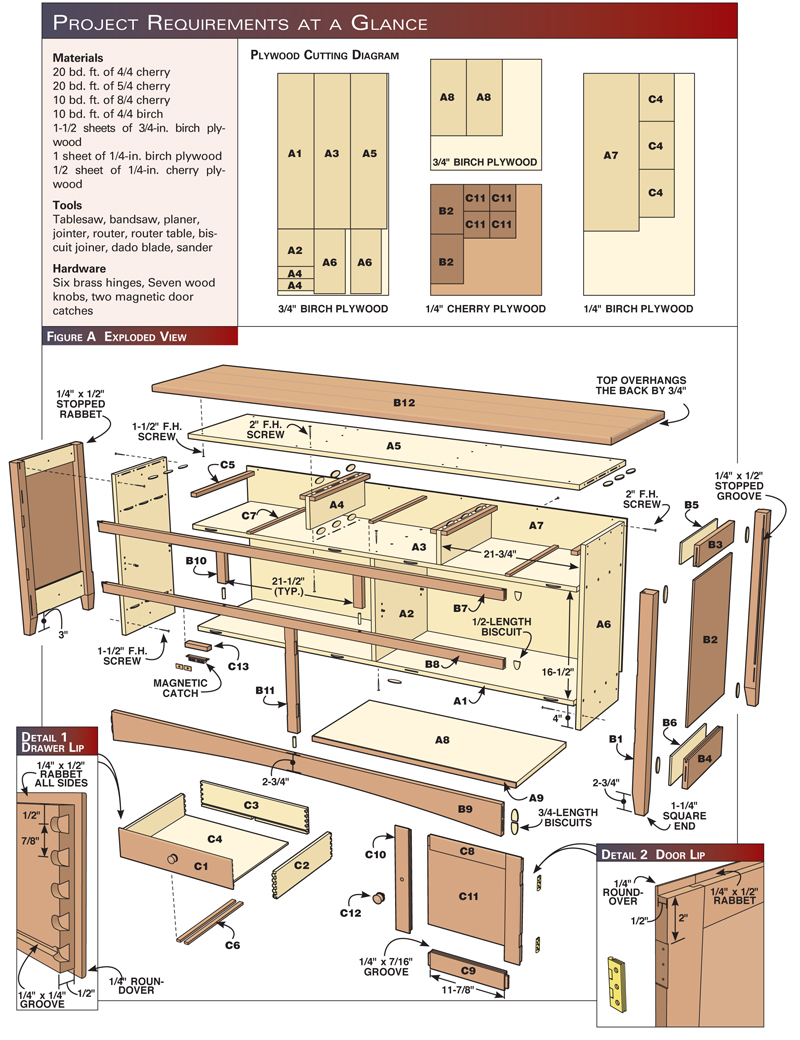
Build the plywood case1. Cut the plywood case parts (A1 through A7, Fig A, Plywood Cutting Diagram; Cutting List). 2. Assemble the bottom, lower partition, middle divider, drawer partitions and subtop with glue, screws and biscuits. 3. Attach the sides (A6) to the plywood case (A1 through A5). Use a 1-in. spacer board at the front corners to create a notch for the legs (B1) to fit into (Photo 1). A precise 1-in. setback ensures that the face frame, which later attaches to the plywood case, lines up evenly with the front face of the legs. Add the leg panels4. Make the legs (B1). Cut the tapered foot (Fig. A) on your bandsaw and use a belt sander to smooth it. Cut a stopped groove for the 1/4-in. center panel (B2) using a slot cutter on your router table (see Sources, at bottom). 5. Cut the stopped rabbet in the back of the rear legs for the back panel (A7) (Fig. A). 6. Make the top and bottom panel rails (B3, B4) and rout grooves in these parts for the center panel. 7. Assemble the leg panels (Photo 2). Use biscuits and glue to join the rails to the legs. When the glue is dry, clamp the leg panels to the plywood case. 8. Cut filler boards (B5, B6) and test their fit (Photo 3). You’ll need to adjust the thickness of these fillers if the plywood you used for the plywood case sides (A6) is not exactly 3/4 in. thick (3/4-in. plywood commonly runs undersize). 9. Unclamp the leg panels and glue the filler boards to the inside surface of the rails. When the glue is dry, attach the leg panels to the plywood case with screws only (Photo 4). Note: Do not use glue at this time. Notice that the screws run through the plywood sides in the drawer opening and below the case’s bottom. These screws are hidden when the sideboard is complete. Make the face frame10. Cut out the face-frame parts (B7 through B11). Test-fit the face-frame rails between the front legs on the cabinet to make sure they are the correct length. 11. Assemble the face frame with dowels (Photo 5). 12. Attach the face frame to the plywood case (Photo 6). Use biscuits to align the face frame to the plywood case. Note: At this time, do not put glue on the end of the rails where they meet the legs. 13. After the face frame is attached to the case and the glue has dried, unscrew and remove the leg panels. 14. Cut biscuit slots in the ends of the rails. The middle and top rails are too narrow for a full biscuit. Position your biscuit joiner on the ends of these rails so the slot breaks out at the top of the rail, but not on the bottom. This will produce a slot for a half-length biscuit. The bottom rail is too narrow for two full biscuits. Position the biscuit slots in the ends of this rail close together so they don’t break out at either the top or bottom. Cut the biscuits for these slots to about three-quarters of their length. Cut corresponding biscuit slots in the front legs. 15. Apply glue to the filler boards’ inside surfaces, the ends of the face-frame rails and the biscuit slots on the legs. Reattach the leg panels to the plywood case (Photo 7). Complete the case16. Glue up the top (B12) and attach it to the plywood case with screws. The holes in the plywood subtop (A5) should be drilled oversize to allow seasonal movement of the top because it’s solid wood. 17. Attach the back panel (A7). 18. Cut the shelves (A8) and glue on their edging (A9). 19. Drill for shelf pins (see Sources, below). Add the drawers20. Make drawer boxes with lipped fronts (Fig. A, Detail 1). I used a half-blind dovetail jig with a 1/2-in.-dia. 14-degree dovetail bit. My jig produces dovetails on 7/8-in. centers, so I ended up with good-looking half pins on both the top and bottom of the drawer sides. 21. Groove the drawer sides, back and front for the drawer bottoms (C1 through C4). Round the front edges using a 1/4-in. round-over bit in your router table. Then assemble the drawers. 22. Attach kicker guides (C5) to the inside of the drawer openings. Adjust the thickness of these guides so there is 1/8-in. clearance between them and the top of the drawer sides. 23. Cut a notch in the bottom edge of the drawer back for the center guide (C7). Attach the bottom guides (C6) to the drawer boxes (Photo 8). Use a spacer between the guides to assist with positioning, but slide the spacer out before the glue sets to prevent it from sticking to any glue that squeezes out. 24. Attach the center guide to the inside of the drawer opening with screws at the front and back. Test the fit of the drawer box. There should be about 1/8-in. clearance along the sides of the drawers. Build the doors25. Cut out the parts for the doors (C8 through C11). Use a slot-and-tenon cutter to machine the joints (see Sources). Assemble the doors. 26. Round the outer front edge of the doors to match the drawer fronts’ roundovers. 27. Rabbet the top and bottom back edges of the doors (Fig. A, Detail 2). 28. Rout and chisel mortises for the butt hinges in the doors and front legs (see Sources) and hang the doors. (Self-closing European-style hinges can be substituted for the butt hinges; see Sources.) 29. Drill the doors and drawers for the wood pulls (C12) and install them (see Sources). 30. Glue the door catches’ cleats (C13) to the back of the center rail and attach the magnetic catches. 31. Remove the doors, drawers, cabinet back, and hardware and finish-sand all the parts. Apply the finishI used the following products and procedure to achieve the rich, even, cherry tone that you see on the finished sideboard. It looks close to unstained cherry after it ages but somewhat redder. If you prefer the browner tone of naturally aged cherry, skip Steps 33 through 36. 32. Brush on a coat of SealCoat dewaxed shellac (see Sources, at bottom) and let it dry overnight. 33. Sand lightly with 220-grit paper. 34. Brush on a second coat of SealCoat and let it dry overnight. 35. Sand lightly with 220-grit paper. 36. Apply a coat of General Finishes Candlelite gel stain (see Sources). Let it dry overnight. 37. Apply a second coat of gel stain to sapwood areas or other light boards and let it dry overnight. 38. Apply a clear topcoat. I applied Deft semi-gloss with a spray gun, but the aerosol cans also work well (see Sources). A brushed or sprayed-on varnish would also be good choice. Sources(Note: Source information may have changed since the original publication date.) Freud Inc, freudtools.com, 800-334-4107, Tongue-and-Groove Bit, Woodcraft, woodcraft.com, 800-225-1153, SealCoat, 1 qt., #823195, $9; VanDyke’s Restorer’s, vandykes.com, 800-558-1234, 1-1/2″ x 2″ Butt Hinges, Antique Brass, #209533, $2.49 per pair. This story originally appeared in American Woodworker March 2007, issue #127.
|
Click any image to view a larger version
1. Begin building the sideboard by constructing a simple plywood case using glue, screws and biscuits. When you attach the sides, use a spacer to ensure a precise setback from the case’s front. The legs will fit into the notch that this setback creates.
2. Glue the leg panels. The center piece fits into a groove in the top and bottom rails and legs, and the rails attach to the legs with biscuits.
3. Clamp the leg panel to the plywood case. Test-fit the thickness of filler boards in the spaces between the rails and the plywood case side. When the fillers are planed to the correct thickness, remove the leg panel and glue the fillers to its top and bottom rails.
4. Attach the leg panels to the sides of the plywood case. Secure the leg panels with screws for now; you’ll need to remove these parts later.
5. Drill dowel holes in the face-frame parts. Only a single dowel is needed at each joint, but you must make sure the joints do not twist during final gluing and clamping.
6. Glue and clamp the assembled face frame to the front of the plywood case. Biscuits on the case’s front help with alignment. Don’t put glue on the ends of the rails at this time; you’ll make biscuit joints and glue them in the next step.
7. Permanently attach the leg panels to the plywood case using both screws and glue. The face-frame rails are joined to the front legs with biscuits. Use half-length biscuits in the middle and top rails and two three-quarter length biscuits in the bottom rail.
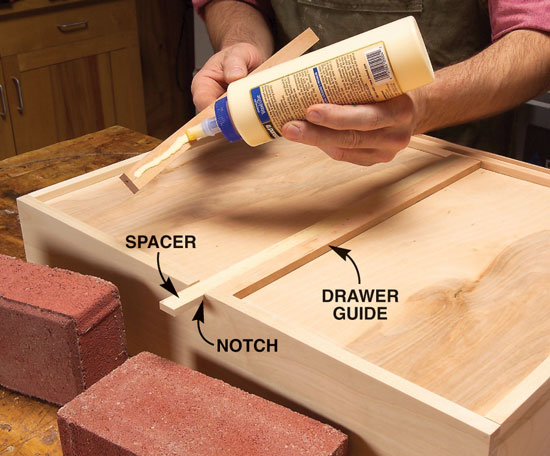
8. Glue guides to the bottom of the drawers. A spacer set in a notch in the drawer back and centered at the front of the drawer keeps the two guides correctly positioned. Use a couple of bricks to hold the guides in place while the glue dries.
9. Install the hinges and doors. The top and bottom of the doors have a lip, but the sides do not. This allows you to use standard butt hinges. The hinges are mortised into both the door and the case.
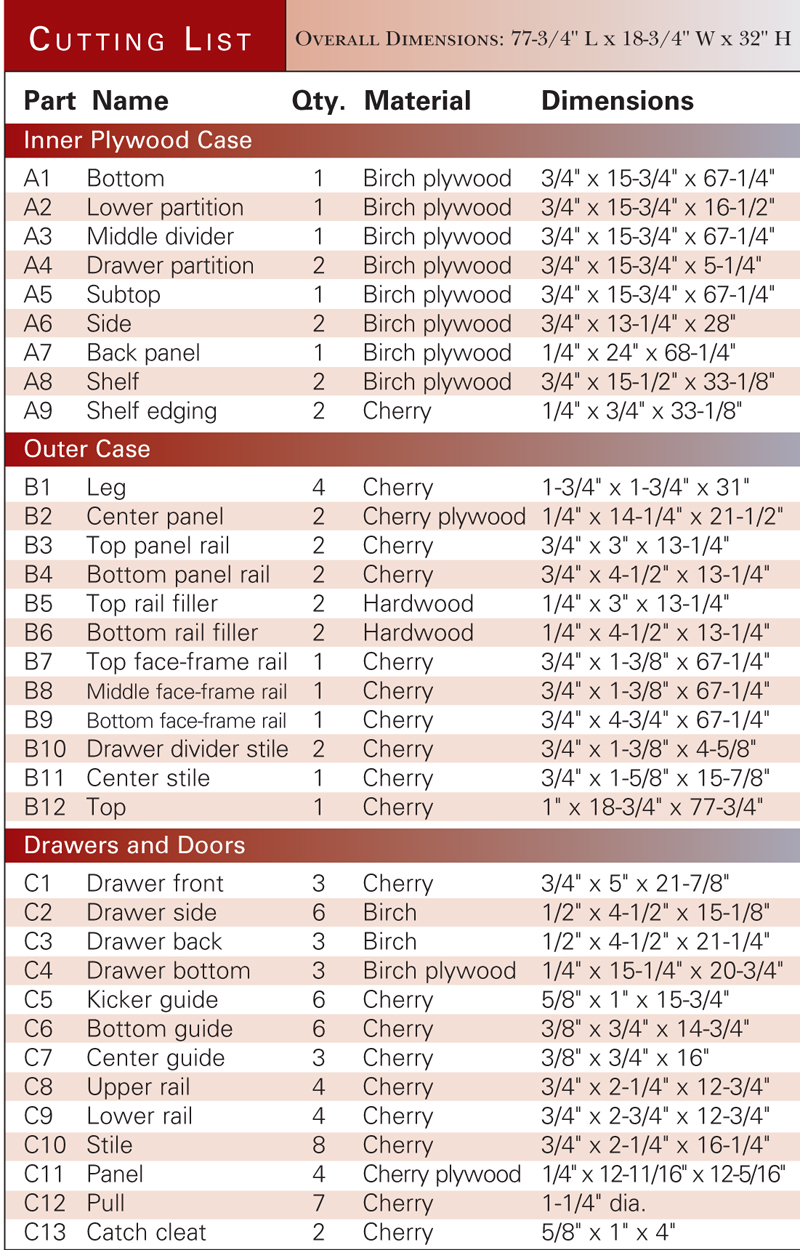
Cutting List
Fig. A: Exploded View
|


Here are some supplies and tools we find essential in our everyday work around the shop. We may receive a commission from sales referred by our links; however, we have carefully selected these products for their usefulness and quality.


