


We may receive a commission when you use our affiliate links. However, this does not impact our recommendations.
 Dust-Free Display and No Hinges to Mount!
 Dust-Free Display and No Hinges to Mount!
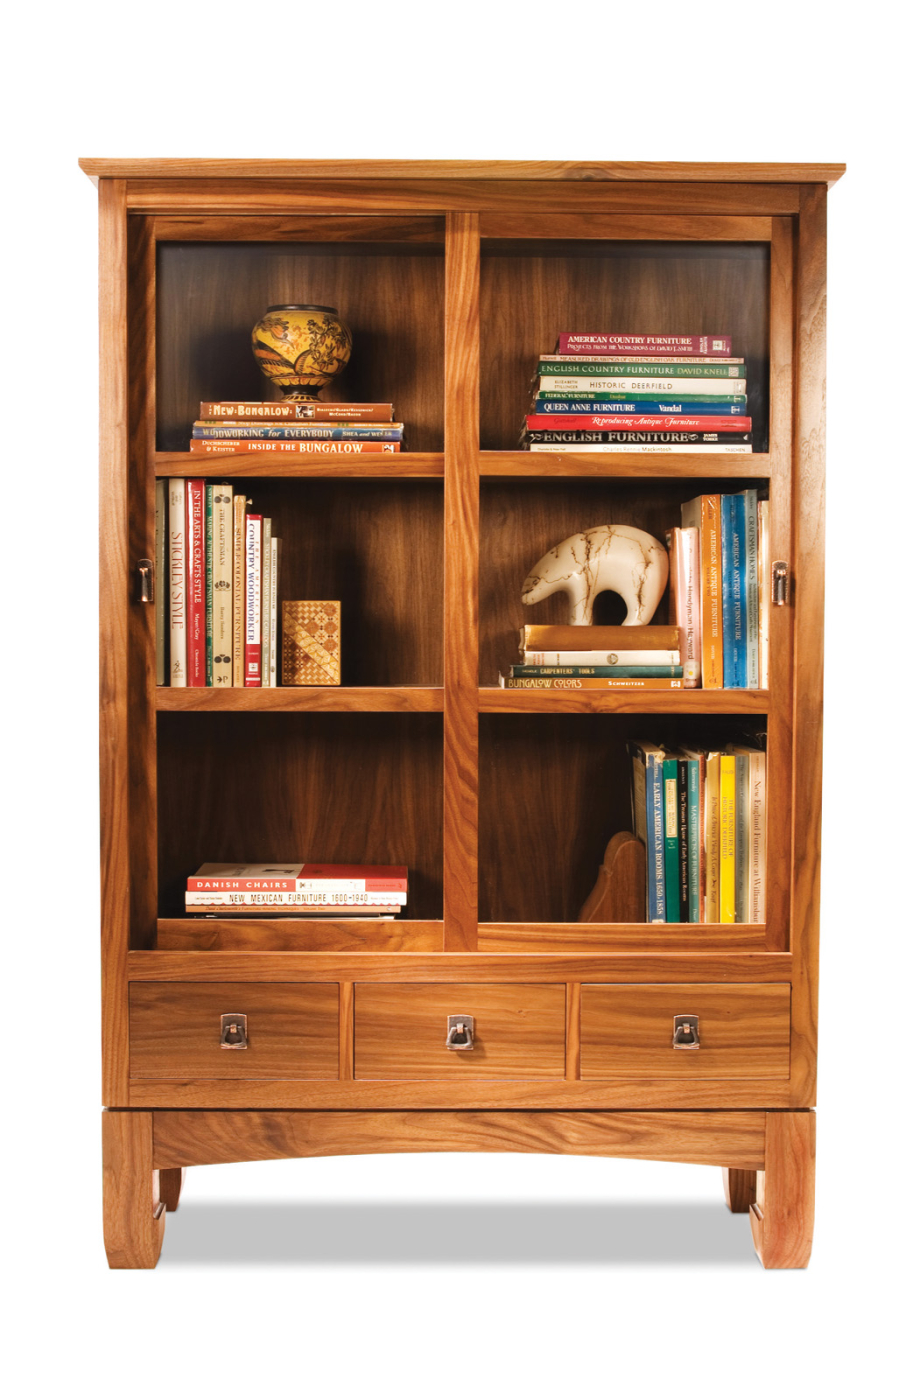
Glass doors make a bookcase, but doors that swing on hinges are a pain to install. Ditto for doors that lift open and slide back—on a Barrister’s bookcase, for example. Regular sliding doors are much easier to install. In addition, they’re ideal for a bookcase designed to fit in a space where swinging doors might get in the way.
This bookcase features super-smooth sliding door hardware that installs in minutes. The shelves are generously deep and widely spaced. Following the lead of Arts and Crafts-era builders, my design incorporates elements inspired by traditional Asian furniture.
Building this project requires two sheets of walnut plywood (one 3/4-in. thick and one 1/4-in. thick) and about 40 bd. ft. of 5/4 walnut. My total cost, including glass and hardware (see Sources) was about $590.


 Build the Cabinet
1. Start by cutting the plywood panels and shelves to final size (Fig. A, Parts A1-A4 and Cutting List).

1. Saw grooves for the sliding door tracks in the top and middle cabinet panels. cut the first groove in each panel, then reposition the fence and cut the second groove.
2. Cut grooves for the sliding door tracks in the top and middle panels (Photo 1 and Fig. G).

2. Rip both cabinet sides from a single wide panel in which all the dadoes have already been routed. This method guarantees that the dadoes will align.
3. Instead of cutting both cabinet sides (A5) to final size, cut one blank twice as wide as the sides, plus 1/8-in. Rip this blank in half after you’ve routed the dadoes, to create the sides (Photo 2). This method saves time and assures perfectly aligned dadoes. Plywood thickness is often undersize, so you may need a special bit to rout the dadoes (Fig. C and Sources, at bottom).
4. Rout dadoes for the drawer dividers (A6) in the middle and bottom panels (Fig. B).
5. Rabbet the cabinet sides and the top and bottom panels for the 1/4-in. plywood back.
6. Glue the cabinet sides and panels together (Photo 3). The top and bottom panels run full the full depth of the cabinet. The middle panel aligns with the rabbet at the back. Use cauls to evenly distribute the clamping pressure. Make sure the assembly is square by measuring corner-to-corner.

3. Glue the cabinet together in stages, starting with the sides and the top, middle and bottom panels. Measure diagonally to be sure the cabinet is square. Glue in the shelves and drawer dividers later. This method doesn’t require as many long clamps.
7. Glue in the shelves. They slide in from the back. Make sure their back edges are flush with the rabbets for the cabinet’s back.
8. Glue on the shelf edging (A7). The edging hides the stopped dadoes in the sides.
9. Glue in the drawer dividers.
10. Fit and install the sliding door track.
11. Cut and fit the plywood back (A8), but don’t install it.
12. Glue spacers (A9) on the top panel. They allow fastening the top.
13. Glue up the top (A10) and cut it to final length and width.
14. Rout a 45-degree chamfer around the top’s front and sides.
Install the Face Frame
15. Cut the face frame stiles and rails (B1 and B2) to final length and width.
16. Assemble the stiles and rails with dowels. Make sure the assembly is square and the bottom and middle rails are spaced 5-1/4 in. apart.
17. Glue the face frame to the cabinet. Make sure the top of the frame’s bottom rail is flush with the top of the cabinet’s bottom panel. Center the frame on the cabinet—it should slightly overhang on both sides. After the glue dries, trim the face frame stiles flush with the cabinet.
18. Glue on the dividers (B3).
19. Install the drawer guide blocks (A11). They fill the cavities behind the face frame, so the outside drawers track smoothly.
Build the Doors
20. Cut the door stiles and rails (C1-C4) to final width and length.

4. Outfit your miter gauge with a fence and a stop to cut the doors’ halflap joints. The stop guarantees that all the tenons will be the same length.
21. Cut the half-lap joints using a fence with a stop (Photo 4 and Fig. H). Make test cuts in scrap stock to dial in the blade’s height and the stop’s location.
22. Remove the stop to cut the stiles’ inner half lap notches.

5. Assemble the doors in two steps. First glue and clamp the two middle rails to the stiles and check for squareness. Then add the top and bottom rails and recheck to make sure the assembly is square.
23. Dry fit each door to make sure all the joints fit. Glue and clamp the doors (Photo 5). Make sure the assembly is square.

6. Rout rabbets for the glass in the back of each door. Make several shallow passes, rather than trying to rout full-depth in a single pass.
24. Rout rabbets for glass in the backs of the doors (Photo 6). Square the corners with a chisel.

7. Bore holes into the doors for the sliding hardware. Use a fence and a stop for accurate positioning. Add a hold-down to keep the door flat on the table.
25. Drill holes for the sliding door hardware with a 35mm-dia. (or 1-3/8-in.-dia.) Forstner bit (Photo 7 and Fig. D). These holes must be precisely centered 13 mm from the doors’ edges. The depth of the holes varies: The top holes are 12-mm deep; the bottom holes are 13-mm deep.
26. Press in the sliding door hardware, install the doors and test their operation. The center stiles won’t align when the doors are closed until you add the door stop (A12). Fine-tune the alignment by adjusting the thickness of the stop or by jointing a smidge off one or more of the doors’ outside edges.
 Euro-Style Sliding Door Hardware
This system takes its cue from Euro-style cup hinges. The components press into 35- mm holes drilled in the door, install in seconds and adjust to fit. Each door requires two upper guides and two lower runners. Rollers integrated into the runners ride on the track’s flange. The roller assembly adjusts in and out to raise or lower the door. Retractable tongues in the upper guides click up into the track after the door is tipped into position.
Build the Drawers
27. Cut the drawer fronts, backs and sides (D1-D3) to final size. I made the grain flow across the front of the bookcase by cutting the drawer fronts sequentially from the same piece of walnut.
28. I use a router table to cut the drawer joints (Photo 8 and Sources).

8. Use a drawer lock bit (below) to build the drawers. It creates both sides of the joint using the same setting. Rout the drawer fronts and backs flat on the table. Rout the sides vertically against the fence.

29. Rout 1/4-in.-deep grooves in the drawer fronts and sides for the drawer bottoms (D4).
30. Glue the drawers together. Make sure the bottom edges of the drawer backs align with the tops of the grooves in the sides, so the bottoms will slide in.
31. Cut the drawer bottoms to size, using walnut plywood left over from making the cabinet back.
32. Insert the drawer bottoms—they’ll extend well beyond the back. Install each drawer to determine how much to trim off to make the drawer front flush with the face frame (Photo 9). Remove the bottom for trimming. Then reinstall and fasten it with nails or screws.

9. The protruding drawer bottoms act as stops by bumping the back of the cabinet. Install each drawer and measure how far it protrudes beyond the face frame. Trim that much from the drawer bottom’s back edge, to make the drawer flush.
Build the Base
33. Glue together three 1-in.-thick pieces of walnut to create a blank for the legs (E1). Joint and plane this blank to 2-3/4-in.-square, then cut it into the four legs.
34. Cut mortises in the legs (Fig. F)
35. To create the Chinese-style horsehoof feet (Fig. E), rip and plane a pair of blocks (E2) to add to each leg.

10. Create the horsehoof feet by building up the two inside faces of each leg. Miter the corner joint between the two added pieces.
36. Miter the blocks and glue them on (Photo 10).

11. Sand coves to ease the transition between the glued-on blocks and the leg.
37. When the glue is dry, rough-saw the foot’s top cove on your bandsaw. Then smooth the curves, using a sanding drum chucked in your drill press, or a spindle sander (Photo 11).
 38. Transfer the outside curves to each foot, bandsaw them and sand them smooth (Photo 12 and Fig. E).
39. Cut tenons on the aprons (E3-E5).
40. Saw the arc on the front apron and sand it smooth.
41. Dry-fit the base and check its dimensions. The depth and width should match the cabinet. Glue the base together. Make sure it’s square.
42. Rout a rabbet around the top of the base (Photo 13).

13. Rout a rabbet on the top of the base. The rabbet creates a shadow line that hides slight dimensional differences between the cabinet and the base. Clamp on a support block to make the router ride smoothly and a 1/8-in. spacer to compensate for the apron’s setback.
Final Assembly
43. Apply a finish before assembling the rest of the parts. I used a wipe-on urethane.
44. After the finish is dry, flip the cabinet upside down and align the base on the bottom of the cabinet.

14. Cleats attach the base to the cabinet. Glue and screw the cleats to the bottom of the cabinet, after positioning them flush against the aprons. Then screw the cleats to the aprons.
45. Glue and screw cleats (E6 and E7) to the bottom of the cabinet (Photo 14). Then attach the base by screwing through the cleats into the aprons. Stand the cabinet right-side up.
46. From inside the cabinet, drill shank holes for screws through the top and the three spacers.
47. Clamp the top in position and then attach it with screws.
48. Screw on the plywood back (A8).
49. Install glass in the doors. Cut and fit the retaining strips (C5) and tack them in place.
50. Install hardware on the doors and drawers (see Sources).

15. Install the inside door first, then the outside door. Leave the inside door’s pull off until both doors are installed.
51. Install the doors. Engage the bottom hardware, then tip the door upright to engage the top (Photo 15). You’ll have to move the inner door’s pull to install the outer door.
52. Load up the cabinet, then sit down and relax with a good book.
Sources
Rockler
Stickley Dark Copper Pendant Pull, 1-1/4” x 1- 3/4”, #10877
Stickley Dark Copper Pendant Pull, 7/8” x 2-3/16”, #26815,
23/32”-dia. straight bit for 3/4-in. plywood, #90264
35-mm Forstner bit, #46532
European-Style Sliding Door Hardware Set, #88155 (2 sets required).
Freud
Drawer Lock Bit, #99-240
Rabbeting Bit, #32-102

Here are some supplies and tools we find essential in our everyday work around the shop. We may receive a commission from sales referred by our links; however, we have carefully selected these products for their usefulness and quality.


