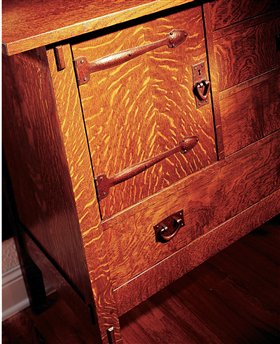
This sideboard is a reproduction
of one that originally
appeared in Gustav
Stickley’s 1912 Craftsman Furniture
Catalog as piece No. 8141⁄2. The cost
was $50. It was factory produced,
at a time when woodworking as
a hobby was virtually unknown.
Today, though it will cost a lot more
than $50, this piece is perfect for our
power tool-driven workshops.
This project is a major undertaking,
but by dividing it into three
stages, you’ll find it easier to manage.
You need to know how to make rabbets,
dadoes, mortises and tenons,
and machine-dovetailed drawers. The
wood for this sideboard cost us $800,
and the hardware, which is unique to this
piece, cost $1000. However, it’s possible
to make your own hardware (see p. 112)
for about $100.
Quartersawn white oak, with its striking
ray flake figure, is the wood of choice
for this piece. The drawer fronts are solid,
the doors and side panels book-matched
veneers. If veneering is new to you, our
step-by-step photos will take you through
the process.
Lay out the parts
Lay out the rough lumber so you can see it
all and decide how to use each piece. On
the completed sideboard, the drawer fronts
(EE, FF, GG, JJ), plate rails (T and MM),
back stile (U), and lower front rail (S) will
be most visible, so use the boards with the
best quartersawn figure. Make the drawer
fronts from single boards.
Boards for the top should be matched
for color first, then figure. Width isn’t an
issue. Choose pieces for the side rails (P
and Q) last. After you’ve chosen the wood
for these important pieces, rough cut them
(including the lower back rail), about 1″
oversized in both dimensions, and set them
aside until you’re ready for them.
The legs (M and N) are made from 8/4
rough quartersawn lumber, with the bestfigured
side as the front of each leg. It’s a
good idea to make an extra leg for testing
tear out and milling to dimension, because
you’ll need to cut 1-7/8″ square legs from
2″ rough stock. It helps to cut the legs to
rough dimensions on the bandsaw, before
planing, to minimize the amount of bow
or cup in each leg. On a wide plank, use
a cardboard pattern to help you lay out
the legs.
Cut all plywood parts and web
frame pieces to exact dimensions.
The only web frame pieces that show
are the front edges of the drawer
divider webs (C). Be sure these show
quartersawn grain. The same is true
for the divider and shelf faces (L
and AA).
Find quartersawn veneer with
suitable width and figure (Sources, below). Faces for the 12-1/2″ wide
doors are made of two pieces bookmatched
so the flake pattern resembles
a mountain peak. Each piece
must be 16″ long and at least 6-1/2″
wide, with ray flake extending diagonally
all the way across. The side panels are
bigger, 23″ L by 18″ W, so use four bookmatched
pieces for each face.
Build web frames
Your first constructions are four web
frames. Two of them (C and D) serve as
drawer dividers. Tongue-and-groove joinery
is easy and allows plywood dust panels
(E) to be included in the design. The lower
frame (F, G, and H) is made the same way,
with an added center rail. This frame will
be glued between the lower front and back
rails. The upper frame, (A and B), employs
mortise-and-tenon joinery for extra rigidity.
Position its inside rails 16-7/8″ apart,
spaced 9-3/8″ from the outer rails.
The top and bottom web frames and the
horizontal shelf (J) must be made square
and to the same width, 47-5/8″, though
they have different depths. Notch the
corners of each piece to fit around the legs.
Make the dividers
Cut dadoes in the vertical
dividers (K). When you measure
for these dadoes, allow for the 1/4″
tongue at the bottom of each
divider. Glue facing strips (L) on
the vertical dividers. At 3/4″,
they’ll be slightly wider than the
plywood. Position them so the
overhang is on the drawer
(dadoed) side, and allow for the
1/4″ tongue at the bottom edge.
After gluing, cut a dado on the
outside of each vertical divider for
door stops, (Fig. A, Detail 1).
Assemble the interior
Notch the front corners of the
drawer web frames so they fit
between the facing strips on the
vertical dividers. Assemble these frames and dividers to form the
drawer section. Glue this assembly,
taking care to make it square.
Cut dadoes in the top web
frame and horizontal shelf to
house the drawer section. Dadoes
for plywood parts are only 23/32″
wide. Fit the drawer section
between the top web frame and
the plywood shelf and glue and
screw them together.
Cutting rails and legs
Cut all the through tenon rails
(P, Q, and S) to size, and make
some scrap pieces for testing
the tenon cuts. Cut the legs (M
and N) to size, mark them for
position (right front; left rear),
and mark each side (front, back,
inside, outside).
Assemble side rails and panels
On a piece of leg scrap, lay out and chop
one mortise 2-1/2″ long and another 1-3/4″
long. Use scrap rail pieces to adjust the fit of
the tenons to the mortises (a sliding fit without
side-to-side play), then cut the through
tenons on the rails. Chamfer the ends.
Cut rabbets in the upper side rails for
the top web frame (Fig. B). Cut dadoes
in the edges of the side rails and
tongues on the panels (R) so the insides
of the rails and panel are flush. Cut dadoes
across the inside of the panels for the
tongues on the plywood shelf and the
lower web frame. Glue the rails and panels
together. Align the inside rabbet on the
panel with, or slightly inside of the tenon
shoulders (Fig. B, Detail 1).
Mortise and dado the legs
Use the assembled sides to locate the positions
of the mortises and mark them on the
sides of the legs. Mark the mortises for the
front and back rails by measuring from the
bottom of the legs (Fig. B, Detail 3). Chop
the mortises (Photo 9) and rout dadoes
for the side panels in the legs (Photo 10).
Dry-assemble the sides and legs, then
add the front and back rails. Check the
fit of the lower web frame between these
rails and make any necessary adjustments.
Remove the rails and legs. Glue the
web frame between the lower rails. Rout
stopped rabbets in the inside back legs for
the back assembly. After all the mortises
are cut, lay out and cut the tapers on the
bottoms of the legs (Fig. B, Detail 3).
Fitting the plate
rail and top
This is the most difficult joint
of the project (Fig. B, Detail 2).
Lay out the tapers on the legs
and make sure the rail stock is
long enough to fit between them
after they’ve been tapered. Cut
the 3/4″ deep mortises in the legs and rail,
enough to house the loose tenons after tapering.
Cut the pyramid tops on the legs with
a tablesaw, miter gauge, and a stop. Leave a
flat spot on the top to bear on the stop. Now
taper the legs.
Reassemble the carcass (without the lower
rail assembly) and transfer the taper of the
leg tops to the plate rail. Use a sliding bevel
to transfer this angle to the miter gauge and cut the ends of the plate rail. After a good fit
between rail and legs is made, cut the peak
on the upper rail’s top edge and glue the
loose tenons into the rail.
Assemble the carcass
Setting up the two interior assemblies and
having a second pair of hands makes a difficult
glue-up easier (Photo 12). After the
clamps are removed, drill holes for the pins
and install them.
Doors and drawers
The doors and drawers on this cabinet
are set back, both for aesthetic
and practical reasons. The set-back
adds visual interest and camouflages a lessthan-
perfect fit.
Work from the open back when positioning
the drawer stop blocks (LL), then
mount the drawer runners (DD). The
drawers’ stepped sides and center-mounted
guides are production techniques that
allow extra margins of error when fitting,
but do little to make the drawers work
better.
Install the back assembly
The back (V-Z) is assembled the same
way as the drawer web frames—tongueand-
groove, with panels between. You’ve
already chosen a piece with nice figure
for the top stile—it’s the only piece that
shows. Cut a rabbet in the bottom stile
to fit over the lower back rail and fit the
back into the leg rabbets. Drill counterset
mounting holes and screw the back in
place.
Attach the top
Notch the back edge of the top to fit the
legs and screw it down through holes in
the top web frame that are large enough
to allow for seasonal movement.
A beautiful finish
We chose a finish that is easy to apply,
adds rich color, brings out the figure, and
has a soft luster.
Mix two shades of Transfast Wood
Dye water-based dye: 5 parts Dark
Chocolate Brown to 1 part Medium
Red Brown, both mixed at 1 tsp. to 4 oz. water ratio. Before you use a water-based dye it is
imperative that you wet all surfaces with a sponge. Let the
surfaces dry and sand the raised grain smooth. Wet the
surfaces again, especially end grain, before you apply the
dye. You can spritz the dye on with a plastic spray bottle
and wipe with a cotton cloth. After the dye has dried, seal
it with a coat of 1-lb. cut dewaxed dark shellac followed
by a coat of 2-lb. cut dewaxed pale shellac. This enhances
the color and builds enough of a finish so you can sand
it lightly before applying the top coats, Master-Gel finish.
(See Sources, below, for these supplies.)
The hardware
The crowning touch on this sideboard is the authentic
hand-hammered copper pulls and strap hinges (see
Sources, below). This hardware is well worth the several
months’ wait and the $1000 cost, but you can also make
your own hardware or buy similar massproduced
hardware.
After the hardware is installed, stand back, and enjoy
your masterpiece!
Sources
(Note: Product availability and costs are subject to change since original publication date.)
B & B Rare Woods, wood-veneers.com, 303-986-2585, Quartersawn White Oak
Veneer.
Certainly Wood, certainlywood.com, 716-655-0206.
Hearne Hardwoods, Inc., hearnehardwoods.com, 888-814-0007, Radial-Sawn Quartersawn
White Oak Lumber.
Vacuum Pressing Systems, vacupress.com, 207-725-0935, Unibond 800.
Craftsmen Hardware Co., craftsmenhardware.
com, 660-376-2481.
Homestead Finishing Products, homesteadfinishingproducts.com, 216-631-5309, Finishing Supplies.
Materials List

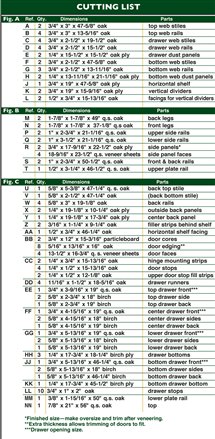
Cutting List

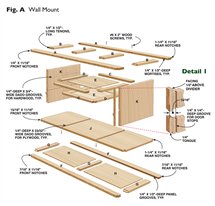
Fig. A: Wall Mount

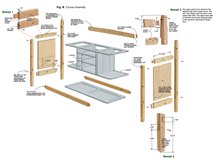
Fig. B: Carcass Assembly

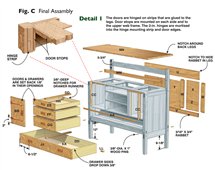
Fig. C: Final Assembly

This story originally appeared in American Woodworker August 1999, issue #74.

|
|
Click any image to view a larger version.


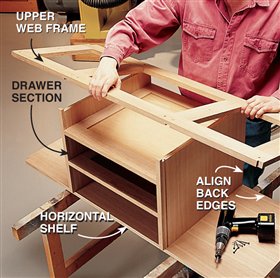
1. Assemble the interior by fitting the
drawer section into the dadoes in the
horizontal shelf and upper web frame.
Dadoes are great for easy, accurate
assembly. Carefully position the three
pieces so their back edges align. Secure
the joints with glue and screws.
Stay 1/16-in. off
the line.

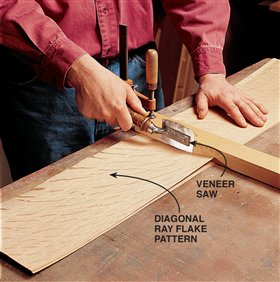
2. Cut the book-matched
pieces of veneer with a veneer
saw. With its flat bottom and offset
handle, the veneer saw is designed
to be used while held against a fence.
Here the fence is a board clamped
across the pieces of veneer. It holds
them in place and guides the saw. The
saw’s curved blade keeps a minimum
of teeth engaged and allows starting the
cut anywhere on the piece. Choose
pieces of veneer with ray flake running
diagonally across their entire widths,
and cut them at least 1″ oversize.

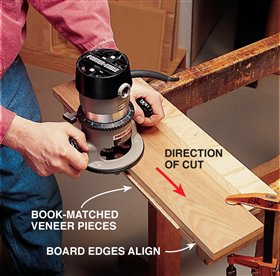
3. Joint the edges
of the veneer. Fold the two
book-matched pieces together
and clamp them between two
straight-edged boards so the
veneer protrudes. Make sure
the edges of the boards are
aligned. Trim the edges of the
veneer with a router and a
flush-cutting bit, making a climb
cut. (Advance the router from
right to left. This will reduce
the chance of tear out.)

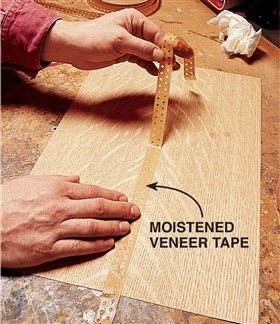
4. Hold the book-matched
pieces together with a piece of
veneer tape. Run this tape the length
of the joint on the front surface after
pieces of masking tape have been
stretched across it on the back side.
After the veneer tape dries, remove
the masking tape. The doors require
two pieces of veneer per side, the
side panels need four.

5. Apply glue to the edged
door substrate. Unibond
800 (see Sources, below) is a
modified urea formaldehyde
adhesive designed for cold
press veneering. It has a slow
set, gives a good bond, won’t
creep, sands well, and is easy
to apply. Use a foam roller to
spread the glue uniformly. To
hide any bleed through, tint
the glue with dye powder—
the same color you’ll be using
to dye the sideboard.

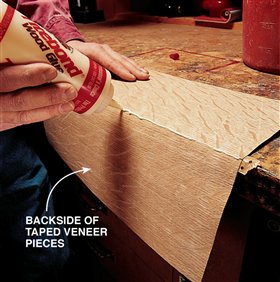
6. Glue the bookmatched
joint from the
back side. Bend the taped
pieces to open the joint and
apply a thin bead of glue. Close
the joint and immediately lay
it, with the veneer-taped side
up, onto the glued surface
of the substrate. Position it
squarely, and press it flat.

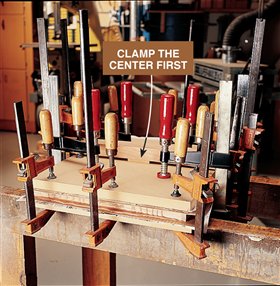
7. Clamp the veneered
panel between sheets
of MDF, separated by
newspaper. Even clamping
pressure, working from the
center to the edges, is the
key to a successful glue-up.
To apply pressure to the
center of the panel, place
boards over blocks taped to
the centers of both pieces
of MDF and clamp the ends
of these boards together.
Move the pressure out by
using deep-throated clamps
first and then smaller ones
around the perimeter. Glue
should squeeze out around
all edges. By setting the assembly
on saw horses,
you can get clamps all
around it.

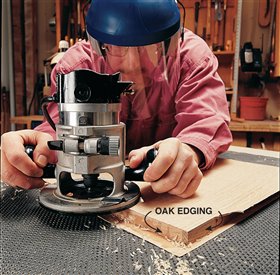
8. Trim the edges
of the veneer with a router
and flush-trim bit, using a climb
cut. The oak edging gives the
appearance of a solid wood
door and provides solid mounting
for the hinge screws. The side
panels need neither edging nor
trimming. Make them slightly
oversized so they can be cut to
final size on the tablesaw.

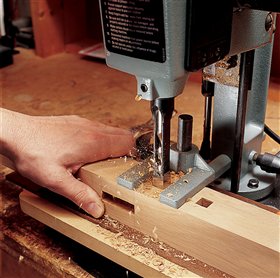
9. Chop through mortises
by cutting to half-depth, turning the piece
over (keeping the same face registered
against the fence), and finishing the cut
from the other side. A mortising machine
is great for this, but a mortising
attachment on a drill press will get the job
done too. The mortise being cut here is
for a front rail. The location of both the
rail and mortise are marked on the leg.
After mortising, locate and drill 3/8″ dia.
by 3/8″ deep tenon pin starter holes in
the legs.

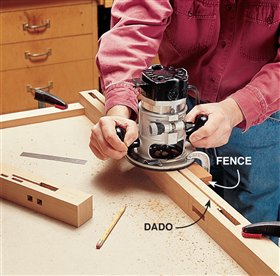
10. Rout the dadoes for the
side panel tongues on the
insides of the legs, between
the mortises. A fence clamped
to the router positions the bit
accurately. Locate the dadoes
by dry-fitting the legs on the rail
and panel assembly and marking
their positions.

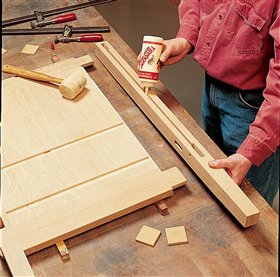
11. Lay a bead of glue in the leg
dadoes, in the mortises and on the
tenons and glue the legs to the rail
and panel assembly. You can’t take
this step until all of the leg mortises,
dadoes, rabbets, pyramids,
and tapers have been completed,
as well as finish sanded, so check
twice to make sure you’re ready.

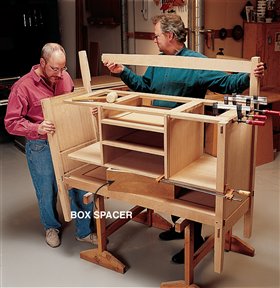
12. Assemble the carcass with glue,
clamps, and a little help from some
friends— a helper is one, the saw horses
are another, and the box, exactly sized
to the opening between the lower rail assembly
and the drawer and shelf assembly,
is the third. Glue and clamp one assembled
side at a time, as shown, adding bar clamps
at the bottom rails and upper plate rail
after both sides are in place.

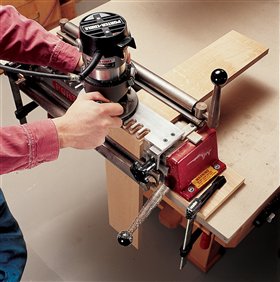
13. Cut dovetails with a router and template jig and
you’ll have drawers that look just like the originals,
especially if you make half-blind fronts and backs. After
dovetailing, and evening-up the bottom edges, cut
1/4″ deep dadoes on all four pieces for the bottom. If
you locate the dadoes behind the lowest tail, it won’t
show from the side. Glue the drawer parts together
with the bottom inside.
|


