We may receive a commission when you use our affiliate links. However, this does not impact our recommendations.
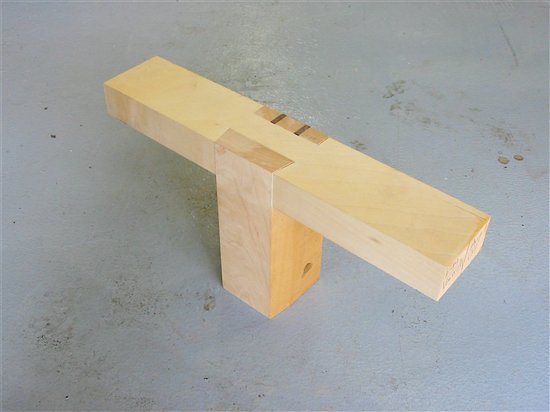
Drawings can only get you so far when you're designing a piece. Sometimes, when I'm stuck, I leave the drawing board and make full-size parts. Here's a sample joint I made before building Ted's Altar.
To give you a sense of scale, the top piece is 1-1/2" thick. The stubby leg is 3-1/2" thick from front to back and 3" wide.
Here's a view from the back side. This tenon is supposed to be secured by wedges, but that didn't quite work out in this sample. Here, I spaced the wedges to divide the tenon in thirds. That looks nice, but the whole point of the wedges was to spread the sides of the tenon so they would lock against the slightly inclined shoulders of the mortise, like a dovetail. These wedges didn't succeed in bending the tenon, though. In the real altar, I moved the wedges farther apart, so the outer sections of the tenon could bend.
Here's the joint taken apart.
Making the leg portion was straightforward. I started with a rectangular blank and cut two notches on its end. I removed most of the waste on the bandsaw, then finished with a dado set. Next, I ripped shallow bevels on the front of the leg (to make the dovetail shape) on the tablesaw. I used the same method for the larger bevels on the back of the leg. I cut notches for the wedges by hand.
OK, now how about the top? The full top on the finished altar is going to be about 24" wide and 60" long–a massive piece of wood. I could have cut its mortises by hand, but I realized that there was a way to machine all of them, instead. The solution was to think of the top as having three sections: two that are as wide as the piece in this sample, and a large, main section. After machining these narrow pieces, I could glue them to the main top. If I picked the wood carefully, and used rift-sawn pieces, the joint would be nearly invisible.
Machining these notches was a cinch. Both are made using a dado set. The angled notch required some paring with a chisel to clean up the corners, but that wasn't hard. Done deal!
Product Recommendations
Here are some supplies and tools we find essential in our everyday work around the shop. We may receive a commission from sales referred by our links; however, we have carefully selected these products for their usefulness and quality.
Recommended Posts


