We may receive a commission when you use our affiliate links. However, this does not impact our recommendations.
Spend a day in any large city library and look for woodworking books written in the 1990s or earlier and you will find a treasure trove of 2D drawings just waiting for a SketchUp Woodworker to take advantage of. One such book is The Book of Shaker Furniture by John Kassay written in 1980 and published by The University of Massachusetts Press (ISBN 0-87023-275-4). The Book of Shaker Furniture is a collection of Shaker chairs, table, chests, clocks, built-ins etc. About every fifth piece has detailed, reproduction quality, 2D drawings from which a woodworker can build.
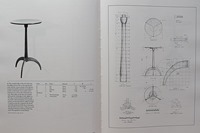
 I have this book, and many more like it, in my own personal woodworking library and have often thought of systematically converting all the drawings to reproduction quality SketchUp models. Maybe one day I will. But I thought that it may be of interest to American Woodworker readers, and maybe even motivation, if I demonstrated how to go about it. I chose a Round Stand made in the New Lebanon, NY Shaker Village as the subject of this post. It is on page 194 of the 7th printing edition which is shown in the image above left. Click on the image to enlarge.
 This post will be a multi part post. I don’t know how many parts yet, but in each post I will make available my SketchUp model for the reader to download and study. In the last post I will provide the completed model. I will also use a few plugins as I go along and will tell you which ones and where you can get them is you choose to install them in your own Plugins folder. This post will use two plugins: The first is my own Construction Plus Toolbar suite of tools and the ZIP file can be downloaded by clicking on this link; The second plugin it the Bezier Toolbar (called BZ_Toolbar) and can be downloaded from this web page http://sketchucation.com/forums/viewtopic.php?f=180&t=13563#p100509 .
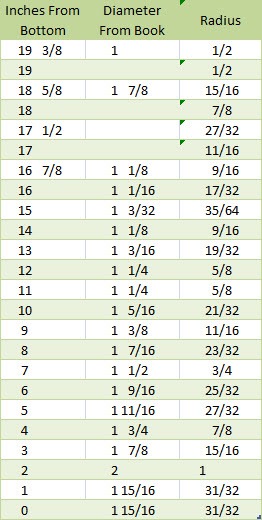
If you enlarge the image above left you will see a lathe turned Pedestal with a grid superimposed on it and diameter measurement at every inch up the Pedestal and at some other strategic points. Don’t bother trying to read the dimensions; you can’t. But I have provided a table with the diameters converted to radius at each point starting from the bottom of the Pedestal. I am using radius dimensions because I will use the Follow Me tool to create the 3D Pedestal as you will see. Refer to this table when viewing the video. Note that there are four entries under Diameter From Book. The book supplied no data for these entries, so I estimated the Radius from the picture of the Pedestal and grid.
In this post I will show you how to use these dimensions to create the SketchUp Pedestal. You can download the SketchUp model used for this post at this link. It’s time to roll the projector again.
Here are some supplies and tools we find essential in our everyday work around the shop. We may receive a commission from sales referred by our links; however, we have carefully selected these products for their usefulness and quality.


