|
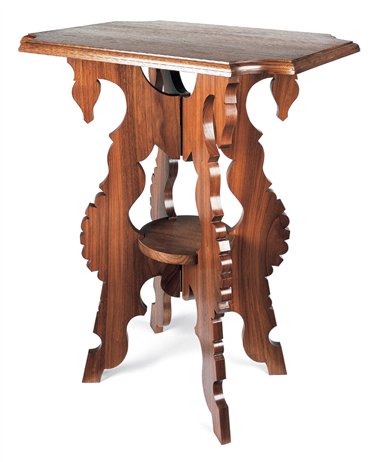
This table is an accurate reproduction
of one purchased by
Molly Brown and her husband
in the late 1880s, when they were starting
their family in the rough mining
town of Leadville, Colorado. It easily
disassembles for transport so it could
lend instant civility to a new home in
unfamiliar surroundings. Simply but
ingeniously built, it bears all the hope
and exuberance of a young America during
its age of westward expansion.
Apparently the Browns liked this
table. They kept it with them even after
they struck it rich, and moved from
Leadville to a large house in Denver’s
most prestigious neighborhood. It still
resides there, in what is now the Molly
Brown House Museum.
Rigid and durable, this table is built
with the simplest joinery. You’ll only
need about 15 bd. ft. of 3⁄4" thick walnut,
and you can build it in a weekend
using your tablesaw, bandsaw, router and
drill.
Making the legs
Look for boards without sapwood that are
8-1/2" wide, otherwise you’ll have to glue pieces
together. You can saw the legs individually, but it’s
better to saw all of them at once. Stack the four leg
blanks together, using pieces of double-stick tape
(Photo 1). Keep the edges aligned. Then affix a
full-size paper pattern on one side (Photo 2) and
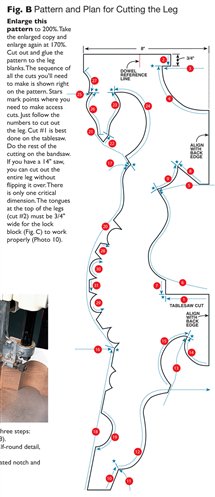
saw out the legs (Fig. B and Photo 3).
Sawing the ganged-together leg blank on the
bandsaw is a simple combination of curved cuts,
access cuts and relief cuts. To be successful, it’s
important that your saw is in tune and the blade is
sharp. A 3/16" 4-tpi skip-tooth blade (see Sources, below) will do a good job. To make accurate cuts
with smooth curves, it’s also important for you to
be in tune with the saw. Use a light touch so you
can find the blade’s optimal feed rate and see how
it tracks. Then advance the workpiece steadily—
don’t try to cut too fast—and let the saw do the
work. Make access cuts first. They allow the blade
to escape from dead-end curved cuts easily.
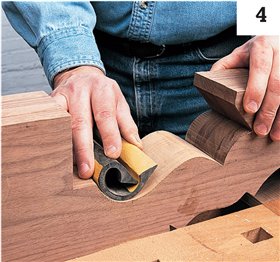
After sawing, clamp the legs in a vise and sand
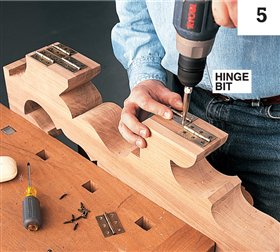
the edges (Photo 4). Attach the hinges (Photo 5),
then pry the legs apart. Use a putty knife with
blunted edges and smooth faces—any burrs on the
knife will scratch the wood. After the legs are loose,
remove the paper pattern and any double-stick
tape that remains. Then sand the faces.
Sanding end grain
Okay. Everybody looks for a way to avoid
sanding end grain by hand, and I did too.
After all, power tool manufacturers are happy
to offer alternatives. But I was disappointed
by all of the other approaches I tried. Progress
with profile sanders was slow and the
vibration made my hands tingle. Drum and
spindle sanders worked fine for the wider
curves, but they couldn’t get into any of the
corners. And on these legs there are more
corners than curves. Besides, sanding the
wide curves is just as easy to do by hand. I
even tried cutting the legs on a scrollsaw, one
at a time. Scrollsaw blades cut very cleanly,
but progress through 3/4" thick walnut was
slow. And without a lot of practice, it’s hard
to cut smooth sweeping curves with those
tiny blades, which means you’re going to
have to sand the profiles anyway.
Sanding end grain by hand can be surprisingly
efficient if you have the right tools and
use the right sandpaper. 3M 216U sandpaper
(it’s gold) is worth its cost because it cuts fast
and lasts. Start with 100 grit. You’ll be
amazed how quickly this stuff removes saw
marks and smoothes end grain. Work your
way through 120 and 180 grits, then use 280
to finish. There’s no need to sand with the
grain—the scratches are too small to see.
Attach the legs to the top
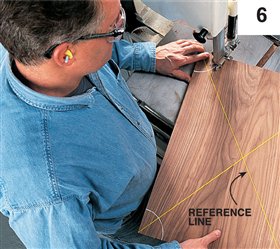
First, make the top, a rectangle with radiused
corners (Photo 6). Rout the top edge
with a 3⁄8" beading bit. Using a doweling
jig, drill dowel holes in the legs, transfer
their location to the top (Photos 7 and 8),
and drill these holes. Then glue dowels
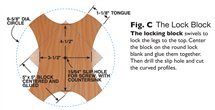
into the legs. Make the lock block (Fig. C
and Photo 9) and install it. Then fit the
legs to the top, and test the locking
operation.
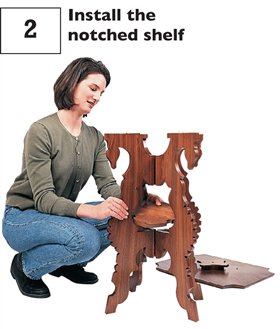
A notched shelf
stiffens the legs
Use the top as a template to make the
notched shelf (Photo 10). For the notches
to slip around the legs without being too
loose, saw on the insides of the lines
you’ve drawn on the shelf. Test the fit on
the assembled table. If the fit is too tight,
widen the notches slightly with sandpaper
or a file. If it’s too loose, just make another
shelf. (That’s what I had to do!)
A canned finish
This project begs for a spray finish. Brushing
the legs would be a drippy nightmare
and oil would make the end grain too
dark. I used shellac, sprayed from an
aerosol can as a seal coat. First I folded the
legs together and sprayed all the end grain
edges at once. Then I opened them up
and sprayed the faces. It took only 10
minutes. The next day, after a light sanding,
I sprayed on a topcoat of aerosol
polyurethane.
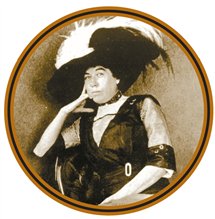
The Unsinkable Molly Brown

Young Margaret Tobin traveled west to
Leadville, Colorado in 1886 to seek her
fortune. Within a year she met and married
J.J. Brown (13 years her senior), an
engineer for the Ibex Mining Company.
In 1893, thanks to a process J.J. devised,
a played-out silver mine, called the Little
Johnny, was found to have one of the
largest veins of gold and copper ore in
the country. The Browns became millionaires
overnight.
In 1894 they moved to Denver, where
Molly immersed herself in Denver
society.
In 1912, she gained national recognition
for her heroism the night of the
Titanic disaster. Mrs. Brown found herself,
with other horrified survivors, adrift
on a lifeboat. Taking command from the
panicked sailor in charge, she began
rowing and instructed others to do the
same, safely piloting the boat through
the icy darkness. Later she raised
$10,000 for families of victims.

She was an excellent fund-raiser for
charitable causes in Denver, where she
was a champion for miners and orphans.
Fiercely independent and outspoken,
she ran for the Senate before women had
the right to vote. She was named to the
French Legion of Honor for her work
entertaining soldiers in WW I.
Not even the largest ocean liner disaster
the world had ever known could stop
the Unsinkable Molly Brown!
Sources
(Note: Product availability and costs are subject to change since original publication date.)
3M, 3m.com, 800-362-3550, Scotch 666
double-stick (coated) tape, 3/4".
Woodcraft, woodcraft.com,
800-225-1153, 3/16" 4 tpi bandsaw blade.
Home center, Brass butt hinges, satin finish,
1-1/2" x 2"; Dowel centers.
Klingspor’s Woodworking Shop,
woodworkingshop.com, 800-228-0000,
Flexible sanding pads (complete set of 18
profiles), #KL50000; Teardrop hand
sander, #KL05245; Flat rubber sanding
block, #KL05215.
Body supply stores, 3M 216U Production RN Fre-Cut sandpaper.
Art supply stores, Chalk marking pencils.
Cutting List

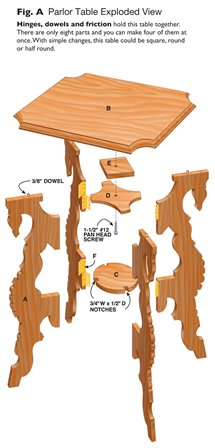
Parlor Table Exploded View

Pattern and Plan for Cutting the Leg

The Lock Block

This story originally appeared in American Woodworker April 2000, issue #79.

April 2000, issue #79
Purchase this back issue.
|
|
Click any image to view a larger version.

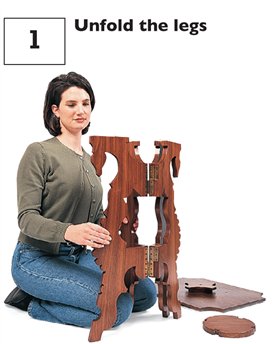
Unfold the legs.

Install the
notched shelf.

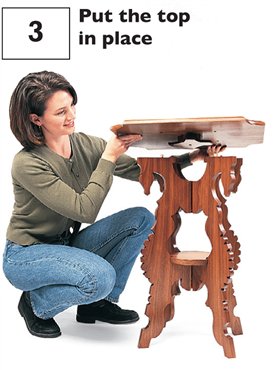
Put the top
in place.

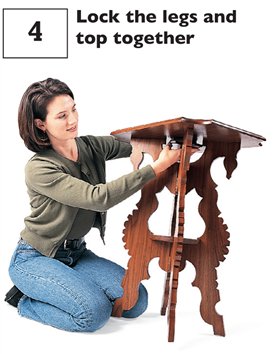
Lock the legs and top together.

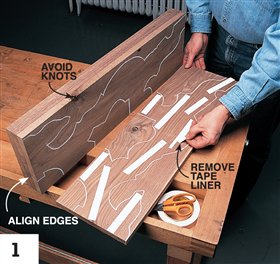
1. Hold the leg blanks together with double-stick
tape (see Sources, page 48). Using the paper pattern
at right, outline the leg on each blank. This keeps the
blanks properly oriented and shows you where to
put the tape. Press the blanks together, one pair at a
time. Keep the back edges of the blanks aligned by
standing them on a flat surface. Align the end-grain
edges with your fingers and then press the blanks
together. Glue the paper pattern on the completed
stack, aligning it with the edges (Photo 2).

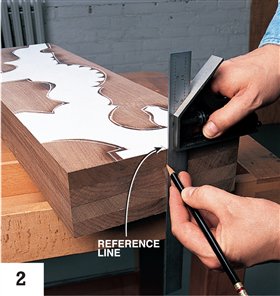
2. Transfer the line for the dowels onto all four
blanks at once, using the reference line on the paper
pattern. Before making these marks, true up the ends
of the stack on the tablesaw, using the miter gauge,
if necessary.

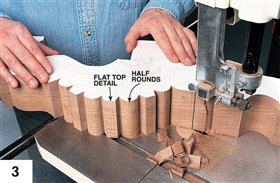
3. Saw the detail shapes at the front of the legs in three steps:
1) Saw the edges of the flat-topped details (Fig. B, #28).
2) Make a relief cut, sawing into one corner of each half-round detail,
creating a notch for the saw blade (#29).
3) Saw the half-round profile, starting at the newly created notch and
working in the opposite direction (#30).

4. You'll be amazed how quickly and accurately you can
smooth and level all four legs at once, using rubber sanding
pads and 3M 216U Production RN Fre-Cut sandpaper (see
Sources). This teardrop sander is perfect for the job because it
acts like a flexible sanding block, conforming to all sorts of
contours.

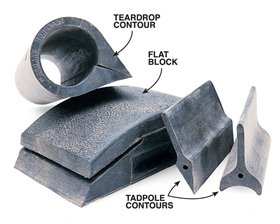
Flexible Rubber Sanding Pads
(see Sources) come in a variety of
shapes and contours, don’t cost
much and make the job of hand
sanding much easier.

5. Mount the hinges while
the legs are still fastened
together. Center the barrel
of each hinge over its joint.
Pre-drill holes for screws
with a #5 self-centering
hinge bit. Use the same
mounting pattern on both
parts of the legs.

6. Saw away the corners
of the top. Be sure to draw
diagonal reference lines for
locating the base before
you cut the corners off.
Lines drawn with colored
chalk pencils (see Sources)
show up great on dark
woods like walnut.

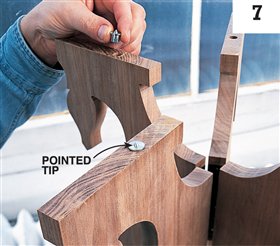
7. Insert dowel centers
(see Sources) in the holes
drilled in the tops of the
legs. Dowel centers are
designed to transfer the
location of dowel holes
from one piece to
another.

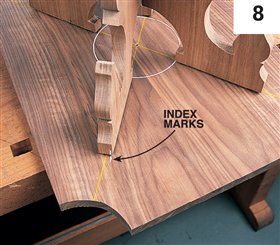
8. Position the base
on the top by centering
it on a 5-3/4" dia. circle.
Then center each leg on
its diagonal. Press or tap
the base onto the top to
set the points of the
dowel centers. Mark
both the top and one leg
for reference. Remove
the base and drill holes
in the top for the
dowels.

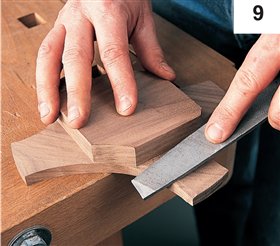
9. Ease the edges
of the lock block
tongues so they’ll
engage the legs
smoothly.

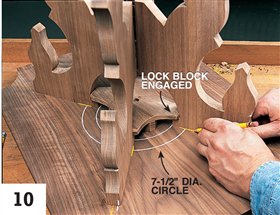
10. Use the top as a template for the notched shelf
that stiffens the legs. First, draw a second circle on the top
that’s the same diameter as the shelf. Then, with the table
assembled, mark where the legs intersect this circle.

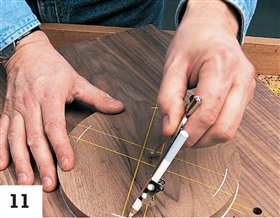
11. Locate the notches in the shelf by centering the
shelf in the circle drawn on the top and transferring
the leg lines. Then draw another 6-1/2" dia. circle
to mark the bottom of each notch.
|


