


We may receive a commission when you use our affiliate links. However, this does not impact our recommendations.
Building for the love of wood.
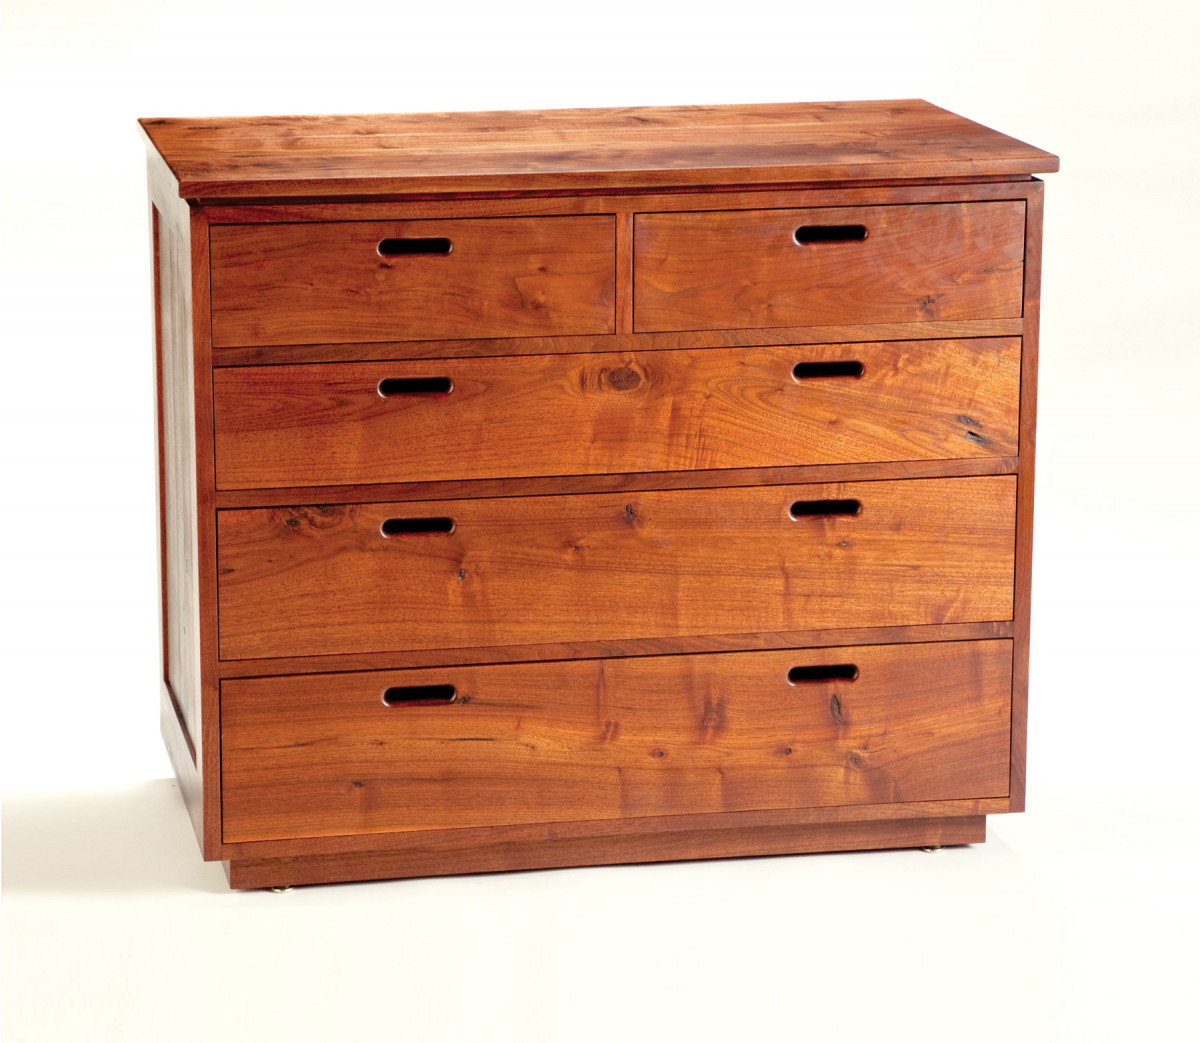
A visit to the Design in Wood exhibition, the annual show sponsored by the San Diego Fine Woodworkers Association, inspired me to enter this chest of drawers, which I built for my daughter Christina. I got lucky on the day I found the beautiful walnut boards that I used to build it. Working with exceptional lumber is one of the things I most enjoy about woodworking, which has been my favorite pastime for more than thirty years—I sincerely do have a love for wood. Maybe that’s why learning that my entry received the show’s “Love of Wood” award took my breath away. Receiving such acknowledgment for something that I truly enjoy doing was a real honor.
I decided on a contemporary design with clean lines because I wanted to highlight the boards’ lovely figure, texture and color—this piece is all about the wood!
My methods of work range from simple to complex. I use machines to mill rough lumber, but I fit edge joints and remove all the milling marks with hand planes. The chest assembles with dowels, simply because I’ve been using dowel joints since I was in high school. The drawers, on the other hand, feature hand-cut dovetails because I like the way they look and enjoy the challenge they present. Of course, drawers with machined dovetails or even simple lapped joints will work just as well.
Walnut Chest of Drawers Cut List and Diagrams
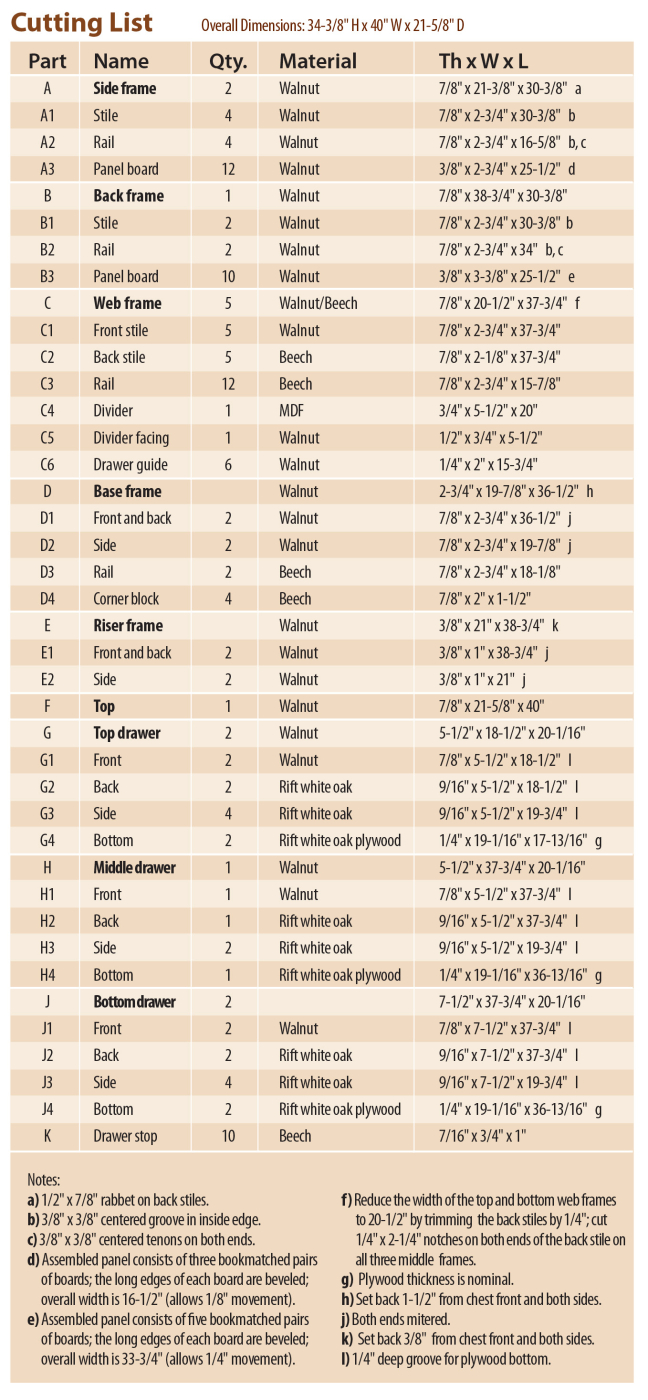
Want a higher-resolution copy of the cutlist? Download the PDF
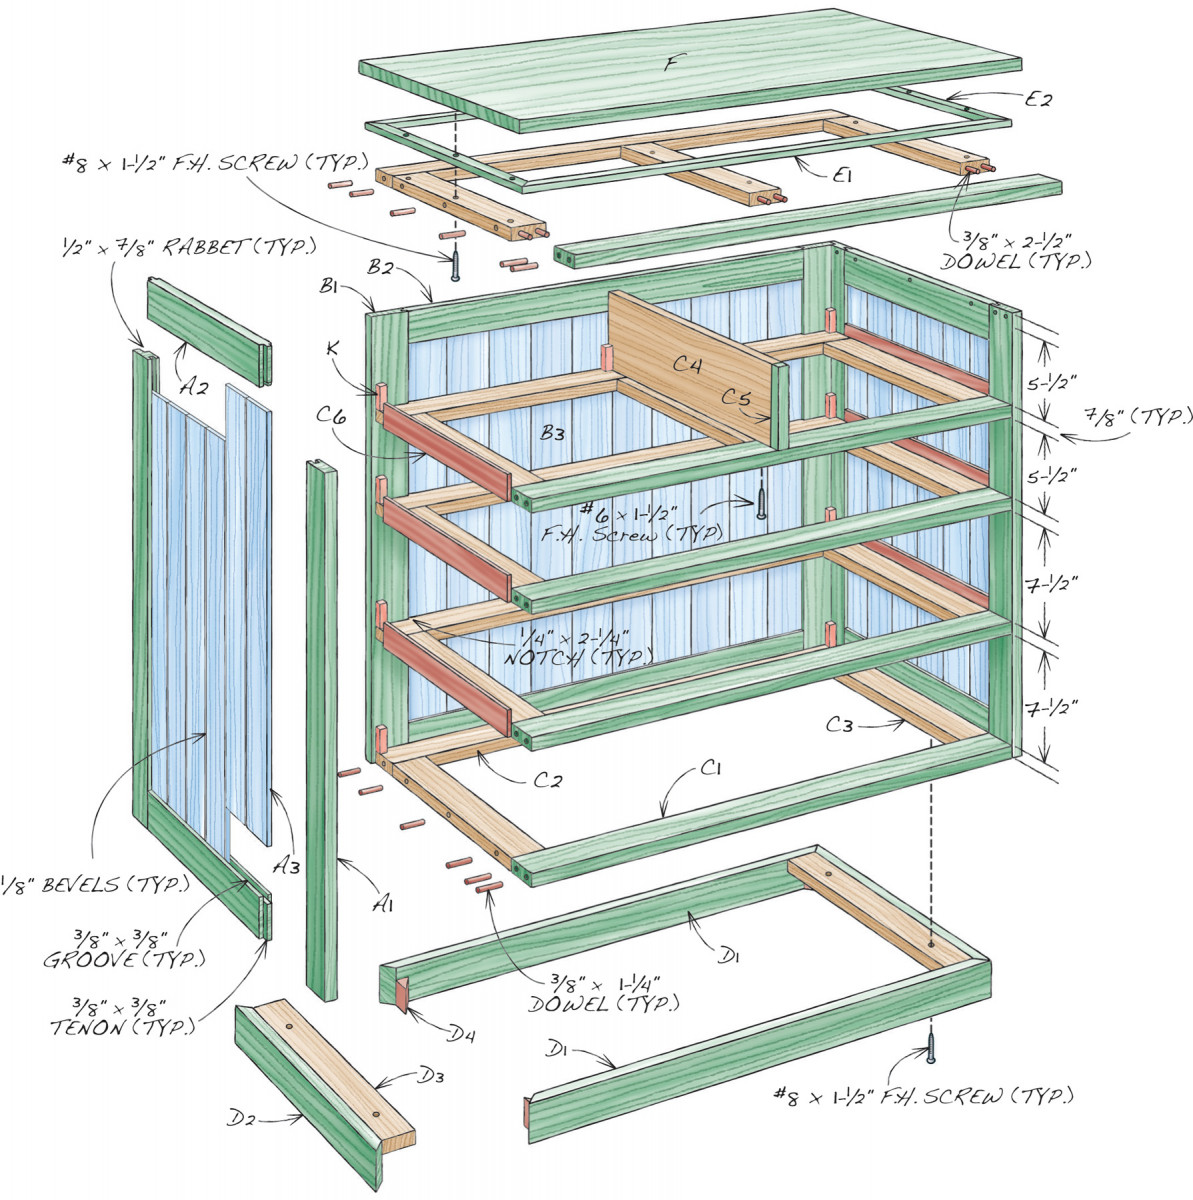
Fig. A) Exploded View
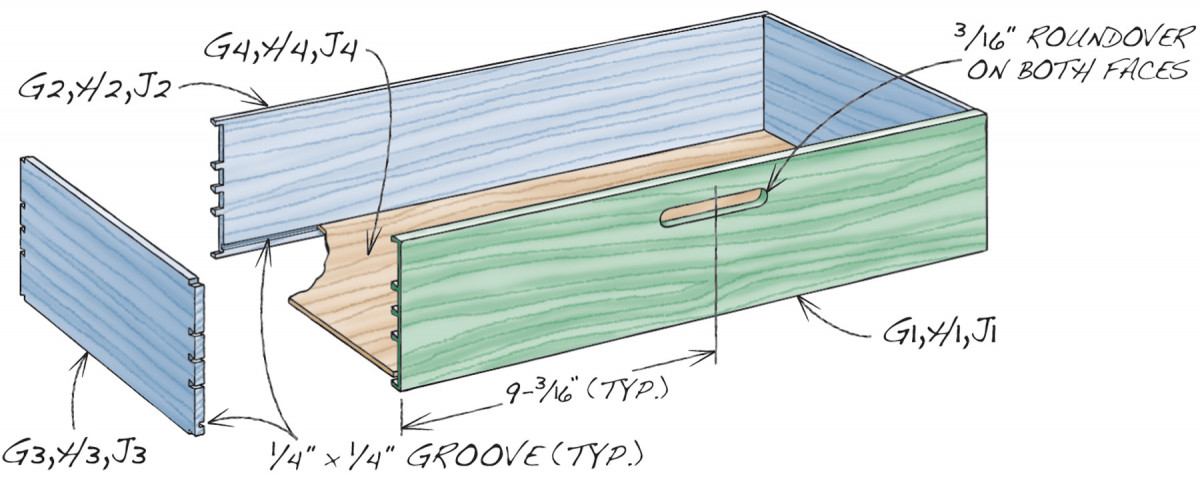
Fig. A2)
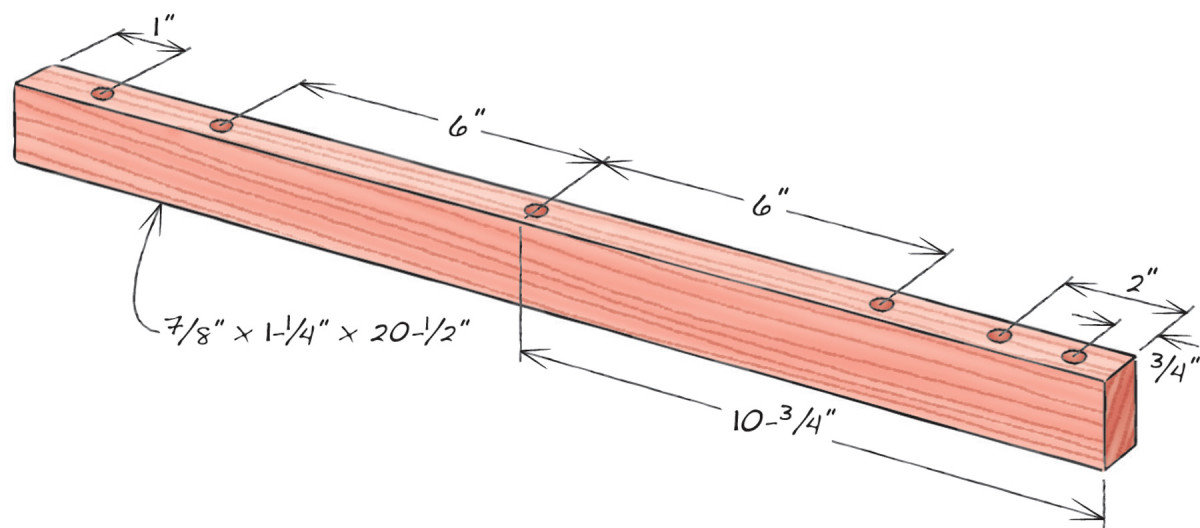
Fig. B) Drilling Jig
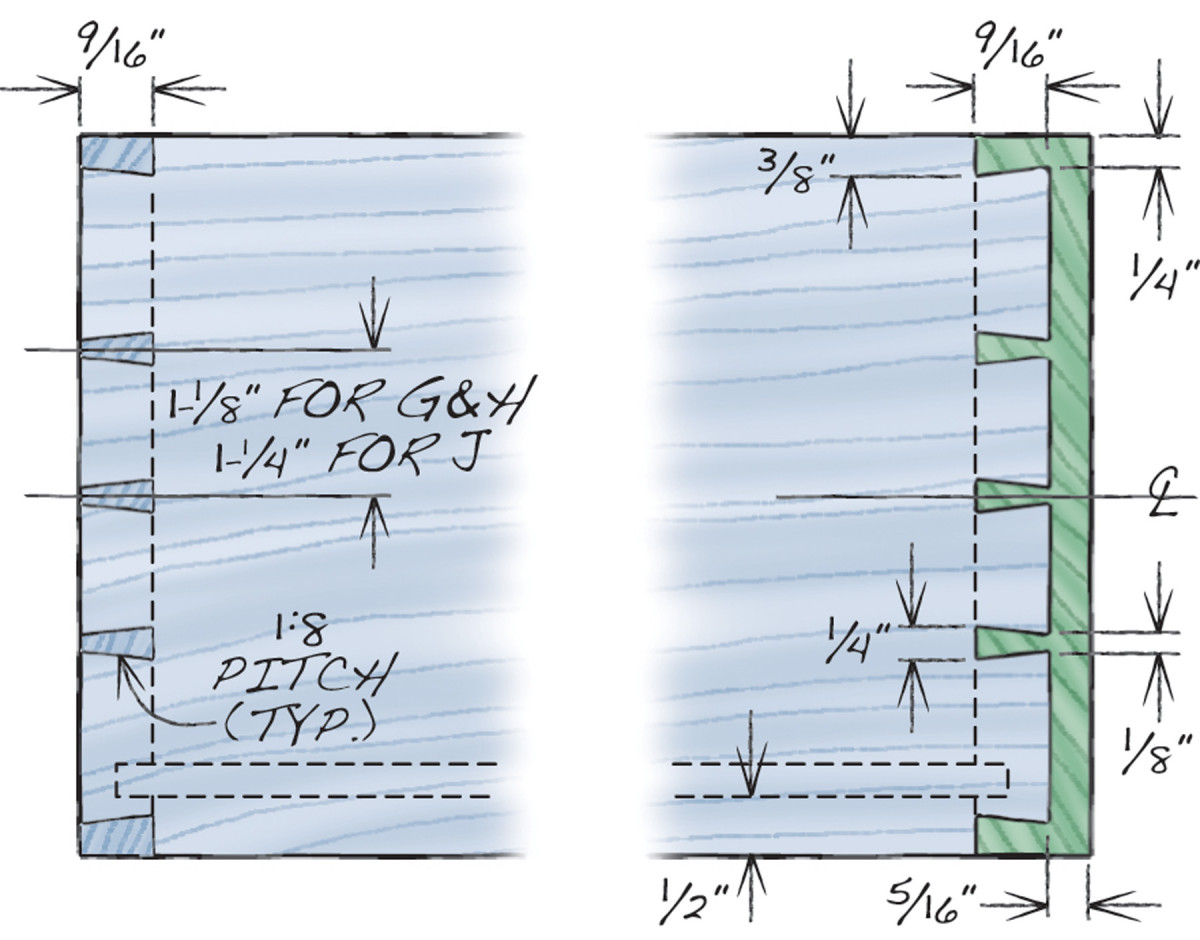
Fig. D) Dovetail Layout
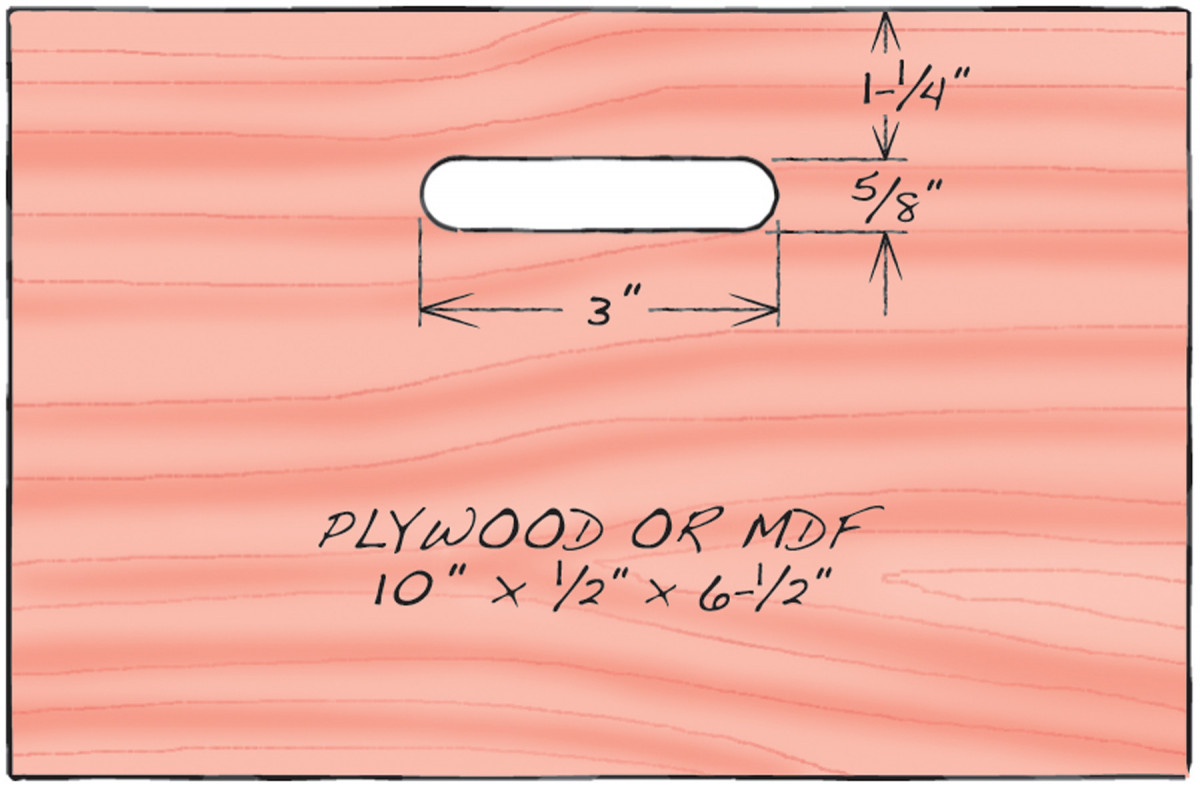
Fig. C) Hand Grip Jig
A frame job
The chest consists of eight frames. Three paneled frames form the sides and back and five web frames provide the structure (A–C, Fig. A, page 66 and Cutting List). To keep things simple, almost all of the stiles and rails for these frames are the same width. The chest sits on a mitered base frame (D). A mitered riser frame (E) creates a reveal between the chest and the top (F).
A treasure hunt

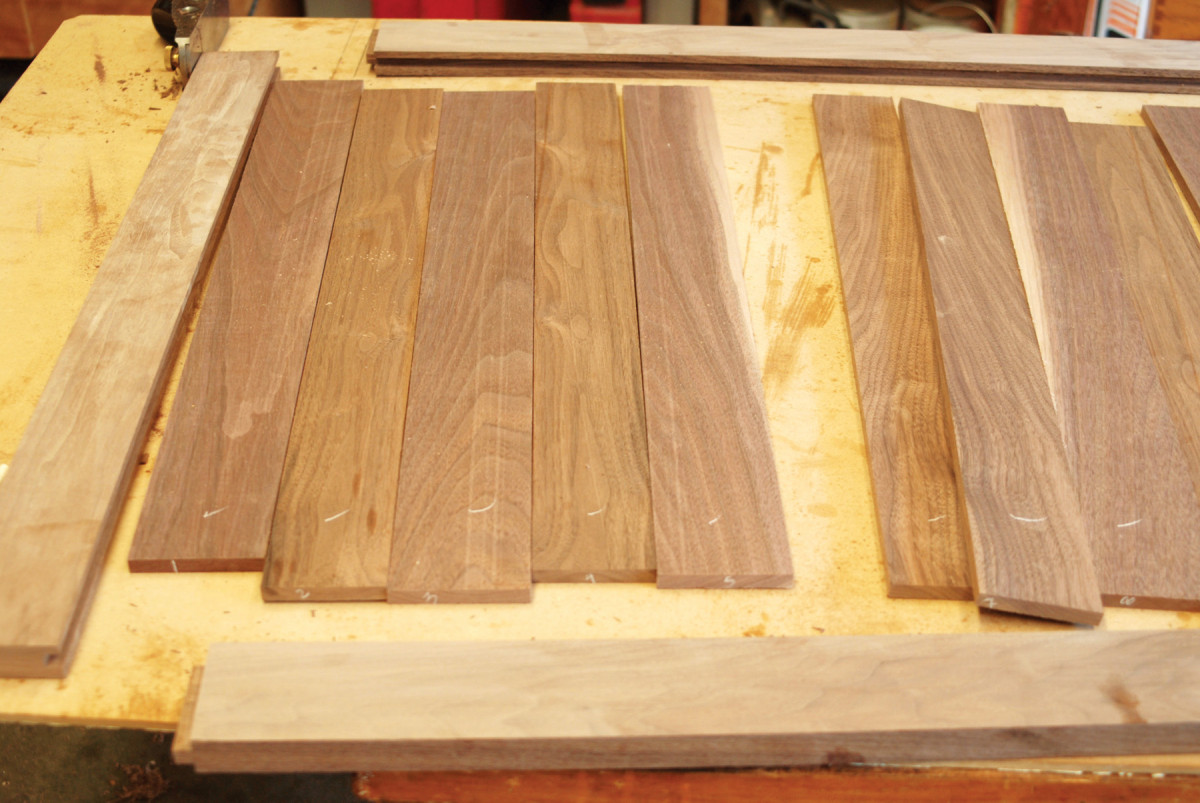
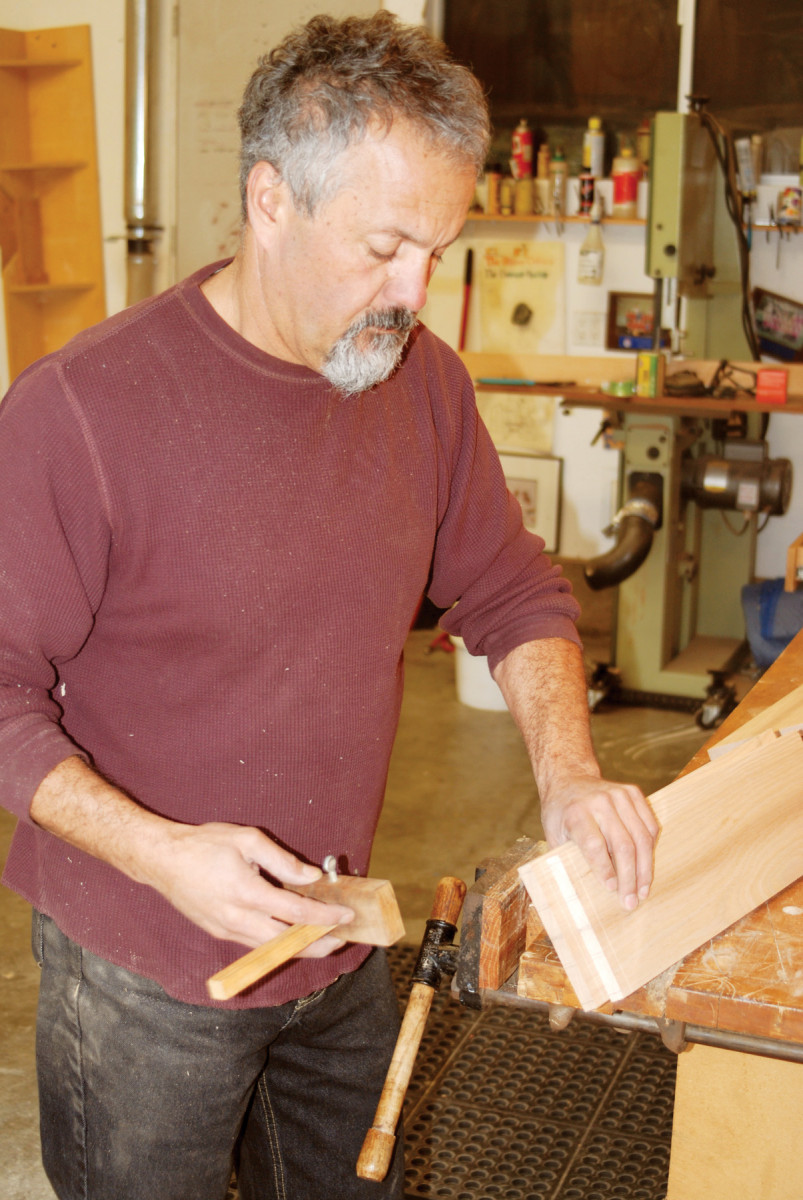
1. Start by slightly planing the roughsawn boards to feel the texture and see the color and grain. This process helps me decide how to use each board.
Going to the lumberyard is like a treasure hunt. I prefer to buy roughsawn stock so I can mill it myself. Controlling this process allows more options and yields thicker, straighter boards.
The process of deciding how to use the boards should begin at the lumberyard. Look for matches of color and figure as you sift through the stacks. Take along a block plane, so you can remove portions of the boards’ rough surfaces for a better look. This process continues in my shop, both before and after I mill the rough boards (Photo 1).
The goal is to choose the best-looking combinations of boards for the chest’s most visible parts—its top and drawer fronts. The wide top must be glued up, but the drawer fronts look best when they’re single boards. Set aside the boards you choose for these parts; then use the remaining stock for the frames and panels. Choose boards with the straightest grain for the side frame stiles and rails. Assign the leftover boards to become the back rails, panel slats, web frame front rails, and parts for the base and riser frames.
Assemble the frames
2. Resaw narrow boards to make slatted panels for the frames that form the chest’s side and back.
Start by jointing and thickness-planing the boards for the paneled frame stiles and rails (A1, A2, B1 and B2). Cut all the pieces to length and width and saw grooves for the panels. Then cut the tenons on the rails.
3. The panel slats float inside the frames because they aren’t glued together. I bevel their long edges to create a reveal at each joint.
The panels consist of pairs of slats (A3 and B3) that are resawn and book-matched (Photo 2). The slats butt together inside the frames, but they aren’t glued (Photo 3). In fact, I slightly bevel the edges. These vertical bevels add interest; they also lighten the chest and make it appear taller. Sand and finish the slats. Then install them and glue together each frame. Make sure both frames are square. After removing the clamps, stack the two side frames and make sure they’re identical—make adjustments, if necessary. Then rout the rabbets in their back edges for the back paneled frame.
Mill the stiles and rails for the web frames (C1–C3) and cut them to width and length. Drill holes for the 3/8″ x 2-1/2″ dowels and then glue together each frame. Note that the top two web frames have a third, centered rail. Make sure all five glued-up frames are flat and identical in length, width and square-ness.
Assemble the chest
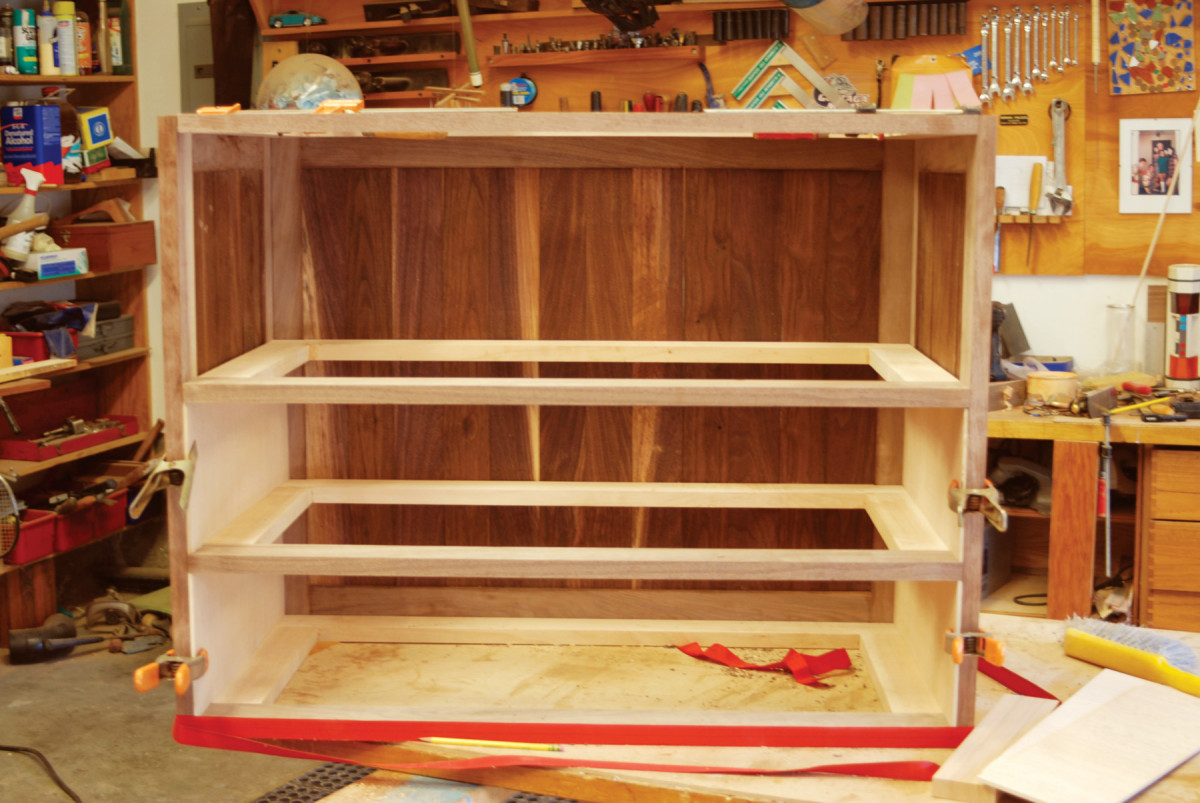
4. Use spacers to precisely locate the web frames for doweling. Clamp the top and bottom web frames in position between the side and back frames. Then mark the three middle frame locations one at a time.
Assemble the chest without glue to locate the three middle web frames. Note: All five web frames have to be trimmed in back to fit flush with the front of the chest. Trim 1/4″ from the back edge of the top and bottom web frames; cut 1/4″ x 2-1/4″ notches in the back stiles of the three middle frames.
Clamp the back frame between the side frames. Then install the top and bottom web frames and use pairs of spacers to position the three middle frames (Photo 4). You’ll need four 7-1/2″ wide spacers and four that are 5-1/2″ wide. Install the spacers and all three middle web frames. Cut the divider (C4) and glue on its facing (C5). Then slide the divider between the top two web frames and precisely center it to create two identical drawer openings. Make sure the width of each opening is the same at the front and the back. Clamp the divider in position and mark its location on both web frames. Then drill pilot holes for screws through the center rails.
Remove the divider and the top pair of spacers and mark the top edge of the middle frame on all four stiles. Hold the frame firmly against the spacers as you draw the lines. Repeat the process to mark the locations of the two remaining middle frames.
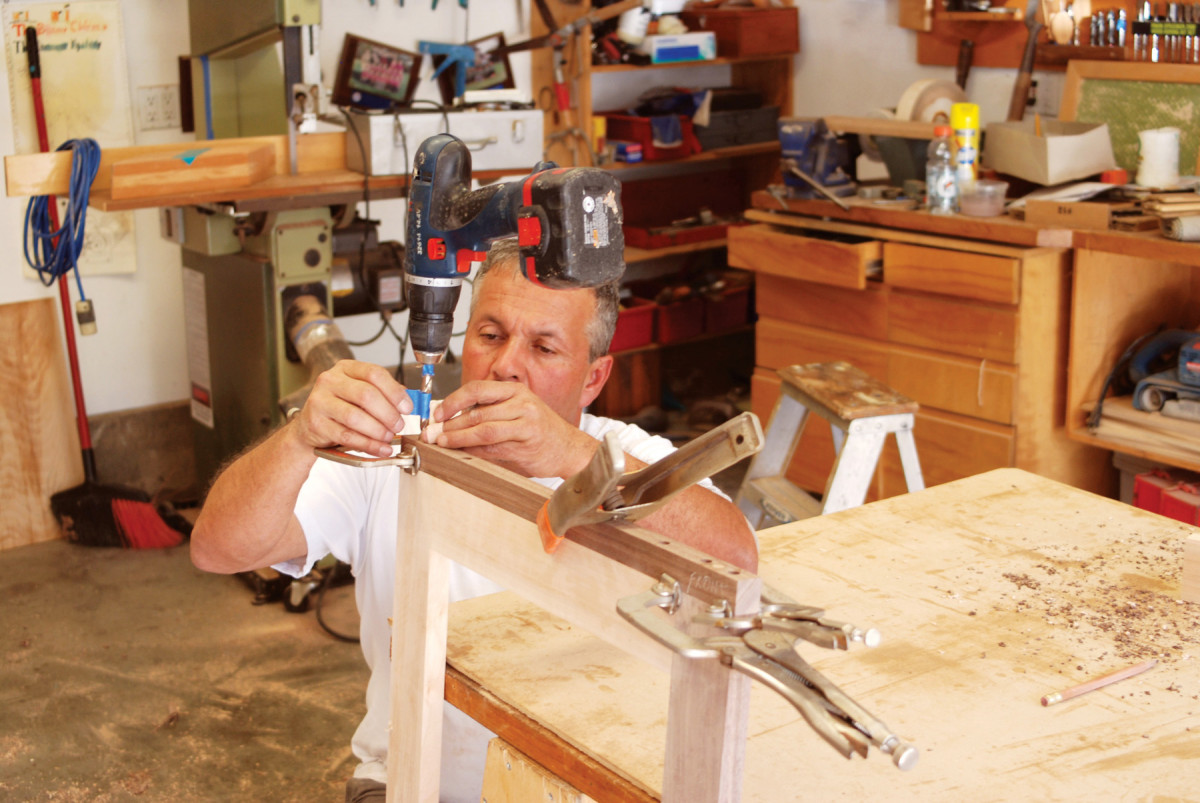
5. Drill holes for dowels in each web frame using a shop-made drilling jig that’s identical to the frames in thickness and length. Use the same jig to drill holes in the chest’s paneled frame sides.
Make a drilling jig from a piece of scrap that’s the same thickness as the web frames and cut as long as the frame is wide (Fig. B). Use a drill press to drill centered holes through the jig. Clamp the jig on each web frame, flush at the front and on both faces, and drill holes for the 3/8″ x 1-1/4″ dowels (Photo 5). Then clamp the jig on each side frame to drill corresponding holes. Use the location lines you’ve drawn on the stiles and the frame’s front edge to position the jig.
6. Install each web frame without glue to make sure it fits properly—square from side to side and front to back, and flush at both ends.
Install each web frame to check its fit (Photo 6). Cut drawer guides (C6) to fit between the side panels’ front and back stiles. Remove the middle web frames and glue a guide to the rail on each end. When the chest is assembled, these guides ensure that the drawers track properly by filling the gaps between the web frames and the side frame panels.
The big glue-up
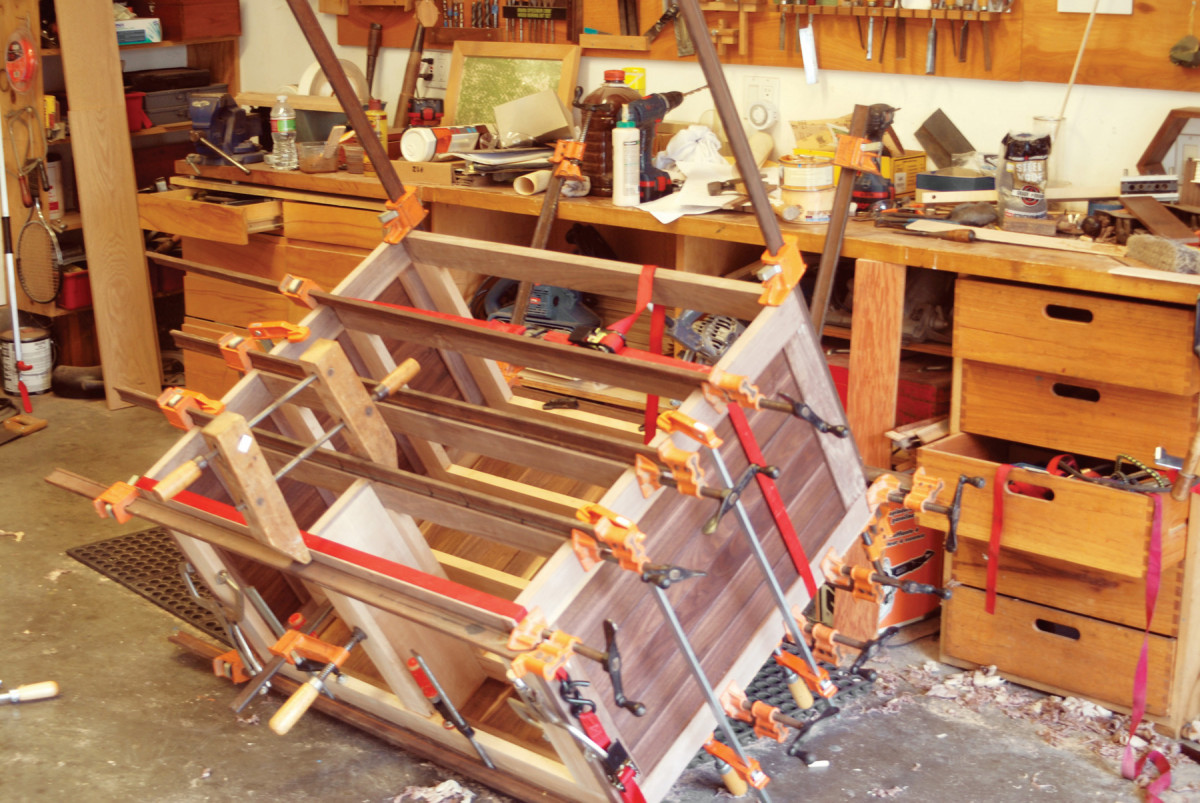
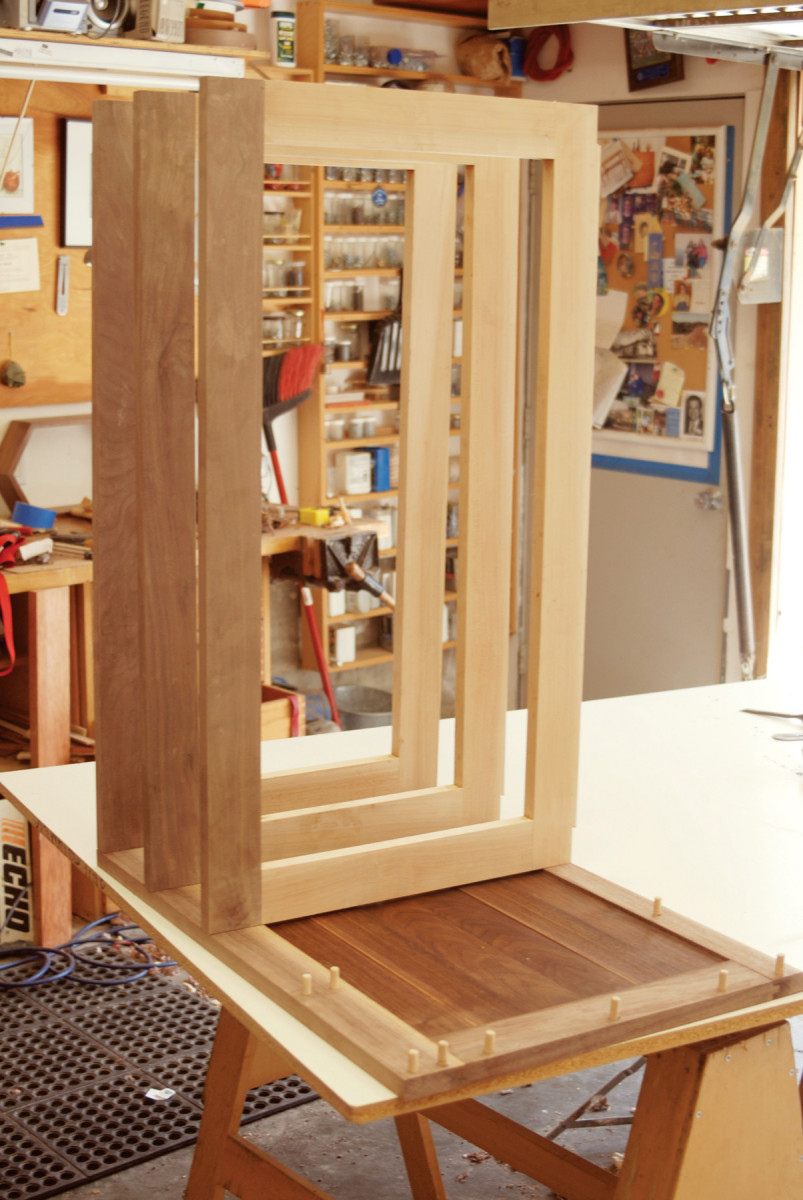
7. Glue the chest together. This complex assembly takes numerous clamps, glue with a long open time and help from a friend.
Enlist a friend to help glue the chest together (Photo 7). Lay the side frames on a flat surface, apply glue with a long open time and install the dowels. Brush glue into the holes in the web frames and install them on one of the side frames. Then install the remaining side frame. Turn the assembly right-side up. Slide in the divider and install the back without glue. Then clamp the joints. Check the assembly frequently as you go to make sure both it and the drawer openings remain square. Let the glue dry. Then remove the clamps and glue in the back. Position the divider and install it with screws to finish the job.
Make the base and top
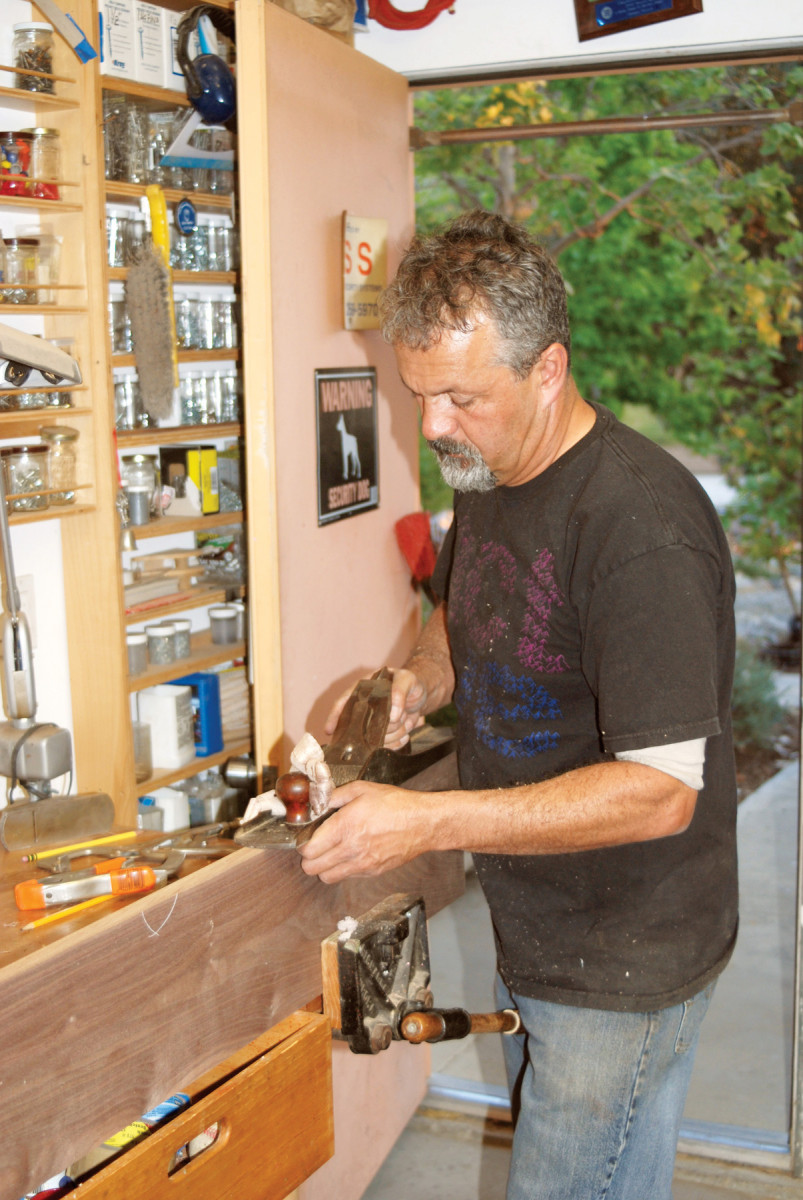
8. Joint all the boards that you’ve chosen for the top. I prefer to plane and fit these joints by hand.
Mill the base and riser frame pieces (D1–D3, E1 and E2) and cut them to width. Cut the miters and glue each frame together. Install corner blocks (D4) to reinforce the miters on the base frame. Fasten both frames to the chest. The base frame sets back 1-1/2″ on the front and both sides; the riser frame sets back 3/8″.
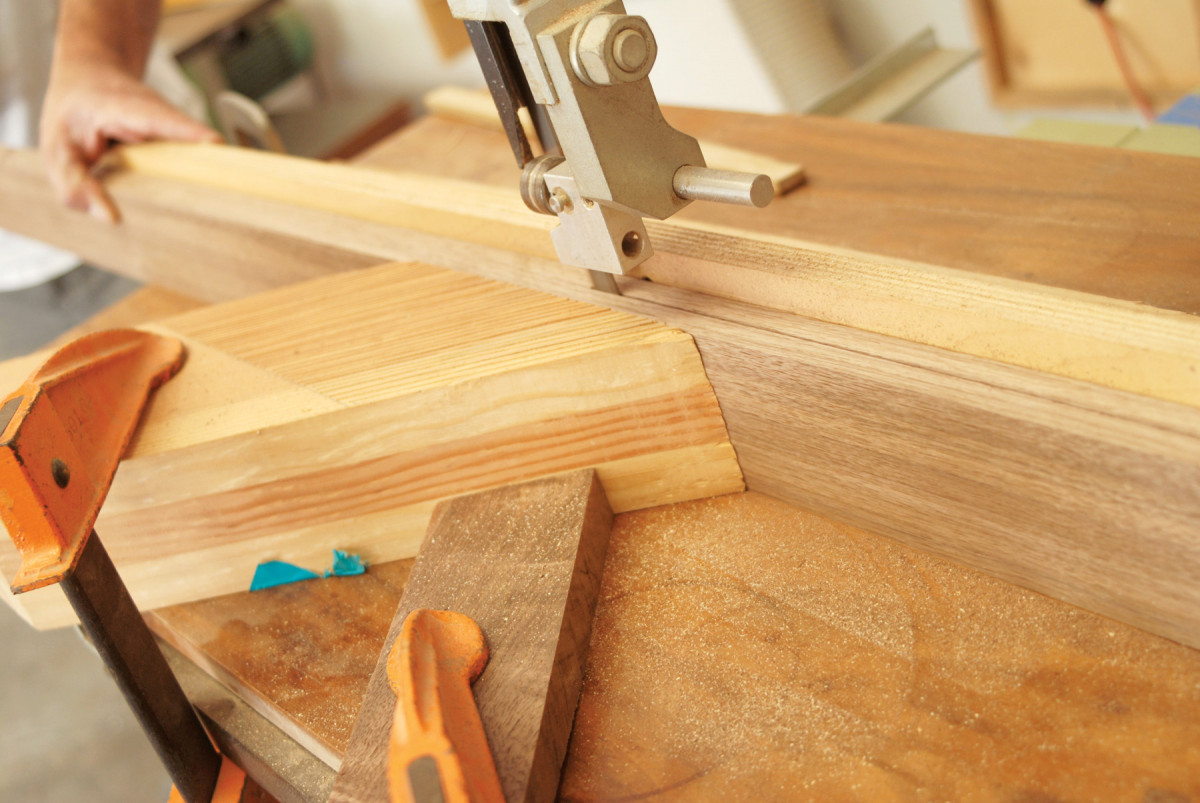
Joint and thickness-plane the boards you’ve chosen for the top (F). Cut the boards at least 1″ oversize in length. Then joint the edges (Photo 8). Glue the top together, trim it to final dimensions and fasten it to the chest on top of the riser frame so that it overhangs the chest by 1/4″ on the front and both sides. The recessed riser frame makes the top appear to float weightlessly above the chest.
Rout hand grips
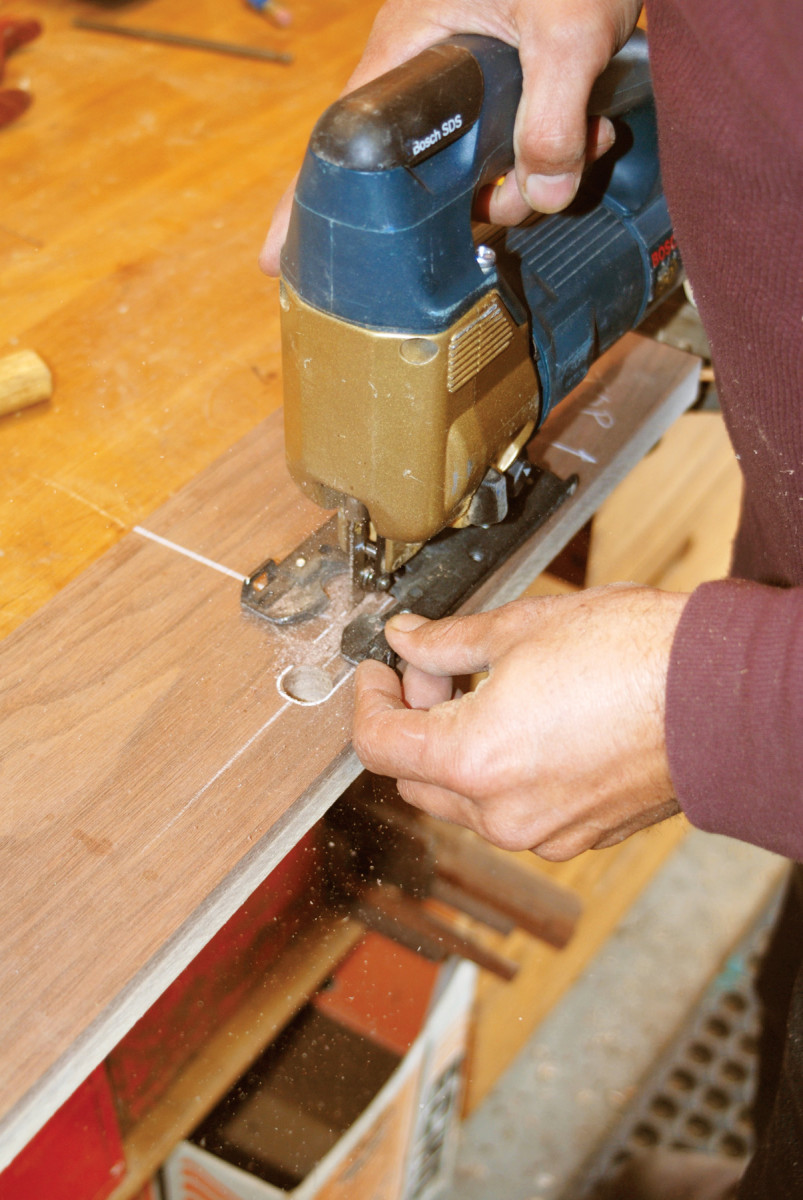
9. Rough out the hand grip on each drawer front. Use the routing jig to lay out the hole and a Forstner bit to drill the rounded ends. Then saw out the waste.
The drawers come in three sizes (G, H and J), but they’re all made the same way. Mill the drawer parts (G1–G3, H1–H3 and J1–J3) and cut them to length and width. Then make a jig to cut the hand grips in the drawer fronts (Fig. C). Use a 5/8″ dia. Forstner bit to create the half-round ends and a jigsaw to remove the waste between them. Smooth and straighten the sawn edges with a file.
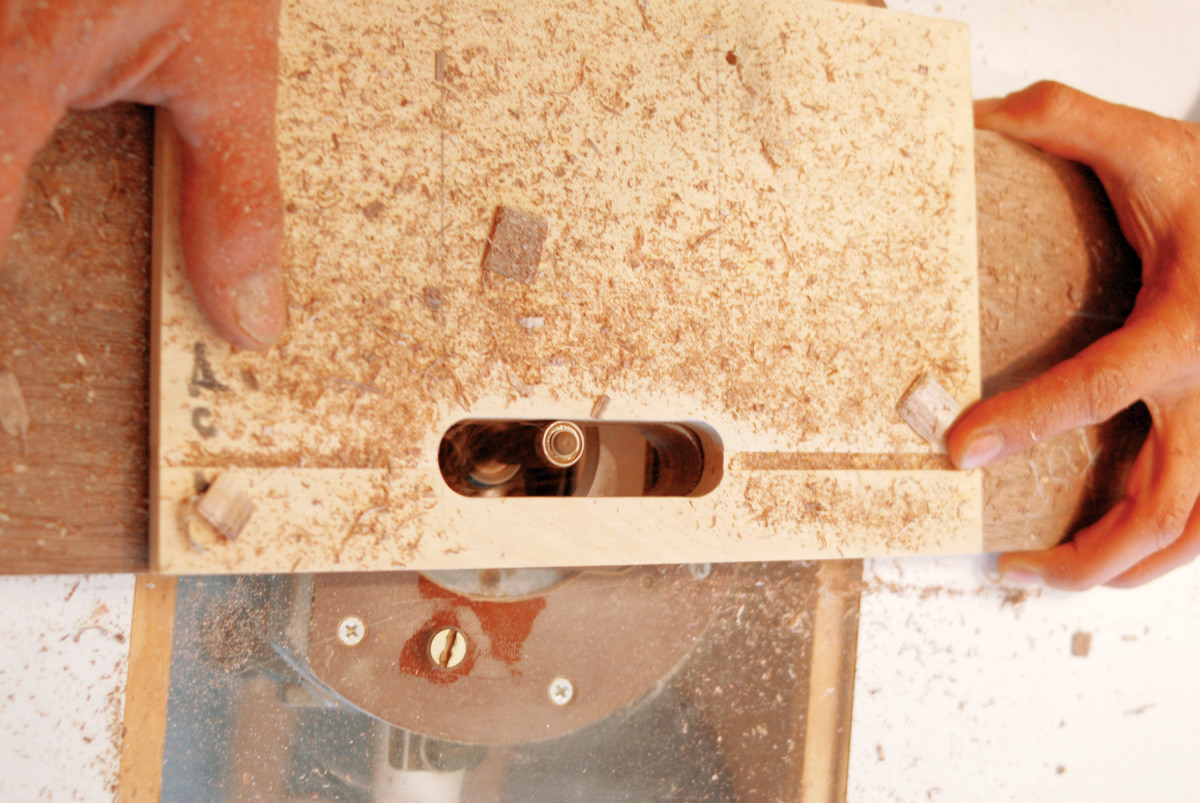
10. Use a flush-trim bit and the routing jig to smooth the rough-cut hand grips. Finish by using a roundover bit to relieve the sharp edges on both sides.
Then use the jig to lay out the holes on the drawer fronts. Center the holes on the two top drawer fronts and use their locations to lay out the holes on the other drawer fronts. Follow the procedure used to make the jig to rough out the holes on the drawer fronts, but use a 1/2″ Forstner bit to stay inside the layout lines. Saw inside the layout lines, too (Photo 9). Use double-faced tape to attach the jig to each drawer front. Then rout the holes to final size (Photo 10).
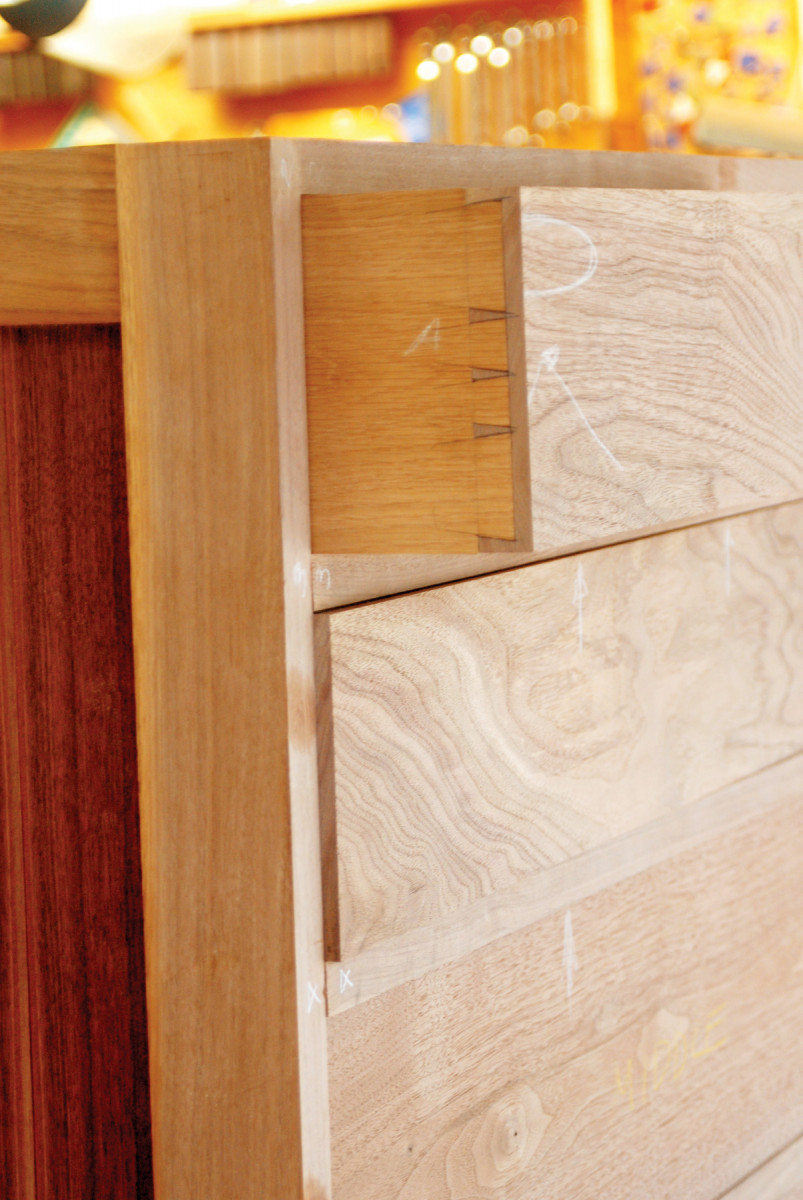
Dovetail the drawers
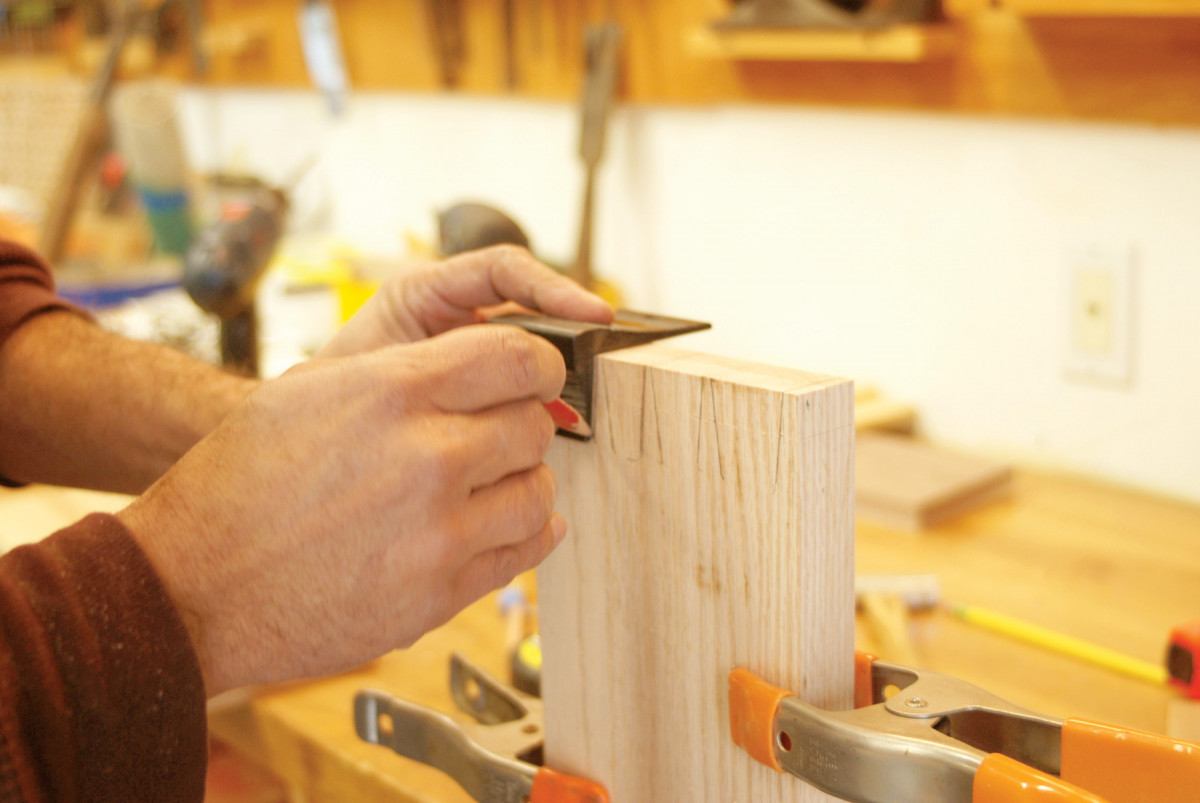
11. Dovetail the drawer joints. For hand-cut dovetails, start by scribing the depth of cut—the thickness of the drawer back—on both ends of the drawer sides and back.
Cut half-blind dovetails on the drawer fronts and through dovetails on the backs. The first step is to scribe the depth of cut on all the pieces. This measurement is determined by the thickness of the drawer sides and backs.

12. Scribe the ends of the drawer fronts to establish shoulders for the half-blind dovetails. Use the same gauge setting used to mark the drawer sides.
On these drawers, they’re the same thickness, so the scribe marks are all the same—9/16″. Mark the faces and edges of the sides and backs (Photo 11). Mark the ends and inside faces of the drawer fronts (Photo 12).
13. Lay out the dovetails on the drawer sides. I gang the sides together and use a dovetail marker to mark lines on the front face and across the top.
Lay out the dovetails on the drawer sides and ends (Photo 13 and Fig. D). I use a dovetail marker to ease this job. Make the width of the wide end of the pin socket (the waste) a tiny bit wider than your 1/4″ chisel.
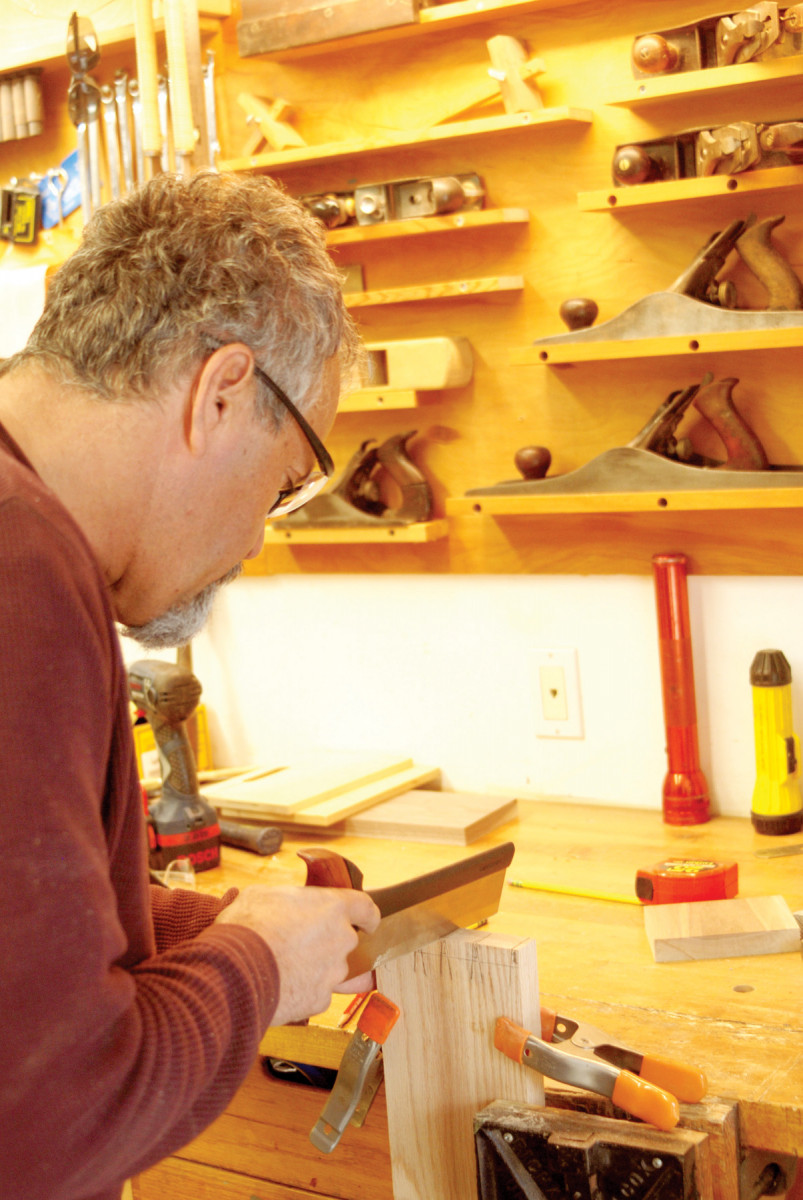
14. Use both lines to guide the saw. Make all the cuts that slope the same way. Then make the cuts that slope in the opposite direction.
Follow both lines as you saw down to the scribe lines (Photo 14). I stopped using Japanese saws for dovetails when I got the Veritas dovetail saw. It’s great!
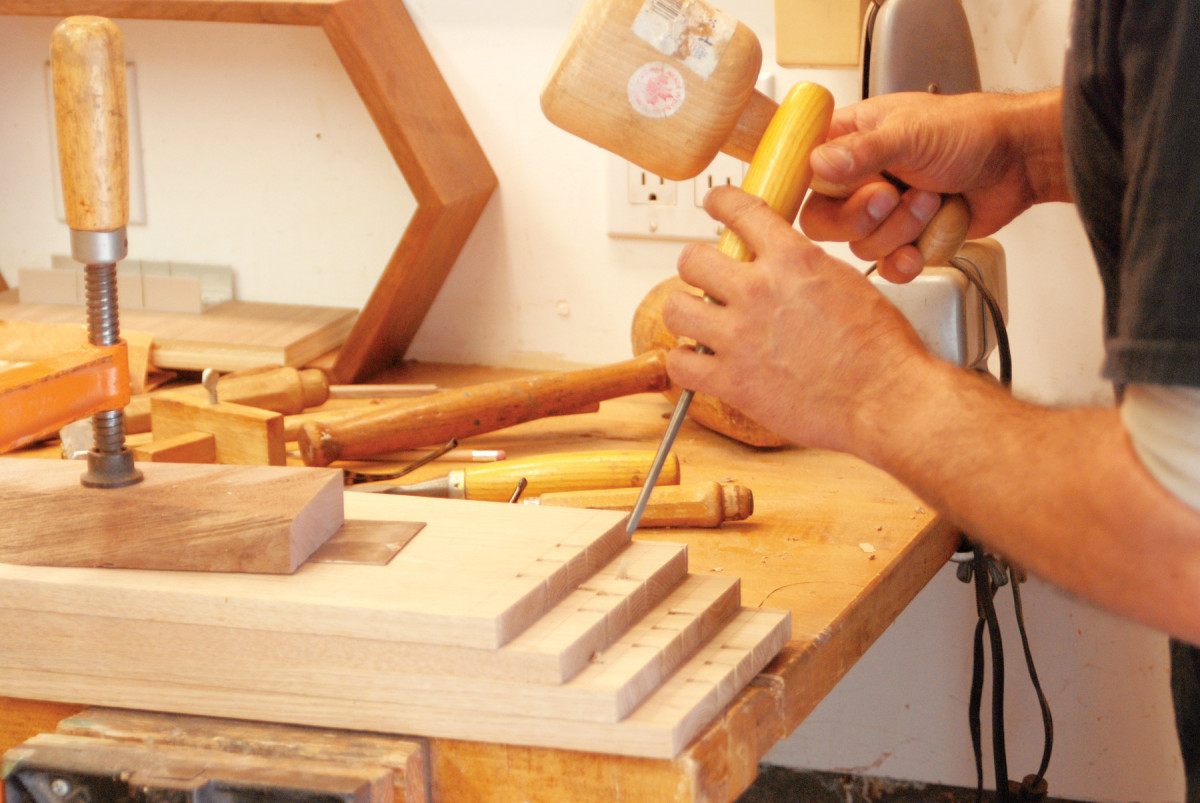
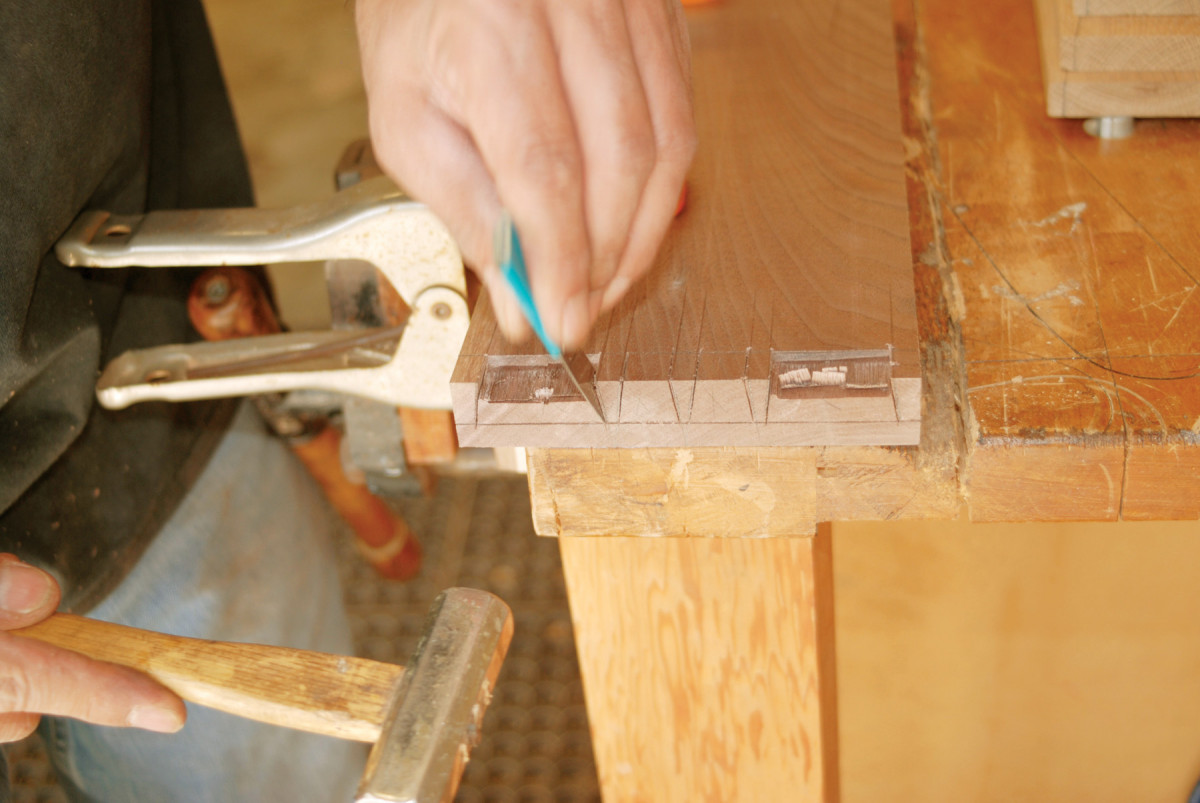
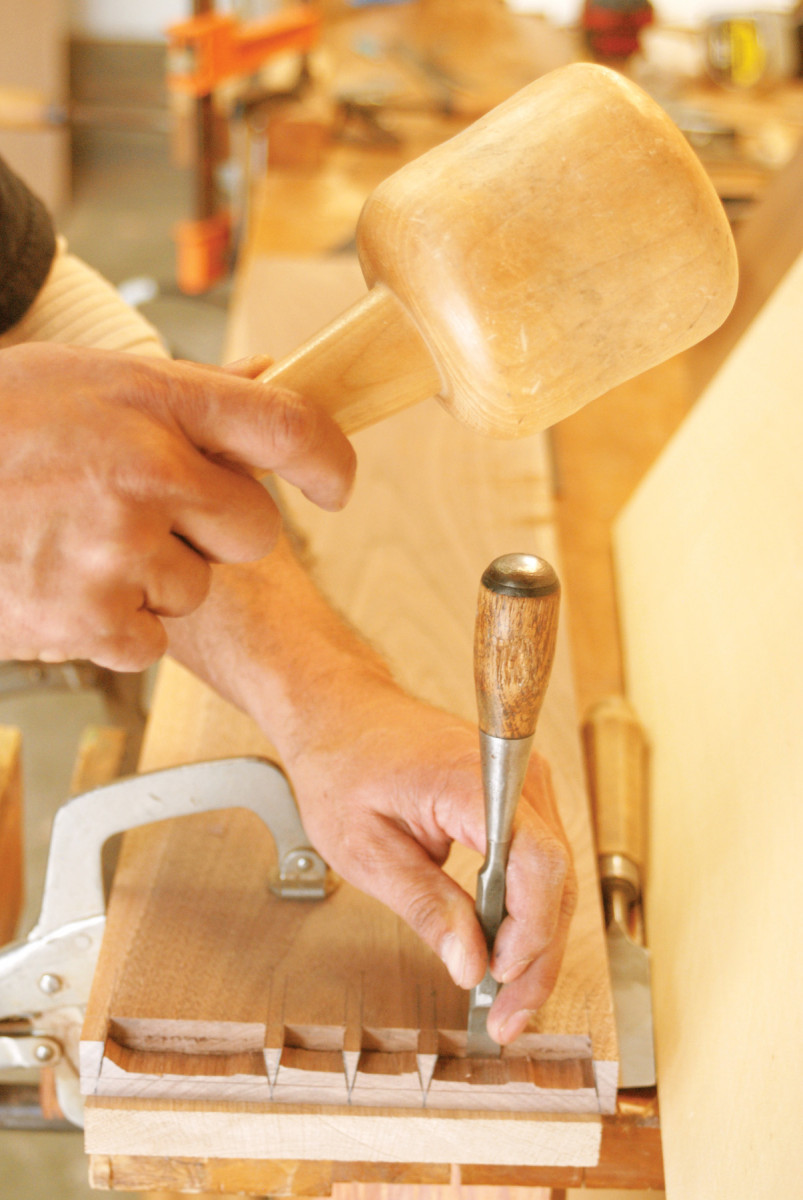
15. Stack the sides to remove the waste. Establish a shallow shoulder at each scribe line and then remove the waste halfway through. Flip over the stack to finish the job.
Remove the waste between the dovetails. Start by establishing a square shoulder. Position the 1/4″ chisel on the scribe line at the wide end of each socket and tap lightly with a mallet to make a shallow 90˚ cut into the wood. Then reposition the chisel and make a shallow sloped cut from the waste end back toward the first cut. This creates a shallow “V” with a vertical shoulder at the scribe line that will support the chisel as you chop out the waste (Photo 15).
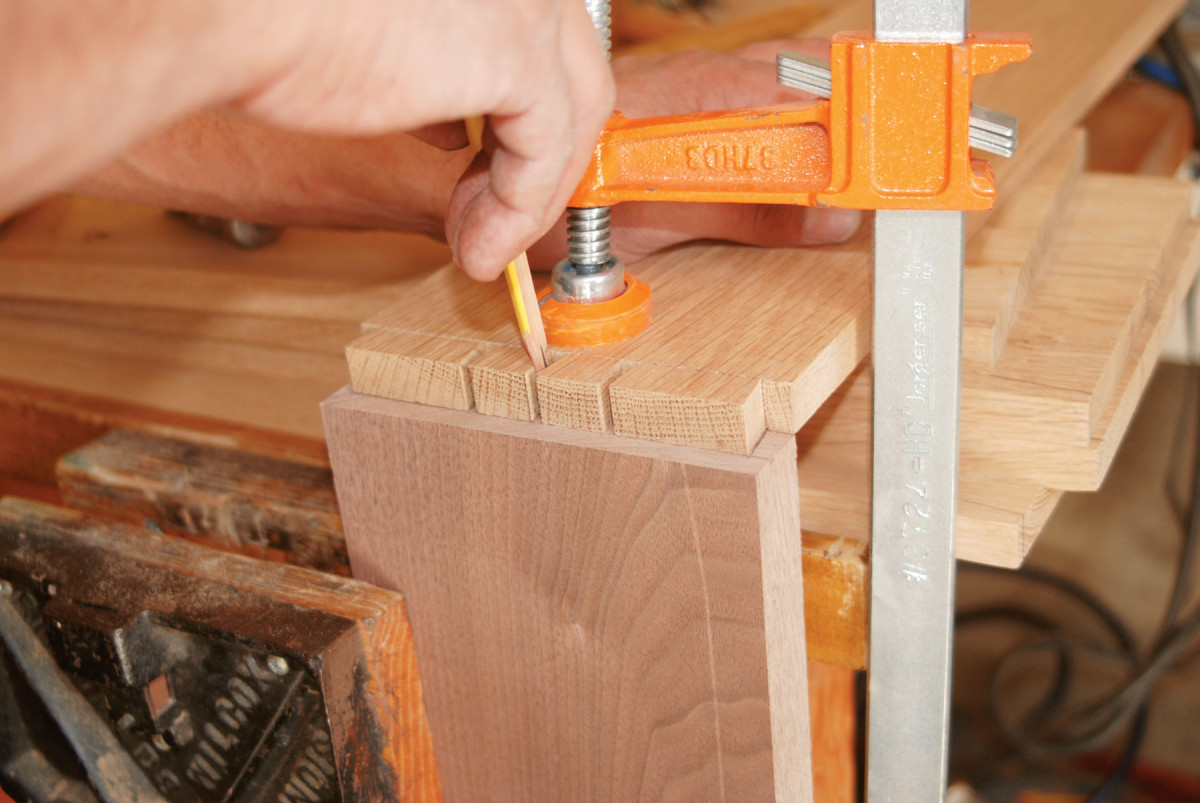
16. Transfer the pin locations from the side to the drawer front. Position the side flush with the scribe mark and flush at the top and bottom.
Use the drawer side to transfer the pin locations to the drawer front (Photo 16). Align the end of the drawer side with the scribe line on the end of the drawer front and flush at the top and bottom edges.
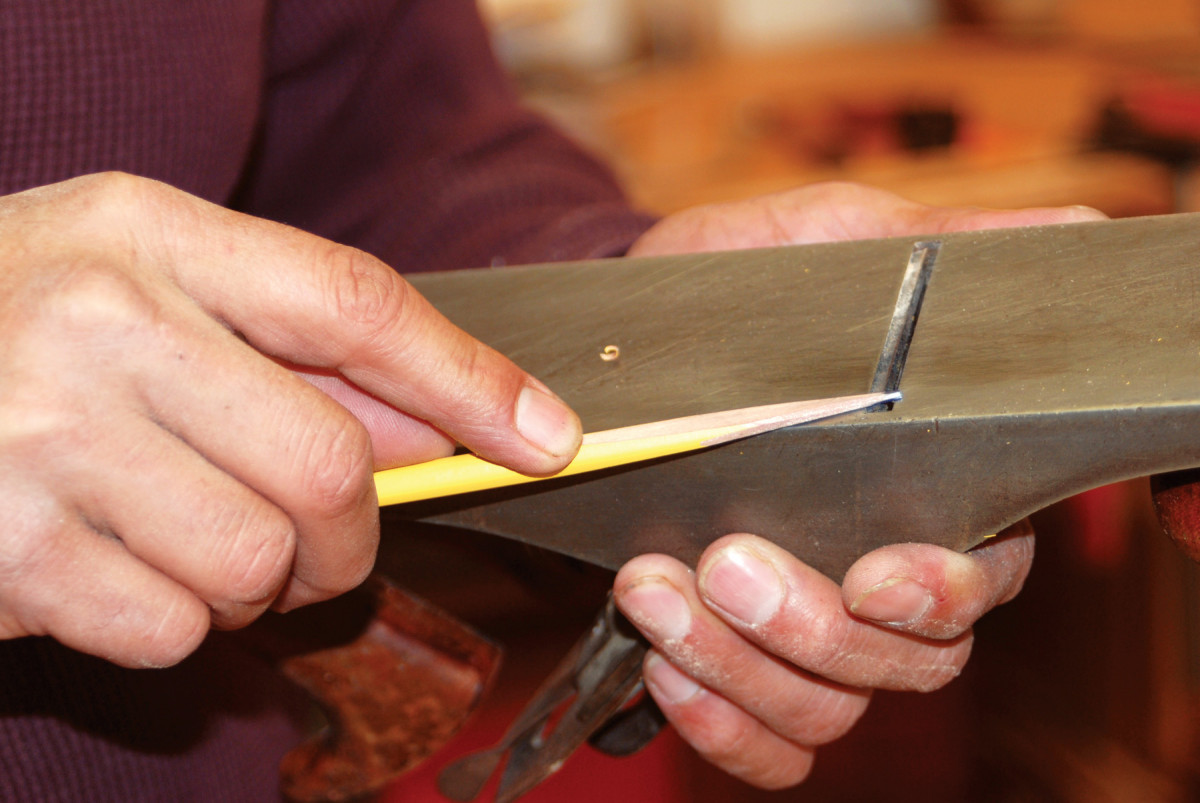
17. Here’s how to make a super-slim, super-sharp pencil to fit in those narrow pin sockets. Make sure to use a pencil with hard lead.
This half-overlay setup creates the half-blind dovetails. Use a super-sharp hard-lead (2H) pencil to mark the lines (Photo 17).
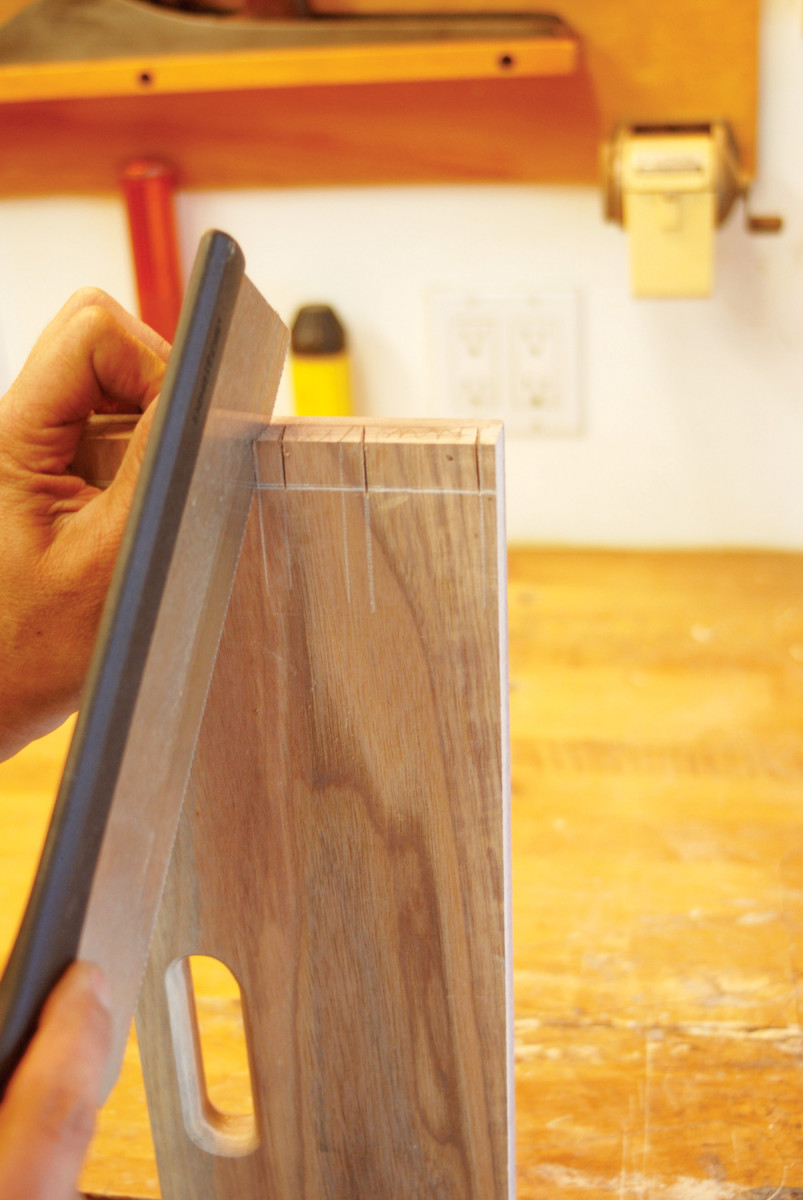
18. Bisect the lines on the edge and back face as you saw. Hold the saw at a 45˚ angle and cut in from the corner to the two scribe marks.
Extend straight lines down the inside face of the drawer front to guide the saw. Hold the saw at 45˚ to cut the half-blind pins (Photo 18). Sawing diagonally leaves the pins only partially cut, which makes it hard to remove the waste in the next step.
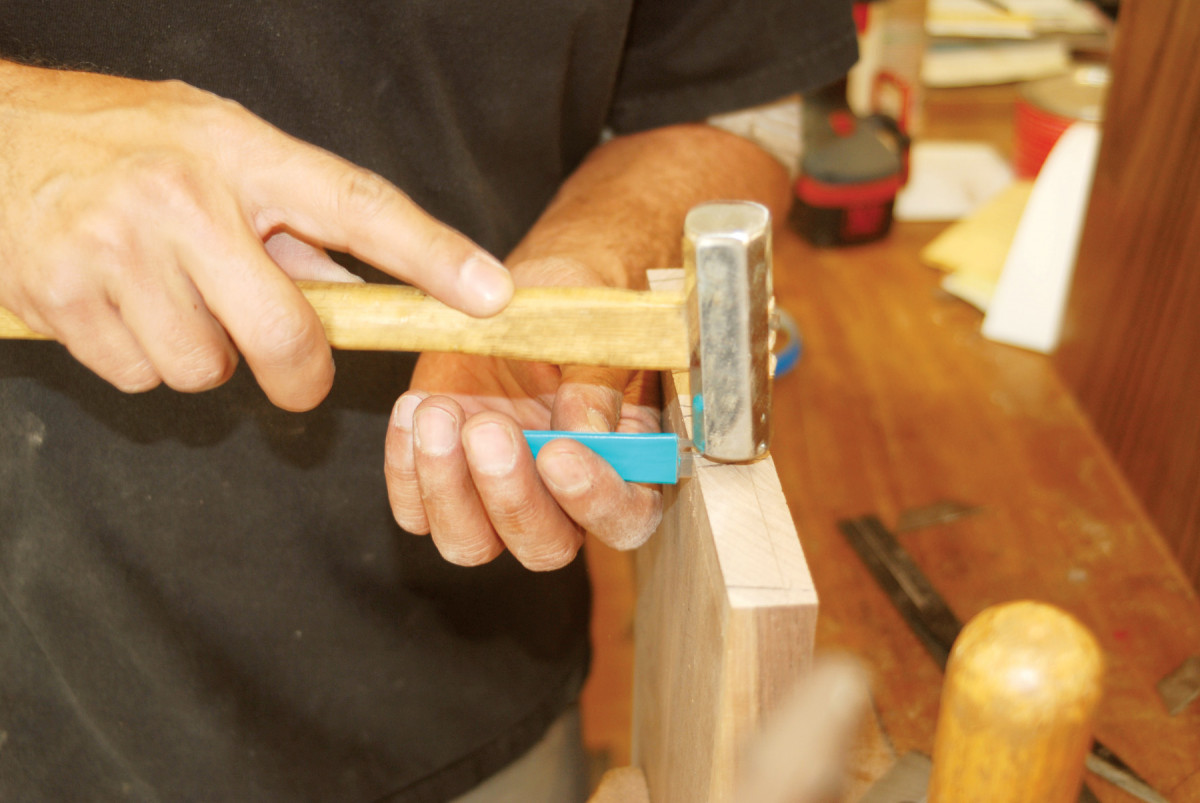
19. Sawing the pins leaves diagonal kerfs that have to be squared to remove the waste. Begin squaring by inserting a scraper blade and tapping lightly.
I use a small card scraper (with tape!) to gradually square the kerf (Photos 19 and 20). To remove the waste, establish square shoulders to support the chisel as before.
20. Continue to square the kerfs as you remove the waste between the pins. Alternate between squaring and removing.
Then alternate between deepening the vertical shoulders and cutting in from the ends to chip out the waste (Photo 21).
21. Gradually remove the waste by alternating between vertical and horizontal chisel cuts. Cut precisely to the two scribe marks and make sure that both shoulders are square.
To mark the pin locations for the through dovetails on the drawer backs, use a full overlay setup: Position the drawer side on top of the back’s edge, so the back edge of the side and the outside face of the back are flush. Extend the line down to the scribe mark on the back’s face. To cut the through pins, start with the saw at 45˚, but this time, gradually level it as you cut across the top edge. This allows you to continue cutting down to the gauge lines on both faces. To remove the waste, use the same method you followed earlier to create the pin sockets in the sides: Establish 90˚ shoulders to support the chisel, chop halfway and then flip over the back and complete the job from the other side.
Fit the drawers
22. Test-fit each drawer. Aim for a tight fit that can be trimmed with a hand plane to allow smooth operation and seasonal movement.
Plan to make adjustments when you test-fit each joint. You’ll quickly learn that all the joint shoulders must be square. Level the bottom edges of each drawer. Then insert each drawer in the chest to test the fit (Photo 22). I remove the top before this step, to allow easier access and better visibility. Reduce the drawer heights appropriately to allow seasonal movement—the amount depends on your location and the time of year. Here in Los Angeles, seasonal movement isn’t an issue, so I allow a minimal amount. Disassemble the drawers and saw grooves for the bottoms (G4, H4 and J4). Then cut the bottoms to fit.
Finish-sand the inside faces of all the drawer pieces. Then glue the drawers together. Slide each completed drawer in the chest and fine-tune its fit. I use a hand plane for this step. Then install the drawer stops (K).
Apply finish
Prepare the chest, drawers and top for finishing. I use a finish made by mixing boiled linseed oil, polyurethane varnish and turpentine, so I sand every surface up to 320 grit.
I apply a generous first coat and wet-sand with 400 grit silicon carbide sandpaper. The next day I apply a second coat and wet-sand with 600 grit. Let this coat dry for three days or longer, if necessary.
Apply a third very thin coat and remove the excess—I use a dry brush for this step. Keep the brush dry by wiping it on a clean, dry rag The wood’s surface should look dry when you’re done. Let this coat dry for a week. Then apply a coat of paste wax.
Here are some supplies and tools we find essential in our everyday work around the shop. We may receive a commission from sales referred by our links; however, we have carefully selected these products for their usefulness and quality.


