We may receive a commission when you use our affiliate links. However, this does not impact our recommendations.
On the first day of my woodworking classes at Dictum GmbH in Bavaria in June, I began with a confession.
“I’m afraid that after three years, my German language skills are still crap,” I told the students. “However, I am fairly fluent in speaking ‘workbench.’”
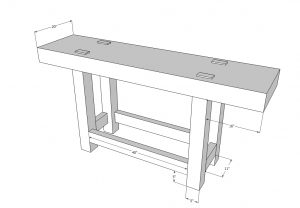
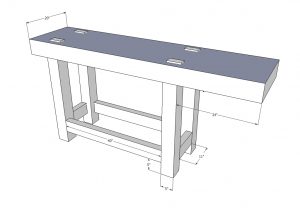
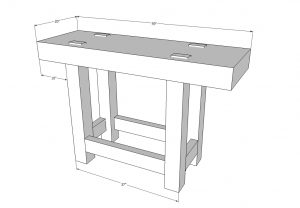
And it was a skill that came in handy during the week-long workbench-building class. Several of the students wanted to redesign their benches to better fit their small shops – the 6’-long model I had designed was too long.
When you need to scale a workbench up or down, you have several choices.
1. Don’t scale it. Simply shrink (or lengthen) the top. I don’t like to do this unless I’m increasing or decreasing the size of the benchtop by less than 12”. Why? The bench can start to look clunky. Or the benchtop’s overhang can become so pronounced that the bench becomes tippy. Or the overhang becomes so reduced that it interferes with any vises you might install on the ends of the benchtop.
2. Shift the base one direction – typically left for right-handed benches. This is a fairly traditional solution when scaling down a bench. It gives you enough overhang at one end to allow you to squeeze in an end vise. If you shift the base just a few inches, you’ll hardly notice it. Shift it significantly, and it will begin to look like a more modern European bench. Shift things too much and it gets tippy.
A quick sidebar on tippy benches. Several smallish European benches intentionally shift the base of the bench all the way to the left of the benchtop so there’s room for full-scale tail vise hardware on the right. This can result in hilarity. Several times I’ve seen people sit on the tail-vise section of these benches, tipping the bench and all its contents.
My personal preference is not to shift the base by more than a few inches. Why? I like the Old World look and never want my bench to tip.
3. Scale everything. This is the more difficult solution because you have to balance what your eye sees, what your shop can handle and what your vises need. I’ve seen lots of workbenches – thousands perhaps – and so I have a feel what looks good and what looks weird. You can develop your eye, too.
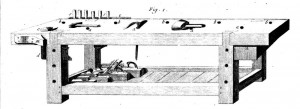
Study A.J. Roubo’s Plate 11 for starters. The overhang on this bench is about one-seventh or one-eighth of the total length. But this is a long bench by modern standards, so simply grafting that proportion onto your bench rarely works – unless your bench is 8’ to 10’ long. Instead you want to achieve the same look but keep the base at least 4’ long in a 6’ bench. Bases shorter than that can be tippy. So, for example, when I design a 6’-long benchtop, I’ll use a 4’-long base, which will give me 1’ of overhang on either side. This looks good, but it is not the same proportions as the bench in plate 11.
By the same token, I don’t use the same proportioning system when I scale benches up in size. I usually limit the overhang to no more than 20” on either end, even with a 12’- to 14’-long benchtop. With long benches, I’m actually not as concerned about the ends, I’m more concerned about the middle. The question is: Is there enough support, or do I need to add another leg or two?
Once I get above 10’ long, I do like to add another leg or two in the middle to add support – both real and visual. Though a 10’-long bench with a thick top probably works just fine, as soon as you get longer than that, it just looks like it needs another leg. So rather than run a bunch of formulas about the modulus of elasticity of my material, I’ll throw in another set of legs.
So if you’ve made it this far in this too-long blog entry, let me add an important caveat: These guidelines are only that. My eyes prefer the Continental Old World look. So don’t try to graft these ideas onto a contemporary Scandinavian bench. I don’t know if that will work.
The goal of any workbench is to make it functional, stable and good-looking (if you care about such things). So, like with any form of furniture, your best bet is to study other examples, internalize them and then trust your gut.
— Christopher Schwarz
Here are some supplies and tools we find essential in our everyday work around the shop. We may receive a commission from sales referred by our links; however, we have carefully selected these products for their usefulness and quality.


Hi Chris.
Sorry that I couldn’t make it to the workbench class, but I’m stuck in Nigeria on an offshore vessel constructing oilwells for Chevron (Agbami project). I will get off in two weeks time, so maybe I’ll see you in Metten next year.
I have a bit off topic question/comment regarding workbenches:
I have thought about making a Roubo with a shoulder vise (since I’m Scandinavian). I plan to make it without the fifth leg, but still reinforce it using M16 or M20 threaded rod. Wouldn’t you think it was stiff enough on a top of 6″ thickness?
Or do you have any smart ideas/plans for a shoulder vise fitting on a Roubo?
Brgds
Jonas
There’s nothing wrong with a long blog article Chris.
Getting your benchtop length right is complicated, particularly when your bench not only has to be short to fit a European (read “small”) woodworking space, but also needs to include a tail vise.
The shorter your bench, the more the legs and rails tend towards the square rather than the rectangular. The leverage of pushing down on the extended end, although the rest of the bench is heavy, works on the fulcrum provided by the legs in contact with the floor.
It helps to add weight underneath at the other end in the form of a box full of handy cast iron stuff, like the odd small anvil and clamp-on vise.
If you need your bench to be in the middle of the floor, so you can work all round it, another problem crops up – the creeping end effect. Sawing and chiseling from one side at the end of the bench turns the bench away from you.
A solution for this, that also gives two working heights for the bench, is to make a pallet from 2 by 4s on their sides that sits on the floor to make up the space between the bench and the wall and prevent the legs moving.
With an anti-fatigue mat on top this can lower the height of the bench on the pallet side to a better chopping down height for mortises, leaving the other side more suited to sawing and chiseling.
What about a top that’s “too thick”
I’ve got a piece I’ve been saving
19″ wide x 5 foot long x 7.5″ thick.
I got it free because the lumber mill
discovered the tree ate a wire fence
so running it through some manner of
woodworking machinery isn’t really an
option and I can’t imagine planing 2 or
more inches off the thickness by hand…