


We may receive a commission when you use our affiliate links. However, this does not impact our recommendations.

Maximize your drum sander’s potential.
1. Skip the Scrape
 Eliminate laborious hand scraping of dried glue: contrary to popular belief, you can take glue-ups directly to your drum sander. The secrets are to use a coarse abrasive (24-grit to 60- grit, depending on the amount of glue and how uneven the glueup is) and feed the wood at a skewed angle. Set the sander so it just hits the elevated glue-lines. Take light cuts until 90- percent of the glue is gone then switch to a finer grit.
Remember, your drum sander’s greatest enemy is excess heat. This is especially true when you sand off glue. Finer grits (80-grit and above) and heavy cuts can generate enough heat to melt the glue and gum up the abrasive. Skewing the work further reduces heat build-up, because it keeps the glue-lines moving across the drum, rather than remaining in one spot on the abrasive.
2. It’s ok to Skip Between Coarse Grits
It’s OK to skip grits below 100-grit. However, it’s best to move through finer grits sequentially. It’s harder for these grits to remove the scratches left by an abrasive that’s more than one step coarser.
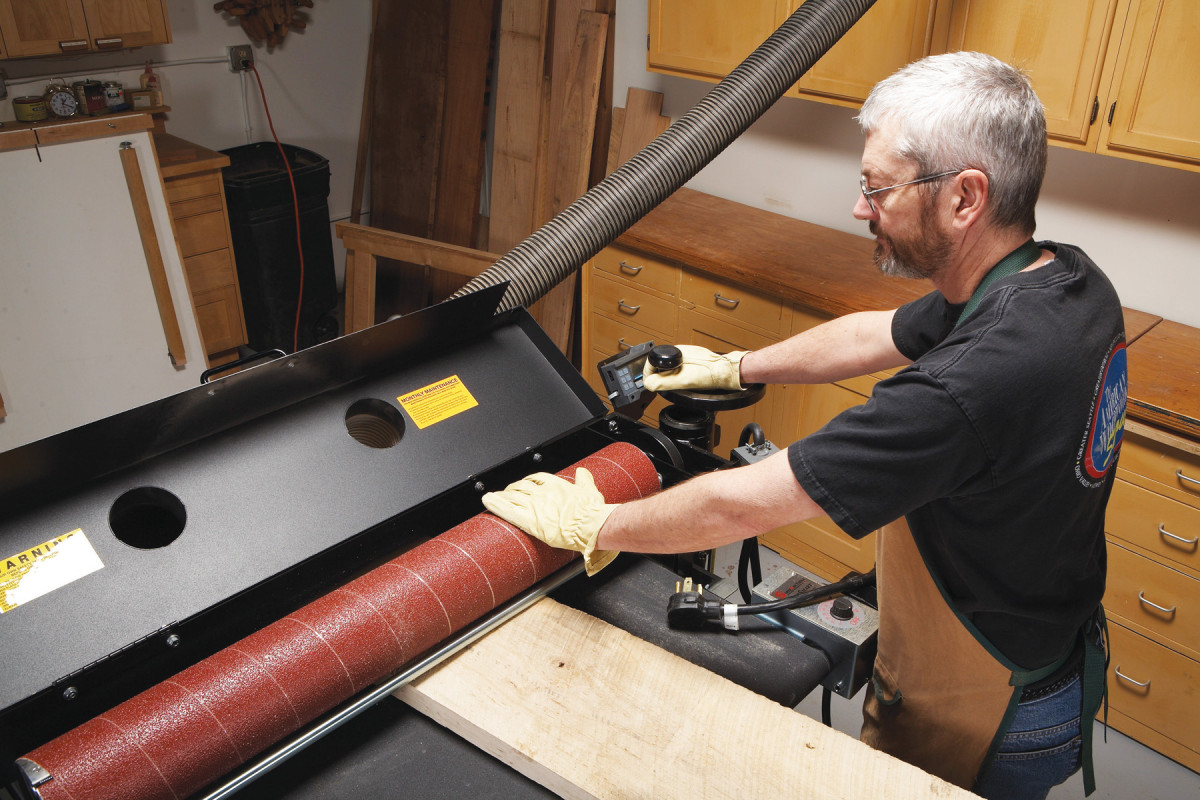
3. Increase Belt Longevity
 Get 20 to 30 percent more life from your aluminum oxide sanding belts by changing the orientation of the grit. It’s easy to do. Simply alternate the end of the belt you install first. Make it a habit to remove the belt from the same side of the drum you installed it on. Wind the belt in a roll as you remove it. That way, what was the trailing end of the belt gets turned around and becomes the starting end. Switching the abrasive’s orientation changes the direction the abrasive particles hit the wood. This causes the particles to wear more evenly, so they last longer.
4. Start with the Right Grit
 The most common mistake people make is to start with grit that’s too fine. Here are some good rules of thumb: For abrasive planing or sanding glue-ups, start with a 24-60 grit belt; for sanding boards from a planer or jointer, start with 80-grit or finer. If you have to make more than three passes with your starting grit, you probably started too fine. (The exception to this is abrasive planing where many passes with a single coarse grit are sometimes needed to joint the board flat.)
5. Dust Collection is a Must!
Do not skimp! Removing sanding debris quickly and efficiently is critical to effective sanding. Make sure your machine is getting all the CFM called for in the manual. Be wary of inflated CFM rates touted by some dust collector manufacturers. Sanders require a lot of CFM because they need to pull dust off the spinning drum before it gets carried around and deposited back on the material being sanded. Fugitive dust will load belts faster, reduce sander efficiency and could cause the material to slip on the conveyor belt and possibly even kick back at the operator. If you are getting any residual dust left on the wood as it emerges from the drum sander, you need a more powerful dust collector. Note: If your sander has two 4-in. ports, you will need a 6-in. line carrying the required CFM to service the machine. Divide this 6-in. line into two 4-in. lines. It’s a mistake to divide a single 4-in. or even 5-in. line in two because it will starve your machine of the airflow volume it needs.
6. Start at the Right Height
Heavy cuts are hard on both your machine and the abrasive. The first cut is the hardest to get right. Here’s the trick. Unplug the machine, and slide the board into the sander so the thickest portion is under the drum. Then lower the drum as you spin it by hand. Stop when the sandpaper starts to make contact with the wood. You’re good to go. Remember, it’s much better to have a very light first cut then one that bogs down your machine.
Once you have the initial setting, subsequent adjustments between passes should be very small, especially with fine grits. Shoot for cuts less than1/64-in. for fine finish work and up to 1/8-in. for abrasive planing on. Also, keep in mind stock width; glue ups that approach the machine’s capacity require lighter cuts than a single 8-in. board. It’s a good practice to occasionally run the stock through a second time without adjusting the depth. If you still hear the abrasive cutting on the second pass, you were probably set too deep on the previous pass.
7. Clean Paper Works Better and Lasts Longer
 Use a rubber belt cleaner whenever the dust build-up on the abrasive can’t be swept off with a brush. A loaded belt will not cut efficiently, because the abrasive particles are partially buried. Loaded belts build-up heat rapidly, making them prone to scorching the wood. When a loaded belt hits a pitch pocket or a knot, the excess heat can melt the pitch and leave a hardened streak of baked on sanding debris on the abrasive.
With the dust collection on, hold the cleaning stick against the spinning drum. The soft rubber scrubs out the embedded debris. Be sure to sweep off any debris left on the drum and conveyor belt. Always wear eye protection when cleaning a belt.
8.Clean Up Stubborn Streaks
 Use a length of 1/4-in. Plexiglas to remove streaks of fused sanding debris. These streaks are typically caused by pitch pockets or knots and can ruin a belt. A rubber abrasive cleaner won’t touch these baked on rings. Instead, hold the Plexiglas edge on the streak. If that doesn’t do the trick, try soaking the belt in mineral spirits or a product like “Simple Green”, overnight. Note: Always wear eye protection for cleaning operations.
9. Choose the Right Feed Rate
 There’s no foolproof formula for calculating optimal feed rates. A good rule of thumb is this: the coarser the grit, the faster the feed rate. Slower feed rates yield more drum RPM’s per inch and helps create the ultra smooth finish you’re looking for with the finer grits. If you start to get some burning on the stock at a slow feed rate, bump the feed rate up until it stops.
Heavy stock removal with coarse abrasives does not benefit from a slow fed rate so it makes sense to go as fast as the machine can to get the job done.
When in doubt about the right speed, set the feed rate between 40 and 50 percent for your first pass. This will get you safely in the ballpark where you can fine-turn the optimal speed for the task at hand. Finally, listen to your machine: it will tell you if it’s working too hard and you need to slow down.
10. Don’t Skimp on Abrasives
 Use high quality abrasives; you’ll avoid all kinds of headaches and in the long run, save money. Look for a backing material made of cloth, polyester or a combination of the two—cloth will stretch a bit more than polyester. Avoid paper-backed products; they’re too fragile and tear easily.
Besides selecting the correct backing material, you should also select the correct backing weight. For a drum sander, look for an X, Y or XY weight rating on the back. This weight range is the best compromise between durability and flexibility.
Inexpensive abrasives tend to use lower quality bonding material (the stuff that holds the grit to the paper) and won’t last as long. Also, the grit on inexpensive paper can be inconsistently sized, which can cause annoying scratch marks on an otherwise smooth surface.
It’s best to stick with reputable abrasive brands like 3M, Norton and Klingspor.
11. Sand Really Thin Boards
 It’s easy to make your own veneer from resawn boards with a drum sander. Furniture repair shops love this feature because it allows them to match the thick veneer used on period furniture. Some drum sanders can sand wood all the way down to 1/32-in. Note: Drum sanders that use compressible materials such as hook and loop fasteners, soft backing under the abrasives or a soft rubber conveyor belt cannot sand this thin.
12. Avoid Burns
Burn-prone woods like cherry, maple or pine need special care when sanding to avoid burn marks on the wood. Try the new zirconium or ceramic abrasives. Both abrasives are harder than aluminum oxide and run cooler, to help minimize burning. This is especially useful during abrasive planing, when heavy cuts and coarse grits are more the norm. As you progress to the finer grits, take very light cuts.
13. Always Finish with an Orbital Sander
Don’t expect a sanding machine to give you surface that’s ready for applying a finish. Always finish the sanding sequence with an orbital or random-orbit sander. It’s best to back up one grit size when you start your orbital sanding. So, if you drum-sand to 180-grit, start your orbital sanding at 150- or even 120-grit.
14. Skew the Work for Best Results
 Feed the wood through the sander at an angle. This creates an efficient shearing cut on the wood fibers that generates less heat than a cut that’s parallel with the grain. Less heat means less belt loading and that means less burning on your wood or melting of glue lines.
A 30-degree angle gives the best shearing cut. If the work is too wide for 30-degrees, do what you can; any amount of skew is better than no skew. Finish with one or two straight-line passes with your final grit to eliminate any cross grain scratches.
15. Sand Box Sides
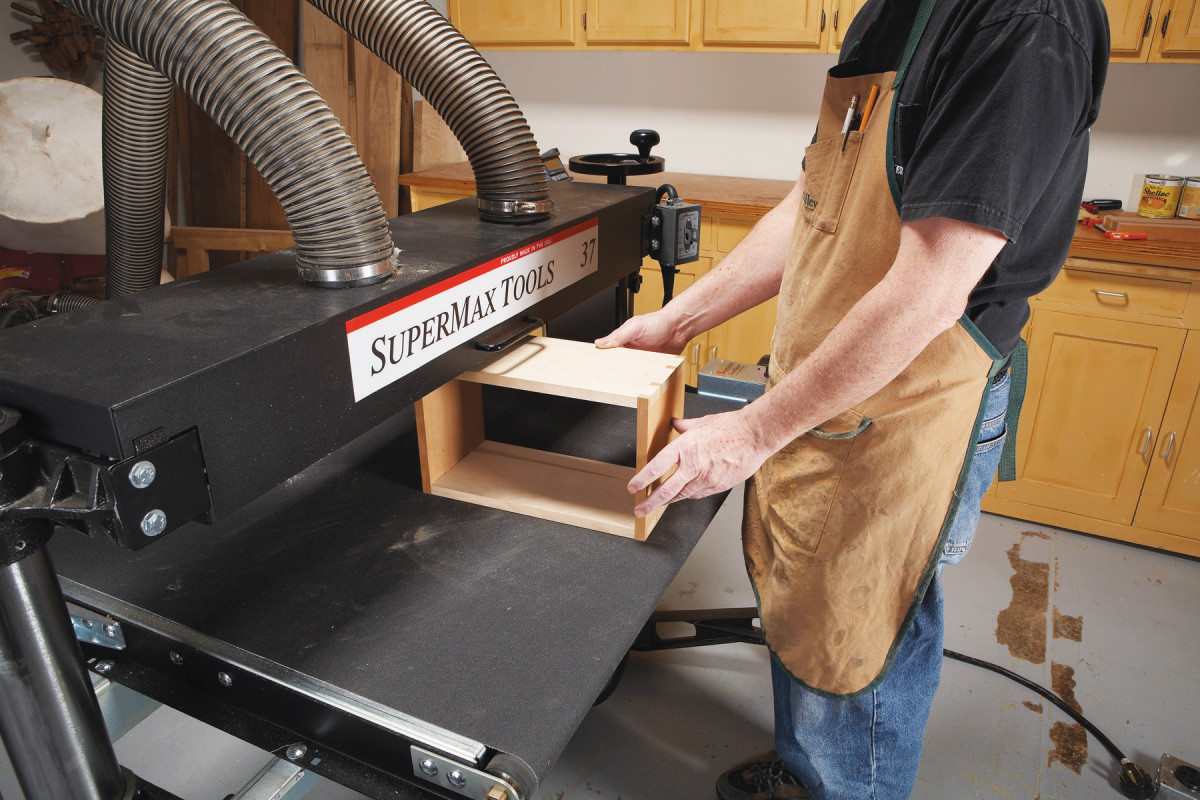 Drum sanders work great for sanding assembled boxes and drawer sides. People pay a lot of attention to the width of their machines, but often ignore the depth capacities. In general, wider machines have larger depth capacities.
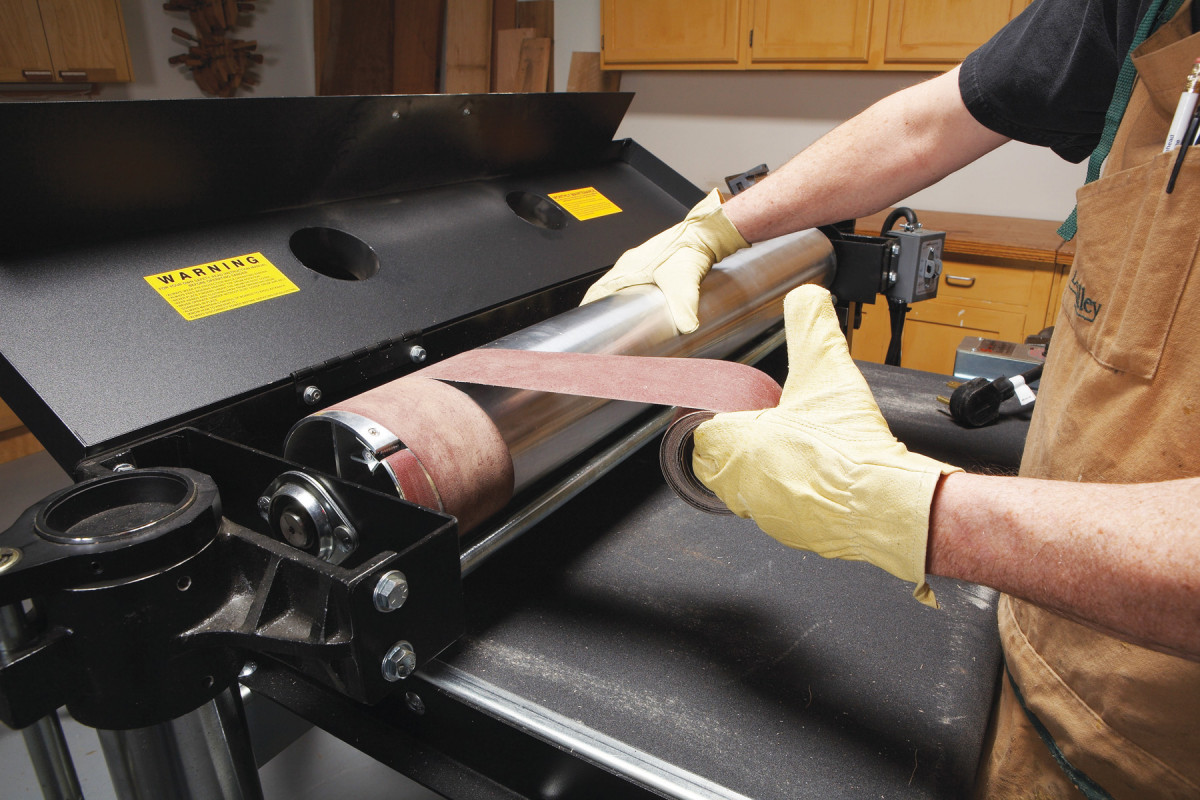
16. Hold the Gap
 When you install a belt, it’s important to leave a gap in the take-up slot at the end of the drum. The take-up pincher inside the drum is spring-loaded, so it’s always pulling on the end of the belt. The gap allows the belt to be pulled further into the drum as it stretches during use. This keeps the belt tight on the drum. Failure to provide this gap locks the belt in place and renders the take-up pincher ineffective. It’s OK to leave a slight gap or no gap where the belt winds around the rest of the drum.
17. Save your Fingerprints
Avoid skin abrasions by wearing leather gloves whenever you handle the abrasives. I learned this lesson when I first started using a drum sander. At the end of a job that required several belt changes, my fingertips were really sore. On closer inspection I saw that my fingerprints had been completely abraded away.
A pair of tight fitting leather gloves really does the trick.
18. Joint Wide Boards
 Use a drum sander to joint boards that are too wide for your jointer. Unlike a planer, some drum sanders (typically ones with adjustable pressure rollers) exert very little downward pressure on the board. That allows them to take the cup or crown out of a board (photo above) without a sled or support. Take light cuts and run the board concave side down.
If your board has a severe twist use some hot melt glue to attach skids on the sides before running it through. Once you get one side abrasive planed flat, knock off the skids and plane the other side.
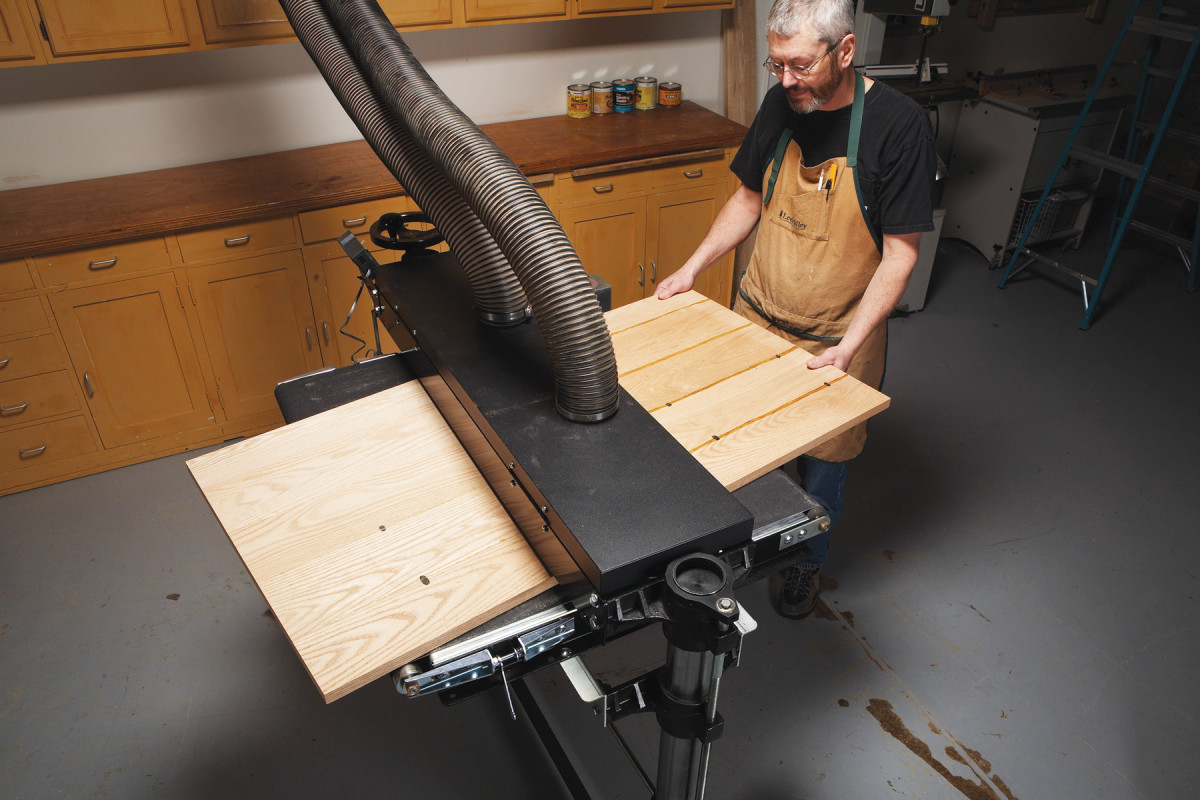
19. Surface Figured Wood Without Tear-Out
 Run a bookmatched, quartersawn oak panel through your planer and I can guarantee you’ll be dismayed at the nasty tear out. Try the same thing on a drum sander – perfect results. You just can’t beat a drum sander when it comes to surfacing figured wood. It does a great job no matter which way the grain runs.
20. Decipher the Back’s Alphabet Soup
 It’s best to know what you’re buying. Most of us are familiar with the grit number on the back of an abrasive, but what about all those other numbers and letters? Manufacturers use proprietary codes on the back of their abrasives. Some of the codes can be cracked by visiting their website. For the Klingspor belts in the photo above, for example, I went to www.klingspor.com/products/ MtlAvail.html and found that the CS311 belt is a Y-weight polyester backed belt, open coat, resin bond, with aluminum oxide abrasive and is available in 36P to 180P grit sizes.
The CS411 belt is an X-weight clothbacked belt with a resin bond and a longer lasting alumina zirconia abrasive, available in 24P to 120P grit sizes. There’s lots more info on Klingspor’s website and from other manufacturers websites as well.
21. Sand Multiples to a Uniform Size
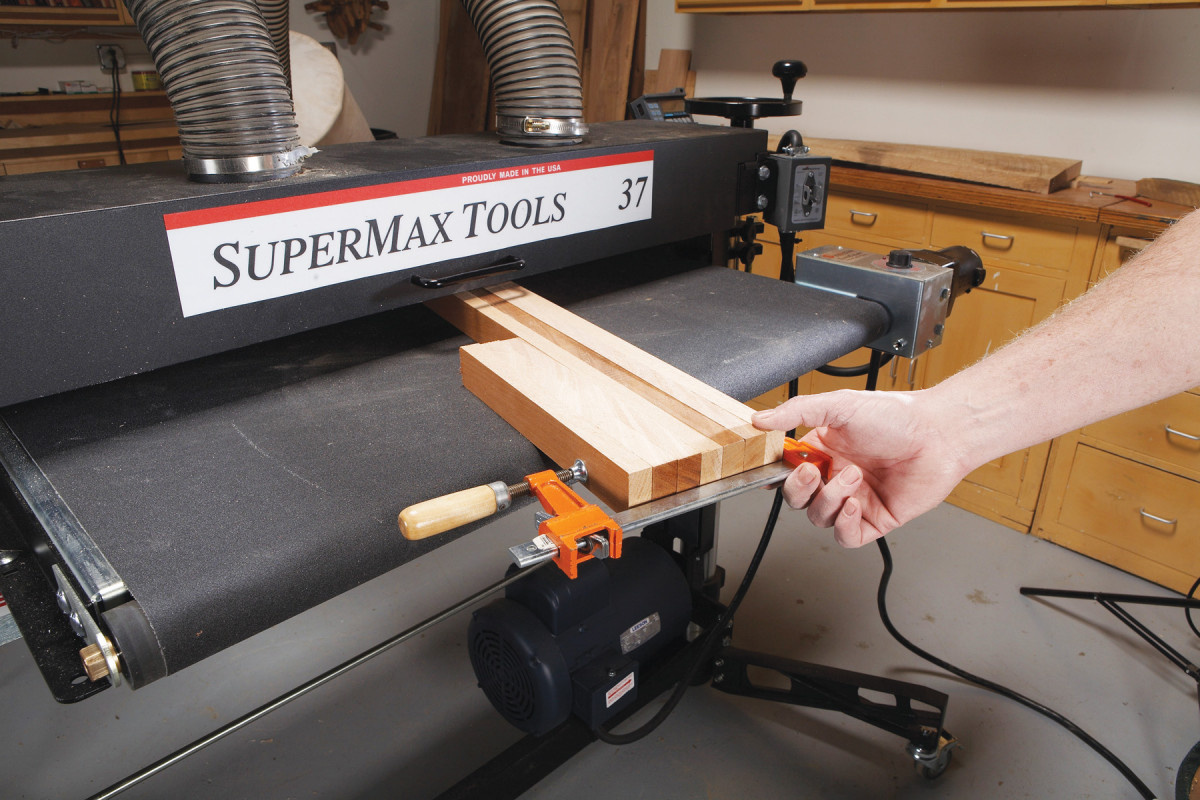 Drum sanders excel at surfacing to a precise dimension. Face frame parts can be clamped together and sanded at once. The drum sander removes all the saw marks and leaves you with parts that are exactly equal in width.
Bonus Dust Collection Tips:
Ground your machine to a plumbing run or a ground screw on an outlet. Sanders can generate a lot of static electricity that cause the sanding dust to cling to the machine and hamper collection.
Be sure to use at least a 2-micron filter on your dust collector. Many single-stage collectors come with 35-micron bags.
Use the least amount of flex-hose possible for more efficient airflow.
Here are some supplies and tools we find essential in our everyday work around the shop. We may receive a commission from sales referred by our links; however, we have carefully selected these products for their usefulness and quality.


