We may receive a commission when you use our affiliate links. However, this does not impact our recommendations.
If I wrote about all the woodworking tools out there that stink, I wouldn’t have much time to build anything.
Most of the junk out there can be avoided. You can buy better drill bits, screwdrivers and hammers than the stuff you find in the $1 bins at the home centers. But for some tools, such as wood threading tools, the options are limited.
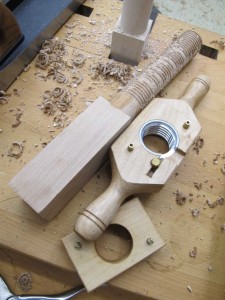
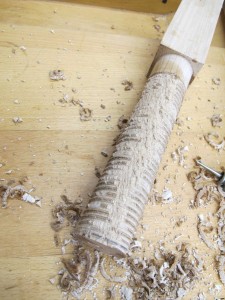
For the last few years, I’ve used the Taiwanese-made manual threadboxes and taps that are for sale at many suppliers of quality woodworking tools. These will usually work out of the box with some tweaking. And after threading at least 100 rods with my kit I’ve become pretty tuned in to how they work.
But today, as we were threading 26 rods during a class at the Marc Adams School of Woodworking, the roof caved in.
The V-shaped cutter essentially crumbled into bits. I removed it and sharpened it – first on diamond plates and then on stones. No joy. Then Jeff Stafford and Doug Dale, the crack assistants at Marc Adams, took a look. Jeff built a jig to regrind the entire cutter to the proper geometry. Then we polished it up.
The first rod went fine. Then the cutter crumbled to bits again.
So I got on the phone and ordered two more of these kits – plus an extra cutter.
These tools are incredibly fussy, which isn’t my complaint. I just can’t believe how the cutter self-destructed. My guess is that only the tip was hardened. After I sharpened it a few times, I got to the soft stuff behind it.
My options are limited. I’m not a router user, so I’m not inclined to use those systems. I don’t have a toolmaker’s lathe (sigh), and they aren’t very portable anyway. The nice German ones cost more than 500 Euros for the 1-1/2” size I need.
So I guess it’s off to the world of vintage thread cutters.
— Christopher Schwarz
Here are some supplies and tools we find essential in our everyday work around the shop. We may receive a commission from sales referred by our links; however, we have carefully selected these products for their usefulness and quality.


In one of the earlier issues of Fine Woodworking (I have it in their Techiniques 1 book) Richard Starr has an article on how to make your own tap and screwbox. While I have not made one, his method looks straightforward… still a fair amount of work though.
Didn’t know about the German tools. At that price they’re not a real option for most of us, but it’s nice to see they got the thread pitch correct. Roubo specified a pitch between 1:12 and 1:18, and the German thread-cutters are all in that range. The ones from Beall and Woodcraft are too fine in the three largest sizes (1″ and up).
I guess until Lie-Nielsen or Lee Valley get around to it, the Beall system is the lesser evil. I know it’s frustrating to buy a router for just this one application, but you can get a trim router for well under $100 these days. Or you can do what Roy did: buy the taps from Beall and use them to make your own threadboxes.
Ron Hock may be able to make a blade as well. I had him make a tongue and groove blade set for my Stanley #148 recently. It works so much better than the original it’s not even a comparison. The set was $60, so I would guess that a small thread box cutter would be reasonable.
Howdy All, there’s a young fellow over on Lumberjocks that has 5 (i think) videos on this subject. Starts out with a little theory and progresses to making the screws for his workbench vises. It is a blended sort of solution. He makes his own die in several sizes, the big one is 2 threads per inch with a cutter defined at 90 degrees(don’t see a degree symbol on my keyboard) . Then he uses a take off on the Beall system, using a 90 degree v-shaped cutter in a shop made router jig. He used this method to make the screws for leg, shoulder and tail vises on his combination Roubo/Klausz style bench. This young man is only 19 but his work is amazing. He deserves a look at his gallery, makes many of his own tools. Sorry for being so long winded. I’m all gassed out now, where’s my oxygen tank.:-(
Pops
The area of wood threading is one that has frustrated this hobbyist traditional woodworker for many years. I have some of the Taiwanese wood threading toys you speak of, and agree wholeheartedly that they are junk. As a woodworker who only uses antique wooden planes (no Stanley or other metal planes), I understand that these types of tools require fine tuning and practice to make them work well, but I’ve compared these new dies to an old one I have, and I believe that the geometry of the cutter placement isn’t correct. Also, in comparison to wood threads on antique wooden clamps, marking gauges, plough planes, and bench vises, the threads cut (if you can get them cut) on these new tap and die sets are too small, and therefore inadequate in strength and speed of adjustment in comparison to the antique competition. As a hobbyist, paying someone to custom make a set, or paying the astronomical prices for the German sets is out of the question. Finding usable or even complete antique sets is also difficult to impossible. As for the router option, I may as well buy the expensive German sets, since I don’t own a router, and at the same time, I may as well buy metal screws to replace the wood ones. No self respecting traditional woodworker would admit to having a router in his/her shop, and as for me, I have no outlets in my shop to plug in a router anyway. Saint Roy would jump out of his red suspenders if he heard of a traditional woodworker going over to the dark side of power tools! Bottom line…I’d love for one of our American toolmaker friends such as Lie-Nielsen to put this on thier new product development list. And I could say the same for brace and bits…Jennings bits, center bits, spoon bits, gimlets…
Try High Speed Steel (HSS). It sharpens well, its tough (which is what this application needs) and blanks in various sizes can be gotten from McMaster-Carr and other industrial supply vendors. And if in a real hurry, visit a local small tool & die / machine shop and they should be able to set you up. They may even grind it to your spec if you ask nicely . . . or promise fresh donuts and coffee . . . or both.
You should definitely learn to harden stuff on site. It’s not perfect and it really could actually be quite bad, but as soon as you know the edge is coming apart, you know that it can’t be worse.
For some small cutter like that it should really be made of O1 and you could probably have 20 blanks by buying pre-hardened steel OR buying an annealed blank, grinding them and then sending them to a local hardening place (almost every town over like 20k people will have at least one place.)
I would like to think a school like “Mark Adams School of Woodworking” profits enough to invest in the German made thread cutters you referenced. An initial investment which will pay for itself over the years.
Chris, be carefull about buying antique taps and box’s. 95% of sets out there are almost but not quite real sets and they won’t work. 4% of them that are a real set have already been buggered up, and won’t work. It is like winning the lottery to find a set that works. I know from experience.
Just curious…what did the thread boxes (two “kits” and extra cutter[s] ) end up costing? I have no vested interest in Jerry Beall’s business, BUT I’ve used his thread cutting system (router based) and never fail to get perfect results. He has a “Big Threader” kit for 1 1/2″ stock, for around $100.00 (doesn’t include a router, but a laminate trimmer type works fine). I understand the desire to work “by hand” as much as possible, but how much is your time worth and how much frustration are you willing to put up with.
I’m sure Peter Ross would be more than happy to make you a new cutter – Or a full out die.
If you wish to make a cutter the easiest approach is to start with O-1 oil hardening 18″ Precision Ground stock. This is commonly available and can be mail ordered, ie KBCtools.com . It is available in many widths and thicknesses, so get one as close as you can to what you need.
It comes annealed (as soft as it gets), so do as much shaping as you can in this state. File it, grind it, whatever works for you.
To harden it, you need to get it red hot, a propane torch will do if it is small. Harden by dunking it in any cheap motor oil (outside as it smokes). Keep it in there. Don’t worry about using residual heat to temper it, this requires experience to do well and isn’t always suitable. Instead, let it cool.
If a file doesn’t skate on top with light pressure, you weren’t hot enough when you dunked it (do it again). Clean it up a bit, remove all oil and sneak into the kitchen. Let it sit in the oven at about 400 degrees F maybe an hour, to temper it to about Rockwell C 62.
Finish it via light grinding, sanding or stoning. You need to see shiny clean steel on any surface that will be part of a cutting edge.
Sounds like a business / community service opportunity for someone in the woodworking community. Any idea of the type of steel needed for the cutter?
What about hardening the metal cutter? You probably don’t know the exact metal mix, but take a swag. A little torch and a quench and you should be good to go.
Besides – what do you have to lose? You can’t really make it worse than it is can you?
Hey Chris,
ever give thought to trying your hand at tool making? Roy has a great video on PBS.org that he did making his own cutter for a thread box.
http://www.pbs.org/woodwrightsshop/video/2700/2704.html
catch it here, hope this helps.