We may receive a commission when you use our affiliate links. However, this does not impact our recommendations.

Splitter for Narrow Pieces
Q:
How can I avoid burn marks when ripping thin strips?
A:
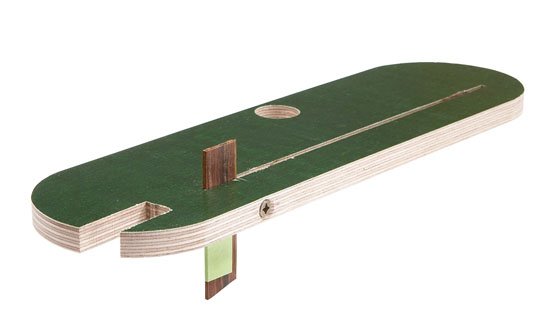
Add a splitter to your zero-clearance throat plate.
A splitter keeps the wood from binding on the back of the blade.For most rip cuts, you should use your blade guard and its built-in splitter to prevent binding, but it’s often not practical when ripping pieces less than 1″ wide. For these cuts, remove the guard and install a shop-made or commercial zero-clearance throat plate so there’s full support under the workpiece.
To add the splitter, first extend the length of the throat plate’s kerf by raising the blade all the way, under power. Next, make the splitter from a piece of wood that’s two paper thicknesses thinner than the kerf, for adequate clearance. Cut the piece 1/2″ wide and 1-1/2″ long. Remove the throat plate from the saw and clamp it in a vise. Wrap the splitter with masking tape (so it fits tight in the kerf) and put it in the throat plate, butted up to the back of the kerf and extending about 1/2″ above the throat plate. Drill and countersink a hole for a long No. 8 screw through the side of the throat plate and through the splitter. Remove the splitter and slightly enlarge the hole, so the screw won’t split the splitter. Put the splitter back in place and drive in the screw. Cut off the tape above the throat plate. Taper the front of the splitter with a file, and you’re all set. Be sure to use a push stick to keep your hands out of harm’s way.
Here are some supplies and tools we find essential in our everyday work around the shop. We may receive a commission from sales referred by our links; however, we have carefully selected these products for their usefulness and quality.


