We may receive a commission when you use our affiliate links. However, this does not impact our recommendations.
A couple weekends ago I did a clumsy thing in front of an audience: I dropped my expensive 5,000-grit waterstone on the floor where it broke into three jagged chunks.
Someone in the audience offered to sell me a replacement stone, but I declined. That’s because I knew I had two good things I could do with those chunks: Shape them into slipstones on a disc sander or glue them back together into a repaired stone.
I already have some slipstones in this grit, so today I glued the three pieces back together. It’s a 10-minute project that works with waterstones, oilstones or other porous media.
The trick is, of course, a strong epoxy and a strong substrate to glue the pieces onto. I’ve glued stones back together on a chunk of white oak before and it worked just fine, but it looks nasty after a while because it soaks up so much metal slurry.
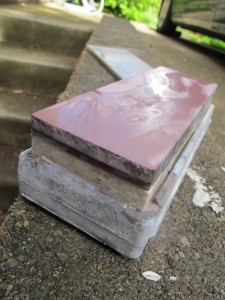
So I chose to use a solid surface material that’s similar to Corian. I have two chunks of this stuff left over after we installed new kitchen countertops five years ago. The countertop installers presented us these two chunks as a “gift,” complete with beveled edges.
“Are these trivets?” my wife asked.
“Uh, no, you can’t put hot things on them,” the installer said.
“So what are they for?” she asked.
“You put stuff on them. But not hot stuff,” he replied.
Brilliant. Anyway, I cut one of these plastic placemats into a chunk that matched the size of my broken stone. Then I mixed up a generous amount of epoxy and spread it on the stone and the seams between the three chunks. I use a little clamp pressure with some quick-release clamps just to keep them from sliding.
When the glue had cured, I scraped off the excess epoxy and flattened the stone in the usual manner with my diamond plate. And I was back in business. When sharpening, I cannot even tell the stone was ever broken. And because of the size of the base, the repaired stone fits all snug-like in my old stone holder.
— Christopher Schwarz
While I prefer the process of making tools dull over the process of making them sharp, learning to sharpen is one of the most fundamental skills in hand-tool woodworking. Last year we produced a DVD on the topic, “The Last Word on Sharpening,” that I am rather proud of. It’s not about one system. It tries to explain all the systems in a way that will help you decode the mumbo-jumbo and improve your edges – no matter how you sharpen. It’s available at ShopWoodworking.com.
Here are some supplies and tools we find essential in our everyday work around the shop. We may receive a commission from sales referred by our links; however, we have carefully selected these products for their usefulness and quality.


I did the same thing with a 8000 grit. If you don’t mind me asking, what sort of epoxy did you use?
I repaired my 8000 Shapton a few years ago. I didn’t use a backer and it seems perfect. Mine has some deep fissures that I have to work around but enough of the stone is there to get a sharp edge on tools. I have no problems with glue bumps.
This experience made me put rubber mats all over my workspace. Well this and my propensity to drop just about everything.
So Megan can do this with the flattening stone you flattened with the claw hammer and no safety glasses? “Oh grow up.”
You’re worried about slurry-stained oak sitting in that crusty, gnarly plastic box you’re using as a stone holder? Snide comments aside, I live in fear of dropping one of my water stones, so this is encouraging. Thanks.
“You put stuff on them. But not hot stuff,” he replied.
Reminds me of the Monty Python sketch about the Royal Society for Putting Things on Top of Other Things.
I’m sure this works, but I’m struggling to understand how.
If the epoxy that you use is not the same hardness of the stone that you’re repairing, I would anticipate that it (the epoxy) would wear at a different rate than the surrounding stone. The result would be a little ‘bump’ in the stone as your tool is passed over the repair cracks.
In practice you must not observe this? Or maybe it’s not noticeable with hard (5000) stones. But what about repairing a 200 grit stone?