


We may receive a commission when you use our affiliate links. However, this does not impact our recommendations.
 Michael Dunbar distills three decades of sharpening into a simple, inexpensive and do-able system.
 Michael Dunbar
 This is a subversive article. Woodworking gurus and companies that make expensive sharpening equipment don’t want you to read this, because when you discover that sharpening is both easy and inexpensive, they are all out of a job.
For Basics Week we’re presenting a special offer on our PopWood+ membership, where you can save 25% off your first month or full year when you use the code BASIC23 at checkout.
When I began teaching Windsor chairmaking in 1980, I was an itinerant. I traveled from city to city and provided a tool list for the students in advance. When the class began, I was amazed at the tools that showed up. Few were ready to use. Many were brand new and had never been sharpened. Others had been on the barn wall where great-granddaddy had hung them decades ago.
These tools were not in working order because the students who had brought them did not know how to sharpen. That meant that I either spent the first morning of a class sharpening tools, or the class would be a disaster.
My problems were compounded by the absence of suitable sharpening equipment. None of my hosts ever had a dedicated sharpening station, and any paraphernalia they could provide consisted of a few waterstones or oilstones. I had to develop a solution, or stop teaching.
These were my criteria. I had to do more than just hone an edge. I had to be able to reshape an entire blade in very short order. My classrooms were full of unusable tools and I could not spend a lot of time on each one. A lot of chairmaking tools have curved blades, and also use both chisel- and knife-edge profiles. So, my eventual solution would have to be versatile. Finally, I would need supplies that were easy to find and provide. Hosts were not going to buy expensive equipment just for me.

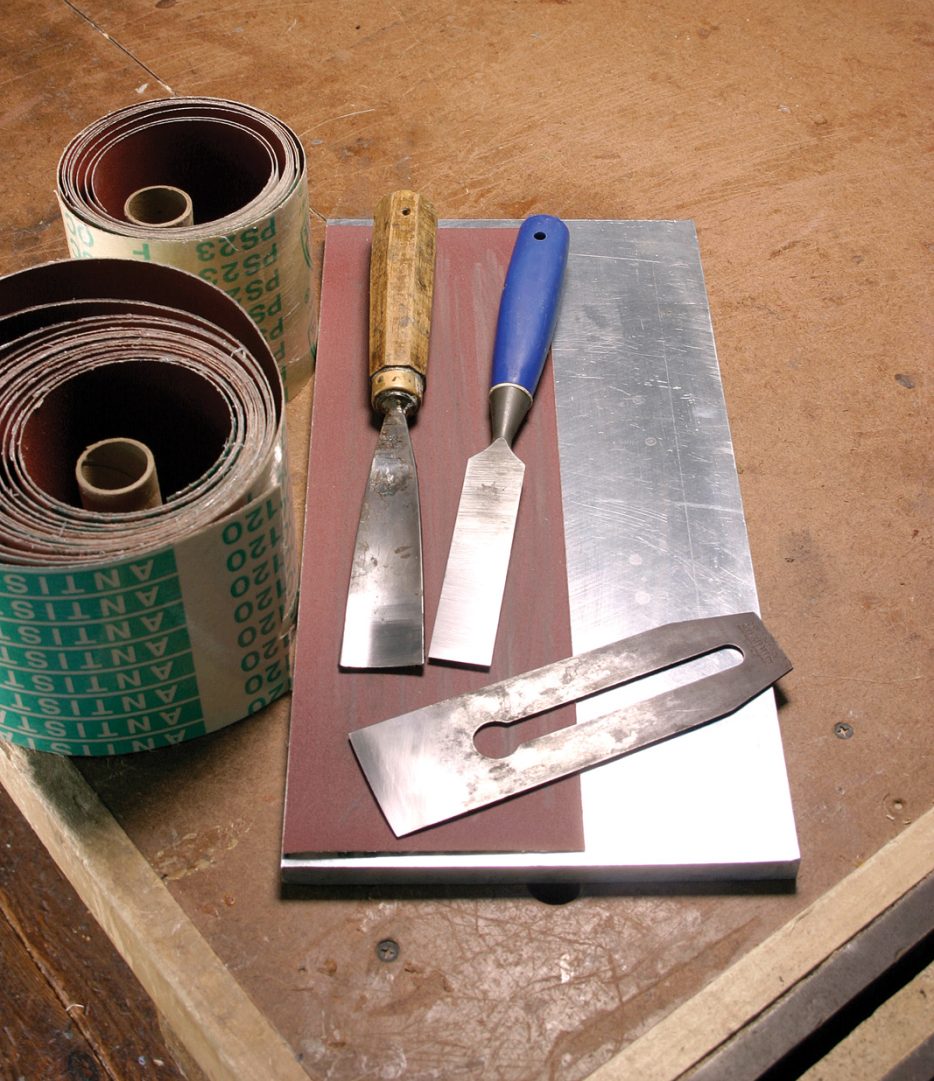
You don’t need expensive equipment to get a sharp edge. Here you can see my aluminum plates, sandpaper and small scraps of wood that allow me to sharpen all of my tools. The razor blades, utility knife and brush round out the equipment needs.
The Answer: Sandpaper
Three things I could find in any host’s work space were sandpaper, a flat surface and small pieces of wood. This was my answer. It was not so much a “eureka” moment as it may appear. I had already been using sandpaper on plate glass for a decade to lap plane soles. I was really taking a process I already used and expanding on it.
Sandpaper sharpening solved my problem. It also had an added benefit. It is so easy and simple that once shown, my students got it and were able to sharpen their own tools. Other advantages are that you will never again burn an edge, and you will be able to use this system to sharpen just about anything, from your best plane to a lawn mower blade.
The primary piece of equipment and the one that will probably cost the most (but not much) is a suitable hard, flat surface. In the beginning I used plate glass, as glass is easy to find. However, it breaks. While no one was ever hurt, I worried. Today, I use 1⁄2“- thick aluminum plates that I bought from a metal dealer. You could also use a piece of granite countertop. Whatever you select, it should be long enough to hold numerous strips of sandpaper of various grits.
The actual sharpening is done with sandpaper. I prefer aluminum oxide, as it seems to hold up best. You can adhere the paper to the lapping plate with spray adhesive, or purchase self-adhering rolls. I do both. Purchase the rolls from a sandpaper catalog and the adhesive at a hardware store.

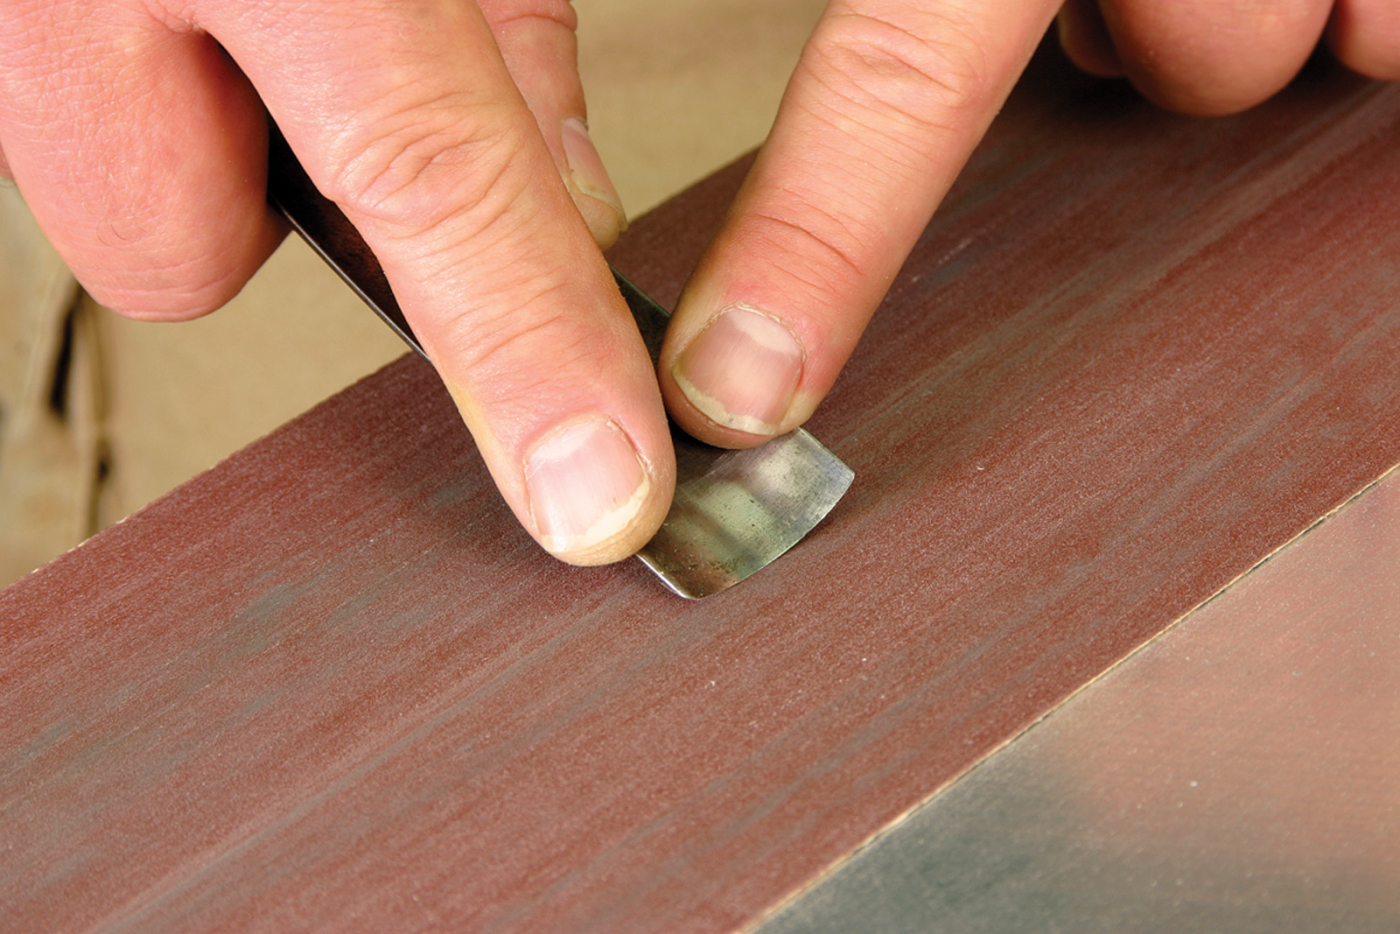
With a new tool, you need to address both the flat back of the tool and the bezel. Here I’m removing factory grinding marks on #80-grit sandpaper. Note the hand position, which allows me to apply consistent and heavy pressure on the tool.
You will need a variety of grits. We use #80, #120, #180, #220, #330, #650, #1,000 and #1,500. The last three grits are wet-and-dry sandpaper available from automotive-supply dealers. Do not confuse these sandpaper grits with waterstone grits. They are not the same measurement.

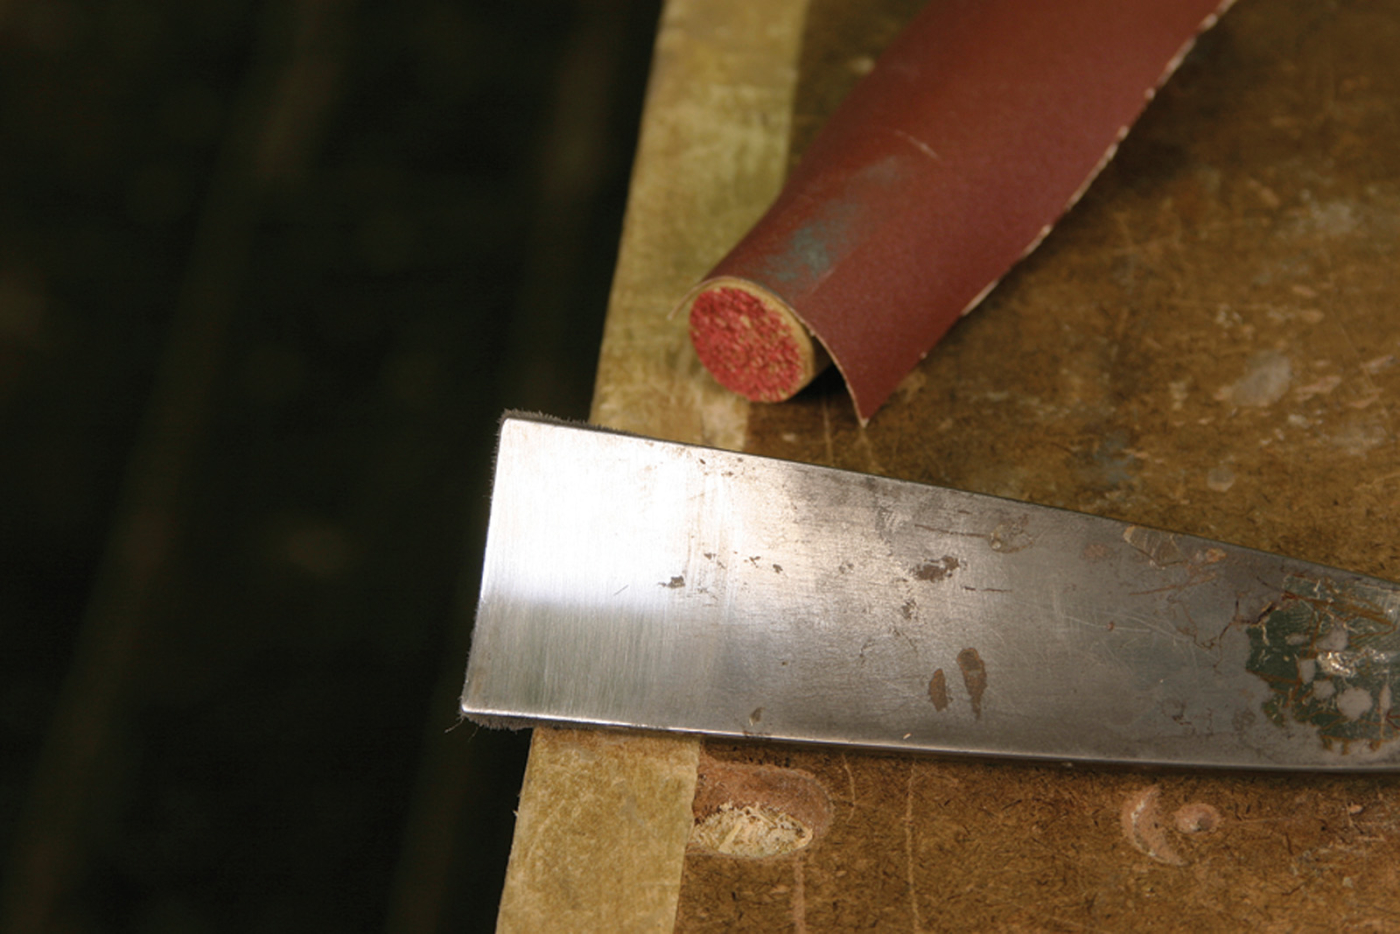
After a few dozen strokes with #80-grit paper, you can see how the scratch pattern is consistent on the back of this chisel. This tool is ready for the next finer grit.
You will also want to have on hand a stiff brush for keeping your paper clean of loose grit. I use a wallpaper brush. Single-edge razors and a holder help remove worn-out paper. Paint thinner dissolves any leftover adhesive. These are all available at a paint store. Finally, you will need a variety of hardwood 3⁄4” blocks of a size that will fit comfortably in your hand. Pieces of dowel of various diameters about 4″ long complete the equipment.
Setting up your sandpaper system depends on your needs. I keep a strip of #80-, #120- and #330-grit paper on one side of the plate and the wet-and-dry papers on the other. You will be more able to plan your own setup by reading on.
Know What a Sharp Edge Is
A lot of the problems woodworkers have with sharpening stem from not knowing, or not being able to envision, what they are trying to accomplish. A sharp edge is simply two flat, polished surfaces intersecting at an angle that will cut wood cleanly. While that is a simple definition, it is very demanding, in that anything less is not sharp. The definition permits no shortcuts, no half measures.
How to proceed depends on whether you are starting with a new, factory-ground edge; an old beat-up, nicked and rusted edge; or a well-maintained edge that merely needs to be honed. It will also depend on whether the tool has a chisel edge or a knife edge. As you can see, this requires some judgment. Sharpening is not a rote process of so many strokes of this surface, followed by so many strokes on another. You need to combine whatever variety of processes your tool needs to achieve our definition.
Factories usually create an edge by coarsely grinding the two surfaces. This is the condition of many cutting edges on newly purchased tools. The grinding leaves behind a series of parallel scratches. If you were to magnify these scratches, each one is a tiny furrow in the metal. Where each furrow intersects the cutting edge it creates a dip. Under magnification, this row of dips looks like the teeth on a saw. Imagine trying to push a saw blade across a piece of wood. It would take a lot of force and the result would be a row of scratches. That is what happens if you try to use a factory edge.
A beat-up edge, as you frequently find on secondhand tools, usually has nicks and rust. A nick is similar to a furrow as described above, but nicks are not evenly spaced and are frequently bigger. Rust will pit the steel, and these pits too, when they intersect the cutting edge, act like the furrows. They leave scratches and require more force to work the tool.
Furrows, nicks and pits need to be removed. This is the reason for the #80-grit sandpaper in my system. It will cut metal fast.
Sharpen a Chisel
Let’s start on a chisel edge as it is the one most woodworkers recognize. Remember our definition. An edge is two flat, polished surfaces. The wide surface is the back and the narrow sloping surface is the bezel. No, this is not a typo. It is actually the precise word. The dictionary defines a bezel as the sloping surface of a cutting edge. In other words, all bezels are bevels, but not all bevels are bezels.
Begin by flattening the back surface. Place it flat on the strip of #80 grit. It is imperative that the blade remain flat on the paper, and that you never lift it, which would round the surface. The action on sandpaper is side to side, rather than front to back, as you would hone on a stone. I rock on my legs and move my body with the blade. This helps to avoid rocking the tool, or applying uneven pressure.
After a dozen or more strokes, examine the results. It is best to do this under natural light and I will usually step to a nearby window. Use a magnifying glass or a jeweler’s loupe if your eyes, like mine, are aging, and no longer see details very well. You will see scratches left by the #80 grit. Scratches are evidence that you have begun to remove the surface grinding, and to reduce any nicks and pits. You may also detect low spots in the surface. It is not uncommon to find that a blade is not actually flat.
Continue this action on the #80 grit until these blemishes are completely replaced by an even matte of sandpaper scratches. The exception is a nick or pit directly in the cutting edge. These may not completely disappear until you work the bezel.
Our definition does not mention how wide those two flat surfaces are. It is not always necessary to flatten the entire back of the blade. A couple inches is usually sufficient. You will probably feel the tool grow hot. It may even get too hot to keep your fingers on it. I usually blow on the tool to cool it. The good news is that you could not possibly hold the tool long enough to burn the edge. That old bugaboo does not occur with sandpaper sharpening.
Use the brush to clean away any loose grit that remains on the lapping table. This is an important procedure to perform at every step, as this grit will damage later stages of the process. Move to the next grit, in my case #120. Repeat the side-to-side lapping, the same as before. If you look at the results after about a dozen strokes, you will see the finer scratches beginning to replace those created by the #80 grit. This is a eureka moment for someone learning to sharpen. The polishing part of our definition is really a process of replacing coarse scratches with finer ones. You have completed the work on the #120 grit when this matte of finer scratches has completely replaced the previous coarser matte. If you look at this surface in a good light you will see what appears to be a shadow moving within it. That shadow is you, beginning to reflect on a surface that is becoming increasing more polished. Now, move to the #180 grit and repeat the process of replacing the #120-grit scratches with an even finer matte.

To find the correct position of the bezel on the sandpaper, I first set the tool down with the heel of the bezel touching.

Then I pivot the tool until the bezel rests flat on the surface of the sandpaper.
At this point, I will usually focus some attention on the bezel. This is a narrower surface and flattening and polishing it does not normally require the coarser grits. However, if the blade has nicks or pits that were not removed in flattening the back, you may need to work the bezel with a coarser paper. The bezel is one of our two flat surfaces and you need to be careful to not round it. No need for a honing jig. The trick is to place the bezel on the paper on its heel. Now, lift the back until you feel the cutting edge make contact. It is a positive feeling that you cannot easily miss. This is the angle. Apply even downward pressure as you go back and forth, and you should have no trouble maintaining the angle.


Here you can see my body motion as I sharpen the bezel. My arms are fixed and I rock my body forward and back. This motion assists in achieving consistent results.
The remainder of the process of sharpening a chisel edge is moving through the finer grits. You will notice that your reflection takes on more definition with each finer grit. By the time you reach the wet-and-dry paper, you should be able to recognize that good-looking face peering back at you. In fact, #1,000 grit will create a polish so fine that you cannot detect any scratches in the metal, and by looking closely you can pick out individual hairs in your eyebrows. Examine the cutting edge by looking directly at it and rolling it slowly up and down. You should see no metal glinting back at you. This is because you can see a dull edge, but a sharp one disappears. If the tool is as described, it should be razor sharp. Test it by paring end grain. You should be able to slice off a shaving that will hold together, and the resulting surface should be glassy smooth.
Gouges and Their Cannels
Chisels and jointer plane blades all have the classic straight cutting edge. A gouge is essentially a chisel, except the blade is rolled like a rain gutter. To complicate our jargon even more, a chisel’s bezel is called a cannel, and a gouge can either be out-cannel or in-cannel. A mere word does not change our definition of sharp. If you cut a section of a gouge’s cutting edge, it is still two flat polished surfaces.
Most gouges you will use are out-cannel. In this case, the problem is to flatten the blade’s back surface, which is a concave curve. I do this by applying strips of various grits of sandpaper to appropriately sized dowels. The larger the gouge, the larger the dowel’s diameter, up to about 1″.

Sharpening the concave section of a gouge involves sandpaper around a dowel – use a bigger dowel for gouges with shallower sweeps. As with sharpening a chisel, you want the unbeveled part of a gouge to exhibit a consistent scratch pattern (below).
If the gouge’s condition requires, I will start with #80 grit and move on up through finer papers. The trick is to lay the dowel flat on the gouge’s concave surface. This means you have contact all along the dowel. Unless you are trying to create a knife edge on a carving gouge, you do not want to round over the concave surface. Work the dowel down one side of the curve and up the other. Repeat this until you have a uniform matte all the way out to the cutting edge. Repeat this through the grits.

Sharpening the cannel of a gouge involves rolling the tool as you move it along the sandpaper. Begin with the cannel contacting the sandpaper on one end (above). As you move the tool along the paper, roll the gouge (below) so that at the end of the stroke you have the opposite corner of the cannel touching the paper.
When you reach #120 grit start to work the cannel through the same grits as was on your dowels. (Depending on the size of the gouge, some judgment is required here.) The cannel is worked on the lapping plate. Once again, find the correct angle by placing the heel on the paper and raising the handle until the cutting edge makes contact. Now, roll the bezel on the paper. Roll up to one corner of the cannel and back to the other. Try to make this a smooth, fluid movement. After a few strokes, check the width of your cannel to make sure it is uniform.
An in-cannel gouge is easier to sharpen. Flatten the convex surface by rolling it from one edge to the other while moving it side to side along the paper. To work the cannel, use various grits of sandpaper applied to dowels.
Crested Plane Blades
Jack and smooth plane blades are crested. In other words, the cutting edge is an arc that looks like a fingernail. This is easy to do on sandpaper. In this case, I shape the edge before flattening the back. Place the blade on its bezel and find the correct angle by lifting the end until the cutting edge makes contact.

The motion is side to side and in an arc. At the beginning of the arc, my finger pressure is on the right corner of the plane blade.

As I move the tool to the right, I shift my finger pressure to the center.

At the end of the arc, I shift my finger pressure to the left corner of the blade.
You are going to use a side-to-side motion, but it will also be arced. Begin on one corner applying pressure there with the fingers of one hand. As you slide along the edge, gradually shift the pressure to your other hand, so that by the time you reach the other corner the weight is all on those fingers. By moving the blade along an arc and shifting the weight, you will abrade more metal from the corners. Keep up this motion and the blade becomes crested. How much you crest the cutting edge depends on the plane’s purpose.
Once the cutting edge is crested, flatten the back of the plane blade as you would a chisel. As you proceed through increasingly finer grits, return to the bezel and work it in conjunction with the back.
The Knife-edge Tools
Many tools have a knife edge. A knife edge is most desirable when a tool cuts down into wood and back out again. Most knife-edge tools are used for shaping and other fairly rough work. An ax, adze and scorp (inshave) are examples of knife-edge tools. A drawknife is also a knife edge, but is a slightly different matter. I do not use the lapping plate for knife-edge tools. Instead, I use wood blocks or dowels with paper adhered to them.
The two sides of a knife edge are symmetrical. Although they are slightly rounded, their shape only defines the angle of the cutting edge. Our definition of sharp still applies, for at the very cutting edge the surfaces are still flattened and polished.
Sharpen an Ax
The ax is the simplest knife-edge tool. So, let’s start here. I adhere several grits of paper to 3⁄4“-thick hardwood blocks about 3″ by 4”. I have a small hand with stubby fingers. If you have a big hand, use a block that fits you comfortably.

Sharpening an ax is best done with the tool secured in a vise, leaving both of my hands free to work the edge. The sandpaper here is affixed to a block of wood.
Because I am running a block over the blade with the cutting edge uncomfortably close to my fingers, I like to have the tool well secured. If a knife-edge tool will not rest stable on a benchtop, I will typically hold it in a vise.
If I am working a new tool that has been coarsely ground, or one that is beat, I begin with #80 grit. The process is one of stroking the block along the cutting edge, starting at the edge itself, and then overlapping the strokes down the curved surface. Work both sides the same and keep at the process until all blemishes have been removed.
Once again, the result will be an even matte of scratches. Now move through the finer grits, repeating the process of polishing. With each grit be sure to work right up to the cutting edge on both sides of the blade and then back down.
Scorp and Adze
Both these tools are concave. While a block works well on the convex surface, you have to use dowels on the inside curve. The only difference between them and an ax is that the stroking is done along inside and outside curves.
Drawknife
This is a modified knife edge. Unlike the other examples, a drawknife’s cutting edge is not symmetrical. Like a chisel edge, one side is flat, while the other is rounded. This point is not appreciated by most modern drawknife manufacturers, who typically grind the tool to a chisel edge. This shape edge prevents the tool from being able to slice into the wood and out again, in the way that knife-edge tools are supposed to work. Instead, a chisel edge on a drawknife causes the tool to dive into the work, frustrating the poor user.

A drawknife should also be secured in a vise when sharpening. Work both cutting surfaces of the tool using overlapping strokes until you obtain a consistent scratch pattern.
Begin by flattening a drawknife as you would do lapping a chisel or plane blade. However, the tool’s handles prevent this from being possible on a lapping plate, and you need to use a wood block. The back is as much as 13⁄8” wide and usually 8″ to 10″ long. I typically begin with #80 grit, as there is so much metal to remove.
With the back flat and with a uniform matte, work the curved upper surface as you did on the ax. Overlap your strokes all the way out the cutting edge. Repeat across the blade until you have the same uniform matte as on the flat bottom. Now, move through a progression of finer papers until you have the degree of sharpness you desire.
Maintain the Edge
These are the steps for sharpening a new tool fresh from the factory, or a secondhand tool that is worn. Some new tools (such as Pfiel carving gouges) are sharpened by the manufacturer. They and any tool you have sharpened, will eventually dull and will have to be sharpened again. This is a slightly different category that I think of as maintenance, as opposed to the preparation described above.
A tool usually dulls due to friction and wear resulting from use. The keen cutting edge created by the arris of two flat intersecting surfaces rounds over. Instead of engaging the wood and shaving it, the rounded cutting edge begins to skate. Engaging it into the wood is only possible by using more force. You can see if an edge is dull. Take the blade to a source of natural light and examine it closely. Again, magnification will help weak eyes. Roll the edge in the light and you will see the rounded edge reflecting the light back to you. Remember, you cannot see a sharp edge, so this is visual proof that it is time to hone.
The good news about honing is that it usually pretty fast. Unless the blade has been nicked, you can usually begin on a medium grit such as #180 or #220 (for a large tool and even finer for a small one.) Hone a chisel edge by lapping the back until the rounded edge on that side is completely removed and the uniform matte extends all the way out to the edge. Remember, there are no shortcuts and half measures. Here’s a trick that may help as you learn to sharpen: Color the rounded edge with a red Sharpie and lap until that red disappears. Now hone the bezel until the rounding on that side of the edge also is removed and the red ink is all gone. You can polish through as many finer papers as you need to achieve the desired result.
For a knife edge the process is similar. Only here, use a medium-grit paper on a block or dowel to remove the line of polish that reveals a rounded edge. Now, work in the same way through the finer grits.
Routine honing brings back a sharp edge for a while. However, repeated honings will eventually remove enough metal from the cutting edge that you begin to change the blade’s angle. The angle can increase to a point where it no longer cuts well. If the blade is mounted in a tool such as a plane, it can even lose the clearance behind the cutting edge that’s required for the tool to take a shaving. In most sharpening methods, this requires going to the grinding wheel. With sandpaper sharpening, you return to the #80 grit and reestablish the original angle through the aggressive abrasion of a coarse paper. Now, hone the newly shaped edge with finer papers.
This article originally appeared in the April 2007 issue of Popular Woodworking Magazine. You can purchase a digital copy of that issue here.
Here are some supplies and tools we find essential in our everyday work around the shop. We may receive a commission from sales referred by our links; however, we have carefully selected these products for their usefulness and quality.


