We may receive a commission when you use our affiliate links. However, this does not impact our recommendations.
This weekend I finished work on a traveling version of my “Anarchist’s Tool Chest” that will fit in my hatchback and will carry (almost) a full set of tools. The last detail of the entire project was how to store the three backsaws that are essential to almost every kit: the tenon saw, carcase saw and dovetail saw.
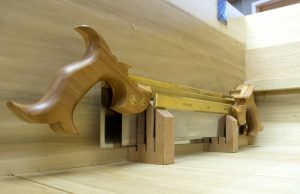
After studying and playing around with a bunch of different ideas, I settled on a traditional rack that is attached to the bottom of the chest. It’s an old solution that I’ve seen on other compact chests (including one that I own), and it gets the three saws in a space that is 2-3/8” wide, 5” tall and as long as your longest backsaw.
Unlike some other solutions, this rack protects the teeth and the fragile sawplate of the backsaw. Saws are the only tools that have been damaged on my travels.
The rack begins as two pieces of wood measuring 1” x 2-3/8” x 3-1/2”. I cut three 1/8” kerfs in the blocks that are spaced 1/2” apart. The depth of the kerf depends on the amount of blade under the spine of each saw.
Then I cut the blocks so they sloped and held the saws in a way that made them easier to grab.
The two racks are 6-1/4” apart from one another and are screwed to the bottom of my chest. The whole thing was a quick 20-minute job and will ensure my saws don’t get bent during my trips. Now I just have to figure out how to keep my students from bending them.
— Christopher Schwarz
Here are some supplies and tools we find essential in our everyday work around the shop. We may receive a commission from sales referred by our links; however, we have carefully selected these products for their usefulness and quality.


Chris
I’m confused as to how the panel saws in the lid don’t interfere with the uppermost till. The top of the till is at the same elevation as the chest side and therefore when the lid is closed the saws would hit the till and prevent the lid from closing. What is the engineer in me missing?
Thanks
Joe
Chris –
Why didn’t you protect the fragile sawplates in their entirity by using a solid sawtill like the one featured in Richard Hubbs’ Traveling Tool Chest?
So my query when I see these types of tills or other slotted storage solutions for saws is how you made the kerfs, which obviously look thicker than the kerfs left by the saws in question.
I have the kinked Disston from an old toolbox I bought to show just why using a single saw kerf from the saw in question is a bad idea.
Is it just a case of carefully sawing two parallel kerfs, and knocking out the leftover bit? Or is this a job best left to power? I don’t have any real power tools – Is a jigsaw blade kerf apt to be thick enough or should I borrow a circular saw?
I need to build a tool chest to travel with when I take classes offered at different locations (such as WWOTSV, MASW, etc). I don’t want something the size of the chest in your Anarchist’s book though. Will a sketchup model be posted, or will this be an upcoming article in PW, to give us an idea to start from? Will you be traveling to WIA West with it? Thanks.
Hi Chris, what hammer do you use in the video?
(Posted on the ring pull blog but didn`t get an answer, so I thought I`d try this blog!)
Are those apple-handled Lie-Nielsens!
WANT!
What is the plan to prevent side to side sliding?
Hi Chris,
There is no need to have a blade guard on the back-saws inside the toolbox? You also mentioned the saws were damaged during travel – is that because of sliding tools, or will the saws come out of the holder? Also, how about the saw holder in the lid – is there some lock mechanism to keep the saws in the pockets?
Thanks,
Steve
Was there any particular reason you used
screws instead of glue and/or pins Chris ?
Will the lower tray still slide clear to the front, or will the saws need to be removed first?