


We may receive a commission when you use our affiliate links. However, this does not impact our recommendations.
Mobile Router Center
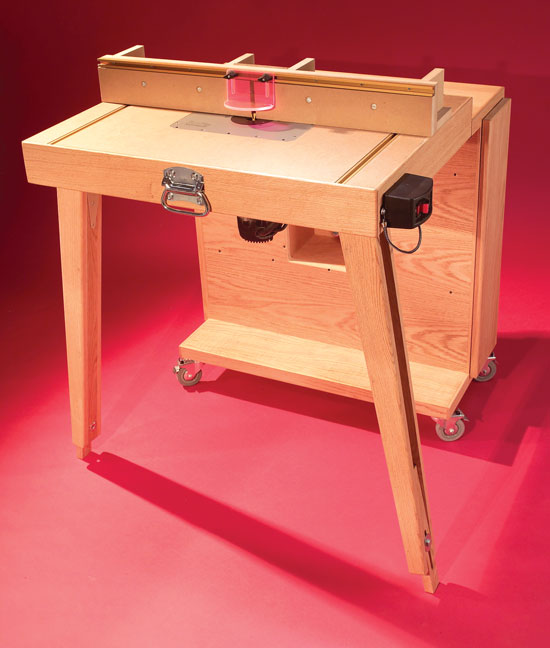
This rolling router center has onboard storage for all your router components, folds into a tidy package, serves as an extra work surface and rolls out of the way when you're done!
By George Vondriska
|
A router table is one of the most versatile tools you can The key to a flat, rigid table is the torsion-box design. |
You may also like… |

|
Use It!
|
Click any image to view a larger version. Move It!
|


Store It!
|
Unfold It!
|


Organize It!
|

|
1. The router table top is a torsion box, which guarantees a stiff, |
|

|
2. Pin the top and bottom skins to the torsion box so they don’t shift during |
|

|
3. Glue the torsion-box on your tablesaw. The surface of the saw virtually |
|

|
4. Flush-trim the cavity in the bottom of the torsion-box |
|

|
5. Assemble the case using glue and screws. Use layout lines to correctly |
|

|
6. Taper the sides of the legs using a taper jig on the tablesaw. |
|

|
7. Screw the leg hinges to the bottom of the router table top. |
|

|
8. Attach the top assembly to the case using a continuous hinge. Use a pair |
|

|
9. Drill and countersink eight holes through the table insert, and fasten |
|

|
10. Screw the self-closing hinges to the door and fasten the door to the |
|

|
11. Cut notches in the fence using a jigsaw. After the fence is |
|

|
12. Assemble the fence with glue and screws. Make sure the face |
|

|
This story originally appeared in American Woodworker March 2005, issue #113.
|
|

Here are some supplies and tools we find essential in our everyday work around the shop. We may receive a commission from sales referred by our links; however, we have carefully selected these products for their usefulness and quality.


